1
22
44
33
1
55
1
2
3
4
QUICK START GUIDE
English
[Getting Started]
Printed in China
LB9213001
www.brother.ca
9
Introduction
Thank you for purchasing the QL-500.
Your new QL-500 is a label printer that connects to your personal computer, enabling you to quickly and easily print professional custom labels that you
have created on your personal computer using the label editing software provided.
This guide briefly describes the steps to start using your QL-500.
Refer to the User's Guide for more detailed information. The User's Guide can be found in the Manuals folder of the CD-ROM included with the QL-500.
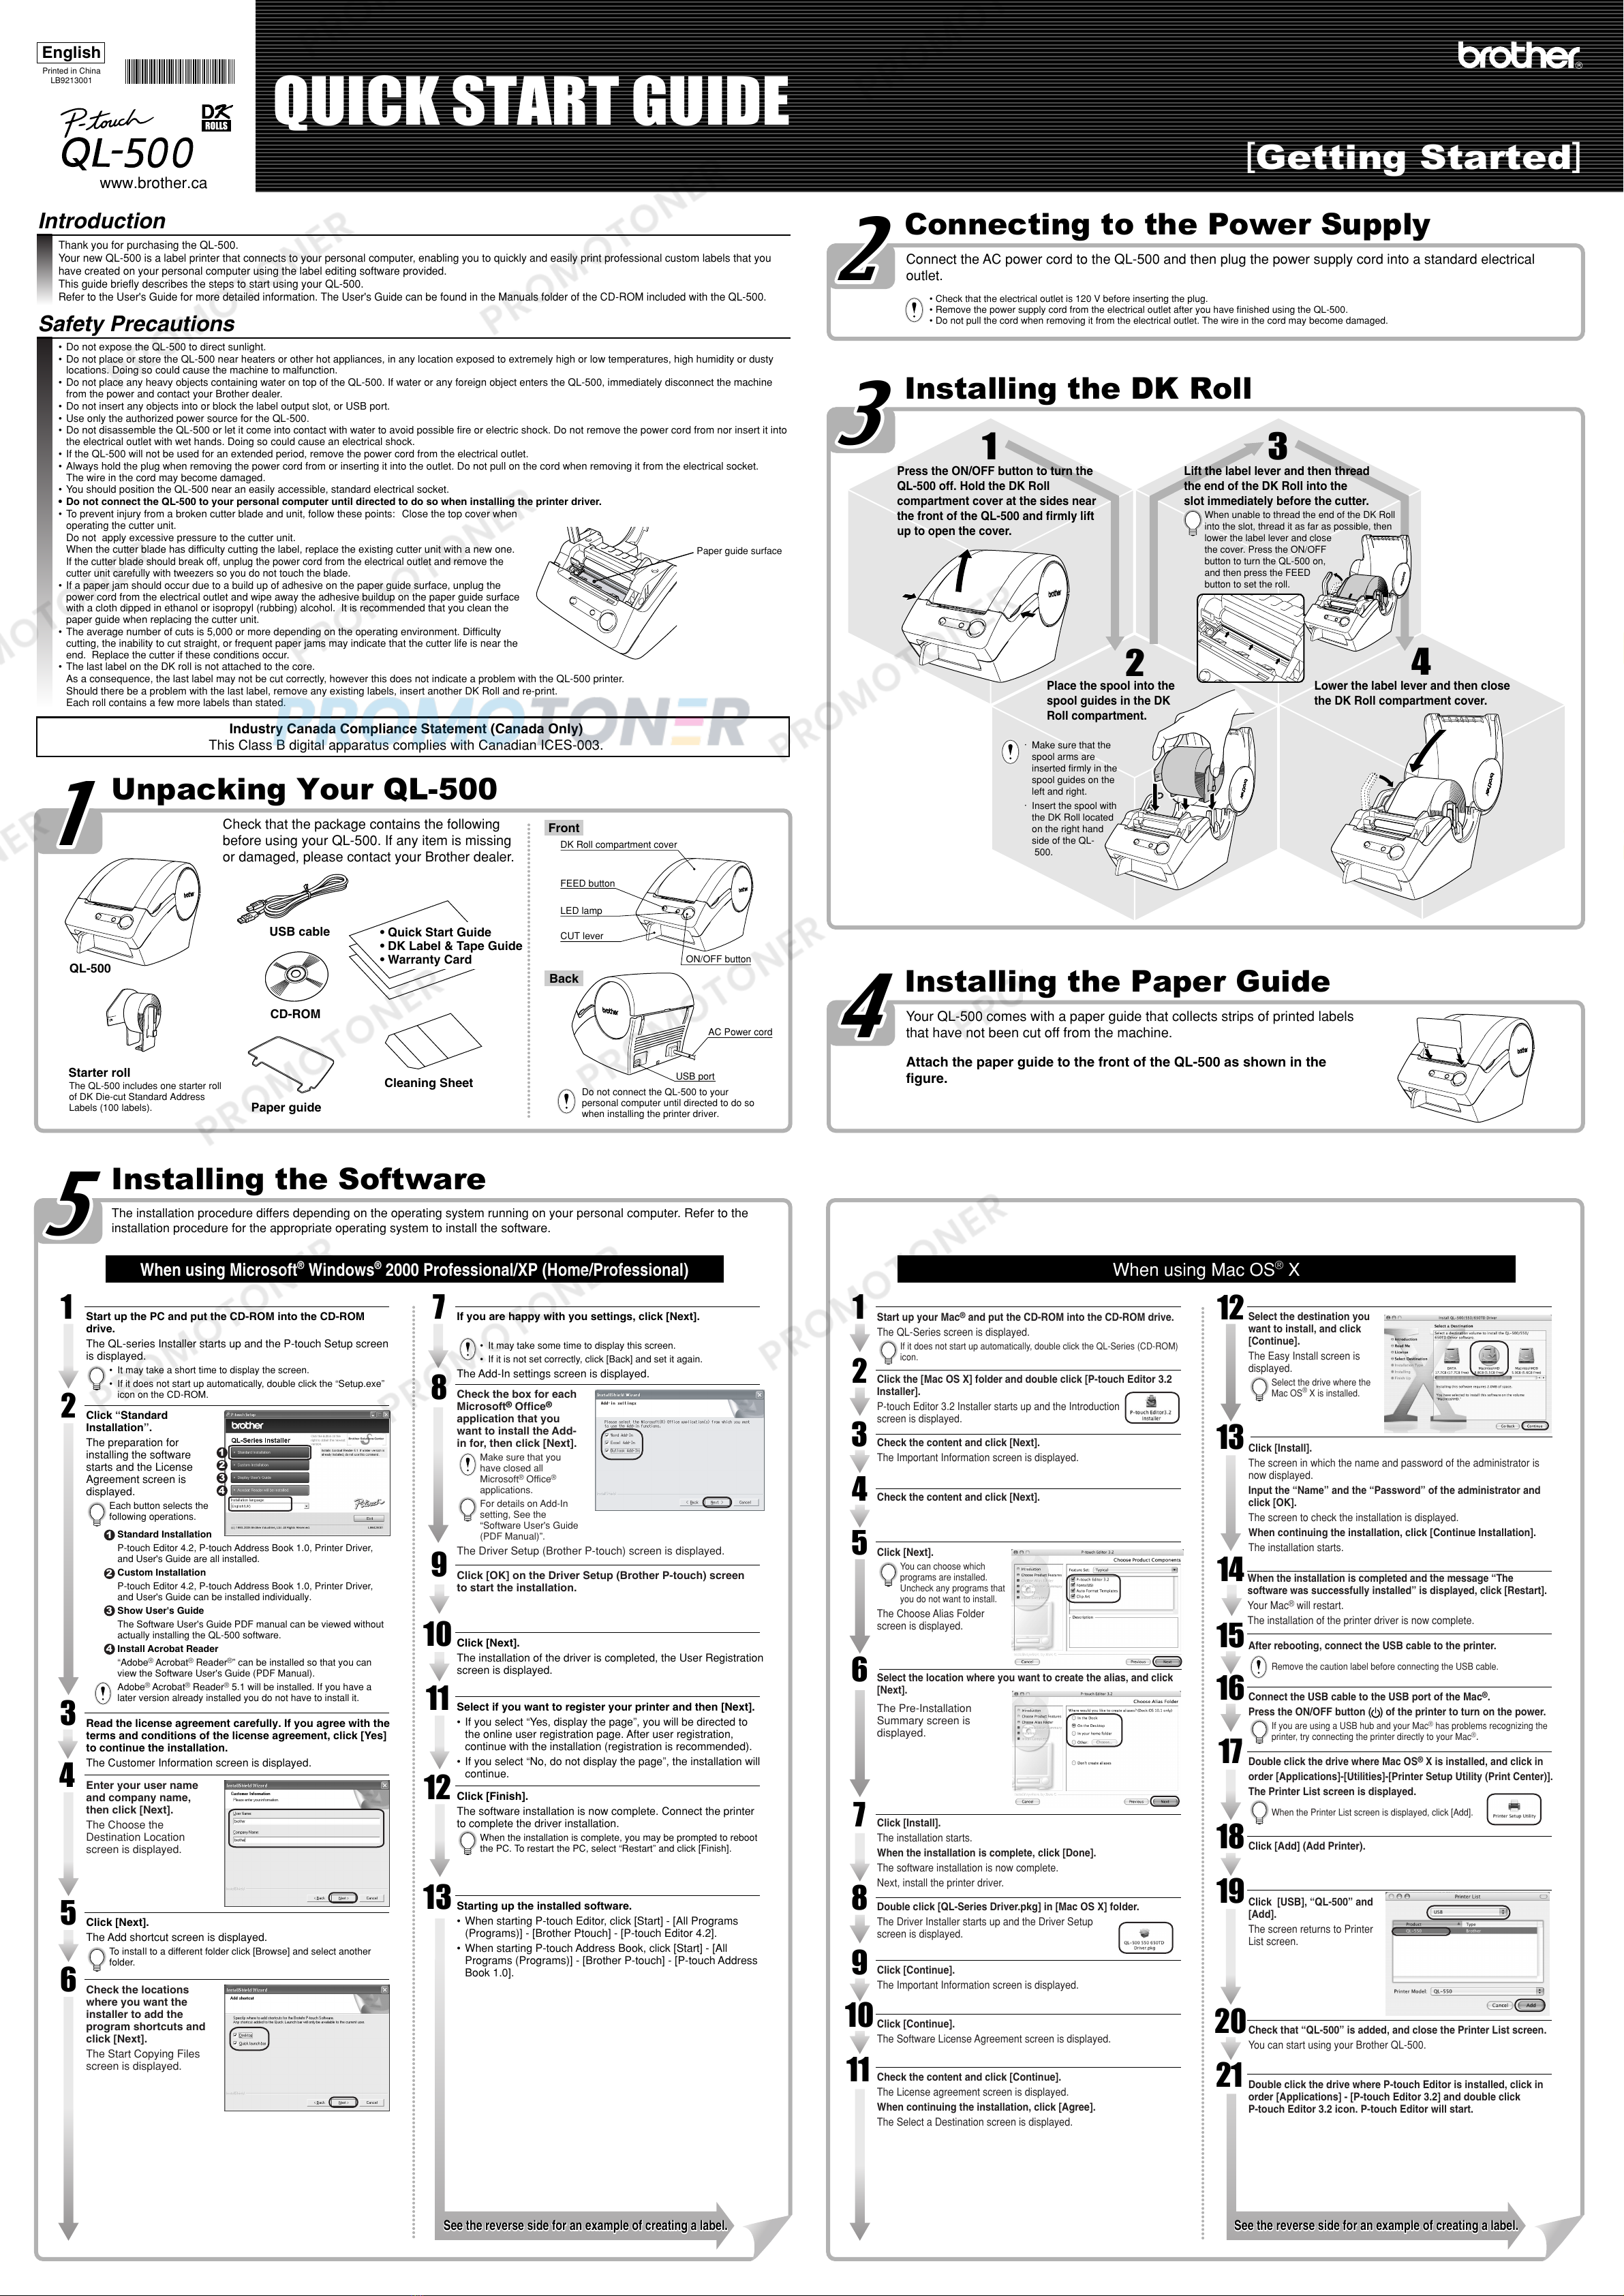
Press the ON/OFF button to turn the
QL-500 off. Hold the DK Roll
compartment cover at the sides near
the front of the QL-500 and firmly lift
up to open the cover.
Place the spool into the
spool guides in the DK
Roll compartment.
Lift the label lever and then thread
the end of the DK Roll into the
slot immediately before the cutter.
Lower the label lever and then close
the DK Roll compartment cover.
Connect the AC power cord to the QL-500 and then plug the power supply cord into a standard electrical
outlet.
• Check that the electrical outlet is 120 V before inserting the plug.
• Remove the power supply cord from the electrical outlet after you have finished using the QL-500.
• Do not pull the cord when removing it from the electrical outlet. The wire in the cord may become damaged.
Check that the package contains the following
before using your QL-500. If any item is missing
or damaged, please contact your Brother dealer.
Unpacking Your QL-500
The installation procedure differs depending on the operating system running on your personal computer. Refer to the
installation procedure for the appropriate operating system to install the software.
Installing the Software
Connecting to the Power Supply
Your QL-500 comes with a paper guide that collects strips of printed labels
that have not been cut off from the machine.
Attach the paper guide to the front of the QL-500 as shown in the
figure.
Installing the Paper Guide
Installing the DK Roll
When using Microsoft®Windows®2000 Professional/XP (Home/Professional)
1
2
Start up the PC and put the CD-ROM into the CD-ROM
drive.
The QL-series Installer starts up and the P-touch Setup screen
is displayed.
• It may take a short time to display the screen.
• If it does not start up automatically, double click the “Setup.exe”
icon on the CD-ROM.
If you are happy with you settings, click [Next].
• It may take some time to display this screen.
• If it is not set correctly, click [Back] and set it again.
The Add-In settings screen is displayed.
8
Click [Next].
The installation of the driver is completed, the User Registration
screen is displayed.
10
Read the license agreement carefully. If you agree with the
terms and conditions of the license agreement, click [Yes]
to continue the installation.
The Customer Information screen is displayed.
Click [Next].
The Add shortcut screen is displayed.
To instaIl to a different folder click [Browse] and select another
folder.
3
5
4
6
USB cable
CD-ROM
Starter roll
Front
Back
FEED button
LED lamp
ON/OFF button
CUT lever
DK Roll compartment cover
AC Power cord
USB port
· Make sure that the
spool arms are
inserted firmly in the
spool guides on the
left and right.
· Insert the spool with
the DK Roll located
on the right hand
side of the QL-
500.
When unable to thread the end of the DK Roll
into the slot, thread it as far as possible, then
lower the label lever and close
the cover. Press the ON/OFF
button to turn the QL-500 on,
and then press the FEED
button to set the roll.
7
See the reverse side for an example of creating a label.See the reverse side for an example of creating a label.
Paper guide
Cleaning Sheet
QL-500
The QL-500 includes one starter roll
of DK Die-cut Standard Address
Labels (100 labels).
Do not connect the QL-500 to your
personal computer until directed to do so
when installing the printer driver.
• Quick Start Guide
• DK Label & Tape Guide
• Warranty Card
33
Safety Precautions
• Do not expose the QL-500 to direct sunlight.
• Do not place or store the QL-500 near heaters or other hot appliances, in any location exposed to extremely high or low temperatures, high humidity or dusty
locations. Doing so could cause the machine to malfunction.
• Do not place any heavy objects containing water on top of the QL-500. If water or any foreign object enters the QL-500, immediately disconnect the machine
from the power and contact your Brother dealer.
• Do not insert any objects into or block the label output slot, or USB port.
• Use only the authorized power source for the QL-500.
• Do not disassemble the QL-500 or let it come into contact with water to avoid possible fire or electric shock. Do not remove the power cord from nor insert it into
the electrical outlet with wet hands. Doing so could cause an electrical shock.
• If the QL-500 will not be used for an extended period, remove the power cord from the electrical outlet.
• Always hold the plug when removing the power cord from or inserting it into the outlet. Do not pull on the cord when removing it from the electrical socket.
The wire in the cord may become damaged.
•You should position the QL-500 near an easily accessible, standard electrical socket.
• Do not connect the QL-500 to your personal computer until directed to do so when installing the printer driver.
•To prevent injury from a broken cutter blade and unit, follow these points: Close the top cover when
operating the cutter unit.
Do not apply excessive pressure to the cutter unit.
When the cutter blade has difficulty cutting the label, replace the existing cutter unit with a new one.
If the cutter blade should break off, unplug the power cord from the electrical outlet and remove the
cutter unit carefully with tweezers so you do not touch the blade.
• If a paper jam should occur due to a build up of adhesive on the paper guide surface, unplug the
power cord from the electrical outlet and wipe away the adhesive buildup on the paper guide surface
with a cloth dipped in ethanol or isopropyl (rubbing) alcohol. It is recommended that you clean the
paper guide when replacing the cutter unit.
• The average number of cuts is 5,000 or more depending on the operating environment. Difficulty
cutting, the inability to cut straight, or frequent paper jams may indicate that the cutter life is near the
end. Replace the cutter if these conditions occur.
• The last label on the DK roll is not attached to the core.
As a consequence, the last label may not be cut correctly, however this does not indicate a problem with the QL-500 printer.
Should there be a problem with the last label, remove any existing labels, insert another DK Roll and re-print.
Each roll contains a few more labels than stated.
Paper guide surface
Click “Standard
Installation”.
The preparation for
installing the software
starts and the License
Agreement screen is
displayed.
Each button selects the
following operations.
Standard Installation
P-touch Editor 4.2, P-touch Address Book 1.0, Printer Driver,
and User's Guide are all installed.
Custom Installation
P-touch Editor 4.2, P-touch Address Book 1.0, Printer Driver,
and User's Guide can be installed individually.
Show User's Guide
The Software User's Guide PDF manual can be viewed without
actually installing the QL-500 software.
Install Acrobat Reader
“Adobe®Acrobat®Reader®”can be installed so that you can
view the Software User's Guide (PDF Manual).
Adobe®Acrobat®Reader®5.1 will be installed. If you have a
later version already installed you do not have to install it.
1
Click [Finish].
The software installation is now complete. Connect the printer
to complete the driver installation.
When the installation is complete, you may be prompted to reboot
the PC. To restart the PC, select “Restart”and click [Finish].
12
Select if you want to register your printer and then [Next].
• If you select “Yes, display the page”, you will be directed to
the online user registration page. After user registration,
continue with the installation (registration is recommended).
• If you select “No, do not display the page”, the installation will
continue.
11
Starting up the installed software.
• When starting P-touch Editor, click [Start] - [All Programs
(Programs)] - [Brother Ptouch] - [P-touch Editor 4.2].
• When starting P-touch Address Book, click [Start] - [All
Programs (Programs)] - [Brother P-touch] - [P-touch Address
Book 1.0].
13
Check the box for each
Microsoft®Office®
application that you
want to install the Add-
in for, then click [Next].
Make sure that you
have closed all
Microsoft®Office®
applications.
For details on Add-In
setting, See the
“Software User's Guide
(PDF Manual)”.
The Driver Setup (Brother P-touch) screen is displayed.
Industry Canada Compliance Statement (Canada Only)
This Class B digital apparatus complies with Canadian ICES-003.
When using Mac OS®X
5
The Pre-Installation
Summary screen is
displayed.
6
11
Click [Next].
You can choose which
programs are installed.
Uncheck any programs that
you do not want to install.
The Choose Alias Folder
screen is displayed.
Check the content and click [Continue].
The License agreement screen is displayed.
When continuing the installation, click [Agree].
The Select a Destination screen is displayed.
Start up your Mac®and put the CD-ROM into the CD-ROM drive.
The QL-Series screen is displayed.
If it does not start up automatically, double click the QL-Series (CD-ROM)
icon.
112
Click [Install].
The screen in which the name and password of the administrator is
now displayed.
Input the “Name” and the “Password” of the administrator and
click [OK].
The screen to check the installation is displayed.
When continuing the installation, click [Continue Installation].
The installation starts.
13
Select the destination you
want to install, and click
[Continue].
The Easy Install screen is
displayed.
Select the drive where the
Mac OS®X is installed.
When the installation is completed and the message “The
software was successfully installed” is displayed, click [Restart].
Your Mac®will restart.
The installation of the printer driver is now complete.
Connect the USB cable to the USB port of the Mac®.
Press the ON/OFF button ( ) of the printer to turn on the power.
If you are using a USB hub and your Mac®has problems recognizing the
printer, try connecting the printer directly to your Mac®.
Double click the drive where Mac OS®X is installed, and click in
order [Applications]-[Utilities]-[Printer Setup Utility (Print Center)].
The Printer List screen is displayed.
When the Printer List screen is displayed, click [Add].
14
15
17
16
After rebooting, connect the USB cable to the printer.
Remove the caution label before connecting the USB cable.
2
3
4
7
8
10
9
18
Click [USB], “QL-500” and
[Add].
The screen returns to Printer
List screen.
Click [Add] (Add Printer).
19
20
Check that “QL-500” is added, and close the Printer List screen.
You can start using your Brother QL-500.
Double click the drive where P-touch Editor is installed, click in
order [Applications] - [P-touch Editor 3.2] and double click
P-touch Editor 3.2 icon. P-touch Editor will start.
21
Check the content and click [Next].
The Important Information screen is displayed.
Check the content and click [Next].
Click [Install].
The installation starts.
When the installation is complete, click [Done].
The software installation is now complete.
Next, install the printer driver.
Click [Continue].
The Important Information screen is displayed.
Click [Continue].
The Software License Agreement screen is displayed.
Select the location where you want to create the alias, and click
[Next].
Click the [Mac OS X] folder and double click [P-touch Editor 3.2
Installer].
P-touch Editor 3.2 Installer starts up and the Introduction
screen is displayed.
Double click [QL-Series Driver.pkg] in [Mac OS X] folder.
The Driver Installer starts up and the Driver Setup
screen is displayed.
1
2
3
4
2
3
4
Enter your user name
and company name,
then click [Next].
The Choose the
Destination Location
screen is displayed.
Check the locations
where you want the
installer to add the
program shortcuts and
click [Next].
The Start Copying Files
screen is displayed.
Click [OK] on the Driver Setup (Brother P-touch) screen
to start the installation.
See the reverse side for an example of creating a label.See the reverse side for an example of creating a label.


