manuals.online logo
Brands
  1. Home
  2. •
  3. Brands
  4. •
  5. BRUSTOR
  6. •
  7. Accessories
  8. •
  9. BRUSTOR B-128 User manual

BRUSTOR B-128 User manual

EN
Mounting instructions
B-128 Conservatory awning
23januari20201:43p.m.
M H
B-128 Conservatory awning Mounting instructions
Table of contents
03
03
04
06
07
08
Contents
1. Placing the screen housing
2. Placing the guides
3. Tensioning the canvas
4. Motor adjustment
5. Assembly support beam
V2017

B-128 Conservatory awning Mounting instructions
I
› Check that all parts are present and/or the dimensions correspond to the order.
› Multiple types of supports possible:
. P   
› First lay duckboards or plates on the veranda.
› Place the screen housing in the designated place on the veranda.
Screen housing
support beam
Side guide
Double guide support
Guide support
Wall support (C)
Double guide support
adjustable - flat (D4)
Guide support
adjustable - flat (D2)
Double guide support
adjustable - straight (D3)
Guide support
adjustable - straight (D1)
V2017

B-128 Conservatory awning Mounting instructions
35cm35cm
=
=
Socket-head 3mm
Fastening plate
. P   
› First remove the covers of the guides (socket-head 3 mm) and of the housing.
› ! If a support beam is also placed, extra fastening plates must be slid into the guide. (1x le 1x right) Make sure that the guide
plates are in the correct place, before and/or behind the guide support.
› Slide the guides on the housing.
› Determine the position of the supports. The back of the support comes flush with the back of the guide.
› Place the top support and bottom support approximately 35 cm from the end. Spread the other supports equally between the first and
last support.
› ! With hanging veranda beams, use shims between the guide and the central support to align the guide supports.
› Take the guide o again to fasten the supports.
› Use a double guide support if an additional veranda screen is placed alongside.
Number of supports per extension
0,5 - 1,5 1,51 - 2,5 2,51 - 4 4,01 - 5
2345
V2017

B-128 Conservatory awning Mounting instructions
› Tighten the bolts of the upper guide supports.
› Check the squareness of the first guide on the housing and fasten it.
› Check the parallelism of the other guides with respect to the first distance.
› Check the fixation by measuring diagonally. The dierence may be no more than 2 mm.
› Firmly tighten all nuts.
› Slide the guides upwards over the fastening plates of the guide supports.
› Slide the zipper in the PVC rail and place the guide wheels in the guide.
› Slide the side guides on the side plates of the screen housing.
› Fasten the guide to the side plate of the screen housing with bolts DIN912 M6x10.
=
=
90°
Guide wheels
PVC rail
Zipper
DIN912 M6x10
V2017

B-128 Conservatory awning Mounting instructions
› Remove the cover of the front louvre.
› The belt comes horizontally out of the housing. Bring the belt forwards and insert it vertically along the wheel in the end cap of the
guide. Do not turn the belt more than 90 degrees.
› Preferably place the belt with the white side on the first wheel, and with the black side on the second. Then the black and least
conspicuous side of the belt is visible when closing the canvas.
› Then insert the belt along the wheel on the side plate of the front louvre in the opening in the front louvre.
› Join the belt with the buckles in the front louvre on the spring.
› Evenly tighten the belt along both sides until the canvas is nicely stretched. Make sure that the spring never becomes longer than 2
metres.
› Replace the covers on the front louvre, the guides and the housing.
1
2
Guide wheel
Guide wheel
Do not remove cladding! DIN965 M4x20
. T  
V2017

B-128 Conservatory awning Mounting instructions
. M 
› Follow the Somfy manual for the adjustment of the motor.
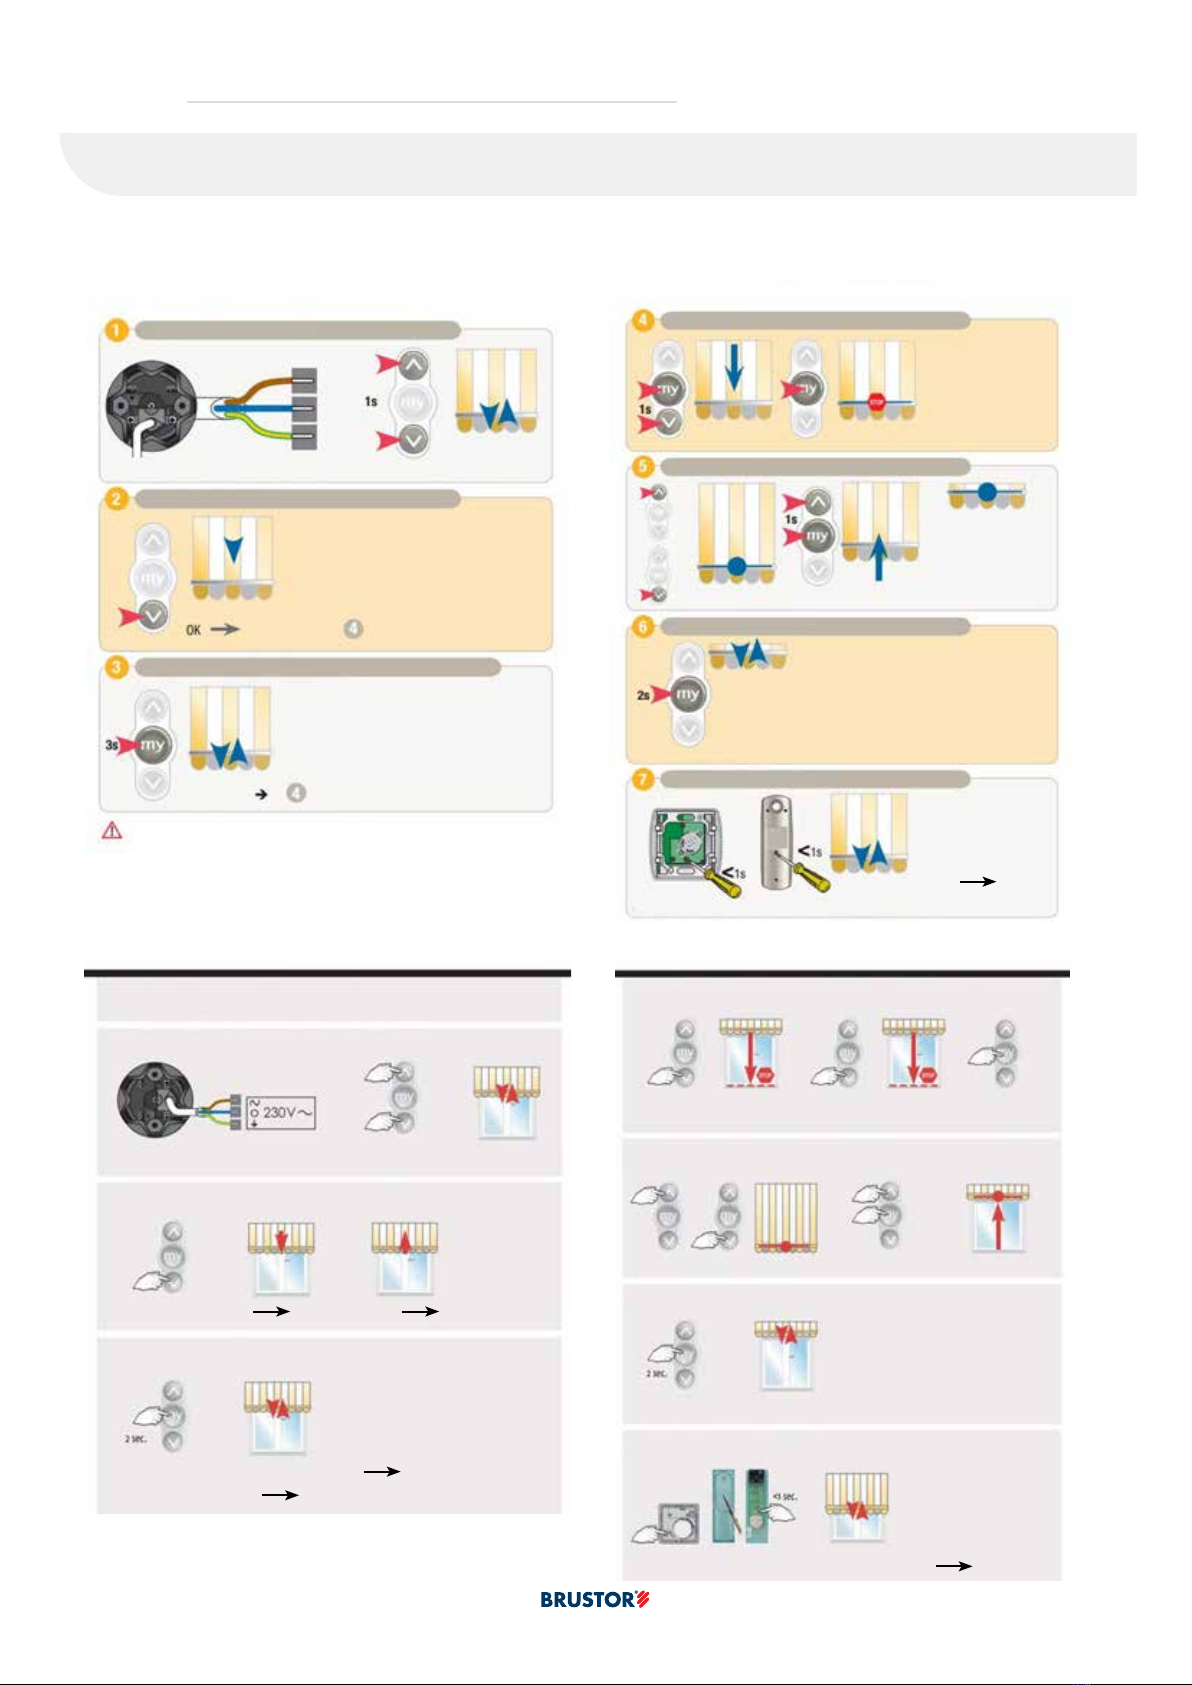
› Motor Somfy Orea RTS:
› Motor Somfy Sunea IO:
Take control over the motor Open the tent
Adjust bottom end point
Fasten the end settings
Programming a transmitter
ADJUSTMENT OREA RTS MOTOR
Adjustment takes place with a Telis or Centralis transmitter.
ADJUSTMENT OREA RTS MOTOR
Check the direction of rotation
Change the direction of rotation – if required
Adjustment and programming (cassette sun awning) 4. Adjustment of the bottom end position, send product downwards
5. Adjustment of the bottom end position (cont.)
6. Fasten the end settings
7. Programming an operation
2. Check the direction of rotation
1. Working on location with a not adjusted motor
3. Change the direction of rotation – if required
Only power 1 motor at the same time Short movement
next page
Short movement
Adjust if required
Short movement
Rear side Centralis Rear side Telis
Short movement OK
Sunea io and Sunea Screen io Sunea io and Sunea Screen io
Only 1 motor connected to the mains voltage (230V~) at the same time.
Press at the same time until ...
...short movement
Press briefly
Press until ...
OK step 4 not OK step 3
...short movement OK
step 4
or
or
Press <2 sec, product
moves downwards in stages.
Product stops on releasing
Press >2 sec,
product automatically
moves downwards.
STOP at
bottom point
Adjust if required
Press briefly at the same time
Stops against the stopper
Check the
end settings
Press until...
Briefly press programming button
...short movement
Short movement OK
V2017

B-128 Conservatory awning Mounting instructions
› A support beam can be placed as canvas support.
› Fasten the end plates of the support beam to a fastening plate in the guide with the bolt DIN6912 M8x16.
› Slide the plastic end cap on the end plate of the support beam and fasten with 2 screws DIN7982 ST3.5x13.
. A  
POSITION
SUPPORTTUBE
5
2
3
4
1
1Fastening plate
2Indication position support tube
3DIN6912 M8x16
4DIN7982 ST3,5x13
5DIN6798A M8

Other BRUSTOR Accessories manuals

BRUSTOR B25 Series User manual

BRUSTOR

BRUSTOR B25 Series User manual

BRUSTOR B50 User manual

BRUSTOR

BRUSTOR B50 User manual

Popular Accessories manuals by other brands

Quincy lab 140AE-1 operating manual

Quincy lab

Quincy lab 140AE-1 operating manual

HomePro ZIR000 user manual

HomePro

HomePro ZIR000 user manual

DOL 20SCR Technical user guide

DOL

DOL 20SCR Technical user guide

RAB Smart Task installation manual

RAB

RAB Smart Task installation manual

Kemppi KMS 300 quick guide

Kemppi

Kemppi KMS 300 quick guide

Stearns 57,500 Series Installation and service instructions

Stearns

Stearns 57,500 Series Installation and service instructions

iGuzzini TWILIGHT COPENAGHEN manual

iGuzzini

iGuzzini TWILIGHT COPENAGHEN manual

Adelaide Annexe & Canvas Avan Deluxe installation guide

Adelaide Annexe & Canvas

Adelaide Annexe & Canvas Avan Deluxe installation guide

OHAUS 5000 instruction manual

OHAUS

OHAUS 5000 instruction manual

HOME8 WLS1300 quick start guide

HOME8

HOME8 WLS1300 quick start guide

MAXBOTIX MaxSonar quick start guide

MAXBOTIX

MAXBOTIX MaxSonar quick start guide

ioSmart iSmart56 Installation and user guide

ioSmart

ioSmart iSmart56 Installation and user guide

Focusrite Scarlett 18i8 user guide

Focusrite

Focusrite Scarlett 18i8 user guide

Velleman ED38105 user manual

Velleman

Velleman ED38105 user manual

JumpSport SkyBounce user manual

JumpSport

JumpSport SkyBounce user manual

Prima-Temp PRIYA Instructions for use

Prima-Temp

Prima-Temp PRIYA Instructions for use

Tefcold BC85I-BC85I W user manual

Tefcold

Tefcold BC85I-BC85I W user manual

Vaisala WMS302 user guide

Vaisala

Vaisala WMS302 user guide

manuals.online logo
manuals.online logoBrands
  • About & Mission
  • Contact us
  • Privacy Policy
  • Terms and Conditions

Copyright 2025 Manuals.Online. All Rights Reserved.