manuals.online logo
Brands
  1. Home
  2. •
  3. Brands
  4. •
  5. BRUUDT
  6. •
  7. Motorcycle Accessories
  8. •
  9. BRUUDT Tail Tidy User manual

BRUUDT Tail Tidy User manual

Montageanleitung
Mounting instructions
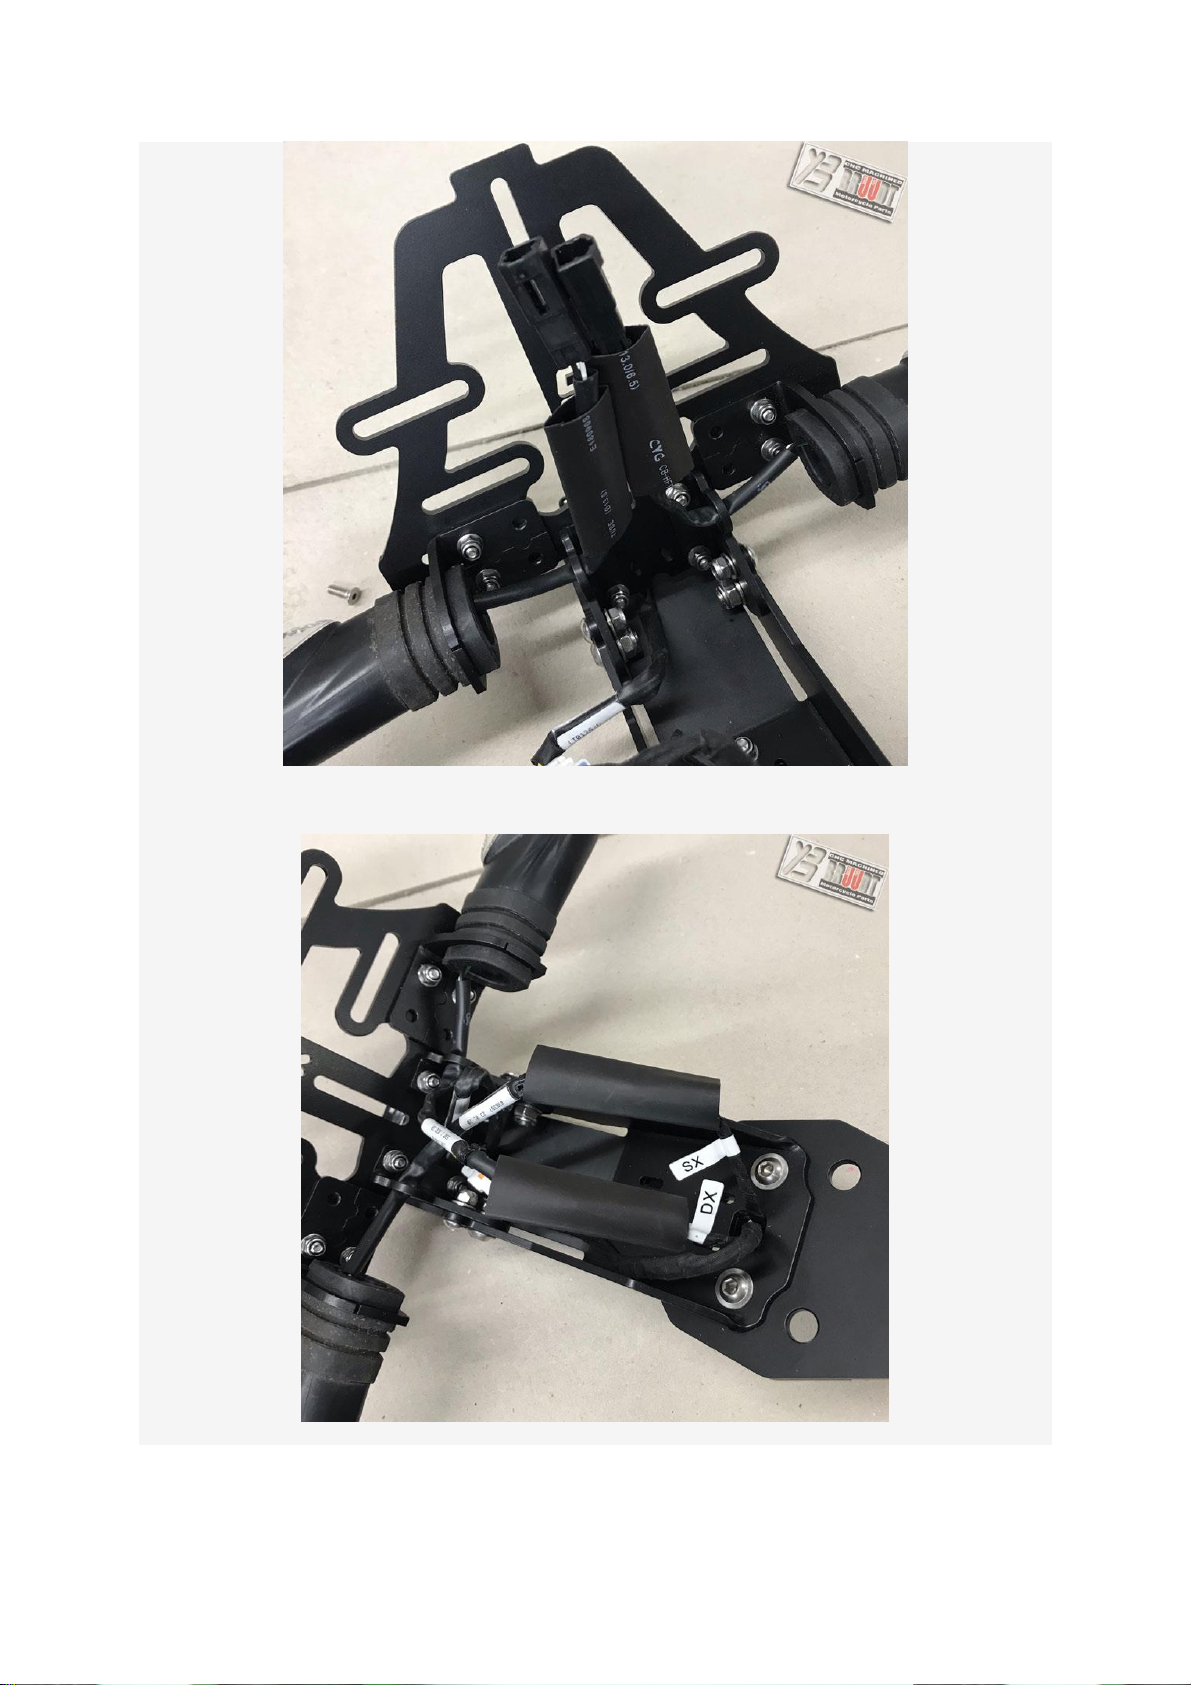
BRUUDT Kennzeichenhalter für die Ducati:
Panigale V4 /R /S /V2 / Streetfighter
BRUUDT Tail Tidy for the Ducati:
Ducati Panigale V4 /R /S /V2 / Streetfighter
Noch einmal vielen Dank, dass Sie sich für unsere Produkte entschieden haben!
Bevor Sie mit der Montage der Teile beginnen, möchte die Firma BRUUDT darauf hinweisen, dass der
Anwender selbst für falsche Installation oder unsachgemäßen Gebrauch der Bauteile verantwortlich ist
und haftbar gemacht werden kann. Wir empfehlen daher, die Montage des Kennzeichenhalter von
qualifiziertem Fachpersonal durchführen zu lassen.
Before Proceeding with the assembling of the product, Firma BRUUDT specifies that the user is liable
for any incorrect installation of the product or its improper use.
We recommend the installation of the tail tidy to qualified personnel
---------------------------------------------------------------------------------------------------------------------
Schritt 1:
Die Stecker vom Blinker und Kennzeichenbeleuchtung müssen aus einander genommen werden.
Dafür müssen Sie erst mal die 5 schrauben unten aus das Heck drehen und das Teil aus einander
nehmen.:
Step 1:
We have to disconnect the indicators and license plate light. First remove the 5 screws from the
bottom of the original fender and take it apart.
Schritt 2:
Nehmen Sie die Stecker aus einander von Kennzeichenbeleuchtung und Blinker. Trennen Sie der
Kabelbinder und der letzte Stecker vom Heck. Entfernen Sie das Heck Teil.
Step 2:
Disconnect indicators, license plate light. Cut the cable ty and disconnect the main connector.
Remove the tail piece.
Schritt 3:
Entfernen Sie die 2 Original Schrauben womit das obere Teil vom Heck montiert ist, und nehmen Sie
das Original Heck ab. ( nach vorne schieben ). .
Step 3:
Remove the 2 m5 screws holding the upper part of the original fender. And remove that part. You have
to slide it toward the front.
Schritt 4:
Legen Sie das Original Heck auf einen Arbeitstisch und Demontieren sie die Blinker, Katzenauge und
Kennzeichen Beleuchtung.
Wann Sie Mini Blinker montieren möchte brauchen sie nicht den originalen Blinker zu demontieren.
Montieren sie dann die mitgelieferten Halterbleche für die Mini Blinker am Kennzeichenhalter. Mini
Blinker bis M10 sind einfach an diesen Halterblechen zu Montieren.
Step 4:
Now you can remove the Indicators, licence plate light and reflector from the stock fender
When you want to mount aftermarket indicators you do not have to remove the stock ones from the
fender. Simply screw the aftermarket indicator holder on our tail tidy and mount the aftermarket
indicators on them.
Schritt 5:
Wenn sie die Original Blinker behalten möchte ist es jetzt Zeit um die Blinker auf der
Kennzeichenhalter zu montieren. Achten Sie, dass es eine Linke und Rechte Blinker gibt. (SX ist
Links. DX ist Rechts)
Step 5:
Now you can mount the original indicators to the tail tidy. Please note that there is a left called SX and
right one DX. For aftermarket indicators you can mount the other set of brackets.
Der Blinker Halter an Kennzeichenhalter besteht aus zwei Teile. Nehmen Sie das untere ab und
montieren Sie so einfach der Blinker an der Kennzeichenhalter.
The indicator bracket is made out of two parts. Take the bottom part from the Tail tidy and mount
the indicator back on to the Tail tidy.
Schritt 7: Montieren Sie die Kennzeichenbeleuchtung. Nutzen Sie dafür beide mitgelieferte M4
Schrauben und schwarze Distanz Buchsen.
Step 7: Mount the licence plate light. Use the 2 M4 screws and the 2 black spacers.
Schritt 8: Der Stecker von der Kennzeichenbeleuchtung ist wasserdicht. Beide von Blinker nicht.
Um diese ab zu schirmen sind Zwei Schrumpfschlauche mitgeliefert. Ziehen Sie die
Schrumpfschlauche um die Stecker vom Blinker und nutzen Sie eine Heißluftgebläse um das
Schlauch zu schrumpfen.
Step 8 The connector from the licenceplate light is waterproof. Both indicator connectors are not.
Use the shrink tube to protect those connectors. Use a heat gun to shrink the tubes around the
connectors.
Schritt 8: Leiten Sie die Kabel durch das Loch im Kennzeichenhalter. Und binden Sie die Kabel
mit dem mitgelieferten Kabelbinder wie da gestellt auf das Bild.
Step 8 Put the cables through the hole in the Tail Tidy and ty them together with a cable ty like the
pictures.
Schritt 8:. Nutzen Sie ein Bisschen fett oder ähnliches beim roten Pfeil so dass das es besser in
das Gummi schiebt bei montieren. Schließen Sie das Kabel wieder an. Drucken Sie der Kabel so weit
wie möglich unter das Heck.
Step 8:
Put a little grease in the area of the red arrow. This helps to slide the tail tidy in the rubber piece.
Connect the cable to the main cable again and put the cable as much as possible underneath the tail.
Schritt 8:. Nutzen Sie beide Original M5 schrauben mit die Schwarze scheiben um das Heck
wieder zu montieren.
ACHTUNG.
Am Anfang stehen die Schrauben nicht senkrecht zum Kennzeichenhalter. Schrauben Sie die
Schrauben also nicht schräg ein. Das erste Foto zeigt den richtigen Winkel.
Passen Sie also auf die Schrauben nicht schief ein zu drehen. Schrauben abwechselnd
eindrehen. Also Links ein paar schlagen und dann rechts bis die
Schrauben fest sind.
Step 8:
Use the original M5 screws together with the 2 black washers to mount the Tail tidy.
Warning! Both screws must be screwed in a couple of turns left and then right until both are
tight.
Please note that in the beginning the screws are not square with the tail tidy. This picture
shows the angle the should have. So please be careful not to screw in the screws in a wrong
angle and damage the thread.
Schritt 10:
Kontrollieren sie bitte ob alle Beleuchtung richtig funktioniert!
Step 10:
Make sure all your lights functions properly
Schritt 11:
Das Original Katzenauge kann jetzt an das T-Blech montiert werden und das T-Blech wieder an die
Halterplatte. (Erstmal nachmessen wo er genau Montiert werden soll). Und montieren sie natürlich die
Kennzeichenplatte wieder. Das T-Blech sollte auch unten an der Kennzeichenplatte montiert werden.
Bohren Sie dafür ein 5,5mm Loch auf die richtige Stelle in der Kennzeichenplatte. Nutzen Sie also 1
mitgelieferte schraube an der Kennzeichenhalter und eine unten bei der Kennzeichenplatte.
Step 11:
Mount the OEM reflector on the T-Bracket. And the T-Bracket with the reflector to the tail tidy if you
need one in your country. Mount your licence plate and mount all the original parts back where they
were. The T-Bracket should also be mounted to the licence plate on the bottom. To do so you need to
Drill a 5,5mm hole through the licece plate. Use 1 m5 screw in the tail tidy and 1 on the bottom to
mount the T-bracket to the licence plate.
Letzter Schritt: Stellen Sie den gewünschten SICHEREN Neigungswinkel ein.
Beachten Sie dabei, dass beim vollständig ein federn auch genügend Abstand zwischen dem
Hinterrad und dem Halter ist!!!
Sichern Sie die Winkel vom Halterplatte mit der Linsenkopfschraube und der
dazugehörigen Sicherungsmutter M5. Dann beide M6 Sicherungsmutter/Schrauben
festdrehen. Links und Recht!!!
Final step: Adjust the angle.
Make sure there is enough clearance when the suspention is completely compressed
between the licenceplate and the rear tire!!
Secure the holderplate by tigtening the two M5 and the two M6 Screws and nylock’s left
and right!!!
Bei fragen stehen wir immer zu Verfugung: Info@bruudt.de oder rufen sie uns einfach an.
Tel:.05944 599 406
If you have any questions don’t hesitate to contact us. Info@bruudt.de or give us a call on
00495 944 599 406

Other manuals for Tail Tidy

1

Other BRUUDT Motorcycle Accessories manuals

BRUUDT CBR1000RR User manual

BRUUDT

BRUUDT CBR1000RR User manual

BRUUDT Tail Tidy User manual

BRUUDT

BRUUDT Tail Tidy User manual

BRUUDT S-2008-MT07 User manual

BRUUDT

BRUUDT S-2008-MT07 User manual

BRUUDT D-4000 User manual

BRUUDT

BRUUDT D-4000 User manual

BRUUDT Yamaha X-MAX 300 User manual

BRUUDT

BRUUDT Yamaha X-MAX 300 User manual

Popular Motorcycle Accessories manuals by other brands

Cobra 602-2600 instruction manual

Cobra

Cobra 602-2600 instruction manual

hepco & becker 650.784 0101 Assembling instructions

hepco & becker

hepco & becker 650.784 0101 Assembling instructions

hepco & becker 7006513 00 01 manual

hepco & becker

hepco & becker 7006513 00 01 manual

Wunderlich 32891-001 FITTING INSTRUCTION

Wunderlich

Wunderlich 32891-001 FITTING INSTRUCTION

Wunderlich 31962-002 Fitting instructions

Wunderlich

Wunderlich 31962-002 Fitting instructions

ZTechnik Z2240 Installation and owner's manual

ZTechnik

ZTechnik Z2240 Installation and owner's manual

KOOFU CS-1 instruction manual

KOOFU

KOOFU CS-1 instruction manual

Metra Electronics Saddle Tramp BC-BTHBSP installation instructions

Metra Electronics

Metra Electronics Saddle Tramp BC-BTHBSP installation instructions

R&G ECC0332R Fitting instructions

R&G

R&G ECC0332R Fitting instructions

Shark SKWAL 2 owner's manual

Shark

Shark SKWAL 2 owner's manual

R&G RAD9021 Fitting instructions

R&G

R&G RAD9021 Fitting instructions

O'Neal Dirt manual

O'Neal

O'Neal Dirt manual

EDELRID MADILLO manual

EDELRID

EDELRID MADILLO manual

ESAB G40 instructions

ESAB

ESAB G40 instructions

PUIG 3493 Mounting instructions

PUIG

PUIG 3493 Mounting instructions

SUOMY STELLAR manual

SUOMY

SUOMY STELLAR manual

Cobra 602-2500 instruction manual

Cobra

Cobra 602-2500 instruction manual

PUIG 7628 Mounting instructions

PUIG

PUIG 7628 Mounting instructions

manuals.online logo
manuals.online logoBrands
  • About & Mission
  • Contact us
  • Privacy Policy
  • Terms and Conditions

Copyright 2025 Manuals.Online. All Rights Reserved.