Bryton GARDIA R300 User manual

1
Back to Top
REARVIEW RADAR AND TAIL LIGHT
R300
USER MANUAL

Table of Contents
Introduction .........................................................................4
Getting Started .................................................................................4
Device Overview .................................................................................4
Light Operation ..................................................................................5
Device Information ..........................................................6
Charging the Device ............................................................................6
Installing the Device ............................................................................7
The Gardia R300 and the Gardia App......................................8
Pairing the Gardia Device With Your Phone..............................................9
Updating the Device’s Firmware via the App ............................................10
Viewing the Gardia on the App..............................................................11
Customizing the Gardia App Settings ....................................................11
The Gardia R300 and the Bryton Rider Series.........................12
Pairing the Gardia Device With Your Rider Series.....................................12
Viewing the Gardia on the Rider Series..................................................13
Customizing the Rider Series Settings....................................................13
Appendix .............................................................................15
Specications ......................................................................................15
Basic Care For Your Gardia R300..........................................................16

WARNING
This device, the Bryton Gardia R300, is intended to be an additional aid in riding and is not
a substitute for maintaining situational awareness. Always be aware of your surroundings
and do not operate this device while in motion, stare at or become distracted by the display.
Improper usage of this device could result in serious injury or death. Use this device at your
own risk.
Video Tutorials
For step-by-step guides on how to use the device or the Bryton Gardia app, please scan the
QR code below for the Bryton Sport YouTube channel and check out the Tutorial Videos.
http://www.youtube.com/c/BrytonActive

4 Introduction
Back to Top
Power Button / Switch Lights
Press and hold 1 second to turn on/
off the device.
Single press to change light modes.
Power Indicator LED
Changes colors based on the
remaining battery level and charging
status.
Link Indicator LED
Changes color when paired with the
Gardia app and compatible bike
computers.
C
A
B
C
POWER INDICATOR LED
Battery Status
Slowly Flashing Green 50% to 100% battery life remains
Slowly Flashing Yellow 15% to 50% battery life remains
Slowly Flashing Red
Below 10% battery life remains.
Low battery mode will be activated
automatically
Charging Status
Flashing Green Still Charging
Solid Green Fully Charged
LINK INDICATOR LED
Slowly Flashing Blue
The device is linked and can be controlled
by a paired app or compatible Bryton
device
Introduction
This section will guide you through basic setup prior to rst use with your Gardia R300.
Getting Started
• Update Device Firmware (Updating the Device Firmware via the App, page 10)
• Charging (Charging the Device, page 6)
• Installation (Installing the Device, page 7)
• Pairing with the Gardia App (Pairing the Gardia Device with Your Phone, page 9)
• Pairing with Rider-Series Bike Computers (Pairing the Gardia With Your Rider-Series
Bike Computer, page 12)
Device Overview
Power / Light Indicator LED
B
A
Note:You can tell wether the device is
powered on based on the indicator LED is
ashing or not.

5 Introduction
Back to Top
High Solid
Low Solid
Group Ride
Night Flash
Day Flash
Light OFF
(Radar Detection Only)
Reboot the Device
Press and hold 12 seconds to reset the Gardia device.
Note: Gardia R300 will go through different status when you continue pressing the power button.
Ensure that you keep pressing for 12 seconds until the device resets.
Light Operation
Manual Mode with Smart Control
Manual Mode
Single pressing the top button will cycle through dierent light modes.
Smart Control
Warning Light: There are two warning light patterns. When a vehicle is detected by the
Gardia radar, based on the level of threat, the light will automatically switch to a suitable
warning light to highlight the cyclist and catch the attention of approaching drivers.
Brake Light: When deceleration is detected, the light will illuminate for 2.5 seconds to
notify approaching vehicles/cyclists.
Low Battery Light: When the battery drops below 15%, the light will automatically dim and
enter power-saving mode. This will extend the battery life.
Sleep Mode
When the Gardia R300 is inactive for more than 10 minutes, it will enter Sleep Mode to
conserve battery life. The current light mode will be saved before entering sleep. Once the
Gardis R300 detects motion, it will reactivate and return to the previous light mode.

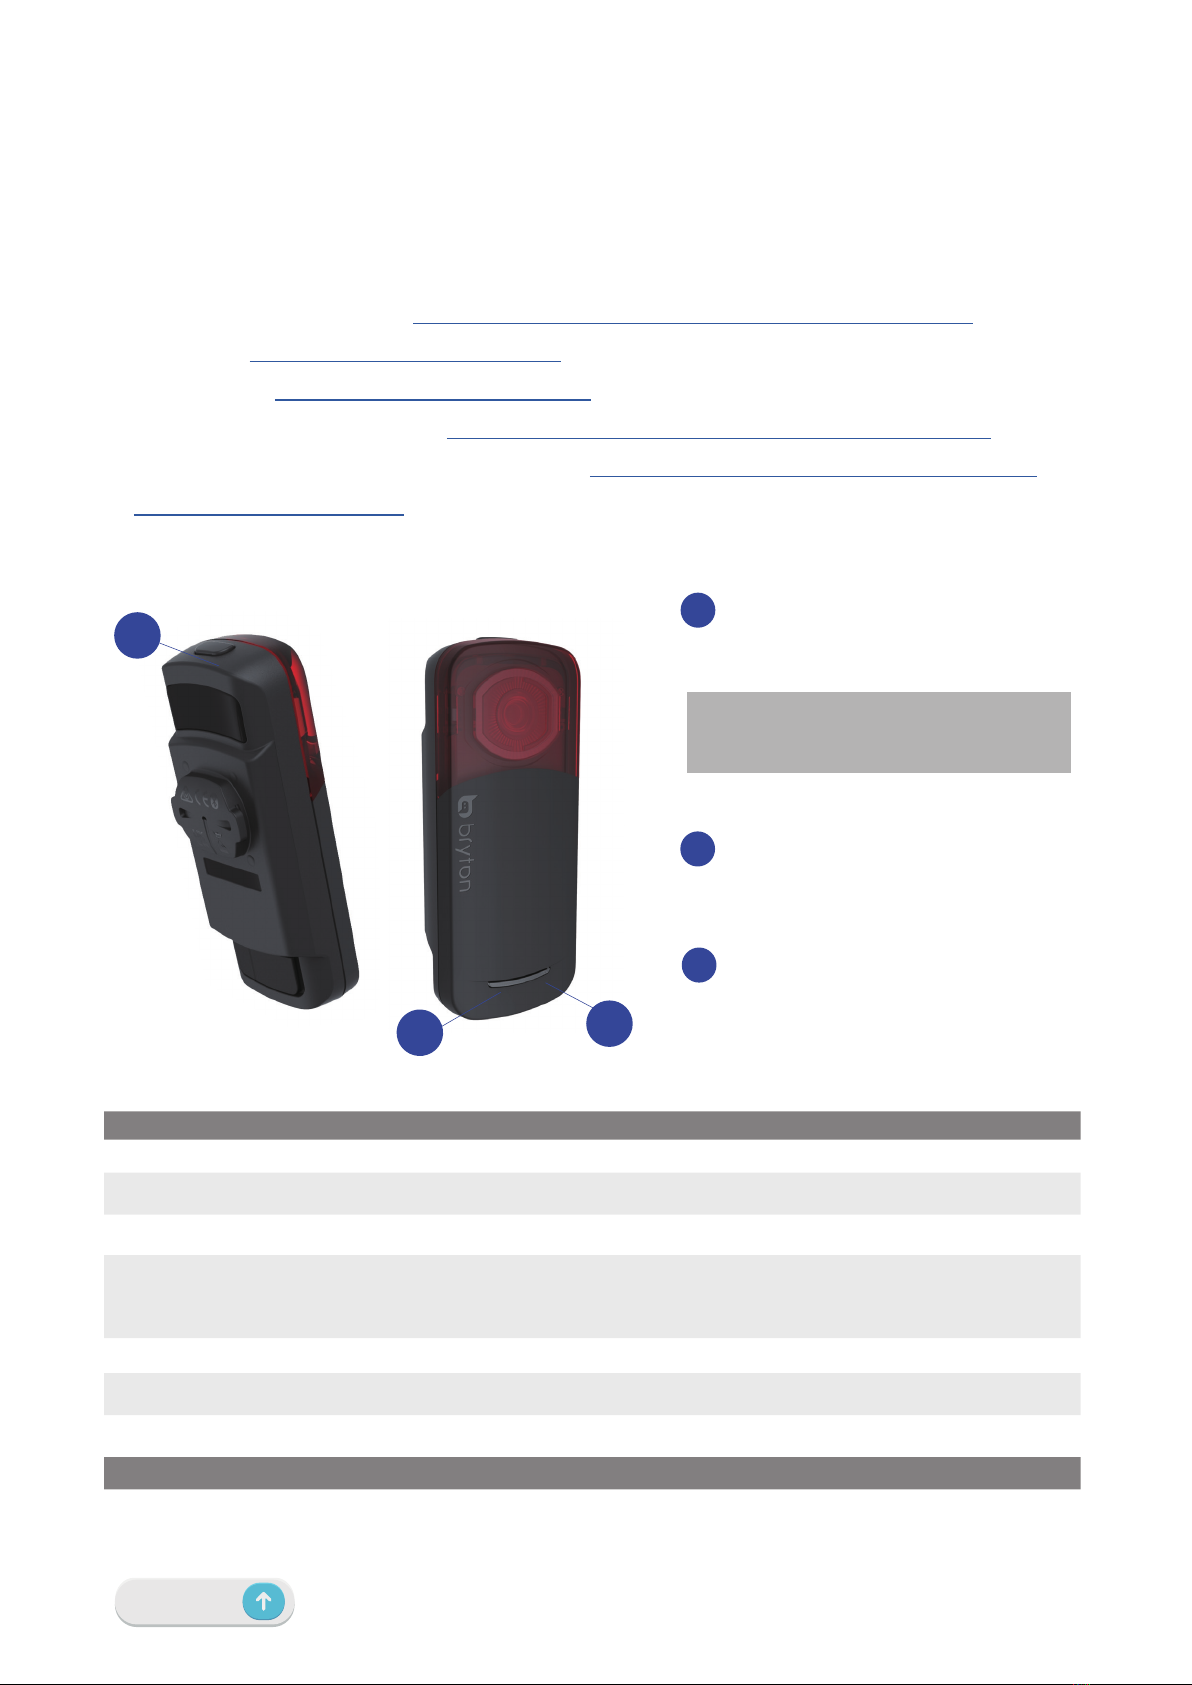
6 Device Information
Back to Top
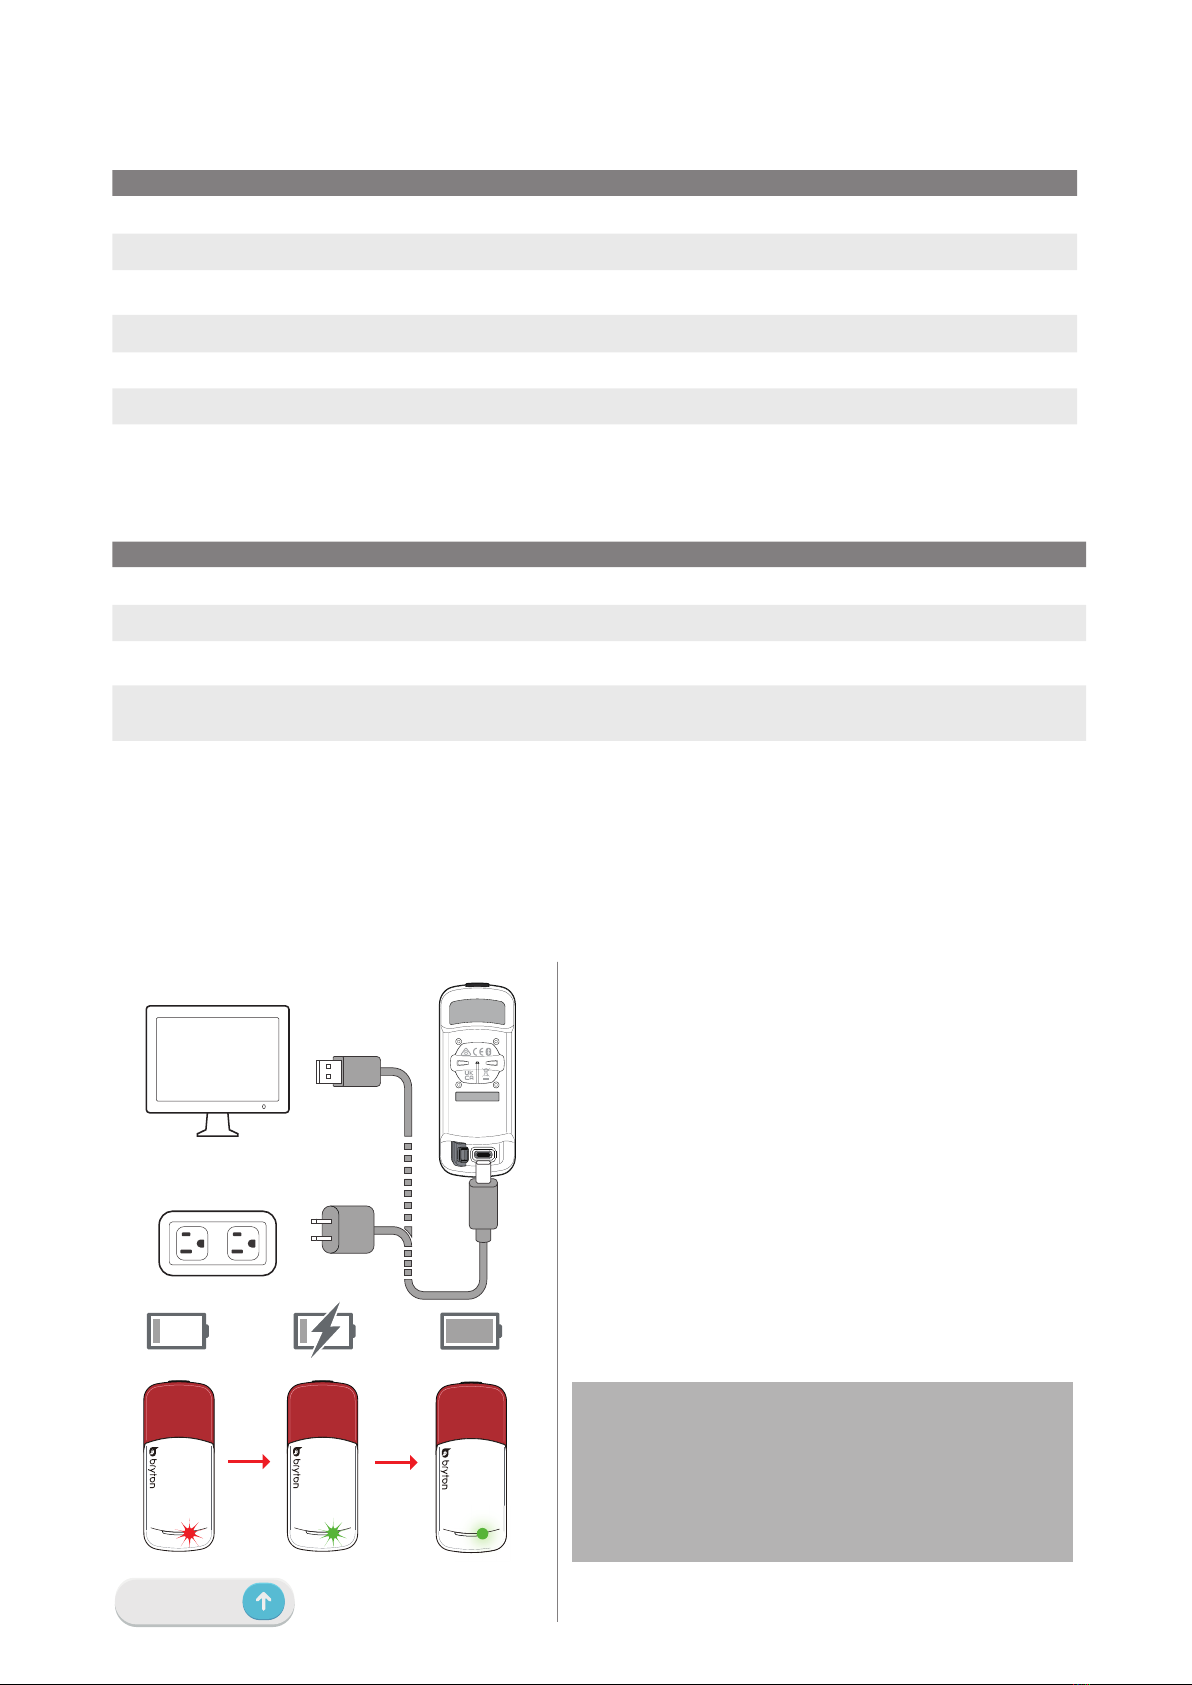
1. Detach the rubber cover from the USB port.
2. Plug the USB type C cable into the USB
port on the Gardia R300.
3. Plug the cable into a standard USB AC
adapter or into your PC’s USB port.
4. If using a standard USB AC adapter, plug
the adapter into a standard wall outlet.
5. Allow the device sufcient time to fully
charge.The LED light will ash green
while charging and change to solid green
when charging is complete.
6. Detach the USB cable and close the rubber
cover from the USB port.
PC
Tail Light Modes and Intensity
Mode Light Intensity Lumen Duration Flash Behavior
High Solid High 20 Up to 8 hr Strong Steady Light
Low Solid Low 5Up to 12 hr Soft Steady Light
Group Ride Moderate 12 Up to 11 hr Slow Light Up / Dim Down
Night Flash Moderate 12 Up to 17 hr Quickly Flashing Light
Day Flash High 73 Up to 17 hr Quickly Flashing Light
Light Off Off 0 Up to 24 hr Light Off, Radar Remains Active
Sleep Mode Off 0 Up to 1 Year Vehicle Detection Disabled
Situational Light Modes and Intensity
Mode Flash Behavior
Brake Light Increase light intensity more than 50% for 2.5 seconds.
Red Warning Light Slowly ashes 3 times then quickly ashes 4 times.
Yellow Warning Light Slowly ashes 2 times then quickly ashes 3 times.
Power Saving Mode When under 15% remaining battery life, the lumens will be decreased to half of the
light’s intensity.
Device Information
Charging the Device
The built-in lithium-ion battery can be charged using a standard wall outlet or via USB cable
with your PC.
Note:
1. To prevent water damage and corrosion, ensure that the
USB port, rubber cover, and the device are fully dry before
charging or connecting to your PC.
2. The devices will not charge when exposed to temperatures
outside of this range: -22 to 55°C (-4 to 131°F)

7 Device Information
Back to Top
Installing the Device
How To Install
Device Installation Notice
• Choose a location to securely mount the Gardia R300 to ensure it does not interfere with
the safe operation of your bike.
• For maximum light visibility and radar detection, ensure the device is mounted as high on
the seat as possible.
• The device should face to the rear of the cyclist and perpendicular to the road.
• Ensure there is nothing obstructing the front of the light.
• Test your conguration during daylight and in a safe environment.
Step 1: Locate a secure mounting position. Step 2: Fasten the rubber mount with the
letter “b” facing upwards.
Step 3: Rotate the device to securely lock into
place.
Step 4: Ensure the device is securely fastened.
Note:
The included mounts are designed to t mo seat po angles. The mount can t 27.2 mm, 30.9 mm, 31.6 mm, D
cross section, and aero cross-section seat pos. In any conguration, the mount surface should be vertical.
90o

8 The Gardia R300 and the Gardia App
Back to Top
The Gardia R300 and the Gardia App
Download the Bryton Gardia app from the iOS app store or Google Play store or scan the QR
code to locate the app.By connecting your Gardia app with your phone, you can adjust light
modes and view radar notications & updates.
9:41
999%
Battery
9:41
28%
Remaining: 2 hours
A
Select to change device settings
Select to change light modes
Select to turn on / off alert sounds
Display battery status and remaninig battery hours
Colors displayed based on threat level
E
Download NOW
B
C
D
E
A
B
C
D

9 The Gardia R300 and the Gardia App
Back to Top
Pairing the Gardia Device With Your Phone
1. Before pairing, please ensure that
Bluetooth is enabled on your phone and the
Gardia R300 device is powered on.
2. Open the Bryton Gardia app and drag
down the page to connect.
3. Once the Gardia R300 has been detected,
select the device from the list of options and
conrm pairing.
4. Once paired, the indicator LED will ash
blue. This indicator light informs users that
the Gardia R300 has been successfully
paired with the app.

10 The Gardia R300 and the Gardia App
Back to Top
Updating the Device Firmware via the App
1. Once paired, the Gardia R300’s device
status and details will be displayed on the
app.
2. If a new rmware version is available, an
update message will display automatically.
Select Update from the pop-up or select
from the status menu to start the update.
3. The update will take a few minutes to
download.
4. Once complete, press Done.
NEW

11 The Gardia R300 and the Gardia App
Back to Top
Viewing the Gardia on the App
1. Before your ride, press Start Riding on the Gardia app.
2. The radar’s status and information will appear on the data screen.
3. The vehicle’s position will move up the screen as a vehicle approaches your bike. Next
to the vehicle, the threat level’s color will change based on the detected level of threat.
Green signies that no vehicle is detected. Yellow indicates an approaching vehicle. Red
indicates that a vehicle is approaching at high speeds.
Customizing the Gardia App Settings
Customizing Alert Settings
Before customizing the radar’s alert settings with the Gardia app, please ensure that you
have already paired the app with your Gardia device. In the Alerts setting, you can enable
sound and vibration alerts so you will be notied even with your phone is stored away,
instead of mounted on the handlebar.
1. From the home page of the Gardia app select >
2. Toggle to enable Sounds & Threat Cleared Tone & Vibration
Enable Brake Light
The Gardia radar tail light can detect when you are braking and notify vehicles behind you
with a brake light, lowering the possibility of collisions when slowing down or emergency
braking.
1. From the home page of the Gardia app select .
2. Enable the brake light status.
9:41
999%
Battery
9:41
28%
Remaining: 2 hours
A
B
A
B

12 The Gardia R300 and the Bryton Rider Series
Back to Top
1. Ensure that the Bryton Rider device is within
range of your Gardia R300 (3m).
Note:
To avoid interference, ensure you are 10 m away from other
ANT+ sensors when pairing.
2. Turn on the Rider-series device.
3. Select Settings > My Sensors > + >
Radar or Light
4. Select the detected Gardia device.
5. If your Gardia R300 has been successfully
paired with your Rider-series device, the status
and other information of both the radar and
light will be displayed.
65%
16 hours
BATTERY
REMAINING HOUR
Status
Sensor Details
Remove
Remove
23478
Radar
Name
Remove
Rear Light
Front Light
23478
12039
Status
Light
My Lights
The Gardia R300 and the Bryton Rider Series
The Gardia R300 device can be controlled remotely and have settings modied using a
compatible Bryton Rider-series bike computer. This section will provide detailed instructions
for Gardia R300 usage with the Rider S500 and Rider S800 devices. Other compatible
Bryton Rider-series devices will contain similar settings and controls.
Pairing the Gardia Device With Your Rider Series
After initial pairing, the Gardia R300 will be automatically connected with your Bryton Rider-
series bike computer when you start your ride and the Gardia R300 is powered on and within
range.
Note:
Only compatible Rider-series devices, such as the Rider
RS500 / Rider RS800 / Rider 750 / Rider 420 can be
paired with the Gardia R300 and display radar-related
data.

13 The Gardia R300 and the Bryton Rider Series
Back to Top
E
100m
100yd
k
Speed Ride Time
m
h
05:21:16
21.8
S
L
W
6
A
B
A
B
1. Go for a ride.
2. The Gardia radar’s status and information
will be displayed on the data screen.
3. The vehicle’s position will move up
the screen as the vehicle approaches your
bike. Next to the vehicle, the threat level’s
color will change based on the detected
level of threat. Green signies that no vehicle
is detected. Yellow indicates an approaching
vehicle. Red indicates that a vehicle is
approaching at high speeds.
1. Ensure that the Bryton Rider-series device
is connected to the Gardia R300.
2. Select Sensor Details > Alert Settings
3. To enable alert tones, toggle the button to
enable Sound
4. To enable the clear tone, toggle the button
to enable Threat Clear Tone
Viewing the Gardia on the Rider Series
Customizing the Rider Series Settings
Customizing Alert Settings
If alert tones have been enabled in the Gardia R300 settings, the Bryton Rider-series
device will use audio alerts to notify the cyclist of status changes. When approaching cars
are detected, the Rider-series device will beep one time and will beep again once the
threat has cleared.
Remove Radar
1. From the My Sensors menu, selects Radar, and choose the paired Gardia device.
2. Select Remove to remove the paired radar.
Sound
Threat Cleared
Tone
Alert Settings
21022
ANT+
SENSOR DETAILS
NAME/ID
TYPE
Note:
The Gardis R300 can also be paired with other ANT+
Radar compatible cycling computers.

14 The Gardia R300 and the Bryton Rider Series
Back to Top
Contorl Light Patterns
Light modes can be controlled remotely via your
Bryton Rider-series device after connecting with
the Gardia R300.
1. From the My Sensors menu, select Light, and
choose a paired light
2. Select Sensor Details
3. Under the Light Patterns section, you can
open the drop-down menu to select a light mode.
4. By pressing in the right-hand corner, you
can learn more about each light mode.
Enable Auto Switch
The Gardia R300 will utilize the Bryton Rider-
sereis device’s sunrise and sunset time to adjust
its light mode.
1. From the My Sensors menu, select Light, and
choose a paired Gardia device.
2. Select Sensor Details
3. Toggle the button to enable Auto Switch.
Enable Brake Light
Utilizing a built-in G-sensor, the Bryton Gardia
R300 radar tail light can detect when you are
braking and notify vehicles behind you with a
brake light.
1. From the My Sensors menu, select Light, and
selects a paired Gardia device.
2. Select Sensor Details
3. Toggle the button to enable Brake Light.
Customizing the Tail Light Settings
Remove Light
1. From the My Sensors menu, selects Light, and choose a paired Gardia device.
2. Select Remove to remove the paired radar or select to delete the paired Gardia device.
Auto Switch
A
A
Auto Switch
Light Pattern
Night Flash
Night Flash
Light Pattern
Brake Light
The Brake Light ashes when the
light is active and detecting a sharp
slow-down
Brake Light
Light Control
915719
ANT+
SENSOR DETAILS
Y=-7
915719
ID
TYPE
ID
Auto Switch
Light Pattern
Night Flash
Brake Light
Light Control
915719
ANT+
SENSOR DETAILS
ID
TYPE
Brake Light ashes when the light is
active and a brake is detected.
High Solid
Group Ride
Night Flash
Day Flash
Low Solid
Light Off
LIGHT PATTERN

15 Appendix
Back to Top
Appendix
Specications
Gardia R300
Item Description
Dimensions 97 X 20.9 X 40 mm
Weight 66 g
Radar Range Up to 150 m
Light Viewing Range Up to 1.6 km
Light Viewing Angle 220°
Operating Temperature -4 to 131°F (-20 to 55°C)
Battery Charging
Temperature
-4 to 131°F (-20 to 55°C)
Battery Rechargeable, built-in, lithium-ion polymer battery
Battery Life Up to 9 hr. in high solid mode
Up to 12 hr. in low solid mode
Up to 10 hr. in group ride mode
Up to 22 hr. in night ash mode
Up to 27 hr. in day ash mode
Up to 40 hr. in light off mode
Up to 1 year in sleep mode
LED luminous Flux 20 lm (high solid mode)
5 lm (low solid mode)
12 Im (group ride mode)
12 lm (night ash mode)
73 lm (day ash mode)
ANT+™ Featuring certied wireless ANT+™ connectivity. Visit
www.thisisant.com/directory for compatible products.
BLE Smart
Bluetooth smart wireless technology
Water Resistance IPX7, Water resistant to a depth of 1 meter for up to 30
minutes

16 Appendix
Back to Top
Copyright 2022 Bryton Inc. All rights reserved.
RF Exposure Information (MPE)
This device meets the EU requirements and the International Commission on
Non-Ionizing Radiation Protection (ICNIRP) on the limitation of exposure of the general
exposure requirements, this equipment must be operated in a minimum of 20 cm
separation distance to the user.
Hereby, Bryton Inc. declares that the radio equipment type Bryton product is in
compliance with Directive 2014/53/EU. The full text of the EU declaration of conformity is
available at the following internet address:
Designed by Bryton Inc.
7F, No.75, Zhouzi St., Neihu Dist., Taipei City 114, Taiwan (R.O.C.)
http://www.brytonsport.com/download/Docs/CeDocs_GardiaR300.pdf
Basic Care For Your Gardia R300
Taking good care of your device will reduce the risk of damage to your device.
Device Care
xDo not drop your device or subject it to severe shock.
xDo not expose your device to extreme temperatures and excessive moisture.
xDo not use power and/or data cables that have not been supplied by or received prior
ofcial approval from Bryton.
xDo not put your device in contact with chemical cleaners, solvents, sunscreen, insect
repellents or other dry or liquid chemicals that can damage components and nishes.
xEnsure the USB rubber cover is tightly closed to prevent water exposure and damage to
the USB port.
Cleaning the DeviceCleaning the Device
xThe screen surface can easily be scratched. Do not use a cloth or any material that can
scratch the optical lens on the front of the device. Scratching the optical lens may cause
poor radar performance.
xRemove dirt and debris from the USB rubber cover and surrounding area.
xWhile the USB rubber cover is closed, briey run water over the device to remove dust.
After cleaning, allow the device to dry completely before opening the cover.
xDo not attempt to disassemble, repair, or make any modication to your device. Any
attempt to do so will make the warranty invalid.
Table of contents
Other Bryton Bicycle Accessories manuals

Bryton
Bryton Rider 420 User manual

Bryton
Bryton Aero 60 User manual

Bryton
Bryton Rider User manual

Bryton
Bryton Amis S430 User manual

Bryton
Bryton Rider User manual

Bryton
Bryton Rider 15 User manual

Bryton
Bryton Rider 100 User manual

Bryton
Bryton Rider 860 User manual

Bryton
Bryton Rider 30 User manual

Bryton
Bryton Rider 750 User manual

Bryton
Bryton Rider 50 User manual

Bryton
Bryton Rider 11 User manual

Bryton
Bryton Rider 50 User manual

Bryton
Bryton Rider 50 User manual

Bryton
Bryton Rider 60 User manual

Bryton
Bryton Rider 35 User manual

Bryton
Bryton rider 310 User manual

Bryton
Bryton RIDER 10 User manual

Bryton
Bryton Rider 100 User manual

Bryton
Bryton Rider 20+ User manual