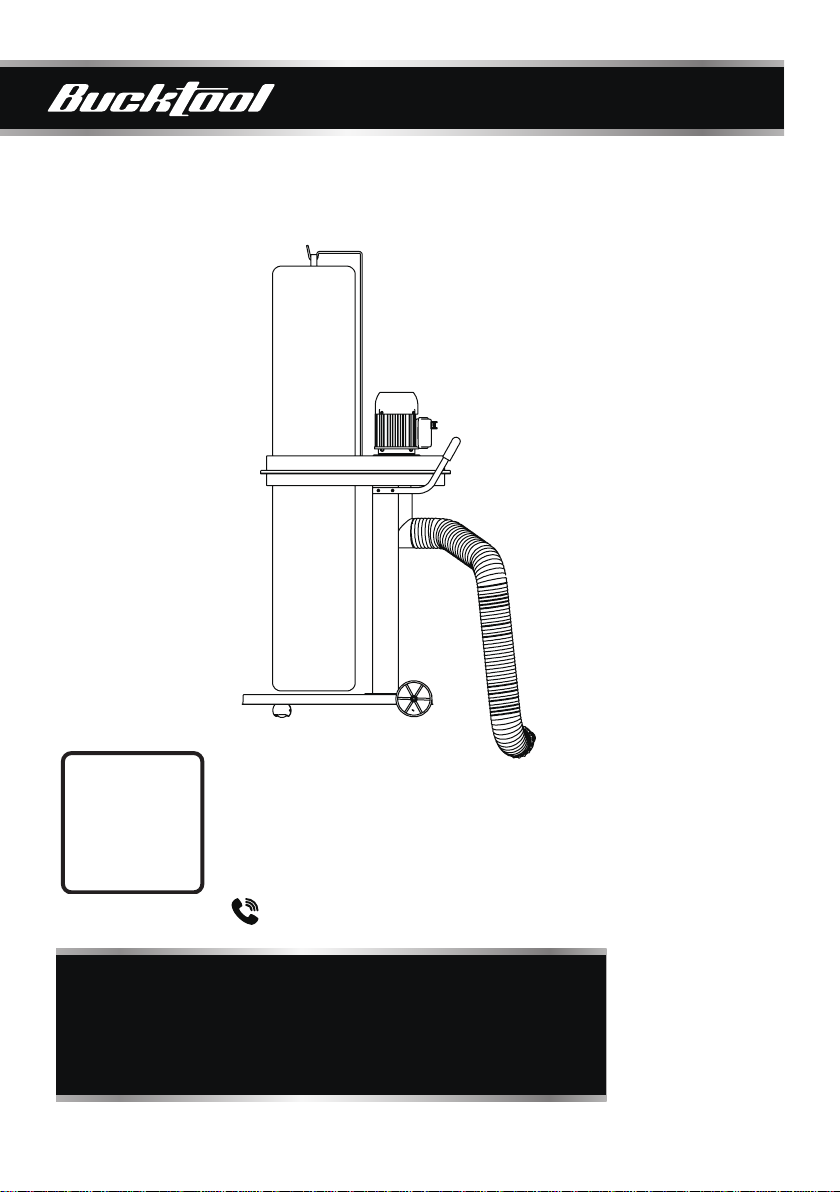
Bucktool DC50 User manual

IMPORTANT:
For your own safety, read and follow all of the Safety Guidelines
and Operating Instructions before operating this product.
DMOVEABLE UST COLLECTOR
Safety guidelines
Specifications
Operating instruction
INSTRUCTION
MANUAL
Buck it , Redefining Efficiency
Contact Us:
email: [email protected]
https://www.bucktool.com
909-255-1088 (8AM-5PM PST)

Safety guidelines 8
Specifications 2
Operating instruction 12
2
Safety guidelines 3
Assembly instructions
10
Troubleshooting 16
Exploded view
17
Parts list
18
Warranty
20
TABLE OF CONTENTS
TABLE OF CONTENTS
SPECIFICATIONS
Motor 115V, 60Hz , 1.2HP
Intake Diameter 4" OD
Specifications 2
The parts list
9
Collection Capacity 36.9 Gallons
Maximum Air Flow 750 CFM
Operating instruction
15
DC50

3
SAFETY GUIDELINES
SAFETY GUIDELINES - DEFINITIONS
DC50
READ AND UNDERSTAND ALL INSTRUCTIONS
Failure to follow all instructions listed in the following pages may result in electric
shock, fire, and/or serious injury.
WORK AREA
1. Keep your work area clean and well lit. Cluttered benches and dark areas
invite accidents.
2. Do not operate power tools in explosive atmospheres, such as in the
presence of flammable liquids, gases, or dust. Power tools create sparks
which may ignite flammables.
3. Keep bystanders, children, and visitors away while operating a power
tool. Distractions can cause you to lose control. Protect others in the
work area from debris such as chips and sparks. Provide barriers or
shields as needed.
ELECTRICAL SAFETYG
1. Grounded tools must be plugged into an outlet properly installed and
grounded in accordance with all codes and ordinances. Never remove
the grounding prong or modify the plug in any way. Do not use any
adapter plugs. Check with a qualified electrician if you are in doubt
as to whether the outlet is properly grounded. If the tools should
electrically malfunction or break down, grounding provides a low resistance
path to carry electricity away from the user.
2. Double insulated tools are equipped with a polarized plug (one blade
is wider than the other). This plug will fit in a polarized outlet only one
way. If the plug does not fit fully in the outlet, reverse the plug. If it
still does not fit, contact a qualified electrician to install a polarized
outlet. Do not change the plug in any way. Double insulation eliminates
the need for the three wire grounded power cord and grounded power
supplysystem.
3. Avoid body contact with grounded surfaces such as pipes, radiators,
ranges, and refrigerators. There is an increased risk of electric shock
if your body is grounded.
4. Do not expose power tools to rain or wet conditions. Water entering
a power tool will increase the risk of electric shock.
5. Do not abuse the Power Cord. Never use the Power Cord to carry the
tools or pull the Plug from an outlet. Keep the Power Cord away from

4DC50
SAFETY GUIDELINES
heat, oil, sharp edges, or moving parts. Replace damaged Power Cords
immediately. Damaged Power Cords increase the risk of electric shock.
6. When operating a power tool out side, use an outdoor extension cord
marked “W-A” or “W”. These extension cords are rated for outdoor use, and
reduce the risk of electric shock.
PERSONAL SAFETY
1. Stay alert. Watch what you are doing, and use common sense when
operating a power tool. Do not use a power tool while tired or under
the influence of drugs, alcohol, or medication.Amoment of inattention
while operating power tools may result in serious personal injury.
2. Dress properly. Do not wear loose clothing or jewelry. Contain long hair.
Keep your hair, clothing, and gloves away from moving parts. Loose clothes,
jewelry, or long hair can be caught in moving parts.
3. Avoid accidental starting. Be sure the Power Switch is off before plugging
in. Carrying power tools with your finger on the Power Switch, or plugging
in power tools with the Power Switch on, invites accidents.
4. Remove adjusting keys or wrenches before turning the power tool on
A wrench or a key that is left attached to a rotating part of the power
tool may result in personal injury.
5. Do not overreach. Keep proper footing and balance at all times. Proper
footing and balance enables better control of the power tool in unexpected
situations.
6. Use safety equipment. Always wear eye protection. Dust mask, nonskid
safety shoes, hard hat, or hearing protection must be used for appropriate
conditions.
SPECIFIC SAFETY RULES
1. WearANSI-approved safety impact eye goggles, hearing protection, and a dust
mask or respirator when operating this product.
2. The Housing contains a high speed Impeller that can amputate fingers, grab
loose clothing and long hair, and propel sawdust at high velocities. NEVER
operate this product without the all guards and screens in place and working
properly.
3. If using this product to help keep 3. airborne sawdust within acceptable limits,

5
DC50
SAFETY GUIDELINES
you must regularly monitor airborne sawdust and maintain the Tool to
avoid exceeding dust limits. Each application is unique, and your maintenance
schedule must be tailored to your specific use.
4. Industrial applications must followOSHA requirements.
5. Use the right tool or attachment for the right job. Do not attempt to force a
small tool or attachment to do the work of a larger industrial tool. There are
certain applications for which this product was designed. It will do the job better
and more safely at the rate for which it was intended. Do not modify this product,
and do not use this product for a purpose for which it was not intended.
6. Turn off the Tool and unplug the Power Cord Plug from its electrical outlet
before changing accessories or performing inspection, maintenance, or
cleaning procedures.
7. People with pacemakers should consult their physician(s) before use.
Electromagnetic fields in close proximity to heart pacemaker could cause
pacemaker interference or pacemaker failure.
8.
This product contains or, when used, produces a chemical known to the State
of California to cause cancer and birth defects or other reproductive harm.
(California Health & Safety Code § 25249.5, et seq.)
9. The warnings, precautions, and instructions discussed in this manual cannot
cover all possible conditions and situations that may occur. The operator must
understand that common sense and caution are factors which cannot be built
into this product, but must be supplied by the operator.
10.Maintain labels and nameplates on the Tool. These carry important information.
If unreadable or missing, contact Harbor Freight Tools for a replacement.
WARNING
!
GROUNDING
TO PREVENT ELECTRIC SHOCK AND DEATH FROM INCORRECT SHOCK
AND DEATH FROM INCORRECT GROUNDING WIRE CONNECTION:
Check with a qualified electrician if you are in doubt as to whether
the outlet is properly grounded. Do not modify the power cord plug
provided with the tool. Never remove the grounding prong from the
plug. Do not use the tool if the power cord or plug is damaged. If

6
SAFETY GUIDELINES
damaged, have it repaired by a service facility before use. If the plug will not fit
the outlet, have a proper outlet installed by a qualified electrician.
GROUNDED TOOLS
TOOLS WITH THREE PRONG PIUGS
3-Prong Plug and Outlet
1. Tools marked with “Grounding Required” have a three wire cord and three
prong grounding plug. The plug must be connected to a properly grounded
outlet. If the tool should electrically malfunction or break down, grounding
provides a low resistance path to carry electricity away from the user, reducing
the risk of electric shock. (See 3-Prong Plug and Outlet.)
2. The grounding prong in the plug is connected through the green wire inside the
cord to the grounding system in the tool. The green wire in the cord must be the
only wire connected to the tool’s groundingsystem and must never be attached
to an electrically “live” terminal. (See 3-Prong Plug and Outlet.)
3. The tool must be plugged into an appropriate outlet, properly installed and
grounded in accordance with all codes and ordinances. The plug and outlet
should look like those in the preceding illustration. (See 3-Prong Plug and Outlet.)
DC50

7
SAFETY GUIDELINES
Extension Cords
1. Grounded tools require a three wire extension cord. Double Insulated tools
can use either a two or three wire extension cord.
2. As the distance from the supply outlet increases, you must use a heavier gauge
extension cord. Using extension cords with inadequately sized wire causes a
serious drop in voltage, resulting in loss of power and possible tool damage.
(See Table A.)
3. The smaller the gauge number of the wire, the greater the capacity of the cord.
For example, a 14 gauge cord can carry a higher current than a 16 gauge cord.
(See Table A.)
4. When using more than one extension cord to make up the total length, make
sure each cord contains at least the minimum wire size required. (See Table A.)
5. If you are using one extension cord for more than one tool, add the nameplate
amperes and use the sum to determine the required minimum cord size. (See
Table A.)
6. Make sure the extension cord is properly wired and in good electrical condition.
Always replace a damaged extension cord or have it repaired by a qualified
electrician before using it.
7. Protect the extension cords from sharp objects, excessive heat, and damp or
wet areas.
RECOMMENDED MINIMUM WIRE
GAUGE FOR EXTENSION CORDS*
(120 VOLT)
NAMEPLATE
AMPERES
(at full load)
EXTENSION CORD
LENGTH
25’
50’
75’
100’
150’
0 – 2.0 18 18 18 18 16
2.1 – 3.4 18 18 18 16 14
3.5 – 5.0 18 18 16 14 12
5.1 – 7.0 18 16 14 12 12
7.1 – 12.0 18 14 12 10 -
12.1 – 16.0 14 12 10 - -
16.1 – 20.0 12 10 - - -
TABLE A * Based on limiting the line
150% of the rated amperes.
DC50

8
TOOL USE AND CARE
1. Use right tool for job. Do not force tool or attachment to do a job for which it was
not designed.
2. Disconnect tool when removing filter or collector bags.
3. Avoid accidental start-up. Make sure that tool switch is in OFF position before
plugging in.
4. Do not force tool. It will work most efficiently at the rate for which it was designed.
5. Leave hands free to operate machine. Protect hands from possible injury.
6. Never leave a tool running unattended. Turn the power off and do not leave tool
until it comes to a complete stop.
7. Do not overreach. Keep proper footing and balance.
8. Never stand on tool. Serious injury could occur if tool is tipped over.
9. Keep hands away from moving parts.
10. Know your tool. Learn the tool’s operation, application and specific limitations.
2.
SAFETY GUIDELINES
DC50

9
THE PARTS LIST
Motor
Handle
Hose
Wheel
Support Leg
Hanger
Filter Bag
Housing
Collector Bag
Base
Caster
DC50

10
MOUNT CASTERS AND WHEELS
NOTE: For additional information regarding the parts mentioned in the
following pages, refer to the Assembly Diagram near the end of
the manual.
Casters are mounted onto the left and right corners of the base over the welded
brackets. To mount casters:
Estimated Assembly Time: 15 - 20 Minutes.
Wheels are mounted onto the two other corners of the base. To mount wheels:
1. Lay the base upside down on a flat surface.
1. Slide shaft through the wheel.
2. Secure shaft to wheel using the fiber hex nut.
3. Slide wheel with shaft through the L-Bracket on the base.
4. Secure wheel assembly to the base by pressing the retaining pin through the
hole on the shaft end.
5. Repeat steps 1 through 4 for mounting other wheel to the opposite side.
2. Mount one caster assembly onto the welded bracket using four washer head
screws.
3. Mount other caster assembly on the opposite side using four washer head
screws.
ASSEMBLY INSTRUCTIONS
Wheel
Caster Assembly
Base
Shaft
DC50

11
ASSEMBLY INSTRUCTIONS
MOUNT SUPPORTS
Supports are mounted onto top of the base. To mount supports:
1. Lay the base on the casters and wheels.
2. Position one support above the base so
that the four holes on the supports are
aligned with four holes on the base.
3. Secure support to base using four hex
washer head bolts.
4. Repeat steps 1 through 3 to mount other
support on the opposite side.
Base
Support
DC50
MOUNT HOUSING ASSEMBLY
Housing assembly is mounted on the supports.
To mount housing assembly:
1. Position housing assembly above the
supports.
2. Slide housing assembly between the
dovetail edges of the supports.
3. Make sure that the housing assembly
is properly seated and the holes on
the front and rear of the supports are
aligned with holes on the housing
assembly.
4. Secure housing assembly to each support
using two hex washer head bolts
from the front and rear.
Housing
Assembly

MOUNT SUPPORTS
12
Handle is attached onto the supports. To attach handle:
1. Slide handle on the housing assembly
so that holes on the handle bar edge
are aligned with the slots on the sides
of the supports.
1. Position the connector so that the
longer arm fits into the housing and
the hose opening faces you.
1. Slide hose clamp onto one end of
hose. Loosen clamp screw if required
to slide hose clamp onto hose.
2. Position the hose clamp wires on the
hose grooves.
3. Slide hose with clamp onto connector.
4. Tighten hose clamp screw to secure
hose with connector.
5. Slide other hose clamp onto the
opposite hose end.
2. Slide connector on the housing.
3. Secure connector to housing using
a washer head screw.
2. Secure handle to supports with two
hex washer head bolts on each side.
MOUNT HANDLE
Connector is attached onto bottom of the housing below the motor. To mount
connector:
MOUNT CONNECTOR
Hose is attached to the connector. To attach hose:
ATTACH HOSE
Handle
Housing
Assembly
Connector
Hose
Hose
Clamp
ASSEMBLY INSTRUCTIONS
DC50

13
A 4” to 21/2” hose adapter is provided. Use adapter if tool has a 21/2” dust port.
To attach adapter to hose:
ATTACH ADAPTER
Hanger is fastened on the top side of housing assembly. To attach hanger:
ATTACH HANGER
4” to
1. Loosen clamp screw on the free end of hose.
1. Gently tighten the hex nut provided
onto the threads on the edge of
hanger.
The filter bag displays the BUCKTOOL logo. The filter bag is hooked onto the
hanger and attached to the housing. To attach filter bag:
ATTACH FILTER (TOP) BAG
1. Hang the filter bag by the loop on
the hanger hook.
2. Slide the bag clamp into the loop on
the bottom of the bag. Keep sliding
the bag clamp until it comes out of
the other side of the loop.
3. Gently lift the clamp handle to release.
4. Slide bag with clamp onto the opening
on the housing top.
5. Secure bag to housing by positioning
the spring connector into one of the
slots on the latch and lock the clamp
handle. Make sure top bag is secure.
2. Slide a flat washer below the hex nut.
3. Position the hanger with hex nut and
washer above the hole on the housing
top.
4. Fasten hanger into the hole. Make
sure hanger is secure.
2. Slide adapter into hose.
3. Tighten clamp screw to secure adapter.
Hanger
Filter Bag
Bag Clamp
ASSEMBLY INSTRUCTIONS
BUCKTOOL
DC50

14
ATTACH COLLECTOR (BOTTOM) BAG
1. Slide bag clamp into bottom bag loop
until it comes out of the other side.
2. Gently lift the clamp handle to release.
3. Slide bag with clamp on to the opening
on the housing bottom.
4. Position the spring connector into
one of the slots on the latch and lock
the clamp handle.
5. Position the spring connector into
one of the slots on the latch and lock
the clamp handle. Make sure collector
bag is secure.
Collector Bag
ASSEMBLY INSTRUCTIONS
DC50

15
OPERATING INSTRUCTIONS
NOTE: For additional information regarding the parts mentioned in the following
pages, refer to the Assembly Diagram near the end of the manual.
1. Turn the Power Switch off. Then, plug the Power Cord Plug into the nearest
120 volt, grounded, electrical outlet.
2. Connect the Dust Collector to a woodworking machine’s dust port using
appropriate dust collection hoses and clamps (sold separately), then turn the
Dust Collector on. After, turn on the machine.
Only attach this dust collector to a woodworking machine.
3. When finished using the Dust Collector turn it off. Unplug the Power Cord
Plug from its electrical outlet. Then store the Dust Collector in a safe, clean
,
dry location out of reach of children and unauthorized users.
WARNING
!
1. Plug in the dust collector.
2. Connect the power cord plug of the woodworking machine into the dust
collector automatic start switch.
3. Turn the linked switch to the “AUTO” position.
4. Turn on the switch of woodworking machine, then the woodworking machine
and the dust collector will start at the same time.
ON / OFF SWITCH
AUTOMATIC START SWITCH
AUTO
DC50

15
TROUBLESHOOTING
16
Problem(s)
P
ossible Cause(s)
S
uggested Solution(s)
Motor will not run
1. Defective plug, cord, switch
or motor
2. Blown fuse or circuit breaker
1. Check wiring, replace defective
parts
2. Check fuse or breaker, replace
1. Check filter and collector bag
connections. Check collector
hose connections
2. Dust trapped under bag clamp or
collector bag not sealed on flange
Excessive dust in air 1. Leaking bag or hose
connection
2. Filter or collector bag leaks
1. Do not vacuum metal materials.
Turn collector off and let debris
settle in collector bag
Excessive impeller
noise 1. Large debris or piece of
wood in impeller housing
2. Disconnect collector from power
source. Remove connector and
tighten impeller
2. Loose impeller
1. Have motor checked by qualified
motor service technician
Excessive motor noise1. Defective motor
1. Remove other electric machines
or appliances from circuit
2. Increase wire gauge size of
extension cords or shorten
extension cords
3. Request voltage check from
power company
Motor fails to develop
full power or motor
stalls
1. Low voltage to collector
caused by circuit overload
1. Check motor, replace if necessary
2. Check switch, replace if necessary
Motor slow to start or
fails to reach full
speed
1. Burned or defective motor
1. Reduce load by slowing dust
production
2. Clean sawdust from motor
Motor overheats
Tripping circuit breaker
or fuses
1. Motor overload
1. Reduce load by slowing dust
production
2. Use proper capacity circuit breaker
or fuse
1. Motor overloaded
2. Improper capacity of circuit
breaker or fuses
2. Improper motor cooling
2. Defective motor capacitor
switch
2. Low voltage to collector
caused by undersized
extension cords
3. Low voltage from power
source
DC50

17
EXPLODED VIEW
DC50

18
PARTS LIST
ITEM DES. SPE. Qty
1 Base Assy 1
2 Caster 2
3 Philips Screw M5x12 9
4 Nut M10 2
5 Wheel 2
6 Shaft 2
7 Retaining Pin Φ12 2
8 Support Leg 2
9 Hex Bolt M8x12 12
10 Clamp 4" 2
11 Hose 4″X60″1
12 Adapter F 1
13 Adapter C 1
14 Adapter G 1
15 Adapter H 1
16 Adapter I 1
17 Connector 1
18 Hex Bolt M6x20 1
19 Spacer 1
20 Spring Washer Φ6 1
21 Impeller 1
22 Sunk Screw M8x32 4
23 Upper Housing 1
24 Philips Screw M5 X 10 16
25 Gasket 1
26 Key 5 X 5mm 1
27 Power Cord Plug 1
28 Strain Relief 1
29 Switch Box 1
30 Motor 1
31 Filter Bag 1
32 Bag Clamp 2
33 Hanger 1
34 Hex Nut M6 1
35 Upper Housing 1
36 Grip 1
37 Cap 2
38 Handle 1
39 Collector Bag 1
40 Spring Washer Φ5 8
41 Cap Nut M5 16
DC50

19
DC50
Brand Concept
Brand Story
Redefining Efficiency -- BUCKTOOL.
Buck It,Redefining Efficiency -- BUCKTOOL
Customer Priority ,High Quality Standard,Impeccable After Sale Service
This is a concept that is at the core of everything we do as a brand and it is what
allowed us to become the brand we are today.
The Customer Priority ,High Quality Standard,Impeccable After Sale Service is a
commitment that starts at the design of our products and ends with our customers
receiving their end product. We possess the capbility to produce expertise but
affordable products, combine this with personalized design and deliver this all with
exclusive products to our customers. This trio is what separates us from other
brand who only provide what we provide at a fraction of the expertise. We are
able to deliver our Customer Priority ,High Quality Standard,Impeccable After Sale
Service through out the entire delivery process of our product lines and this concept
is what drives us every day at BUCKTOOL to be the brand we are.
We’re BUCKTOOL. We’ve been dealing with the manufacturing of power tools for
many years. Our concept focus on Customer Priority ,High Quality Standard,
Impeccable After Sale Service which has allowed us to deliver products with high
quality, excellent customer service and reasonable price to our customers. This
lethal trio is embedded in to the core of our brand and is what allows to be the
unique power tools manufacturer and supplier worldwide. Our business, experience,
and technology is built on a foundation of power tools expertise we’ve built for
decades. Through a combination of years of hard work and experience we’ve been
able to bring you the BUCKTOOL brand you see today. We live for challenges and
strive to make our customers 100% satisfied. What BUCKTOOL does for customers
is special, and we want to share this with you.

19
WARRANTY
20
ONE-YEAR LIMITED WARRANTY
Buck it , Redefining Efficiency
Having Problems ?
Give us a chance to help you before returning this product
https://www.bucktool.com
909-255-1088 (8AM-5PM PST)
Table of contents
Other Bucktool Dust Collector manuals