Bullet tools EZ Shear SST 20 User manual

Applies to Model Numbers: 220
www.BulletTools.com | USA (800) 406-8998 | Int'l (208) 772-0175
PRT-INS-0220Rev.A-7.27.11 ©2011 Bullet Tools
DUST FREE CUTTING FOR SIDING, SIDING TRIM, & MORE!
POUR LES PLANCHERS, LE BARDAGE ET PLUS ENCORE!
PARA COLOCACION DE PISOS, CUBIERTAS DE PARED Y MAS!
INSTRUCTION MANUAL
READ BEFORE USE!
MANUEL D’UTILISATION
LISEZ CECI AVANT D’UTILISER!
MANUAL DE INSTRUCCIONES
¡LEA ESTO ANTES DE USARLO!
“Make the Cut!”
20"

www.BulletTools.com | 800 - 406 - 8998 | 3390 W Hayden Ave, Hayden ID 83835
EZ SHEAR™SST 20
2
Please record your serial number here:
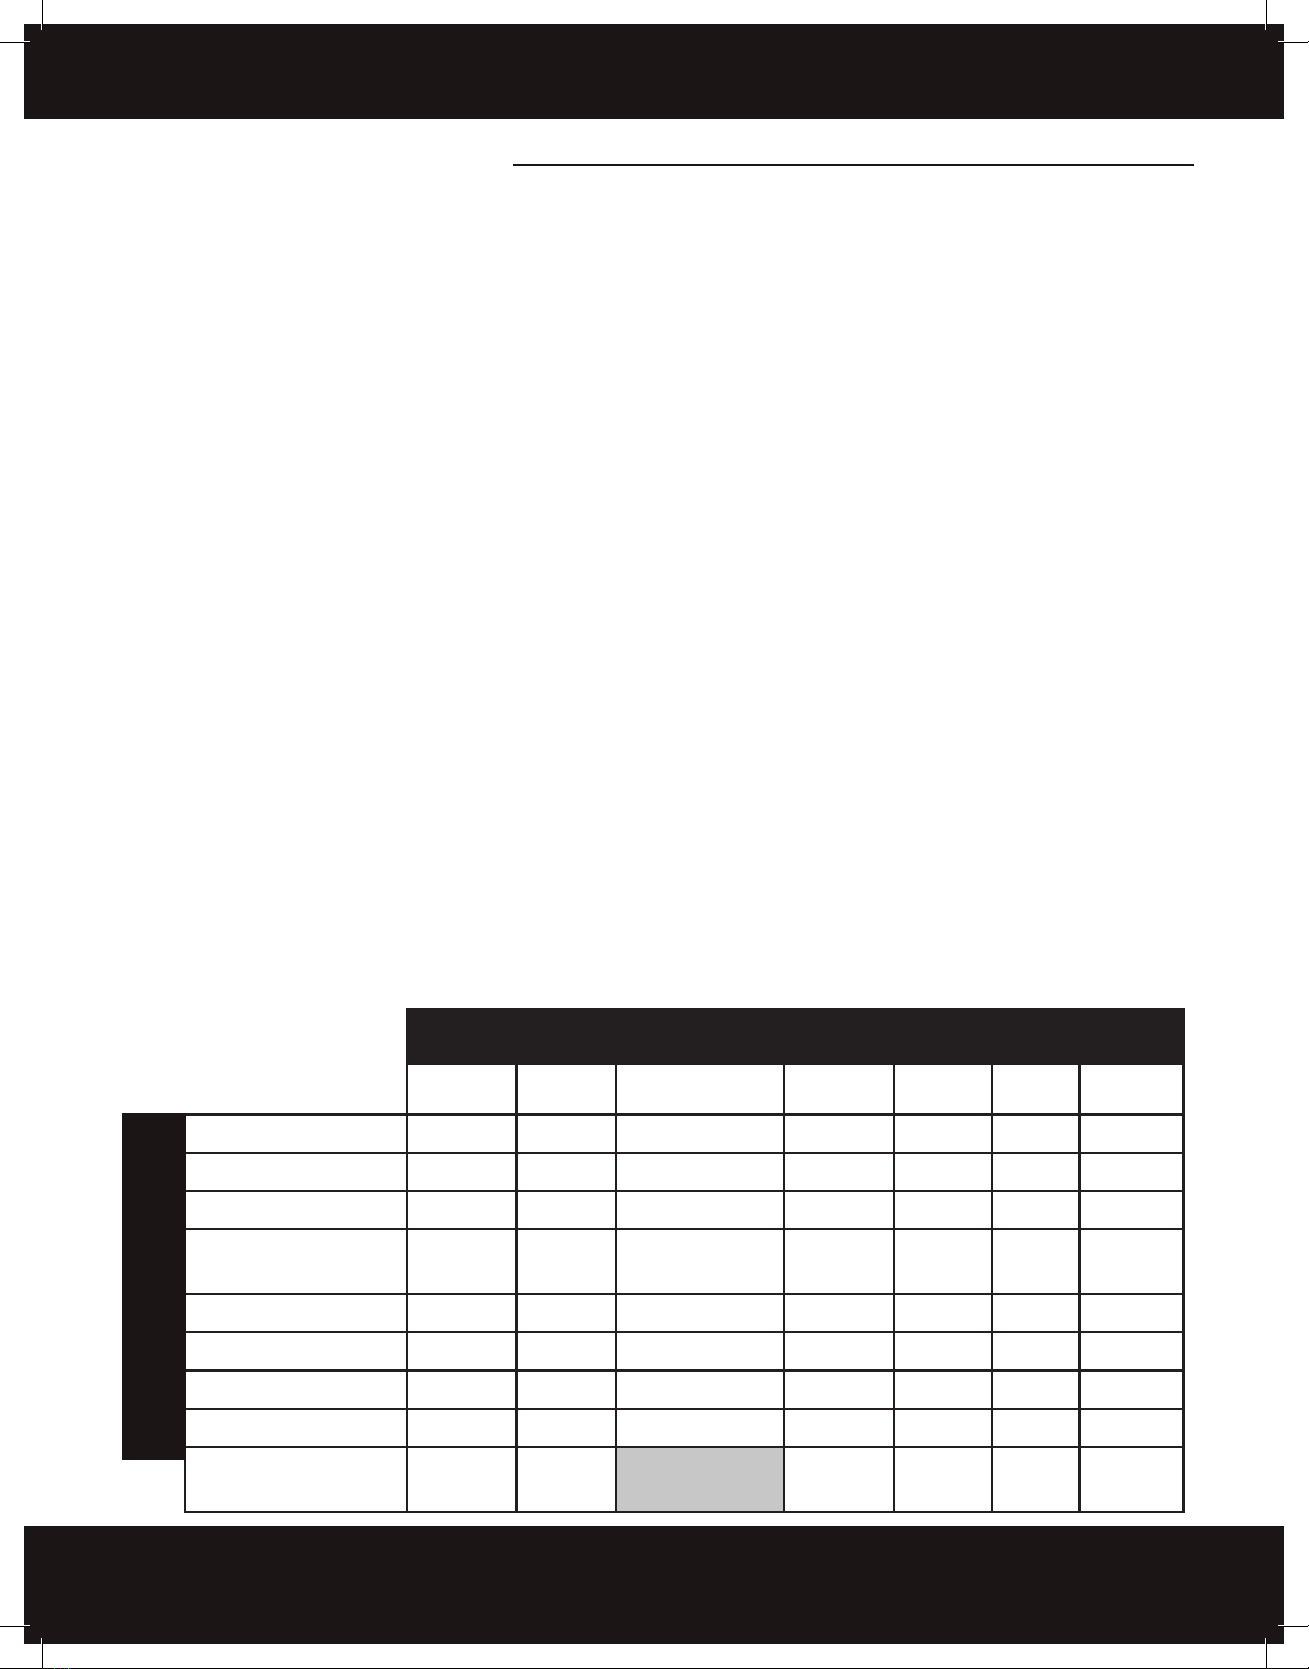
BLADE SIZE
9" 13" 20" 25" 26" 30" 40"
Silver Edition #700B #701B - 3mm
XL-25 701XLB
X Series, E Series #690B #700B #701B #726B
L Series #809B,
#909B
#813B,
#913B
#820B,
#920B
#826B,
#926B
#840B,
#940B
I Series Pro #909B #913B #920B #926B
I Series RCT #520B #930B #940B
MagShear Lite #513B
EZ Shear #109B #113B
EZ Shear SST #209B,
#909B
#213B,
#913B
#220B,
#920B
BLADE COMPATIBILITY CHART
WARRANTY
SERIES
(Located on the under side of the machine)
90 Day Satisfaction Guarantee
Bullet Tools is confident that you will be absolutely pleased with the purchase of our product. If, for any reason, you should
not be completely satisfied with your EZ Shear, we will refund your purchase price at anytime within 90 days of your original
purchase (receipt required). If you want to return your product under our 90-day no risk trial offer (valid only for purchases
made in the US), please contact us at 1-800-406-8998 or 208-772-0175 for return instructions.
Limited Lifetime Warranty
Bullet Tools warrants only to the original purchaser of this product from an authorized reseller or distributor that this prod-
uct will be free from defects in material and workmanship under normal use and service for the lifecycle of the product.
This limited lifetime warranty includes all EZ Shear parts except the blade and cosmetic appearance (chips, dings, scratches)
caused by normal use and wear. This limited warranty does not cover any damage due to accident, misuse, abuse or negli-
gence. Further, it is valid only if the product is used with the cut products specified in the cut guide. Please refer to the User
Guide for details or call Bullet Tools’ technical support. In order to recover under this limited warranty, Purchaser must make
claim to Bullet Tools within 60 days of occurrence, and must present acceptable proof of original ownership (such as original
receipt, warranty card registration, on-line registration, or other documentation Bullet Tools deems acceptable) for the prod-
uct. Bullet Tools, at its option, shall repair or replace the defective unit covered by this warranty. To obtain warranty service,
please contact Bullet Tools at 1-800-406-8998 or 1-208-772-0175 for pre-authorization and further instructions. Except for
the limited Lifetime Warranty provided herein, to the extent permitted by law, Bullet Tools disclaims all warranties, express
or implied, including all warranties of merchantability and/or Fitness for a particular purpose. Additional rights may be avail-
able under the laws of your State or Province. Any and all warranties, written or implied, are void with any alterations to the
product.
Note: Bullet Tools shall not be liable for any special, incidental or consequential damages, including but not limited to lost
revenue, lost profits, rental or replacement equipment, downtime, damage to property and third-party claims, arising out of
any theory of recovery, including warranty, contract, statutory or tort.

3
WARNING Very Sharp Blade
!
PRT-INS-0220Rev.A-7.27.11 ©2011 Bullet Tools
EZ SHEAR™SST 20
WARNING Very Sharp Blade
!
WARNING: FAILURE TO FOLLOW THESE RULES MAY
RESULT IN SERIOUS INJURY! USING THIS MACHINE WITH
RESPECT AND CAUTION WILL CONSIDERABLY LESSEN THE
POSSIBILITY OF PERSONAL INJURY.
SAFETY RULES FOR THE EZ SHEAR SST™
1. ......Read and understand this instruction manual before operating the EZ SST™
2. ......If you are not thoroughly familiar with the operation of the EZ SST , obtain advice
from a qualified instructor or call 800-406-8998 (International: 208-772-0175)
3. ......Stay alert. Do not operate the EZ Shear SST™ while under the influence of drugs, alcohol, or
medication.
4. ......Always wear safety approved eye protection with side shields (ANSI Z87.1).
5. ......Keep work area clean and free of debris.
6. ......Keep children and unauthorized persons away from the EZ SST™ and work area.
7. ......Make sure tool is secure. Operate only on a firm substrate or solid stand.
8. ......Use the right tool. Do not force the EZ SST™ or use it for a job for which it was not
designed; use only on approved materials (see list on p. 10)
9. ......Keep blade sharp. A dull blade will not perform properly.
10. ......Always keep hands away from blade while operating or carrying.
11. ......Do not alter or misuse this tool. The EZ SST™ is precision built; modifications not
specified in this manual may result in a dangerous condition.
12. ......Maintain your EZ SST™ with care. Keep blade sharp and clean. Follow instructions for
lubricating and changing accessories.
13. ......Use only recommended accessories. The use of improper accessories may cause hazards or
injury.
14. ......Never leave your EZ SST™ unattended. Secure the handle with the safety lock
when not in use.
15. ......Warning: The dust generated by cutting certain wood, wood fiber, fiber cement, and/or PVC
products can be injurious to your health (but since our shears don't create any
dust, we suggest that you don't eat the small chips sometimes created when cutting).
16 ......Bullet Tools does not endorse or warrant inferior "knock off" immitations of our designs, using
these may be dangerous, please contact their manufacturer about any defects.

www.BulletTools.com | 800 - 406 - 8998 | 3390 W Hayden Ave, Hayden ID 83835
EZ SHEAR™SST 20
4
1. Power Assembly
2. Handle Assembly
3. Fence
4. Table
5. Tail
6. Rails (2)
7. Instruction Manual
8. Hone Stone
9. Hardware Kit
10. Reinforcement Spacer
11. Mounting Bracket
Item A. (4) 6mm x 60mm PH Phillips Machine Screws
Item B. (4) M6 Star Washers
Item C. (4) 6mm x 25mm PH Phillips Machine Screws
Item D. (3) #10x1.25" PHP Screws
Item E. (4) #10 x 1 PH Phillips Self Tapping Screws
Item F. (4) M8 x 20 SHCS
Item G. (1) M6 Allen Wrench
SET UP
ASSEMBLY
WELCOME! YOUR EZ SHEAR™COMES READY TO ASSEMBLE.*
1. ATTACH RAILS
Attach rails, reinforcement spacer, and mounting
bracket to base using (4) Item A machine screws
fitted with star washers, Item B.
2. ATTACH TAIL
Attach tail and mounting bracket to rails using
(4) Item C machine screws. Make sure holes in
tail are facing up.
*You will need #2 & #3 Phillips head screwdrivers
Please Review and Verify Parts Included in Box:
HARDWARE KIT:
21
A
G
F
F.
E
D
C
B
10.
11.
1.
A.
D.
E.
C.
2.
3.
4.
6.
8.
5.

5
WARNING Very Sharp Blade
!
PRT-INS-0220Rev.A-7.27.11 ©2011 Bullet Tools
EZ SHEAR™SST 20
SET UP
3. ATTACH TABLE
A. Attach table to base starting
with front, start screws with
hand, use 3 Item D self tapping
screws.
B. Attach back of table to tail
using Item E self tapping screws.
4. TO ATTACH HANDLE:
Align handle to preferred position (center
or right) insert screws from handle
assembly, and tighten with hex wrench.
Note: To ensure correct alignment, start
each of the four (4) bolts by hand before
using item G hex wrench
5. PLACE THE FENCE
Your EZ Shear SST 20" is equipped with
an aluminum fence which may be set to
common roof pitches. ( 4/12 6/12 8/12 and
12/12 ) Simply align with desired position and
press pins into place.
Note: The fence is friction fit (requires effort
to insert or remove).
33B
4
5
3A
Handle under pressure - do not allow to slam back!
!
Optional side
location
Center handle
location

www.BulletTools.com | 800 - 406 - 8998 | 3390 W Hayden Ave, Hayden ID 83835
EZ SHEAR™SST 20
6
MAKING CUTS
The EZ Shear™ is operated manually. The two-part handle is grasped by the operator and pushed down
to make a cut. ALWAYS KEEP HANDS / FINGERS AWAY FROM THE BLADE!
CUTTING
1. Unlock safety lock by sliding knob over and down.
2. Insert material. It is recommended that you HOLD MATERIAL IN PLACE until the cut is complete.
3. PUSH HANDLE DOWN TO CUT. Some effort may be required depending on hardness of material.
4. CAUTION: Handle is spring loaded. DO NOT ALLOW HANDLE TO SLAM BACK AFTER MAKING A CUT.
TIP: DOUBLE CUTTING
Most materials (listed on p. 10) shear very well with just one
cut. However, some brands of laminate flooring and other
products may require cutting twice to produce a better cut.
Simply make your first cut 1/8" to 1/4" (3 to 6mm) longer
than your mark, then go back and make your second cut on
your mark. This is very useful to create a cleaner cut when
trim cannot be used to cover your cut end.
USE EXTREME CAUTION! Blade is very sharp.
!
SAFETY LOCK
For maximum security, the safety lock will automatically
reset in the "locked" position unless disengaged. The safety
lock can be disengaged by sliding the knob over and down,
hooking into slot. (Shown Right)
TRANSPORT
It is important to re-engage lock and secure handle in
down position while storing, carrying, or transporting your
EZ Shear™.
Locked
Unlocked
CUSTOM SETTINGS
THE ANVIL
The Anvil has two edges: a 1/32" (0.75mm) narrow edge and a
3/16" (4.5mm) wide edge. Either edge can be used according
to the support needed to make a clean cut. (Some soft-backed
products require the wider anvil edge).
TO CHANGE
BETWEEN EDGES
Simply remove the anvil screws and flip the anvil over. Ensure
blade stop is in place.
TABLE
I-BEAM
ANVIL
BLADE
BLADESTOP
TABLE
I-BEAM
ANVIL
BLADE
BLADESTOP
TABLE
I-BEAM
ANVIL
BLADE
BLADESTOP
TABLE
I-BEAM
ANVIL
BLADE
BLADESTOP

7
WARNING Very Sharp Blade
!
PRT-INS-0220Rev.A-7.27.11 ©2011 Bullet Tools
EZ SHEAR™SST 20
MAINTENANCE
REPLACING BLADE
The blade must be placed with the flat side toward
the table. Only use compatible blades, see blade
compatibility chart on page 2. Any other blade
will not perform properly and may damage your
machine.
WHEN TO HONE
There are three situations when it is very important
to hone the blade (remove burrs) on the flat side of
the blade.
1. After the first 30-100 cuts on a new blade
2. Every 100+ cuts on the job
3. When the blade has been re-sharpened
SHARPENING THE BLADE
The blade can be sharpened to restore a one-side, 21º - 22º knife edge. It is important to note that the
blade must be sharpened only on the beveled side, leaving the flat side flat.
We recommend that power grinding only be done professionally, as the blade must be fluid cooled during this process.
TO HONE
With the blade in the machine, it is quick and
easy to hone; Simply pull the EZ Shear™ handle
down until the blade is just above the blade stop
(approximately 1/8"). Then, lay the wide flat side
of the hone stone against the flat side of the
blade and move hone stone from end to end 2
to 3 times to remove any burrs.
Use Hand Protection! Blade is very sharp!
Note: It is not necessary to remove the small nicks or chips from
the blade edge when sharpening or honing.
!
Flat Side of Blade
Table
Beveled Side
Flat Side
(Table Side)
See blade compatibility chart (Page 2) to identify an
appropriate replacement blade.

www.BulletTools.com | 800 - 406 - 8998 | 3390 W Hayden Ave, Hayden ID 83835
EZ SHEAR™SST 20
8
MAINTENANCE
CHANGING THE BLADE
WARNING
Blade is extremely sharp! Use hand protection when
removing, honing, or sharpening blade!
LUBRICATING THE BEARINGS
Before every job you should clean and re-grease the cam bearing
surface.
THE BLADE STOP (SEE TOP OF PAGE 6)
The blade stop may become worn. Remove anvil, turn blade stop over
for more use. Replacements can be purchased at your dealer. (Page 3)
1. TURN SHEAR UPSIDE DOWN
Tip: put the shear on the edge of a sturdy table.
2. LOOSEN BLADE
Using a Phillips screwdriver, remove the Item D
screws.
3. REMOVE BLADE
Hold blade by each end and carefully lift out
of pocket.
4. INSTALL BLADE
Hold blade by each end and carefully place into the
blade pocket in the head, with the flat side of the
blade facing the table. Be sure that it is firmly seated
and the pocket is clear of debris.
5. TIGHTEN THE BLADE
Using a Phillips screwdriver, replace & tighten the
screws, starting with the center screw.
!1 2
3
4 5
Hold by ends

9
WARNING Very Sharp Blade
!
PRT-INS-0220Rev.A-7.27.11 ©2011 Bullet Tools
EZ SHEAR™SST 20
AVAILABLE ACCESSORIES
HONE STONE #701S
Keep your blade honed for longer use!
EZ SHEAR STAND #709
Provides a sturdy, raised platform for use or display. Mounting
bracket not included.
ANGLE GUIDE KIT #856AG-20
Provides a fixed "stop" point for more accurate repeat/multiple cuts.
Includes 45º Angle Guide with fence upgrade.
ALL ANGLE FENCE #701AF
Sets to any angle from 0 to 90 degrees.
SLICKSHOT #701SL
Dry lubricant for the EZ Shear™.
5
4
3
2
1
1
2
3
4
5

www.BulletTools.com | 800 - 406 - 8998 | 3390 W Hayden Ave, Hayden ID 83835
EZ SHEAR™SST 20
10
CUTTING INFORMATION
APPROVED MATERIALS &
SIZE LIMITATIONS GENERAL INFO
FOR EZ 20 SST™
(Cuts up to 20 inches wide)
Max
Thickness
Material
Siding, Fiber Cement Board 12mm or 1/2"
Siding, Pressboard Lap 18mm or 3/4"
Siding, Vinyl 25mm or 1"
Siding, Wood 25mm or 1"
Trim, OSB 25mm or 1"
Trim, Fiber Cement 25mm or 1"
Trim, Vinyl 25mm or 1"
Shingles, Tar or Wood 12mm or 1/2"
Commercial Vinyl 24mm or 1"
Cork 24mm or 1"
Durastone™ 6mm or 1/4"
Laminate Flooring 15mm or 5/8"
Leather 25mm or 1"
Luxury Vinyl Tile 25mm or 1"
Parquet 12mm or 1/2"
Permastone™ 6mm or 1/4"
PVC Tile 25mm or 1"
Recycled Tire Tile 25mm or 1"
Rubber Cove Base 12mm or 1/2"
Rubber Tile 25mm or 1"
Soft Plastic 25mm or 1"
Tirex™ & Rope Cord 25mm or 1"
Please note: Approved materials may vary in density
and hardness. If extreme pressure is required to
cut a product please contact Bullet Tools™ before
proceeding to avoid damaging your machine.
Warranty is void if an unapproved product damages
the machine.
WHEN TO HONE
There are three situations when it is very important
to hone the blade (remove burrs) on the flat side of
the blade.
1. After the first 30-100 cuts on a new blade
2. Every 100+ cuts on the job
3. When the blade has been re-sharpened
TO HONE
With the blade in the machine, it is quick and easy to
hone; Simply pull the EZ Shear™ handle down until
the blade is just above theblade stop (approximately
1/8"). Then, lay the wide flat side of the hone stone
against the flat side of the blade and move hone
stone from end to end 2 to 3 times to remove any
burrs.
TIP: DOUBLE CUTTING
Most materials (listed on p. 10) shear very well with
just one cut. However, some brands of laminate
flooring and other products may require cutting
twice to produce a better cut.
Simply make your first cut 1/8" to 1/4" (3 to 6mm)
longer than your mark, then go back and make your
second cut on your mark. This is very useful to create
a cleaner cut when trim cannot be used to cover your
cut end.

www.BulletTools.com | 800 - 406 - 8998 | 3390 W Hayden Ave, Hayden ID 83835
1. Power Assembly
2. Handle Assembly
3. Fence & Angle Guide
4. Table
5. Tail
6. Rails (4)
7. Mounting Brackets (4)
8. Back Stroke Stop
9. Hone Stone
10. Hardware Kit
Item A. (8) 6mm x 60mm PH Phillips Machine Screws
Item B. (8) M6 Star Washers
Item C. (8) 6mm x 25mm PH Phillips Machine Screws
Item D. (6) M6 x 16mm FH Phillips Machine Screws
Item E. (4) #10 x 1 FH Phillips Self Tapping Screws
Item F. (2) M8 x 50mm SHCS
Item G. (1) M6 Allen Wrench
SET UP
Addendum for SST26
WELCOME! YOUR SST 26 COMES READY TO ASSEMBLE.*
*You will need #2 & #3 Phillips head screwdrivers
Please Review and Verify Parts Included in Box:
HARDWARE KIT:
HARDWARE KIT
ASSEMBLY
1. ATTACH RAILS
Attach rails and mounting bracket to base using
(8) Item A machine screws, tted with (8) Item B
star washers.
2. ATTACH TAIL
Attach tail and mounting bracket to rails using
(8) Item C machine screws. Make sure holes in tail
are facing up.
21
A.
C.
D.
E.
F.
B. G.
F.
6.
1.
A.
7.
8.
7.
D.
E.
C.
2.
3.
4.
9.
5.

WARNING Very Sharp Blade
!
SET UP
3. ATTACH TABLE
A. Attach front of table to base,
using (6) Item D screws. Tighten
with #2 Phillips.
B. Attach back of table to tail
using (4) Item E self tapping
screws. Tighten with #2 Phillips.
4. TO ATTACH HANDLE:
Insert (2) Item F screws through back stroke
stop, and tighten with Item G hex wrench.
Note: To ensure correct alignment, start each
of the bolts by hand before using Item G hex
wrench.
5. ATTACH FENCE
Slide xed clamp into the front quick alignment
notch.
For 90° cuts, slide loose clamp into rear
alignment notch and tighten star knob.
For angle cuts:
1) Align edge of fence with the desired angle
guide mark in center of table.
2) Slide loose clamp to edge of table and tighten
star knob.
33B
4
5
3A
Handle under pressure - do not allow to slam back!
!
Item E
Item D
Item F
Tail
6. REPLACING THE BLADE
Follow the directions on Page 9 of the manual, using a 226B replacement blade.
MAINTENANCE
The SST 226 has the same maintenance requirements as the SST 220. See Manual.
PRT-INS-M226 Rev.A-11.12 ©2012 Bullet Tools
Table of contents
Other Bullet tools Cutter manuals

Bullet tools
Bullet tools Paladin MS93-1009 User manual

Bullet tools
Bullet tools EZ Shear SST220 User manual

Bullet tools
Bullet tools CenterFire Shut-n-Cut User manual

Bullet tools
Bullet tools SHUT-N-CUT User manual

Bullet tools
Bullet tools EZ Shear 220 User manual

Bullet tools
Bullet tools MAGNUM EDGE MS60-1613 User manual

Bullet tools
Bullet tools 113-FLR User manual
Popular Cutter manuals by other brands

HSS Hire
HSS Hire 733 Operating & safety guide

Huskie Tools
Huskie Tools SL-MKS720 Operator's manual

Dremel
Dremel DIGILAB LC40 Operating/safety instructions

Hilti
Hilti DCH 230 operating instructions

Dexter Laundry
Dexter Laundry 800ETC1-20035.1 instruction manual

Logan
Logan simplex plus 760 Instruction and operation manual