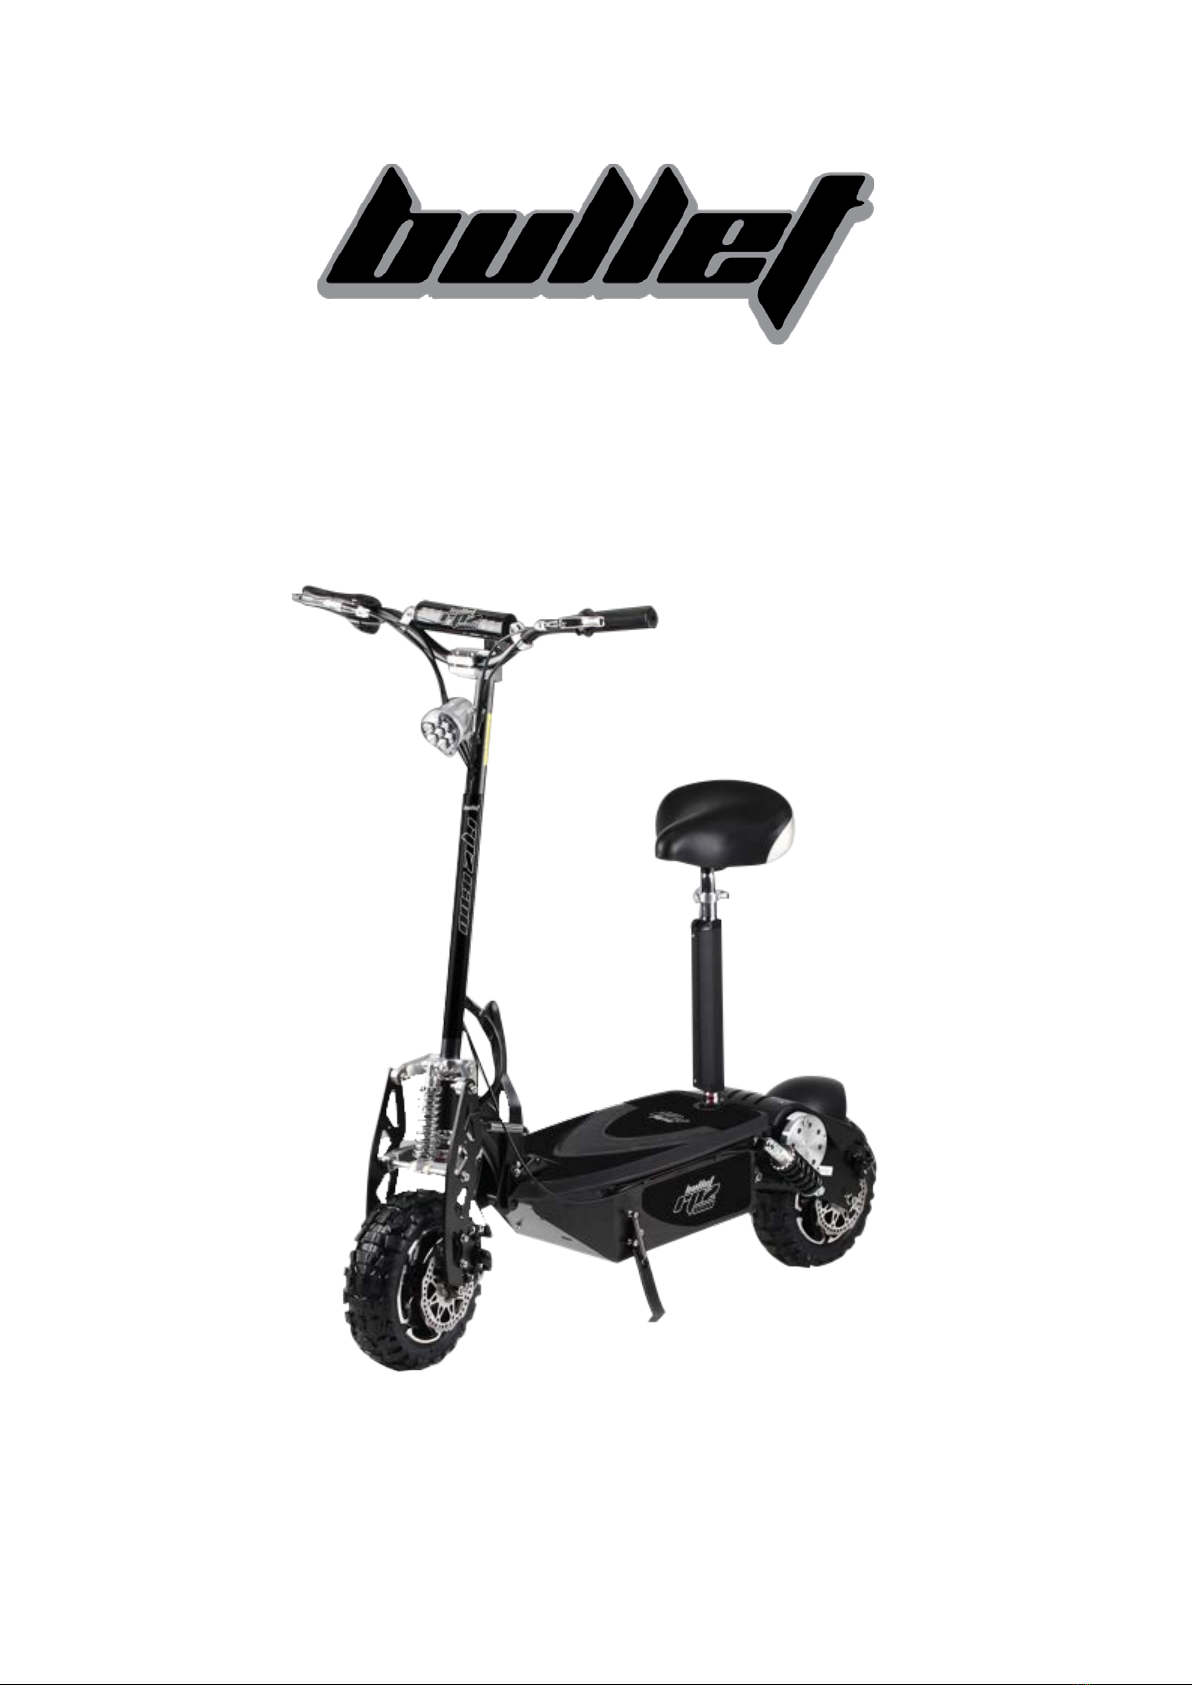
Bullet RPZ1600 User manual

1600W SCOOTER
OWNER’S MANUAL

TABLE OF CONTENTS
TABLE OF CONTENTS……………………………………………………………2
IMPORTANT INFORMATION…………………………………………………..3-4
QUICK REFERENCE………………………………………………………………5
GETTING TO KNOW YOUR SCOOTER………………………………………….6
PACKAGE CONTENTS…………………………………………………………….7
GETTING STARTED………………………………………………………………..7
ASSEMBLY…………………………………………………………………….7-8
FUSE INSTALLATION…………………………………………………………..8
SEAT&SEAT POST INSTALLATION……………………………………………8
CHARGING……………………………………………………………………….9
RIDING/BRAKING……………………………………………………………….9
FOLDING AND STORAGE…………………………………………………………10
BRAKING SYSTEM………………………………………………………………...10
ADJUSTING BRAKES……………………………………………………………...10
TIRE PRESSURE……………………………………………………………………11
MAINTENACE……………………………………………………………………...12
RECOMMENDED TOOLS.....................................................................................12
ADJUSTING THE HEAD UNIT............................................................................12
ADJUSTING THE CHAIN……………………………………………………12-13
MAINTENANCE SCHEDULE……………………………………………………...13
TROUBLESHOOTING GUIDE……………………………………………………..14
OTHER QUESTIONS………………………………………………………………14
CIRCUIT DIAGRAM………………………………………………………………..15
TECHNICAL PARAMETER………………………………………………………...16

PLEASE BE SAFE WHEN RIDING
ALWAYS WEAR A HELMET AND OBEY ALL LAWS!
BATTERY MAINTENANCE and CHARGING
INSTRUCTIONS
1. You MUST charge completely prior to initial use. (Follow charging
instructions in your Product Handbook)
2. Charge immediately after each use.
3. Charge before storage. You must charge every 30 days if not in use.
4. Charge the unit for 6-8 hours or until the light on the charger turns
red& green.
5. DO NOT allows this unit to deep discharge the battery.
6. For safety purposes, DO NOT charge for over 24 hours.
7. Turn the unit OFF when not in use.
8. In the use of electric skateboards car should check handlebar, saddles,
saddle tube and wheel fastener whether tighten, folding institutions
locking structure whether lock, should pay attention to the safety of
saddle tube; Should check whether the brake effectively
Failure to follow these INSTRUCTIONS will
VOID YOUR WARRANTY!
IMPORTANT

This PRODUCT IS NOT INTENDED FOR EXTREME OFF-ROAD Use!
Please take care of your Bullet 1000w!
DO NOT JUMP orABUSE THISPRODUCT!
DO NOT RIDE IN WET/ICY CONDITIONS!
Failure to follow these instructions will
VOID YOUR WARRANTY!

WARNING
This product does not conform to Federal Motor Vehicle Standards and is not
intended for operation on public streets, roads or highways. Serious injury can result
from the unsafe operations of this product. Operator can minimize these risks by
using certain safety equipment such as: safety helmet, goggles, gloves, elbow and
kneepads and appropriate footwear.
DO NOT operate in traffic, on wet, frozen, oily or unpaved surfaces or under the
influence of drugs and/or alcohol. Avoid uneven surfaces, potholes, surface cracks
and obstacles.
DO NOT use a water hose to clean this product. See Product Handbook for more
information.
This product is recommended for riders 13 YEARS OF AGE and older.
SAFETY
Persons without excellent vision, balance, coordination, reflex, muscle and bone
strength and good decision-making capabilities should not use this product.
Minors without adult supervision should not use this product.
Persons unwilling or unable to take responsibility for their own actions should
not use this product.
The user of this product assumes ALL risks associated with its associated with its
use. To minimize these RISKS, the user must wear safety helmet, goggles, gloves,
elbow and kneepads and appropriate footwear.
This product is ELECTRIC! DO NOT ride this product in wet conditions, puddles or
rainy weather.
IMPORTANT
PLEASE AND THIS BEFORE USING THIS PRODUCT
READ THIS FIRST!

SAFETY GUIDE
The recommended minimum age for riding this scooter is 13 years old.
To avoid damage to the motor and footplate, do not overload the scooter.
Never ride with more than one person.
Inspect your scooter thoroughly before each use for loose or missing parts.
Avoid unintentional starts by turning the scooter off while not in use.
To avoid the risk of a short circuit in the electrical parts, do not use your Electric
scooter in the rain and never spray or wash off your scooter with water.
Do not place the battery near fire or heat.
To avoid damage to the battery, do not use the charger if it has been damaged in any
way.
Keep hands, face, feet and hair away from all moving parts.
Do not touch the motor or wheels while they are rotating.
Brakes are designed to control speed as well as stop the scooter. Practice braking for
proper slowing down and smooth stops.
Maintain your SCOOTER as recommended in this Product Handbook.
Use only quality replacement parts as recommended by the manufacturer.
Inspect the entire scooter prior to each use. Replace any part that is cracked, chipped
or damaged before use.
*NEVER ALLOW CHILDREN TO OPERATE THE SCOOTER WITHOUT ADULT
SUPERVISION.
*NEVER ATTEMPT TO OPERATE THE SCOOTER WHILE UNDER THE INFLUENCE OF
ALCOHOL.
If a situation arises that is not covered in the manual,
Proceed with caution and use good judgment.
Contact your dealer
If you need further assistance
QUICK REFERENCE
SAFETY GUIDE

GETTING TO KNOW YOUR SCOOTER
(Photo’s may vary)
Optional Seat
Kit Included
Powerful 800
Wait Motor
Front & Rear
Hand Brakes
Variable speed
throttle
Front Shocks
Front Disc Brakes
10”Aluminum Wheels
Lock and Fold
Design for easy Storage
Rear Brakes
Rear Shock

PACKAGE CONTENTS
Your Scooter comes with following items in the box. Please locate all of the following:
1. Scooter
2. 36V Battery Charger
3. Tool Kit User Manual and 25 amp Fuses
4. Seat
5. Seat Post & Clamp
Getting started
Please read and understand these instructions and the OPERATING PRO
CEDURES section, prior to starting or riding your BULLET 1600W
Assembly
1.
Carefully remove the scooter
form the box. Then install the
wheels please.
2. To unfold the scooter,
begin by pressing down on
the FOLDING HSNDLE
with one hand while gently
3. Fully extend the handlebars
to their upright position until
you feel the mechanism lock
into place
4. Attach the handlebars by inserting the
silver handlebar clamp onto the handlebar
post stopping just below the top. Be sure
to orient the bars in the correct riding
position with the throttle on the rider’s
right side. Secure the handlebars to the
post by tightening the bolts on the clamp
with the enclosed Allen wrench as shown.

Assembly-Continued:
5. Secure the hand brakes in place by
using the provided Allen Wrench to first
loosen the tension bolts.
Adjust the
levers to a comf
ortable position and
tighten the bolts.*BE CAREFUL NOT
TO PULL ON THE CABLES!
6. Insert the 25 amp fuse by
opening the footplate cover as
shown. Insert the fuse into the
fuse hol
der then close the
footplate cover.
7. Attach the seat post to the seat
post receiver, and then attach the
clamp to the top of the seat post.
P
ull the upper seat post to the
desired position and tighten the
clamp securely.
8. Attach the seat to the upper
seat post and tighten the seat
bolts as shown.

CHARGING
Your scooter comes charged out of the carton. We still recommend charging the unit
for 6-8 hours prior to its first use. We also recommend charging your scooter after
each use and prior to storage.
Warning: Do not allow scooter to go into deep discharge, as this will damage the
batteries.
RIDING
1. Make sure that all of the exposed bolts and screws are tightened.
2. Raise the kickstand to its upright position.
3. Push the on/off switch (located on the handlebar) to the ON position.
1. Make sure unit is turned off.
2. Open the charging socket
cover located on the right
side of the scooter frame,
under the footplate.
3. Locate your Battery Charger.
Find the charger socket and plug it into the
scooter.
4. Next, plug theAC into a wall outlet
When first plugged in the charger has one red light
that will illuminate at the same time, indicating that
the charging process has started. Once the light on the
charger turns red &green, you may remove the
charger and close the safety cap.

4. Put one foot on the deck of the BULLET 1000W while pushing off with the other foot, gently
rotate the THROTTLE GRIP. On the right side of the handlebars. The BULLET 1000W will begin
to move on its own power.
**Your scooter has a variable speed hand throttle. You can control the speed of your scooter by
the amount of pressure you use when rotating the hand throttle. The more you rotate, the faster
you will go.
STOPPING&BRAKING
1. To brake, release the THROTTLE GRIP and depress the BRAKE LEVERS (on the left/right side of
the handlebars.) Depressing the brake will disengage power to the motor. When the unit
feels like it is losing power or losing power or not accelerating to full speed, the scooter is
ready to be re-charged.
NOTE: If the on/off switch is left in the ON position for more than 10-15 minutes without moving,
Smart Power will shut itself OFF. To reset, turn the unit OFF, wait a few seconds and then switch it
back ON again.
FOLDING&TORAGE
BRAKING SYSTEM
The scooter uses a pinch braking system for the front, and a disc/caliper system for the rear. They
are both activated by a hand brake lever on the left and right side of the handlebar. Squeezing
the hand brake lever with your left hand actives the rear brake. Squeezing the hand brake
lever with your right hand actives the front brakes. Your BULLET 1000W is equipped with
switches on each brake lever that will disengage power to the motor when motor when the
brake levers are depressed.
Practice braking on a smooth, dry surface to get used to the feel of the braking system. Braking
distance is affected by wet conditions and loose and uneven riding surfaces.
Adjusting the Brakes
The Brakes on the scooter should come fully adjusted form the factory.
However, it may be necessary to adjust the brakes from time to time.
To adjust the rear brakes:
For brakes that are adjusted too loose:
1.Adjust the tension screw on the right hand brake lever by rotating it counter-clockwise until the
When you are done riding the scooter you can fold it
down for compact storage and transportation. First
remove the seat post and seat, then using one
hand, push down on the folding handle while gently
pushing down on the handlebars. BE CAREFUL
NOT TO HIT YOUR HEAD WITH THE
HANDLEBAR, SET YOURSELF AT THE RIGHT
SIDE IS NECESSARY. Push down until you feel the
mechanism lock into the down position.

wheel spins freely.
For brakes that are adjusted too tight:
2.Tighten the tension screw on the right hand brake lever by rotating it clockwise until the wheel
has a slight drag.
To adjust the front brakes:
.
For brakes that are adjusted too loose:
3. Adjust the tension screw on the left hand
Brake lever by rotating it counter-clockwise until
the wheel spins freely
For brakes that are adjusted too tight:
4. Tighten the tension screw on the left hand b
rake lever by rotating it clockwise until the wh
eel has a slight drag.
For further front break Adjustment
5.Locate the adjustment screw on the fr
ont brake assembly (located above the f
ront wheel).Tighten or loosen as necess
ary.
For further Rear Brake Adjustment
6.Locate the adjustment. Screw on the rear brak
e assembly (Located on the left side of the bac
k wheel.)Tighten or loosen as necessary.

SQUEAKY BRAKES
The brakes may squeak before they are broken in. This is normal and will not affect the
function or performance of the brakes. With continued use the squeak should go away.
TIRE PRESSURE
The tire must be inflated to a maximum of 50.P.S.I.It is also recommended to use a tub
e additive like Slime, available from any motorcycle shop, to avoid inconvenient puncture
s.
Empty all air from the tire, prior to loosening the bolt to split the rim.
MAINTENANCE
RECOMMENDED TOOLS
To adjust and service the scooter you will need the following tools:
Allen Wrenches:3/4/5/6 mm
Wrenches:10/13/13 mm Open end wrench
Large Adjustable Crescent Wrench
Philips Head Screwdrivers
Oil, Grease or Lubricant
ADJUSTING THE HEAD UNIT
The head unit will come adjusted from the factory. However, riding on rough terrain and
general use may cause the head unit to become loose over time. It may be necessary
to adjust the head unit from time to time.
ADJUSTING THE CHAIN
The chain will come adjusted from the factory. However, it may be necessary to adjust t
he chain from time to time. The chain must be well aligned onto the sprockets in order
to avoid uneven wear. This will result in shortened chain life.
How tight should the chain be?
If the chain is skipping or jumping on the sprockets, this is too loose and may be
To adjust the head unit:
1.Rotate the handle bar as far right as it will go
to expose the HEAD UNIT(see fig left)
2.Using a large adjustable wrench, gently turn the
BEARING LOCK clockwise to tighten. “DO N
OT OVER TIGHTEN OR IT WILL DAMAGE T
HE BEARINGS"

harmful.
If the chain is making a humming sound when the wheel is turning, this is too ti
ght and may cause the chain to snap.
The correct tension is achieved by adjusting the chain from its loose position to w
hen it becomes lightly tense.
MAINTENANCE SCHEDULE
Proper care of your scooter will insure optimal performance and longer life span. The fol
lowing are a few maintenance suggestions that will keep your scooter running in top co
ndition:
Daily Maintenance
Perform each time your ride your scooter
Clean the exterior of the unit with a soft, damp rag.(DO NOT WASH
WITH A HOSE)
Check that all nuts and bolts are securely tightened.
Lubricate the chain with any silicone spray, 3&1 oil or any good clean
motor oil.
Check battery charger for any frayed/cut wires.
Check whether the power cord before moving motor shave fall off hid
den trouble, motor gear is worn, if there are any loose bolts and oth
er bad problems.
Check if there’s any loose controller shell, each connectors if there’s a
ny loose fall off and other bad phenomenon.
TROUBLESHOOTING GUIDE
SYMPYTONS POTENTIAL CAUSE SOLUTION
The charger light turns gree
n & red right away
1. This indicates the batteri
es are adequately charged.
2.Bad Fuse or open connect
ion between charger socket
and batteries
1. Continue to charge the b
atteries for 6-8 hours prior
to initial use.
2. Check Fuse Look for loos
e or disconnected wire.
Batteries do not hold a cha 1. Batteries have reached th 1.Replace Batteries
To tighten the chains:
Slightly loosen the two axle bolls on the both
sides of the rear wheel. Then slowly adjust the
two adjusting screws on each side of the rear
tire until chain reaches the proper tension
Rotate the rear wheel to make sure the chain i
s aligned.
Finally lock and tighten the rear axle bolts prio
r to riding

rge. Unit does not have spe
cified travel range.
e end of their useful life.
2.charge is malfunctioning
2.Replace Charger Unit
Unit moves intermittently or
very slow.
1. Batteries not fully charge
d.
2. Loose Wire.
3. Bad Throttle or controlle
r.
1. Charge or replace batteri
es.
2.Check for loose wires
3.Replace
Unit will not move when th
rottle lever is activated.
1. Batteries not fully charge
d.
2.Brake switches out of adju
stment
3.Batteries have reached the
end of their useful life
1. Replace batteries or char
ger.
2.Loosen brakes
3. Replace batteries.
Unit stops abruptly during u
se.
1.Fuse Blown
2. Loose or broken wire.
1.Replace Fuse
2. Check for loose or broke
n wires and repair/replace.
Thank you for purchasing and please tell your friends how much fun you’re having on the scooter
Circuit diagram

Electric mini quad
Technical parameter
1. product size: 120X650X1085mm
2. CTN/size:
3. Electrical motor:
1090X325X445mm
Continuous 1000W (1600W Peak)
4. Maximum Speed: 50km/h
5. Weight capacity:
6. Charging time:
120kg
8-10h
7. Wheel distance:
8. Wheel material:
9. Input voltage of charger:
950mm
pneaumatic rubber tyre
110v-220v
10.Battery capacity: 12AH/48V
11.Net weight:
12.Gross weight:
45kg
48kg


Some experts believe the incorrect or prolonged use of almost any
product could causeserious injury or death. For information that
may reduce your risk of serious injury or death consult thepoints
below and additionally, the information available at
www.datastreamserver.com/safety
- Consult all documentation, packaging and
product labelling be fore use. Note that some
products feature online documentation which
should be printed and kept with the product.
- Check product for loose / broken / damaged /
missing parts, wear or leaks (if applicable) be fore
each use. Never use a product with loose / broken
/ damaged / missing parts, wear or leaks (if
applicable).
- Products must be inspected and serviced (if
applicable) by a qualified specialist every 6
months assuming average residential use by a
person of average weight and strength, ab ove
average technical aptitud e, on a property
matching average metropolitan specification.
Intended use outside these guidelines could
indicate the product is not suitable for intended
use or may require more regular inspection or
servicing.
- Ensure all possible users of the p roduct have
completed an industry recognised training course
before being given access to the product.
- The product has been supplied by a general merchandise
retailer that may not be familiar with your specific applic ation or
your description of the application. Be sure to attain third party
approval for your application from a qualified specialist before use
regardless of prior assurances by the retailer or its representatives.
- This product is not intended for use where fail-safe operation is
required. As with any product (take an au tomobile, aircraft,
computer or ball point pen for example) there is always a small
chance of a technical issue that needs to be repaired or may
require replacement of the product or a part. If the possibility of
such failure and the associated time it takes to rectify could in any
situation inconvenience the user, business or employee or could
financially affect the user, business or employee then the product
is not suitable for your requirements. This p roduct is not for use
where incorrect operation or a failure of any kind, including but
not limited to a condition requiring product return, replacement,
service by a technician or replacement of parts could cause a
financial loss, loss of employee time or an in convenience
requiring compensation.
- If this item has been purchased in error considering the points
above simply contact the retailer directly for details of their
returns policies if required.
Table of contents
Other Bullet Scooter manuals