Burmester BC350 User manual

OWNER’S MANUAL
350

T
A D ....................................................
A T O I ...................................
I .........................................
S .....................................................
T ......................................
A ( ) ..................................
A .................................................
T .........................................
C ( )............................
Connection cable .................................................................15
Mounting the connection bridges ...................................................16
Dismounting the connection bridges ................................................16
Correct polarity ...................................................................17
The classic connection .............................................................17
Bi-amping........................................................................18
O ..............................................
Optimising the sound - Pure / Live mode .............................................20
Changing the modes (skilled workers) ...............................................21
Ambience tweeter (skilled workers)..................................................22
S, .....................................
D............................................................
G ..........................................................
T ....................................................
T ......................................................

About this Device
BC 350 5
A D
The BC350 loudspeakers are capable of reproducing music in two different tunings.
Switching between the discrete crossovers, which are consistently constructed
separately, allows the listener to choose between the highest attention to detail in Pure
Mode and maximum level readiness when the stage is raised in Live Mode. It thus
offers the opportunity, without compromise, to reproduce different focal points of the
sound image depending on the music genre or listening situation.
The elaborately designed switchover is designed for minimum contact resistance and
extreme current power handling. Two 32 cm basses, which are extremely portable,
provide powerful bass, perfectly matched to the bass reflex cabinet, with one bass
reflex tube each, two 22 cm mid-range drivers with light glass fibre papyrus cones for
superior sound purity and two AMT tweeters (Air Motion Transformers) with folded foil
cones for a natural-looking nuanced shine in the overtone range. A large AMT sends its
sound directly to the listeners, while a smaller AMT is directed upwards in order to
promote the wide-ranging nature of the music reproduction with indirect sound, if
desired, in Live Mode.
Due to its high weight, the loudspeakers have been designed as stationary
loudspeakers and may therefore only be moved and connected by qualified personnel.
It is exclusively suitable for stationary operation.
The Highlights:
• High efficiency chassis for impressive dynamics and lowest distortion values.
• All chassis and crossovers are selected to match each other.
• Pure Mode for a pure high-end music experience.
• Live Mode for a fascinatingly vibrant sound experience.
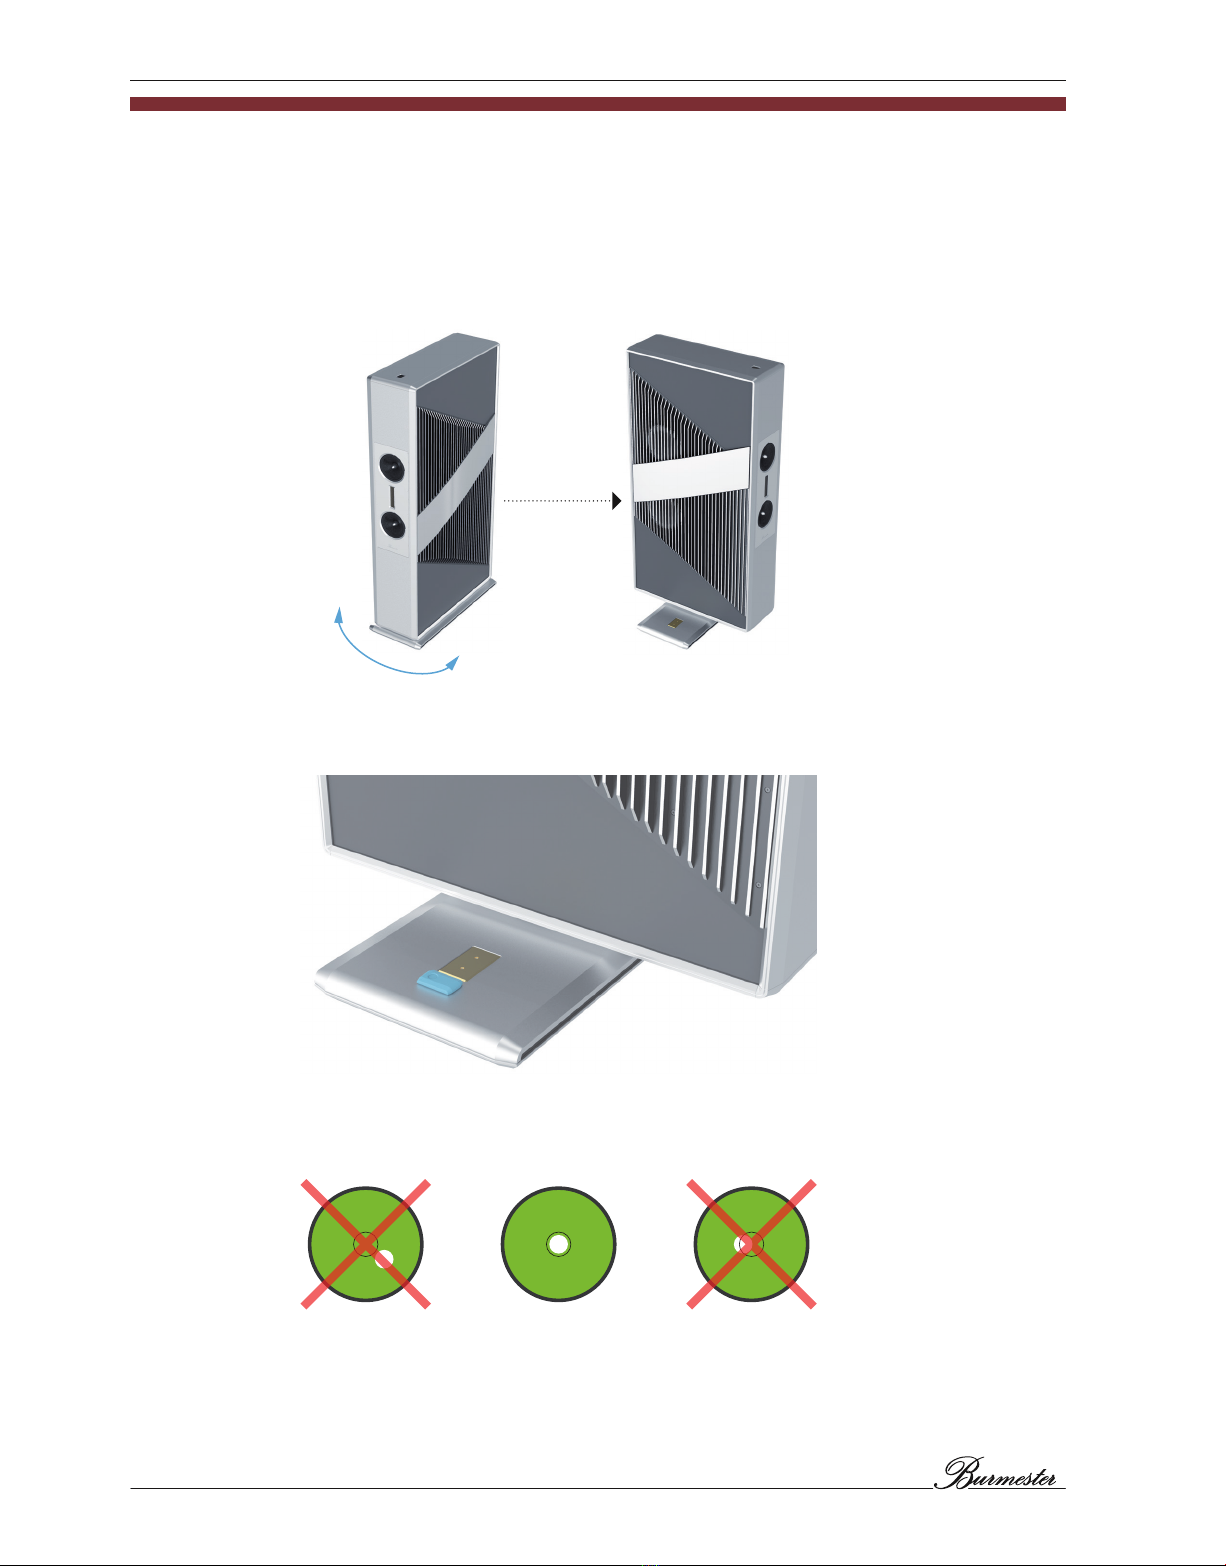
• The body of the loudspeakers can be swivelled so that it can be adapted to your
listening habits without having to be repositioned.
• Each chassis and crossover has a single cabinet to avoid mutual interference.
Dear Music Enthusiast,
congratulations on your selection and thank you for your trust.
You have chosen a product that combines absolute fidelity and uncompromising
quality with technological innovation and maximum flexibility.
Please read through these operating instructions at least once before initially installing
the product so you can fully benefit from all the functions of this truly high-fidelity
device. Should any of your questions remain unanswered, please contact your
specialist dealer or us directly.
Talk to us about any special requests you may have – even if they seem exceptional. We
love accepting technically feasible challenges.
We wish you many hours of high-fidelity listening.
The Burmester team

About these operAting instructions
6
A T O I
These operating instructions describe the operation of the BC350 speakers by the user.
In addition, they provide information for skilled workers. Sections which exclusively
concern skilled persons are marked accordingly in the heading. Additionally there is a
coloured bar at the top of the corresponding pages. ( ).
Symbols and markups used
Prerequisite
Indicates a prerequisite that must be fulfilled before a subsequent action can be
carried out.
►Action Step
Indicates a single action step.
1.
2.
3.
Sequence of Actions
Indicates a sequence of action steps that must be carried out in the order given.
Result
Indicates the result of an action.
Meaning of warning symbols and words
In this document, the following warning messages, symbols and words are used:
The general hazard symbol is used together with the words
CAUTION, WARNING and DANGER when there is risk of serious
injury. Follow all subsequent messages to avoid injury or death.
The lightning symbol is used with the warning word DANGER to
warn of life-threatening electric voltage.
ATTENTION The warning word ATTENTION indicates a hazard that can lead to
damage of the device.
CAUTION The warning word CAUTION indicates a hazard that present a low
or moderate threat of injury.
WARNING The warning word WARNING indicates a hazard that can lead to
death or serious injury.
DANGER The warning word DANGER indicates a hazard that leads
immediately to death or serious injury.
Please note the subsequent information:
►Read and follow the messages that are given, in particular safety and warning
messages.
►Keep these operating instructions.

importAnt sAfety instructions
BC 350 7
I
►Please read the operating instructions for your speakers fully and keep them.
Unpacking
►To avoid damaging the housing, do not use any sharp objects when opening the
packaging.
When setting up
Observe the following points when setting up:
• Avoid direct sunlight.
• Avoid excessive heat, cold, humidity and dust.
• Do not expose the speakers to any drops or splashes of water and do not put any
container with liquid on the speaker.
• The speakers are not suitable for use outside.
• Only place the speakers on horizontal and load-bearing floors. Due to the high
weight of the speakers, we recommend that you consult a structural engineer before
installing them.
WARNING
High loudspeaker weight - Stationary operation
The speakers are extremely heavy and may cause serious injury if dropped.
►The speakers may only be unpacked and installed by a specialist who is used to
handling heavy loads.
►At least three persons are required for safe unpacking and installation.
Connection
►Turn off the amplifier you are connecting to before connecting to the speakers.
Children
If not used properly, the speakers pose many injury risks. Therefore, never leave your
children alone with this speaker.
This device is not intended for use by children.

scope of Delivery
8
S
Included in delivery:
• BC350 Loudspeaker
• Cable bridges (installed on speaker)
• Packaging for accessories:
— Catalogue
— Booklet “Making of...”
— Operating Instructions
— Guarantee certificate
— Spirit level for aligning the speaker
— Design drawing
— Tool for height adjustment

the correct instAllAtion position
BC 350 9
T
The spatial imaging increases as the distance between the speakers and the wall
increases, while bass reproduction decreases. The BC350 loudspeakers are designed
in such a way that they do not require any bass boost through placing them close to the
wall. However, since rooms can behave very differently acoustically, it may be
advantageous in some cases to place them close to the wall.
The distance between the two speakers should be approximately 4 m, and the space
between the speakers should remain as free as possible. The distance to the listener
should also be approximately 4 m.
The placement of the loudspeakers on the longer wall of a room with a rectangular
base is preferable to placement on the shorter wall, and placement in the acoustically
“hard” area (on smooth walls and window surfaces) of the room is preferable to
placement in the acoustically “soft” area (damped by upholstered furniture, books and
carpets).
Distance from rear wall: minimum 50 cm
Distance from side wall: minimum 100 cm
Loudspeakers angled towards the listening position:
• The treble increases.
• More precise soundstage and imaging.
Loudspeaker not angled:
• Spatial imaging / base width increases.
• The treble decreases.

ADjusting the feet (skilleD workers)
10
A ( )
Each loudspeaker has four height-adjustable feet to compensate for any unevenness in
the floor.
Procedure
1. Turn the speaker 90° in any direction.
2. Place the spirit level as shown in the picture.
3. Turn the feet as required, until the air bubble is exactly in the middle of the spirit
level. This is the only way to ensure vertical alignment of the loudspeaker. You will
learn how to adjust the feet in the next sections.

BC 350 11
ADjusting the feet (skilleD workers)
Adjusting a foot upwards
You can do this with any of the feet. This is explained for one foot for illustrative
purposes.
1. Position the tool as shown in the picture below.
2. Turn the tool clockwise.
The foot lifts.
3. Repeat until the foot is in the desired position.
Adjusting a foot downwards
You can do this with any of the feet. This is explained for one foot for illustrative
purposes.
1. Position the tool as shown in the picture below.
2. Turn the tool anticlockwise.
The foot lowers.
3. Repeat until the foot is in the desired position.

Aligning the speAker
12
A
WARNING
Stability of the loudspeakers
The speakers are extremely heavy and may cause serious injury if it falls over.
►The loudspeakers may only be turned by a maximum of 15° in each direction.
►The mark on the speaker must not be outside the scale.
►Do not lean against the speakers.
CAUTION
Risk of injury
During alignment, there is a risk of crushing.
►Never turn the speaker directly on its foot.
►Never reach into the area of the foot while the speaker is being turned.
You can rotate the speakers 15° in both directions for optimal alignment. On the back,
there is a scale on the foot and another mark on the speaker to help you orientate
yourself. This also allows you to remember the position if you turn the speaker to
another position at a later time and want to return to the old position.
note: The scale is divided into 1° steps. The zero point and all angles divisible by five are
marked by a longer line.

the louDspeAker At A glAnce
BC 350 13
T
Loudspeaker
4
5
6
9
8
7
Seitenenansicht außenSeitenenansicht innen
4 Mid-range driver
5 Woofer
6 AMT tweeter (Air Motion Transformer)
Upwards-emitting tweeter to amplify the room sound in Live Mode. With level
adjustment knob
7 AMT tweeter (Air Motion Transformer)
8 Bass reflex tubes
9 Height-adjustable feet

the louDspeAker At A glAnce
14
Connector panel
13
14
12
11
10
10 Switch for Pure Mode / Live Mode
11 Level adjustment control for the upper AMT tweeter
12 Connection for the mid-range / tweeter unit
13 Connection bridge
14 Connection for the woofer unit

BC 350 15
connecting the speAkers (skilleD workers)
C ( )
►Note the operating instructions of the connected components before connecting.
►Pay attention to the correct polarity: red = positive, black = negative
WARNING
Dangerous voltage at the terminals
Dangerous voltages may be present at the terminals during operation.
►Before connecting, turn off all components of your stereo system and do not turn
them on until you have correctly set up all connections.
►Never operate the speakers with the rear flap open.
WARNING
Crushing due to the flap.
The flap can quickly move out of its open position and cause serious injury to your
hand if improperly operated.
►Make sure that the flap is locked when opening.
►Keep your hands in the danger area for as short a time as possible.
ATTENTION
Damage due to faulty connection
A short circuit or faulty connection may damage the speakers and other components.
►Turn off the power amplifiers before connecting the speakers. In this way you can
avoid possible short circuits caused by cables that are not yet connected on both
sides.
►First connect the cables to the speakers, then to the power amplifiers.
►Only connect the speaker cables to the appropriate terminals of an audio amplifier.
Never plug the connecting cables into the socket, otherwise the loudspeakers will
be destroyed.
Connection cable
Burmester recommends the use of cables with a large cross-section as the connection
between loudspeaker and power amplifier. The large cross-section allows the damping
factor of the power amplifiers to be maintained for optimum control of the
loudspeakers. The best result is achieved by using original Burmester speaker cables,
which have the same electrical and sound characteristics as the internal wiring of the
Burmester speakers and amplifiers.
These cables have been optimally adapted to the loudspeaker and tested.
WARNING: The insulation of the loudspeaker cable must correspond to the original Burmester
loudspeaker cable and at least meet VW-1 requirements.

connecting the speAkers (skilleD workers)
16
Mounting the connection bridges
1. Switch off the power amplifier.
2. Fully loosen the negative terminals (black) by turning them counterclockwise.
3. Place the connection bridge on the connections.
4. Attach the negative terminals (black) to the negative terminal again by turning
clockwise.
2
3
4
5. Repeat steps 2 to 4 with the positive pole terminals (red).
Dismounting the connection bridges
1. Switch off the power amplifier.
2. Fully loosen the negative terminals (black) by turning them counterclockwise.
3. Remove the connection bridge.
4. Attach the negative terminals (black) to the negative terminal again by turning
clockwise.
2
3
4
4
5. Repeat steps 2 to 4 with the positive pole terminals (red).

BC 350 17
connecting the speAkers (skilleD workers)
Correct polarity
►When connecting the speakers, make sure that the polarity of the connections is
correct. It is important that you establish all connections in phase:
— positive output of the power amplifier = positive input of the loudspeaker
— negative output of the power amplifier = negative input of the loudspeaker
note: Phase-inverted connection of the two channels leads to weak bass and diffuse
reproduction. In case of doubt, please ask your dealer.
The classic connection
This is the usual type of connection. Each amplifier channel is connected to a
loudspeaker via a 2-pole cable. Two mono power amplifiers are therefore required for
stereo playback.
To connect the speakers:
1. Switch off the power amplifier(s).
2. Make sure that the connection bridges (13) are inserted.
3. Attach one side of the speaker cable to the negative terminal for the mid-range/
tweeter unit (12) (black terminal).
4. Attach the other side of the speaker cable to the negative terminal of the power
amplifier.
5. Attach one side of the speaker cable to the negative terminal for the mid-range/
tweeter unit (12) (black terminal).
6. Attach the other side of the speaker cable to the negative terminal of the power
amplifier.

connecting the speAkers (skilleD workers)
18
Bi-amping
In bi-amping, woofers as well as mid-range drivers and tweeters are connected to their
own power amplifier channels. This brings significant sound advantages, as the power
amplifier channel for the mid-range/tweeter unit is relieved of the high power
requirements of the woofers. However, this type of connection also requires twice the
number of power amplifier channels. With this type of connection, four mono power
amplifiers are required.
To connect the speaker:
1. Place two mono power amplifiers near each speakers.
2. Connect the pre-amplifier to the mono power amplifiers as shown below. You will
need two optional Burmester bi-amp adapters or adapter cables. Your dealer will be
happy to assist you.
3. Remove the connection bridges.
4. Connect each subwoofer and mid-range / tweeter unit of the loudspeakers
separately to the outputs of the corresponding mono amplifier.
R
L
+
–
+
–
+
–
+
–

operAting the speAkers
BC 350 19
O
ATTENTION
Incorrect wiring or excessive sound levels
Incorrect wiring or excessive levels can damage system components.
►Before switching on the system, check all cable connections for correct polarity
(positive, negative).
►After any new wiring, slowly raise the volume until you are sure that everything is
connected correctly.
CAUTION
Sound with high intensity
Loud output signals can lead to hearing damage.
►Set the amplifier connected to a lower volume level before you turn it on.
►To prevent hearing loss, avoid hearing at high volume levels for long periods of
time.
CAUTION
Voltage on the chassis
Voltage may be applied to the chassis during operation.
►Do not touch the chassis during operation.
note: All the chassis used in this loudspeaker have been burnt in and selected in pairs using
a computer-aided measuring system. Nevertheless, like all mechanical systems, they
require a certain break-in time before they can unleash their full sound potential.

operAting the speAkers
20
Optimising the sound - Pure / Live mode
You can operate the speakers in two different modes to optimally adjust the sound to
your needs:
Pure Mode:
For audiophile music enjoyment, the
planar loudspeaker is operated in "Pure
Mode". The tonal tuning here is based
on the priorities of a pure high-end
musical experience: authenticity, tonal
balance, the highest resolution,
precision and plasticity. In this mode,
the front tweeter, one of the two mid-
range drivers and both woofers are
active. The soundstage representation
allows the differentiated positioning of
the individual instruments and voices,
but, at the same time, captivates with its
homogeneity. Sound image and speech
reproduction benefit from the fantastic
resolution and fine dynamic
reproduction.
Live Mode:
The loudspeaker offers a fascinatingly
lively sound experience in “Live Mode”.
Here the focus of the tuning is on
dynamics, joy of playing and three-
dimensionality with maximum power
handling. An adjustable tweeter on the
upper side of the cabinet is activated to
increase the spatial sound according to
individual preferences. In addition, both
mid-range drivers work in parallel as
per the D’Appolito principle. Thus, the
membrane surface increases and load
capacity and dynamics experience a
significant increase. The sound in this
mode is dynamic and powerful and
impresses the listener with detailed
resolution and the ability to reproduce
even enormous volume levels
distortion-free.

BC 350 21
operAting the speAkers
Changing the modes (skilled workers)
WARNING
Dangerous voltage at the terminals
Dangerous voltages may be present at the terminals during operation.
►Before opening the flap, switch off all components of your music system and switch
on the components only after you have closed the flap again.
►Never operate the speakers with the flap open.
WARNING
Crushing due to the flap.
The flap can quickly move out of its open position and cause serious injury to your
hand if improperly operated.
►Make sure that the flap is locked after opening.
►Keep your hands in the danger area for as short a time as possible.
Switching to Live Mode
The speaker is in Pure mode.
1. Turn off the amplifier(s).
2. Remove the locking screws on the rear flap.
3. Slide the flap upwards.
4. Slide the sound mode setting lever down.
The speaker is now in Live mode.
5. Close the flap again.
6. Re-tighten the locking screws.
7. Turn on the amplifier(s).
8. Repeat the procedure with the second speaker.
Switching to Pure Mode
The speaker is in Live mode.
1. Turn off the amplifier(s).
2. Remove the locking screws on the rear flap.
3. Slide the flap upwards.
4. Slide the sound mode setting lever up.
The speaker is now in Pure mode.
5. Close the flap again.
6. Re-tighten the locking screws.
7. Turn on the amplifier(s).
8. Repeat the procedure with the second speaker.

operAting the speAkers
22
Ambience tweeter (skilled workers)
WARNING
Dangerous voltage at the terminals
Dangerous voltages may be present at the terminals during operation.
►Before opening the flap, switch off all components of your music system and switch
on the components only after you have closed the flap again.
►Never operate the speakers with the rear flap open.
WARNING
Crushing due to the flap.
The flap can quickly move out of its open position and cause serious injury to your
hand if improperly operated.
►Make sure that the flap is locked when opening.
►Keep your hands in the danger area for as short a time as possible.
As it moves towards higher frequencies, a loudspeaker concentrates the sound field
more strongly. With conventional loudspeaker systems, this results in a very precise but
also sometimes cramped spatial image.
To counteract this, the BC350 is equipped with the Live mode. Among other things, an
upwards-emitting tweeter is additionally activated here. This provides a wider and
deeper stage, which you can adjust to your personal taste using the control on the
connector panel.
Adjusting the Ambience tweeter
1. Turn off the amplifier(s).
2. Remove the locking screws on the rear flap.
3. Slide the flap upwards.
4. Use the level adjustment control (11) to select the desired setting between 0 and 7.
5. Close the flap again.
6. Re-tighten the locking screws.
7. Turn on the amplifier(s).
8. Repeat the procedure with the second speaker.
note: The Ambience tweeter setting only affects the Live Mode. In Pure Mode, this is
disabled.
Table of contents
Other Burmester Speakers manuals

Burmester
Burmester B100 User manual

Burmester
Burmester AMBIENCE 31 User manual

Burmester
Burmester B 18 User manual

Burmester
Burmester BC150 User manual

Burmester
Burmester B38 User manual

Burmester
Burmester InWall User manual

Burmester
Burmester B10 User manual

Burmester
Burmester Ambience 71 User manual

Burmester
Burmester B 18 User manual

Burmester
Burmester B28 User manual