Your YARDAGE PRO TOUR is a precision instrument designed to provide many years of
enjoyment. This booklet will help you achieve optimum performance by explaining its
adjustments and features as well as how to care for this precise laser rangefinding
instrument. To ensure optimal performance and longevity, please read these
instructions before using your YARDAGE PRO TOUR.
INTRODUCTION
Your Bushnell YARDAGE PRO TOUR is the worlds smallest and most advanced laser
rangefindermadeexclusivelyforgolf. UsingDigitalTechnologyandmeasuringamere
1.5x4x2.75 inches and weighing 6.8 ounces, the YARDAGE PRO TOUR delivers superb
and accurate range performance to +/- one yard to virtually any object found on a golf
course. The BUSHNELL YARDAGE PRO TOUR DOES NOT require the use of reflectors.
Range to a golf flag as far as 225 yards out or to a tree or bunker 570 yards away for a
reference point. With YARDAGE PRO TOUR, you can determine club selection, save
strokes, and build confidence. The unique shape and palm size allows outdoors
enthusiastto easily gripwith a singlehand. When not using,place it inthe convenient
carryingcase and cliptoyour golf bag.Therugged and weatherresistantYardage Pro
Tour features popular Scan mode providing continuous distance measurements as
multiple targets in the field of view are scanned.
The YARDAGE PRO TOUR emits invisible, eyesafe, infrared energy pulses.
Sophisticated digital technology and a high-speed clock are used to instantaneously
calculate distances, by measuring the time it takes for each pulse to travel from the
rangefinder, to the target, and back.
The ranging accuracy of the YARDAGE PRO TOUR is plus or minus one yard / meter
under most circumstances. The maximum range of the instrument depends on the
reflectivity of the target. The maximum distance for most objects is 570 yards / 521
meters while for highly reflective objects the maximum is 700 yards / 640 meters. Note:
You will get both longer and shorter maximum distances depending on the reflective
properties of the particular target and the environmental conditions at the time the
object is being distanced to.
The color, surface finish, size and shape of the target all affect reflectivity and range.
The brighter the color, the longer the range. Red is highly reflective, for example, and
allows longer ranges than the color black, which is the least reflective color. A shiny
finishprovidesmorerangethanadullone.Asmalltargetismoredifficulttorangethan
a larger target. The angle to the target also has an effect. Shooting to a target at a 90
degree angle (where the target surface is perpendicular to the flight path of the
emitted energy pulses) provides good range while a steep angle on the other hand,
provides limited ranging. In addition, lighting conditions (e.g. the amount of sunlight)
will affect the ranging capabilities of the unit. The less light (e.g. overcast skies) the
farther the unit’s maximum range will be. Conversely, very sunny days will decrease
the unit’s maximum range. Ranging through a glass window is not possible in most
circumstances due to the reflection caused by glass.
OPERATIONAL SUMMARY
Whilelookingthroughthemonocular,depressthepower
button once to activate the inview display system (LCD).
Aim the YARDAGE PRO TOUR at a target at least 10
yards away, depress and hold the power button down
until range reading is displayed. Release the power
button. Your Yardage Pro TOUR features an adjustable
eyepiece. Simply rotate the monocular until the reticle and
object distanced to are in focus to your eye. Note: Once
activated, the YARDAGE PRO TOUR’s LCD will remain active and display the last
distance measurement for 6 seconds. You can depress the power button again at any
time to distance to a new target. As with any laser device, it is not recommended to
directly view the emissions for long periods of time with magnified lenses.
FEATURES
The YARDAGE PRO TOUR’s sophisticated digital technology allows you to select between various
units of measure and targeting modes. In addition, your YARDAGE PRO TOUR’s LCD incorporates
illuminatedindicators that adviseyou when thelaser is activeand when thebattery charge islow.
A summary of these features is presented below:
UNIT OF MEASURE OPTIONS The YARDAGE PRO TOUR can be used to measure distances in
yards or meters. The unit of measure indicators are located in the upper right portion of the LCD.
To select between yards and meters, look through the monocular, depress the "mode" button (left
sideoftheunitunderneaththeBUSHNELLYARDAGEPROlogo)andholditdownforapproximately
2 seconds. If you are changing from yards to meters, a change in unit of measure will be indicated
by the illumination of the letter M for METER indicator while the YD for YARD indicator is turned
off. If you are changing from meters to yards, the opposite will occur. Note: The YARDAGE PRO
TOUR will return to the last setting used, each time the unit is turned on.
TARGETING MODES The YARDAGE PRO TOUR incorporates exclusive targeting modes that
allow you to adjust the performance parameters of the unit to suit your specific situation and
environment. The different targeting modes available are listed below:
Standard (LCD Indicator - none) This setting allows most targets to be distanced up to 570 yards.
Used for moderately reflective targets that are typical of most distancing situations. The minimum
distance in the standard mode is 10 yards.
SCAN (LCD Indicator - "SCAN") When the Power button is held down longer than 3 seconds, the
unit transitions to SCAN mode. This mode allows the range to be continuously updated as long as
thePower button remainsdepressed. The word "SCAN"will blink and appearin the leftside of the
LCD once this mode is activated.
ILLUMINATING INDICATORS Low Battery Charge (LCD Indicator - ) When both dashes
insidethe battery symbol aredisplayed,the battery is fullycharged.When the dashes starttofade
away, it means the battery charge is getting low and the 3-volt lithium battery should be replaced.
ROLL DOWN EYECUP TheYARDAGEPROTOUR’smonocularisequippedwitharubber eyecup
designed for your comfort and to exclude extraneous external light. If you wear sun / eyeglasses,
roll down the eyecup. This will bring your eye closer to the ocular lens, thus providing improved
field of view.
SPECIFICATIONS
OPTICAL DESIGN A liquid crystal display (LCD) is mounted within the optical system and when
activated, displays a reticle for targeting, yard / meter and mode designations, and low battery
indicators. Inherent in the manufacturing process are small black spots that appear in the optical
system. These are a natural characteristic of the LCD, cannot be fully eliminated in the
manufacturing process and do not affect the distancing performance of the unit.
INSTRUCTION MANUAL
20-0002
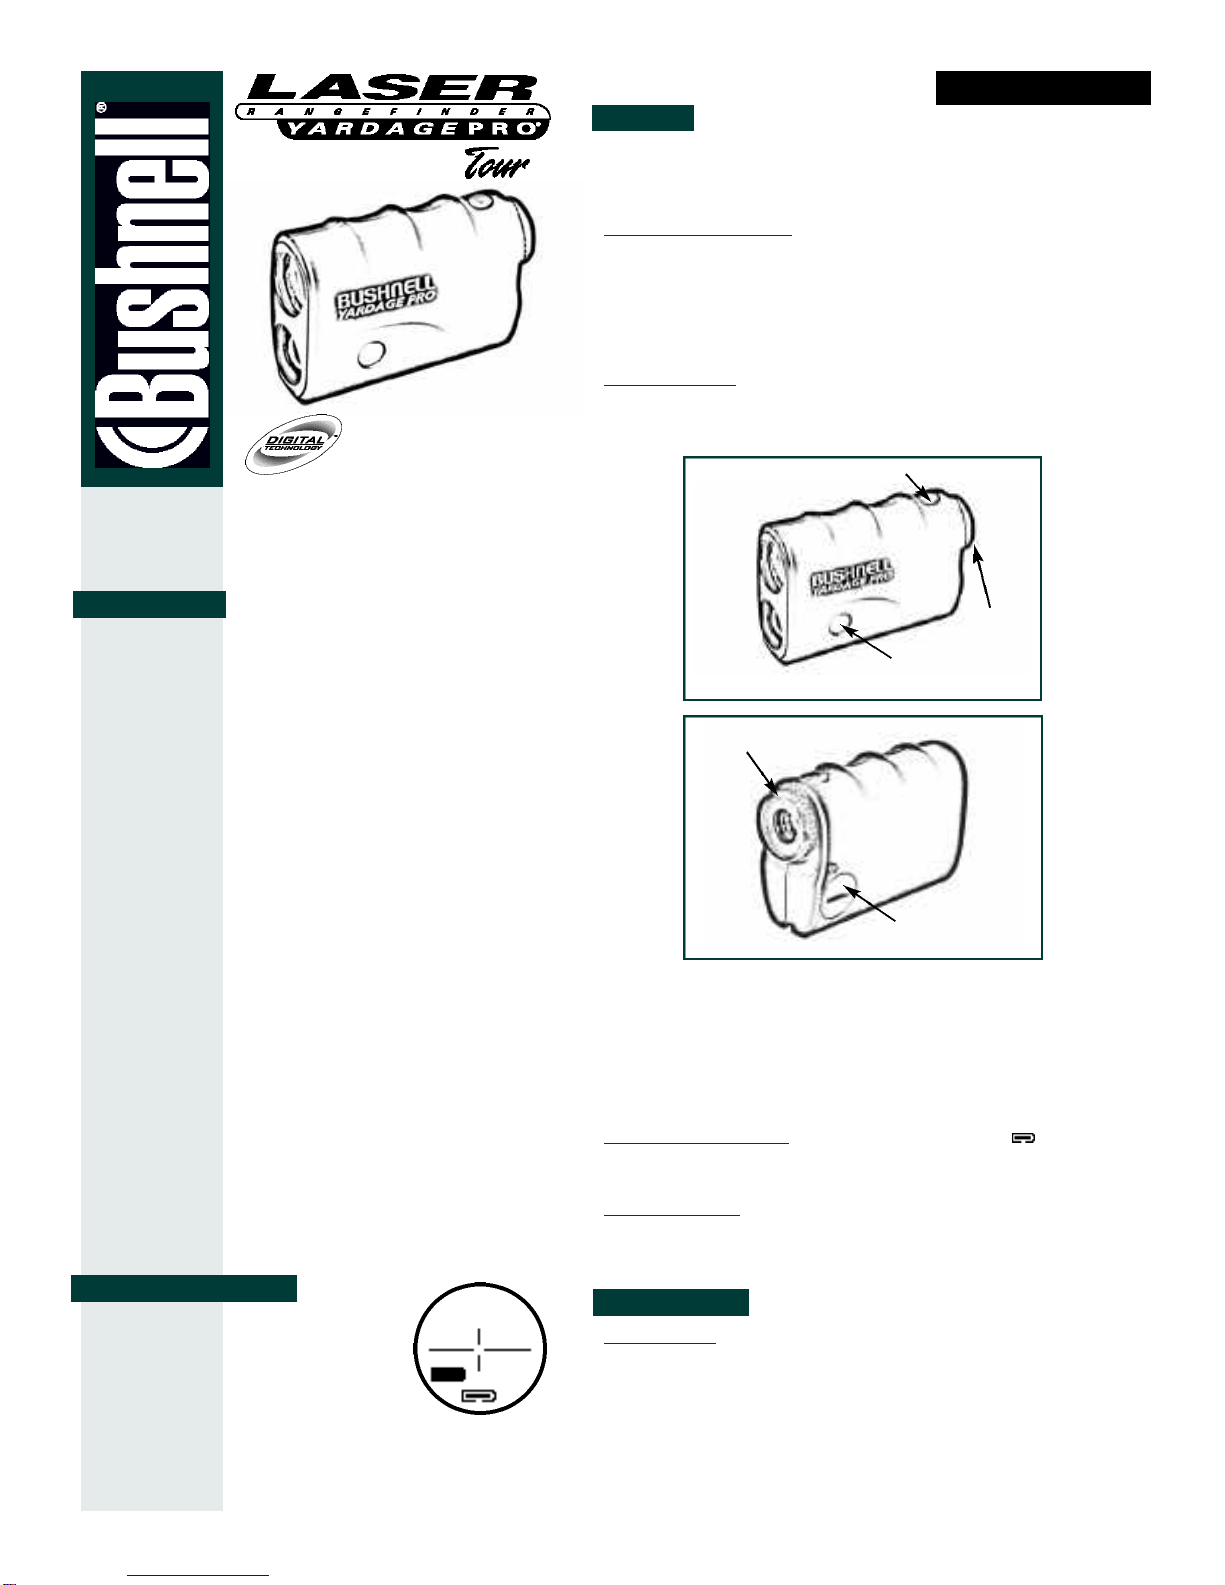
Mode Button
Power Button
Monocular
Battery
Compartment
Adjustable eyepiece
Lit. # 91-0145/03-01
Continued on page 2
2 7 9 YD
SCAN


