Bushranger 78X04 User manual

78X04

Congratulations on your purchase of the Bushranger® Gas Hot Water Shower.
To take full advantage of this product, please read this manual carefully before
using. Retain this manual for future reference for installation and warranty.
Table of contents
Product Information
Safety Instructions
Performance
Specications
Set Up
Operation
Care and Maintenance
Trouble Shooting
Technical Assistance
Warranty
1
3
4
7
9
11
17
18
19
20

Important Warnings
It is IMPORTANT that you read these instructions carefully and understand the
operation and safety features of this appliance. Familiarise yourself with the
appliance before connecting it to its gas container. Keep these instructions for
future reference.
The manufacturer reserves the right to make all the modications to its products
that it deems necessary or useful, also in your interests, without prejudicing its
essential functional and safety characteristics.
The manufacturer cannot be held responsible for any inaccuracies due to printing
or transcription errors that may be found in this handbook.
• Adjustments and maintenance must only be carried out by an
authorised person.
• The installation of all gas and combustion appliances must comply with the
standards in force. For more information contact your state regulatory ofce.
• The appliance must only be used for what it has been made for heating water.
• Any other use is considered improper and, as such, dangerous.
• The manufacturer cannot be held responsible for any harm to people or
damage to property deriving from an incorrect installation or maintenance or
from an erroneous use of the appliance.
• Once the outer wrapping and the inner wrappings of the various parts
have been removed, check and make sure that the appliance is in perfect
condition. If you have any doubts do not use the appliance.
• The packaging materials used (cardboard, bags, polystyrene foam, nails,
etc.) must not be left anywhere in easy reach of children because they are
a potential hazard source. To safeguard the environment all packaging
materials are environment-friendly and recyclable.
• In the case of a failure and/or malfunction, DON’T ATTEMPT TO REPAIR. Take
the appliance back to the place of purchase, if unavailable call our customer
service team on 1800 654 767 detailing the trouble and product information.
Note: the pictures shown in the gures in this handbook are purely indicative.
• Do not use the appliance if it has a leak, or has worn, deteriorated or
damaged seals. Accessible parts may be very hot. Keep young children away.
• It may be hazardous to attempt to t other types of gas containers
or cartridges.
• This appliance is to be stored in a dry & well- ventilated location free from
direct sunlight. Do not store when still connected to the cylinder. Make sure
that the cylinder is disconnected and is stored in a well-ventilated area, free
from direct sunlight, heat and ignition sources. If being stored indoors, ensure
that the location complies with the standard AS/NZS1596.
• Do not use adaptors or modify the appliance to t other connectors
or cylinders.
• When using this appliance, children must be supervised by an adult at all times
• Never leave appliance unattended when operating.
• Do not use as a cooking appliance or modify for any other reason.
• Avoid twisting & kinking the Propane Gas hose.
• Do not place articles on or against this appliance.
• Do not place chemicals or ammable materials, or spray aerosols near
this appliance.
• Do not operate with panels, covers or guards removed from this appliance.
• If you smell gas immediately turn the gas off at the cylinder and move the
appliance & cylinder to a well-ventilated area outside, keeping well away from
sources of heat such as naked ames & pilot lights. Check for leaks using soapy
water as stipulated on page 5.
• Do not attempt to move or relocate the appliance whilst it is operating.
Extinguish the burner & allow cooling. Disengage the gas cylinder then move
the appliance.
CAUTION!
• THIS APPLIANCE IS NOT INTENDED FOR THE SUPPLY OF DRINKING WATER.
• THIS APPLIANCE IS INTENDED FOR THE SUPPLY OF HEATED WATER FOR THE
PURPOSE OF WASHING AND CLEANING ONLY.
• CHECK AND CONFIRM SAFE WATER TEMPERATURE BEFORE USING THIS
APPLIANCE. WATER FROM THIS APPLIANCE MAY BE VERY HOT.
• THIS APPLIANCE MUST BE PROTECTED FROM RAIN
• THIS APPLIANCE IS DESIGNED FOR OUTDOOR USE ONLY.
• USE ONLY IN WELL-VENTILATED AREAS.
| Gas Hot Water Shower |Gas Hot Water Shower
Page 1 Page 2

Safety Instructions
This appliance shall only be used in an above ground open air situation with
natural ventilation, without stagnant areas, where gas leakage and products of
combustion are rapidly dispersed by wind and natural convection.
FIGURE D1 – Outdoor Area Example 1.
An enclosure with walls on all sides, but no
overhead cover. FIGURE D4 – Outdoor Area Example 4. With the
open side at least 25% of total wall area and
30% or more in the total of the remaining wall
area is open and unrestricted.
FIGURE D5 – Outdoor Area Example 5. With the
open side at least 35% of the total wall area
and 30% or more in total of the remaining wall
area is open and unrestricted. In the case of
balconies, 20% or more of the total wall area
shall remain open and unrestricted.
FIGURE D2 – Outdoor Area Example 2
Within a partial enclosure that includes an
overhead cover and no more than two walls.
FIGURE D3 – Outdoor Area Example 3.
With both ends open.
Carbon Monoxide Hazard
Hanging The Appliance
Appliance Performance
This appliance can produce carbon monoxide, which has no odour. Using
it in an enclosed space (For example, caravan, tent, car or mobile home)
may cause DEATH.
OUTDOOR USE ONLY – The appliance must be used outdoors only and is to be
operated no closer than 1000mm from the sides and 1000mm from above to all
combustible surfaces, fabrics, ammable materials & people
The appliance is designed to be hung upright against a non-combustible vertical
surface. Do not operate from a non-upright position. Doing so can be dangerous
and will damage the appliance.
During operation ensure that air inlets and the top exhaust are kept free from
obstructions and closure.
Important – This appliance is designed to be used with a source water temperature
of 20°C or below. If the temperature of the outlet water exceeds 50°C the burners
will shut off; you will be required to turn the water ow off and back on to reignite
the burners.
This appliance is designed to raise the outlet water temperature by a maximum
(average) of 25°C above the source water temperature and can be adjusted by
the gas regulator and water regulator control knobs located at the front of
the device.
The following gures are diagrammatical representations of outdoor areas
suitable for use with this appliance. Rectangular areas have been used
in these gures – the same principles apply to any other shaped areas.
Any enclosure in which the appliance is used shall comply with one of the
following:
Open side at
least 25% of
total wall area
Open side at
least 25% of
total wall area
Both ends open
30 percent or more in total
of the remaining wall area
is open and unrestricted.
30 percent or more in
total of the remaining
wall area is open and
unrestricted.
| Gas Hot Water Shower |Gas Hot Water Shower
Page 3 Page 4

Safety Features
Gas Type
This appliance has been designed in accordance with and tested to AS2658. It is
equipped with the following safety features:
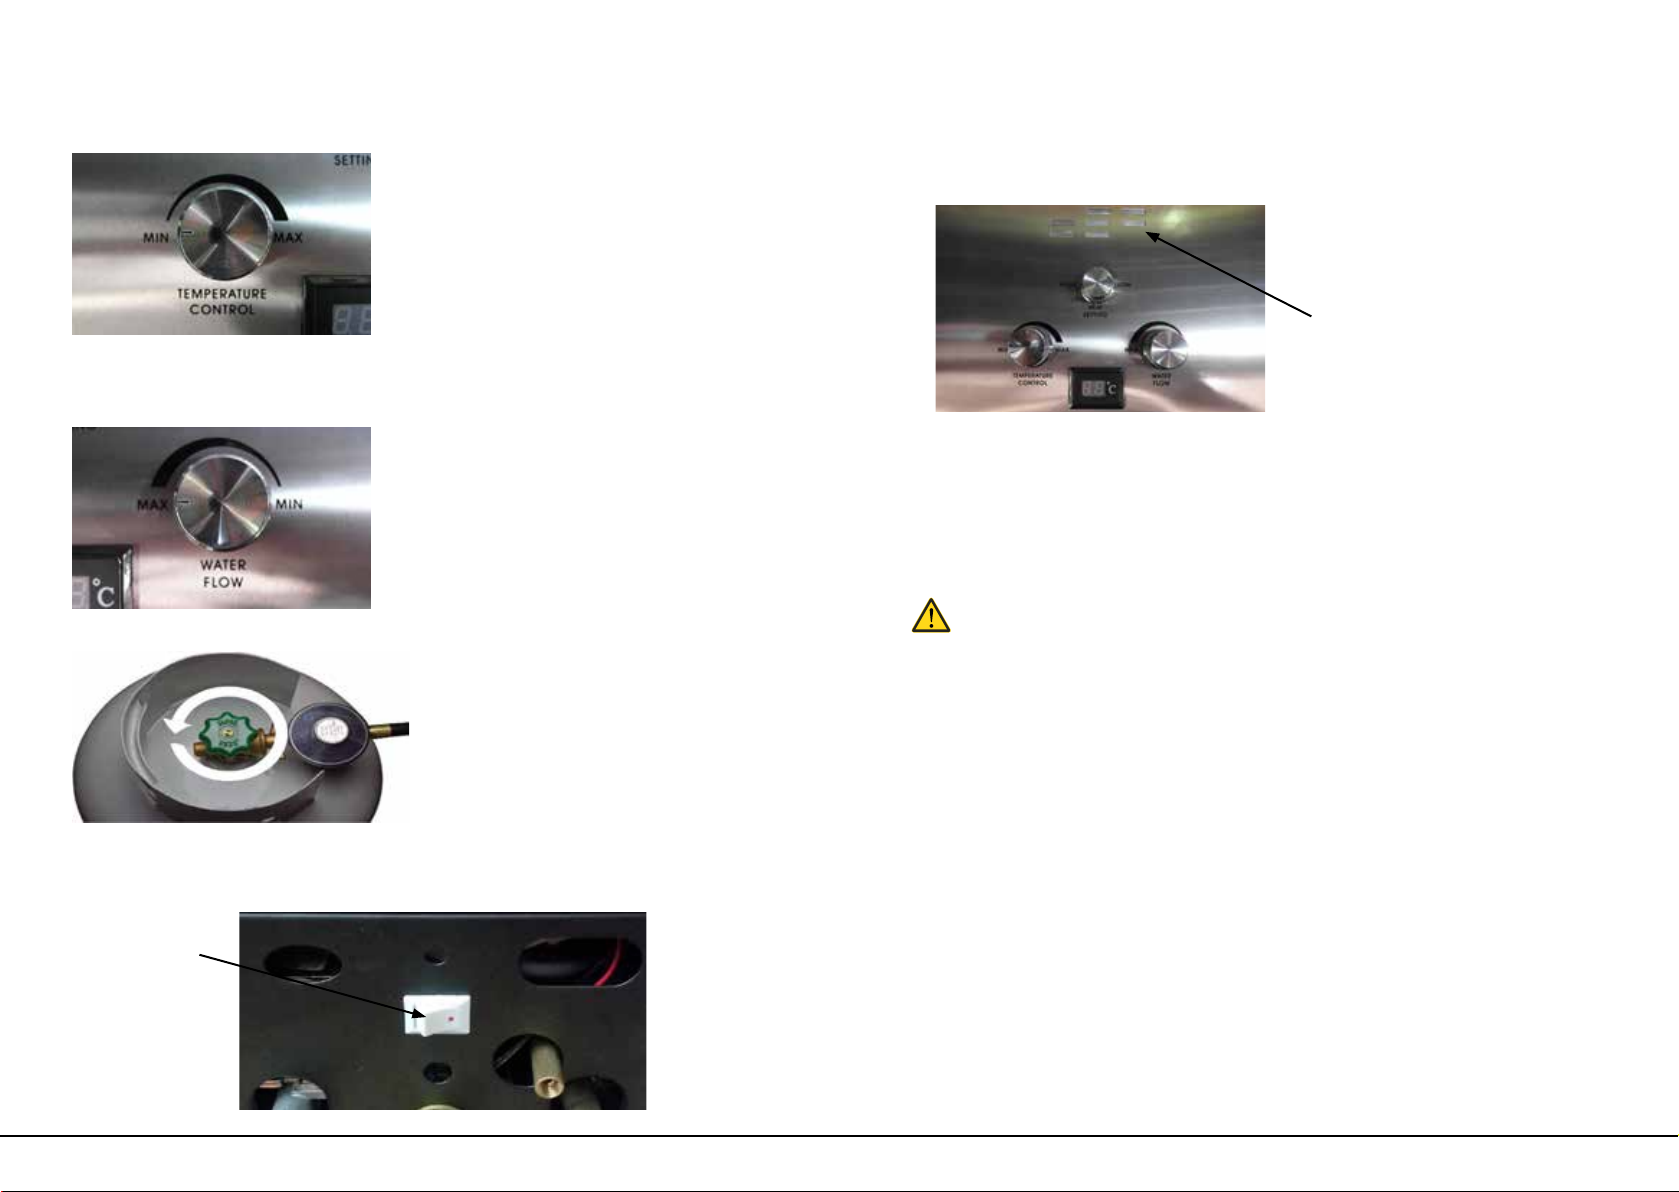
Over-temperature sensor – the appliance will not allow the burner to remain in
operation once the outlet water temperature reaches 50°C. To relight the burner
you will need to either:-
- Turn the switch off on the unit and allow cool water to ow through the unit until it
drops the internal temperature low enough to reignite the burner.
- Turn the water ow and gas off, allow unit to cool for 30min then reignite.
Water ow sensor – water must be owing through the system to allow the burner
to ignite. In the case that the water supply is restricted or no longer ows. For
example, if you close the water ow at the shower nozzle, the burner will be
extinguished and will not relight until the water ow recommences.
Tilt Switch – this safety device will not allow the burner to operate if the appliance
is any more than 45 degrees from its normal operating position. To relight the
burner you will need to turn the water ow off, position the appliance to the
normal operating position and turn the water ow back on.
Exhaust Flue Sensor – the appliance will shut down if the exhaust ue becomes
partially or fully restricted from operating properly. To relight the burner, turn all
gas and water devices off, remove restriction or re position the appliance in safe
operating location and start the appliance as per instructions.
This appliance shall only be used with the Australian Approved Propane gas hose
& regulator assembly supplied with the appliance and must be connected only to
a Propane gas cylinder certied to AS2469 and AS2030.1 standards tted with POL
connections only.
This appliance and gas cylinder is to be stored in a dry and well ventilated
location free from direct sunlight, heat and ignition sources. Do not store when still
connected to the gas cylinder. If being stored indoors, ensure that the location
complies with AS/NZS 1596.
WARNING: It is hazardous to attempt to t other types of gas containers. Connect
and change cylinders in a well-ventilated location, preferably outside away from
people and any sources of ignition, such as naked ames, pilot ames, electric
heaters/equipment.
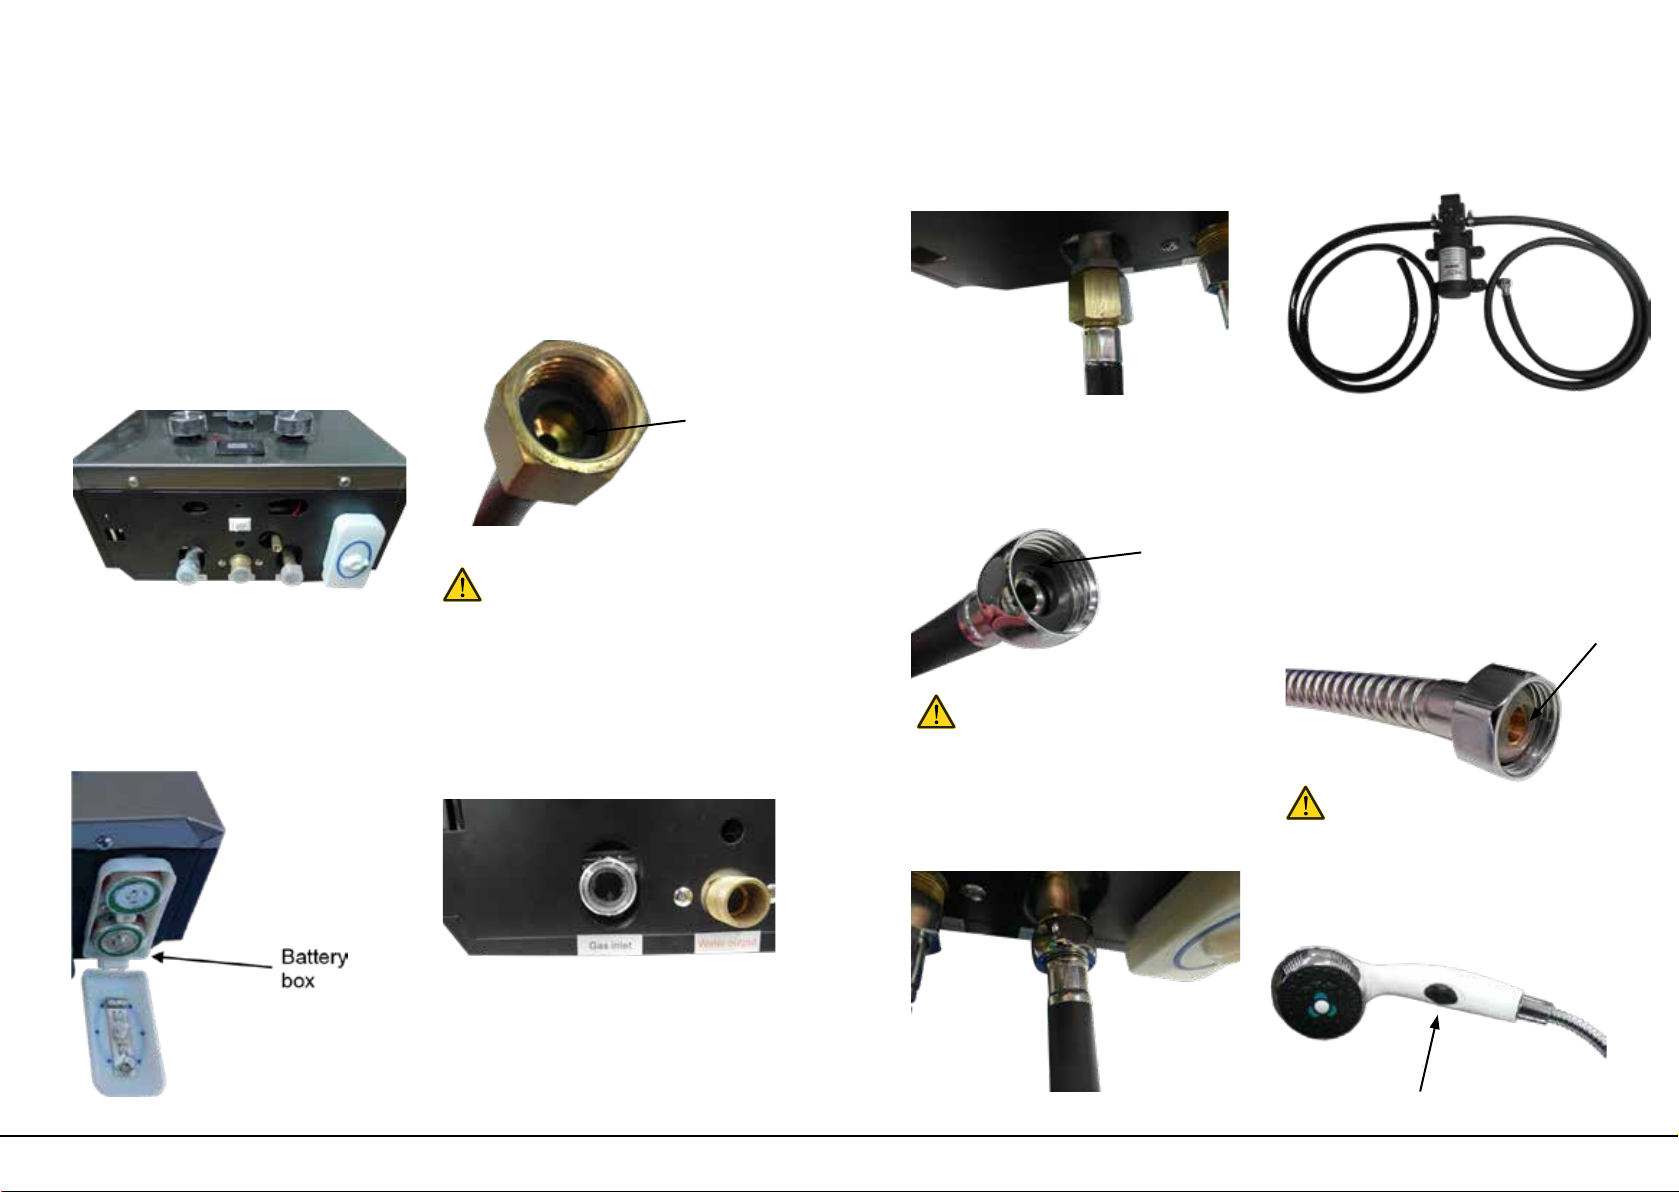
List of Parts Supplied
• 1 x LPG Portable Water Heater
• 1 x Gas hose and Regulator assembly
• 2 x Batteries ‘D’ Cell
• 1 x Water Pump – 4.3lpm, 12V DC
• 1 x Shower Rose with Hose and On/Off Switch
• 2 x Hose + hose clamps + ttings
• 1 x Pump wiring harness
Not included: Spanner, Screw Driver, Fresh Water Tank/Container or similar, Water
Pump 12V DC Power Supply and Gas Bottle.
If required, contact Bushranger 4x4 Gear for advice on the above items.
Checking For Gas Leaks
• Ensure rubber seals (i) between the regulator and gas cylinder, and (ii)
between the hose assembly and appliance inlet are in place and in good
condition before connecting the gas cylinder.
• Check that all connections are tight and that the gas cylinder connection has
been tightened before you turn the cylinder gas valve on.
• NEVER check for leaks with a ame or pilot light.
• Using soapy water, coat all connections, if bubbles appear, turn the cylinder
gas control off and retighten the connection before re-testing.
• Inspect the appliance regularly for signs of wear, leaks or incorrect operation. If
symptoms such as aring of the burners, issues with lighting, damages to hoses
or connections or leaks from seals or gas controls are identied do not attempt
to repair, contact customer service on: 1800 654 767.
• To check if gas remains in the cylinder, disconnect from the appliance and
hold the cylinder in a vertical position then shake from side to side. If there is a
sound or feel of liquid movement inside the cylinder contains gas.
• When changing gas cylinders ensure this is conducted outside in a well-
ventilated location free from people, animals & ignition sources such as naked
ames, pilot lights & electrical equipment such as heaters or elements.
| Gas Hot Water Shower |Gas Hot Water Shower
Page 5 Page 6

Specications
Model Number 78X04
Australian Standard AS2658
IAPMO GMK10458
Injector Size (mm) 0.62
Total NGC (MJ/h) 28
TPP (kPa) 2.75
Min. Water Pressure (kPa) 25
Max. Water Pressure (kPa) 1000
Size (mm) 500 x 300 x 140
Weight (kg) 4.7
Power (kw) 12
Water ow rate (max) (L/min) 6
Model Number T-2A & T-3A
Australian Standard AS/NZS 1869
AS/NZS 4621
AGA Certicate No. 7087
Inlet Pressure (kPa) 250 – 1750
Outlet Pressure (kPa) 2.8
Temperature Limit (°C) -20 to 60
Regulator Classication Low-Pressure Gas
Regulator
Flow Rate (kg/h) 1.5
Mounting Preferences Horizontal with
conical face up
Inlet Connection POL Fitting with
Left-Hand thread
Size (mm) 35 x 75 x 1630
(hose included)
Weight (kg) 0.45
Model Number FL-022
Power Supply (V DC) 12
Power Demand (Amps) 3.5
Pump Type Diaphragm
Pump
Pressure (PSI) 35
Flow Rate (l/m) 4.3
Size (mm) 185 x 110 x 65
Weight (kg) 0.67
Max. Flow Rate (l/m) 6 (Heat
Exchanger Limited)
Flow Restriction On / Off Switch
Flow Variations 4
Dimensions (mm) 2.75
Weight (kg) 0.27
Max. Water Pressure (kPa) 900
Size (mm) 400 x 295 x 140
Weight (kg) 0.26
Length (m) 2
Power Supply (V DC) 12
Fuse (Amps) 4
Connection type Cigarette and
Alligator Clamps
Heat Exchanger
Gas Hose and Assembly Regulator
Pump
Power Cable
Shower Rose
Diaphragm
Pump
| Gas Hot Water Shower |Gas Hot Water Shower
Page 7 Page 8

Set Up
Before using the appliance, it is important to prepare the appliance by installing
the proper adaptors to suit our intended use. In this example, we will be preparing
the portable water heater to be used with a hose input from a 12-volt pump.
1. Remove the heater along with all the
components from the box and place
them on a table. Notice that there is a
gas input, hot water output, cold water
input as well as a battery box.
5. Fit and tighten the hose tting with a
spanner, taking care not to over tighten
as this could break or crack the inlet
pipe. The ‘gas input’ is now ready to be
connected to the gas regulator hose.
7. Tighten the hose, taking care not
to over tighten as this could break or
crack the inlet pipe.
10. Attach the shower rose to the
exible shower hose using the conical
end tting. Hand force only. Do not
over tighten.
8. Connect free end of Water Hose
to the outlet side of the pump. Use a
hose clamp to x hose to pump. Attach
other hose to inlet of pump with hose
clamp. See Page 15 for more details.
9. Fit seal to chrome exible shower
hose, then attach hexagonal end to
the ‘water out’ connection (middle
connection) on the water heater. Do
not over tighten.
Seal (Clear rubber washer):
Ensure a seal (supplied) is inserted into
the connector at both ends of the
exible shower hose.
6. Attach black inlet hose to unit via
crimped swivel tting. Ensure a seal is
inserted into the tting.
3. Locate the Gas Hose and Regulator.
It requires a black rubber seal to be
inserted into the end shown below.
Seal (Black
Rubber Washer)
Seal (Black
Rubber Washer)
Seal (Clear
Rubber Washer)
Seal (Black rubber washer):
4. DO NOT USE TEFLON TAPE on the
gas or water ttings. The unit has been
designed to be assembled with the use
of rubber washers.
2. Insert two ‘D’ batteries into the
‘battery box’ and close the battery box
lid. Note: The orientation of the battery
terminals.
On/Off
| Gas Hot Water Shower |Gas Hot Water Shower
Page 9 Page 10

Operation
Now that the appliance has been prepared for our intended use, we can set it up
for operation.
1. Find a suitable sturdy, non-combustible vertical surface to hang the appliance. The
surface should be at least 1000mm clear from the sides and 1000mm from the top of all
combustible surfaces, fabrics, ammable materials & people.
Hang the appliance on a suitable vertical surface by the top hanger attached to the
back cover of the heater.
The appliance is ready to be connected to gas and water hoses.
6. It is preferable to set the Heat Setting Control to LOW
Our heater is now set up and ready for use. Notice: the positioning of the gas
cylinder away and to the side of the appliance; never place the gas cylinder
directly beside or above the appliance.
2. Connect the Gas Hose to the POL Propane gas cylinder. Hand-tighten the
connection in an anti- clockwise direction.
Open gas tap on cylinder one full turn, and then check the connections for
leaks with soapy water.
DO NOT use a ame. If a leak is detected, turn the cylinder valve off (close),
check seals and retighten all connections and retest.
4. Once you determine that there are no leaks present with the gas valve open,
turn the cylinder valve to the off (close) position.
5. Connect water supply by either pump supplied or alternate pressurised
water source.
Gas Hose
and Regulator
Shower Hose
3. IMPORTANT
| Gas Hot Water Shower |Gas Hot Water Shower
Page 11 Page 12

7. IMPORTANT
8. IMPORTANT
It is important that when starting the appliance that the temperature control is set
to the ‘min’ position.
It is important that when starting the appliance that the water ow is set to the
‘max’ position.
9. Turn the gas cylinder on in an anti- clockwise direction one (1) full turn.
10. Switch LPG Water Heater ON using the rocker switch located at the bottom on
the LPG Portable Water Heater. Do this by having the red dot pushed in.
11. Turn on the pump to allow water to ow through the shower unit.
Note: You should hear a series of clicks and then the burner should ignite. The
burner ame can be seen operating through the ‘viewing window’ located at the
front of the appliance.
12. Adjust the temperature of the water owing from the shower head by turning
the ‘temperature control’ and ‘water ow’ knobs.
Note 1: For higher temperatures, increase the HEAT SETTING control and decrease
the WATER FLOW control. Switch the TEMPERATURE CONTROL from MIN to MAX will
increase the temperature further.
A temperature in excess of 50°C will activate the Over Temperature Safety Sensor
and will shut down the burners. To relight the burner you will need to either:-
- Turn the switch off on the unit and allow cool water to ow through the unit until it
drops the internal temperature low enough to reignite the burner.
- Turn the water ow and gas off, allow unit to cool for 30min then reignite.
IMPORTANT – Water remaining in the heat exchanger while the ow is stopped
may become very hot. It will require water to ow through the unit for a short time
to clear the hot water. The user must check the temperature output to ensure it is
suitable and not too hot before showering.
Note 2: When using the 12V Pump provided with the water regulator knob set
to “low”, a small amount of pulsing may be experienced at the shower rose.
This is normal.
Note 3: After use, turn the gas cylinder valve off, wait for the ame to go out,
then turn the appliance control valve off.
WARNING
Viewing Window
Switch
| Gas Hot Water Shower |Gas Hot Water Shower
Page 13 Page 14

Installing the 12V Pump
1. Install the pump in a suitable high and dry position to avoid any contact with
water, as the pump is not waterproof.
2. It is recommended to secure the pump to a mounting plate or bracket (not
provided).
3. Checking the direction of ow indicator arrows on the pump.
4) Connect the pump to a suitable 12 Volt power source (When not using the
Power Cable provided) Installation Tips for xed mounting:
5. Operate the pump, inspecting every joint and pipe run for leaks.
a. Using a hose clamp (supplied), connect a 1.5m length of fresh water hose
to the pump inlet. The other end of the inlet hose is located at a potable water
source.
a. It is recommended to seek a qualied auto electrician when xed mounting
of the water pump. It is important to use the correct gauge wire for the distance
from 12V power source and the current draw from the pump. Improper
installation may cause the pump to not function correctly and/or fail.
b. Be careful to properly route and secure all wiring.
c. Fuse appropriately.
d. Toggle switch with adequate amp rating is required to allow for
ON/OFF operation.
b. Using a hose clamp (supplied), connect the 1.5m length of fresh water hose
with crimped swivel tting from the pump outlet to the Gas Hot Water Shower.
Important: The pump must be NOT be installed with the motor
facing downwards.
WARNING: Do not use a 240-volt pump or other electrical appliances
where they could be affected by water.
Keep pump inlet hose (suction) and pump outlet hose (pressure) as short
as practical as not to exceed suction and pressure head. Excessive
suction or pressure head may cause damage to the pump and will void
warranty.
Typical Installation Above
The supplied meter LPG hose and regulator assembly connects to a 9 kg LPG
cylinder (maximum size). The water heater is then located 1.4 meters from ground
level to the connection points as shown above. Water pump and fresh water tank
are to be located in a convenient position as shown.
1.4m
1m 1m
Water source
*Gas cylinder not included
1m
| Gas Hot Water Shower |Gas Hot Water Shower
Page 15 Page 16

Care and Maintenance
Your LPG Portable Water Heater has a metal casing and a stainless Steel face
plate and so, should be cleaned after each use. This will not only maintain the
appearance of your Gas Hot water Shower, it will also add to its longevity.
Clean your LPG Portable Water Heater by following these steps:
More frequent cleaning may be necessary for coastal and tropical climates or in
salty or corrosive environments.
Always ensure no debris is present in the ue or unit as this may cause a re
when use.
NOTE: Failure to clean your LPG Portable Water Heater adequately or failure to
follow these cleaning instructions will void your warranty.
The use of ABRASIVE materials and/or ALKALINE based cleaners will damage the
LPG Portable Water Heater. Their use is strictly prohibited and will void
your warranty.
If you are unsure of how to adequately clean and maintain your LPG Portable
Water Heater, please contact your place of purchase for further information.
If using water other than drinking quality water ensure the pump lter
supplied is clean before each use.
Storage, Frost / Freezing temperatures: If the appliance is to be stored for any
length of time or subjected to temperatures below freezing, it is necessary to
drain any water trapped in the appliance.
1. Disconnect the inlet water hose.
2. Allow the hot water hose and shower rose to hang down.
3. Loosen the screw in the water drain valve located at the bottom of the
appliance, (near to the water inlet tting) allowing the appliance to drain.
Gently re-tighten the water drain screw.
1. Wipe down using a pH neutral soap solution, diluted in clean water.
2. Only use non-abrasive bre brushes or sponges while cleaning.
Troubleshooting
This guide should be followed in case of failure of the appliance to operate
correctly. If symptoms persist contact Customer Service on 1800 654 767
Problem Cause
The Appliance will not
light at all
Make sure you have new batteries installed in the
correct position.
Negative should be down closest to you and Positive
towards the back. In high humidity conditions it may be
necessary to clean and dry the battery box
prior to operation.
Check for sufcient water pressure. The unit must have
a minimum of 25KPA of sustained pressure to activate
the burners.
There may be debris within the water inlet. Remove
connections to the inlet and inspect. Remove any de-
bris that may be blocking the unit and retry.
The gas line may need purging. Turn gas to maximum
and burners to High on the unit and turn the water on/
off a few times.
Check that water is owing through correctly. Make
sure “Water In” is on the right and “Water Out” is in
the middle.
Make sure the On/Off switch is turned on, do this by
having the Red dot pushed in.
If unit fails to ignite when LED display lights and ignition
is clicking.
1. Disconnect all gas attachments from the unit and
gas bottle.
2. Re-connect your gas line to the unit including all tape
and washers (do not turn the gas on).
3. Turn your water supply on.
Once the unit starts to click, turn your gas bottle on
slowly and watch for ignition through the window.
Water ows through, but
the unit will not get hot
New batteries may be required for the ignition switch.
Verify that the batteries are aligned in the proper
polarity (+/-). Check the battery case.
Check that the water pressure is at least 25 kPa to
activate the burners.
Make sure there is an adequate amount of gas in your
bottle.
Check that water is owing through correctly. Make
sure “Water In” is on the right and “Water Out” is in the
middle.
Try the unit on mains water if possible, if this works, there
is an issue with the pump. Please make sure your pump
meets requirements.
| Gas Hot Water Shower |Gas Hot Water Shower
Page 17 Page 18

Problem Cause
Water is Not Hot Enough
Adjust the gas regulator and water
regulator to meet your desired temper-
ature. To Increase temperature; turn the
gas regulator control from minimum to
maximum and turn the water regulator
control from maximum to minimum.
Also, switch burners from “Low” to
“High”.
Check source water temperature. If the
source water temperature is too cold
then you may need to recirculate the
water through the system back into
the source reservoir then through the
appliance again to meet your desired
temperature.
Check if there is a blue ame in the
‘viewing window’. If you see a yellow
ame there may be debris in the unit.
Turn unit off immediately. Try to clear
debris with compressed air. If further
assistance is required please call 1800
654 767.
Check your Gas Cylinder to ensure it is
not empty. If using a new cylinder; try to
cycle the unit on and off by using the
Shower Head switch several times to
purge the air from the gas lines.
Water Pump not working
Make sure the power source for the
pump is adequate enough and has
enough charge to operate the pump
Ensure all connections are securely
joined and the switch is in the ON
position
Pressure switch may be broken.
Pump motor may have failed.
Troubleshooting (continued)
Technical Assistance and Spare Parts
The Bushranger Gas Hot Water Shower has been inspected, tested and set by expert personnel prior to
leaving the factory to guarantee quality.
We always recommend contacting the place of purchase, specifying the model, serial number and type
of problem you are having with the unit. If unavailable contact:
Kingsley Enterprises Pty Ltd
PO Box 6007, Minto BC 2566
Phone:
Fax:
1800 654 767
1800 655 196
International:
Email:
+612 8700 0400
Kingsley Products - Warranty Policy
Term Meaning
Product
information
information about the Kingsley product which may be contained in any of the documentation provided
with the Kingsley product, including safety instructions, installation instructions, operating instructions, owner’s
manual, service manual, labels and packaging
Purchase date the date you purchased the Kingsley product from a Kingsley outlet, as specied in the purchase receipt
Kingsley outlet an outlet authorised by Kingsley to sell Kingsley products
Kingsley products products or components which Kingsley manufacturers or sells through Kingsley outlets
Warranty period commences on and from the purchase date and ends as follows:
Portable Gas Hot Water Shower - 5 years
We/Us
Kingsley Enterprises Pty Ltd (ABN 23 001 592 749)
A: 6A Brooks Road, Ingleburn NSW 2565
P: 1800 654 767
W: www.kingsleyenterprises.com.au
You the purchaser of the Kingsley product from a Kingsley outlet
1. Our Warranty
We warrant to you that the Kingsley product is free from defects in workmanship and materials for the
warranty period.
2. Fitting and use
Please ensure you:
a. t the Kingsley product in accordance with the product information and all relevant vehicle safety and
compliance laws
b. use the Kingsley product for the purpose for which it was originally designed and in accordance with
the product information and all relevant vehicle safety and compliance laws
3. Exclusions
Our warranty doesn’t cover:
a. normal wear and tear
b. tting the Kingsley product other than in accordance with the product information and any relevant
vehicle safety and compliance laws, including incorrect tting
c. using the Kingsley product other than for the purpose for which it was originally designed or other
than in accordance with the product information and any relevant vehicle safety and compliance
laws, including unusual, improper or negligent use or misuse or overloading
d. misuse or neglect of the Kingsley product, including improper repair or maintenance or failing to repair or
maintain
e. alteration, abuse, acts of nature, terrorism, vandalism, collision, road hazards or adverse conditions
4. Making a claim
Please immediately contact us as soon as you become aware of a possible defect in the Kingsley product.
We’ll arrange for you to either attend a Kingsley outlet (at your cost) for a Kingsley representative to inspect
the Kingsley product (as tted to your vehicle) or for you to return the Kingsley product to us. We’ll also
request you to provide the purchase receipt and complete a warranty claim form. In order to ensure our
warranty is not voided, please keep the purchase receipt as proof of purchase and don’t remove the tted
Kingsley product from your vehicle before contacting us. Note: Non-transferable warranty. The original
purchaser can only claim warranty. If your claim’s in order, we’ll notify you and (at our sole discretion) either
repair or replace the defective workmanship or materials (at our cost) or refund to you the purchase price you
paid for the defective Kingsley product. If further information or investigation is required or if the claim does
not meet the requirements under our warranty, we’ll let you know.
5. Australian Consumer Law
The Kingsley product comes with guarantees that can’t be excluded under the Australian Customer
Law. You’re entitled to a replacement or refund if there’s a major failure and compensation for any other
reasonably foreseeable loss or damage. You’re also entitled to have the Kingsley product repaired or
replaced if it fails to be of acceptable quality and the failure doesn’t amount to a major failure.
6. Other consumer rights
The benets to you under our warranty are in addition to any other rights and remedies you are entitled to
under relevant consumer laws. Our warranty replaces any other warranty given by Kingsley or it’s supplier in
respect of the Kingsley product.
7. Terms
The following terms have the following meanings:
| Gas Hot Water Shower |Gas Hot Water Shower
Page 19 Page 20

bushranger.com.au
Free Call |1800 654 767 (Australia only)
International |+61 2 8700 0400
Fax |+61 2 8700 0499
Address | 6A Brooks Road, Ingleburn NSW 2565
Table of contents
Other Bushranger Bathroom Fixture manuals
Popular Bathroom Fixture manuals by other brands

Hans Grohe
Hans Grohe Focus E 04371 0 Series Installation/User Instructions/Warranty

Bathroom Butler
Bathroom Butler 9108 Assembly instructions

SANPLAST
SANPLAST KN4/FREEII Installation instruction

CRISTINA
CRISTINA NEW DAY CRIND406 installation instructions

Brizo
Brizo Odin 65675LF Series manual

comfortel
comfortel comet footrest II 10289 owner's manual

Oceania
Oceania FP 32 installation manual

Calflex
Calflex CARIMALI RIGOLETTO MySlim 00-1805-CR Installation

Hans Grohe
Hans Grohe Raindance Showerpipe Eco Assembly instructions

Foremost
Foremost MARINA MRHG-CL manual

Triton
Triton Amber 2 quick guide

Hans Grohe
Hans Grohe MySelect S Vario 26637400 Assembly instructions