manuals.online logo
Brands
  1. Home
  2. •
  3. Brands
  4. •
  5. BWT
  6. •
  7. Swimming Pool Vacuum
  8. •
  9. BWT myPool BC 200+ User manual

BWT myPool BC 200+ User manual

Other BWT Swimming Pool Vacuum manuals

BWT BC 30 User manual

BWT

BWT BC 30 User manual

BWT BC 50 User manual

BWT

BWT BC 50 User manual

BWT P450 User manual

BWT

BWT P450 User manual

BWT B Series User manual

BWT

BWT B Series User manual

BWT MAX 200 User manual

BWT

BWT MAX 200 User manual

BWT BC Series User manual

BWT

BWT BC Series User manual

BWT BC 30 User manual

BWT

BWT BC 30 User manual

BWT D500 User manual

BWT

BWT D500 User manual

BWT FALCON K100 User manual

BWT

BWT FALCON K100 User manual

BWT BC Series User manual

BWT

BWT BC Series User manual

BWT INO 30 User manual

BWT

BWT INO 30 User manual

BWT BC02 User manual

BWT

BWT BC02 User manual

Popular Swimming Pool Vacuum manuals by other brands

Maytronics Dolphin POOL UP operating instructions

Maytronics

Maytronics Dolphin POOL UP operating instructions

Kokido SKOOBA K535CBX/18/EU user manual

Kokido

Kokido SKOOBA K535CBX/18/EU user manual

SmartPool Robo-Kleen PLUS user manual

SmartPool

SmartPool Robo-Kleen PLUS user manual

Brilix BARACUDA Installation and user guide

Brilix

Brilix BARACUDA Installation and user guide

POOLGOODS PoolGobbler Pro user guide

POOLGOODS

POOLGOODS PoolGobbler Pro user guide

Hayward Navigator Pro manual

Hayward

Hayward Navigator Pro manual

Polaris Vac-Sweep 380 owner's manual

Polaris

Polaris Vac-Sweep 380 owner's manual

Pentair Prowler 710 Installation and user guide

Pentair

Pentair Prowler 710 Installation and user guide

iRobot Verro 600 owner's manual

iRobot

iRobot Verro 600 owner's manual

Dolphin MCC6 operating instructions

Dolphin

Dolphin MCC6 operating instructions

Winny OD15061 instruction manual

Winny

Winny OD15061 instruction manual

baracuda Captura EM14 Series quick start guide

baracuda

baracuda Captura EM14 Series quick start guide

Aquabot Pura Series quick start guide

Aquabot

Aquabot Pura Series quick start guide

Zodiac G2 installation instructions

Zodiac

Zodiac G2 installation instructions

Dolphin Dynamic PRO X operating instructions

Dolphin

Dolphin Dynamic PRO X operating instructions

Winny RoadRunner Plus user manual

Winny

Winny RoadRunner Plus user manual

AquaTools AT5800 owner's manual

AquaTools

AquaTools AT5800 owner's manual

Bestway AQUACLEAN manual

Bestway

Bestway AQUACLEAN manual

manuals.online logo
manuals.online logoBrands
  • About & Mission
  • Contact us
  • Privacy Policy
  • Terms and Conditions

Copyright 2025 Manuals.Online. All Rights Reserved.

Remove the pins from the
wheels. Keep the wheels aligned
and insert both arms of the roller
into the wheel chamber as shown
below. The longest edge of the
arms must be at the bottom and
not ipped upside-down.
Align and insert the pins
thoroughly through the holes of
the wheel chamber to secure
the wheels and arms of the
roller. Make sure the pins are
thoroughly inserted for the side
hooks on their ends to secure the
installation.
Retirer les broches des roues.
Maintenir les roues alignées
et insérer les deux bras du
roulement dans la chambre de
roue comme montré ci-après.
Le bord le plus long des bras
must doit être en bas et non pas
retourné à l’envers.
Aligner et introduire les broches
soigneusement à travers les
trous de la chambre de roue pour
assurer les roues et les bras du
roulement. S’assurer que les
broches sont soigneusement
introduites pour les crochets
latéraux sur les extrémités pour
xer l’installation.
Extraiga los ejes de las ruedas.
Mantenga las ruedas alineadas e
inserte ambos brazos del rodillo
en la cámara de las ruedas, tal
como se muestra abajo. El borde
más largo de los brazos debe
quedar situado en la parte inferior.
Alinee e inserte los ejes a través
de los oricios de la cámara de
las ruedas hasta que hagan tope
para jar las ruedas y los brazos
del rodillo. Asegúrese de que
los ejes queden completamente
insertados, de tal manera
que los ganchos laterales de
sus extremos garanticen una
instalación segura.
Roller assembly
Montage des roulement
Montaje del rodillo
200+BC
2021/02 : AMAINTENANCE & CLEANING 1/2
Montage van de rol
Assemblaggio del rullo
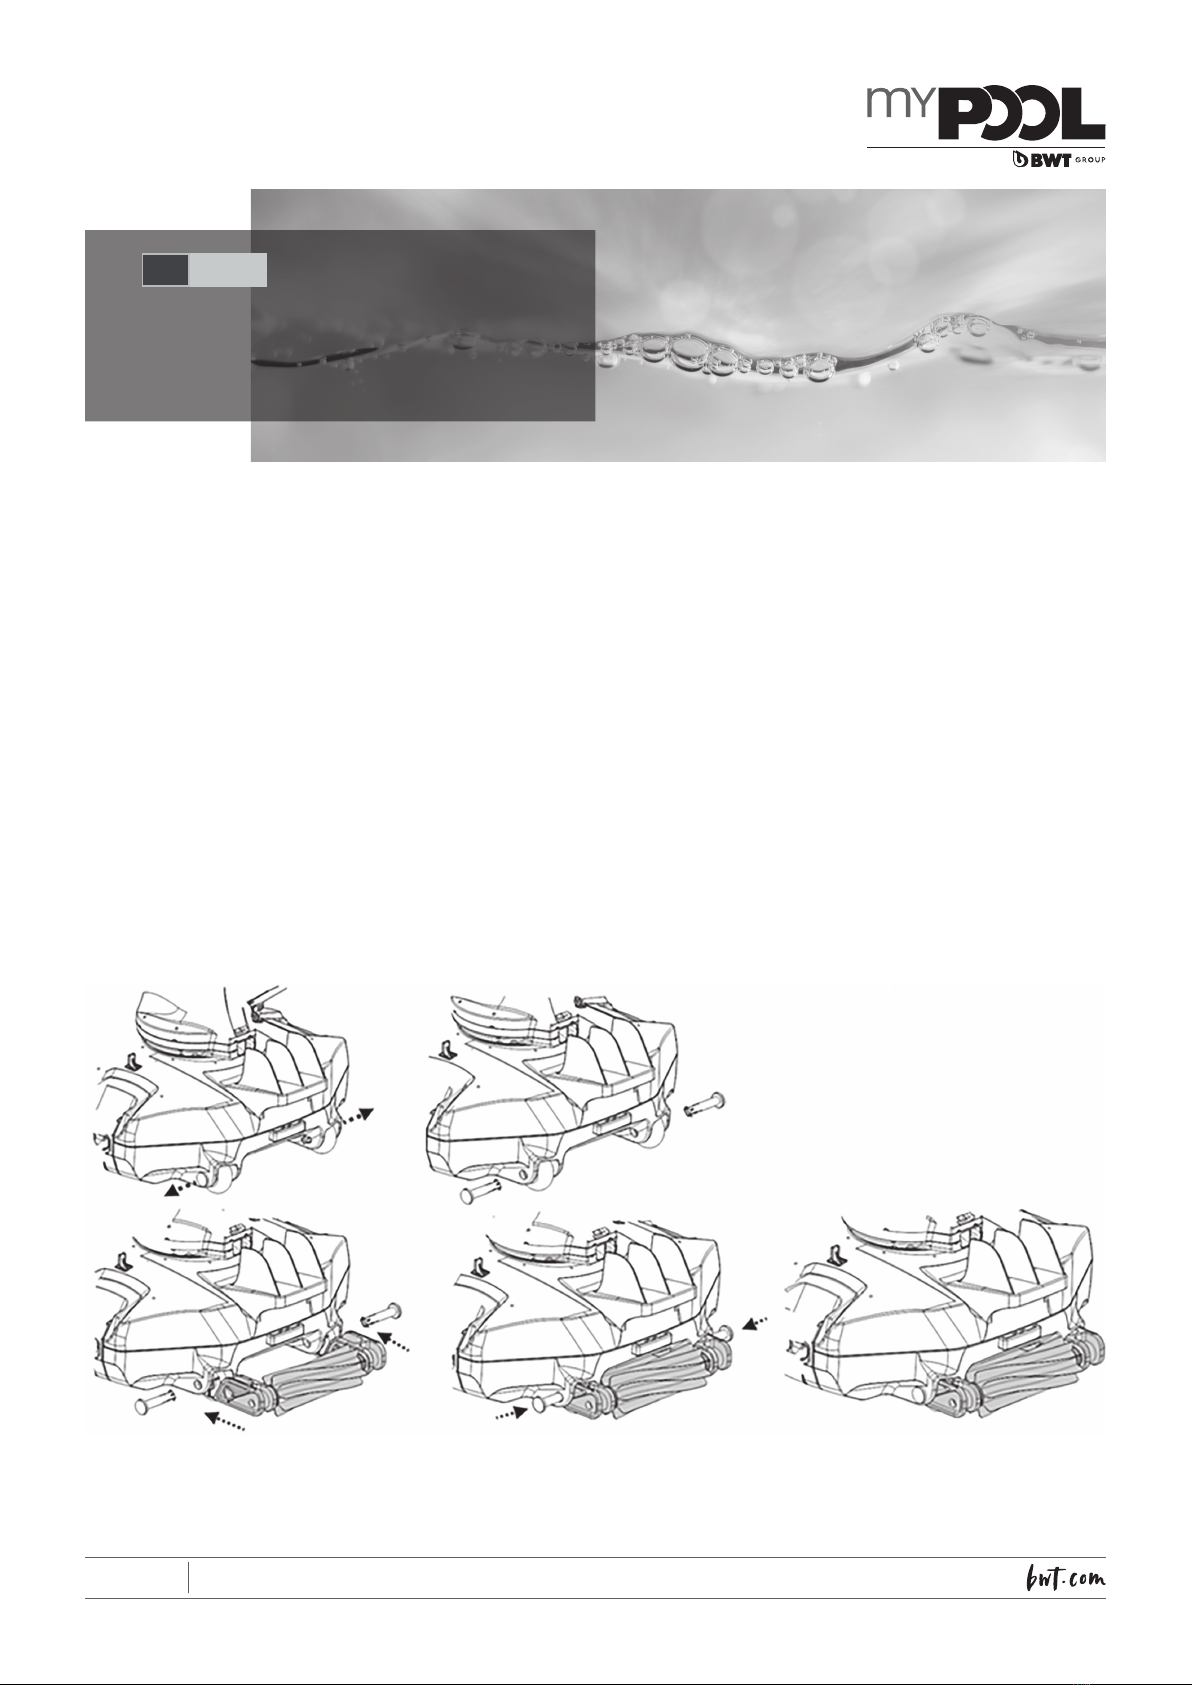
Montage der Walze
Verwijder de pennen van de
wielen. Houd de wielen op één lijn
en steek beide armen van de rol
in de wielkast zoals hieronder is
aangegeven. De langste rand van
de armen moet aan de onderkant
zitten en mag niet ondersteboven
zijn gedraaid.
Lijn de pennen uit en steek ze
door de gaten van de wielkast om
de wielen en de armen van de rol
vast te zetten. Zorg ervoor dat de
pennen voor de zijhaken aan de
uiteinden stevig zijn ingebracht
om de installatie te beveiligen.
Rimuovere i perni dalle ruote.
Tenere le ruote allineate e
inserire entrambi i bracci del rullo
nella camera della ruota come
mostrato di seguito. Il bordo più
lungo delle braccia deve essere
posizionato in basso e capovolto
a testa in giù.
Allineare e inserire accuratamente
i perni attraverso i fori del vano
ruota per ssare le ruote e le
braccia del rullo. Assicurarsi che
i perni siano inseriti a fondo per
i ganci laterali alle loro estremità
per assicurare l’installazione.
Entfernen Sie die Stifte von den
Rädern. Halten Sie die Räder
in einer Linie und führen Sie
beide Arme der Walze wie unten
gezeigt in die Rollenkammer ein.
Die längste Kante der Arme muss
sich unten benden und darf nicht
nach oben gerichtet sein.
Richten Sie die Stifte aus und
führen Sie sie sorgfältig durch die
Löcher der Rollenkammer ein, um
die Räder und Arme der Walze zu
sichern. Achten Sie darauf, dass
die Stifte sorgfältig eingeführt
sind, um die seitlichen Haken
zur Sicherung der Baugruppe
einsetzen zu können.
200+BC
2021/02 : A MAINTENANCE & CLEANING
2/2