CAB e4 User manual

cab Produkttechnik GmbH & Co KG
1
PRODUCTMARKINGANDBARCODEIDENTIFICATION
1
Operator´s Manual
Thermal / Thermal Transfer e4
e4E2_101
Edition 1.01 / 2006

cab Produkttechnik GmbH & Co KG
2
PRODUCT MARKING AND BARCODE IDENTIFICATION
2
cab Operator´s Manual
valid for following printer types:
e4/200TM
e4/300TM
copyright © cab Produkttechnik GmbH & Co KG
allrightsreserved
No parts of this manual may be copied, rewritten or used for anything else
thanfororiginalcabprinters.
This interdicts the usage of the manual for OEM products
unless you have a written permission.
cab Produkttechnik GmbH & Co KG
cab Produkttechnik GmbH & Co KG
Wilhelm Schickard Str. 14
76131Karlsruhe/Germany
Tel:++49-721-6626-0
Fax:++49-721-6626-239
Email:[email protected]
http://www.cabgmbh.com
Allregisteredtrademarksorproductnamesaretrademarksoftheirrespectivescompanies
ARMisaregisteredtrademarkofAdvancedRISCMachinesLtd.
CentronicsisaregisteredtrademarkofCentronicsDataComputerCorporation.
Microsoft,WindowsareregisteredtrademarksofMicrosoftCorporation.
PS/2isaregisteredtrademarkofInternationalBusinessMachinesCorporation.

cab Produkttechnik GmbH & Co KG
3
PRODUCTMARKINGANDBARCODEIDENTIFICATION
3
Table of Contents
e4 series Operator´s manual
copyright © cab Produkttechnik GmbH & Co KG......................................................................... 2
Tableof Contents ......................................................................................................................... 3
FCC Notice .................................................................................................................................. 4
ImportantSafetyInstructions ....................................................................................................... 5
PossibleCorrectiveAction ........................................................................................................... 5
Preface ........................................................................................................................................ 5
Chapter 1Introduction .................................................................................................................. 6
Printer Specifications .................................................................................................................. 6
UnpackingandInspection ............................................................................................................ 7
PackingList¨Figure 1: .................................................................................................................. 7
Chapter2Getting Started............................................................................................................. 8
Settingup .................................................................................................................................... 8
ConnectingthePrinter ................................................................................................................. 8
InterfaceConnection .................................................................................................................... 9
MainParts and Features.............................................................................................................10
Description .................................................................................................................................11
LoadingtheRibbon .....................................................................................................................12
LoadingtheMedia ......................................................................................................................16
Adjusting the Position of Media Sensor.......................................................................................17
Mediasensing ............................................................................................................................18
Mediasensing ............................................................................................................................19
OperationBasics ........................................................................................................................20
PowerSwitch..............................................................................................................................20
TheFrontPanel ..........................................................................................................................20
IndicatorLamps ..........................................................................................................................20
Buttons......................................................................................................................................21
System Mode .............................................................................................................................21
MediaSensorCalibration ............................................................................................................22
SelfTest .....................................................................................................................................22
DIP Switch at the Back Panel.....................................................................................................23
WindowsDriverInstallation .........................................................................................................24
LabeleditionsoftwareeLABEL ...................................................................................................24
Chapter3Maintenance ...............................................................................................................25
Warning: .....................................................................................................................................25
CleaningthePrinthead................................................................................................................25
Chapter4 Troubleshooting ..........................................................................................................26
ErrorIndications..........................................................................................................................26
AppendixA: Interface Specifications ...........................................................................................28
RS232Serial...............................................................................................................................28
Parallel(Centronics)....................................................................................................................29
AppendixB:ASCIITable .............................................................................................................30

cab Produkttechnik GmbH & Co KG
4
PRODUCT MARKING AND BARCODE IDENTIFICATION
4
FCC Notice
Thisequipmentmaygenerate,useand/orradiateradiofrequencyenergy.
If not installed and used in full accordance with this instruction manual,
interferencetoradio communications mayoccur.Thisequipmenthasbeen
tested and complies with the limits for a Class A computing device pursuant
toSubpartJ of Part 15ofFCCRules,whicharedesigned to provide reasonable
protectionagainstsuchinterferencewhenoperatedinacommercialenvironment.
Operationofthisequipment in a residential area mayalsocauseinterference.
In such case the user will be required, at his own expense, to correct the
interferenceusingwhatevermeansnecessary.

cab Produkttechnik GmbH & Co KG
5
PRODUCTMARKINGANDBARCODEIDENTIFICATION
5
Important Safety Instructions
Onlyqualifiedandtrainedservice technicians should attempt to repair the printer.
Do not place the printer on or near a heat source.
Be sure that the output of the power adapter is 24VDC and your power source matches
therating listed onthe power adapter. Be certain your powersource is grounded.
Toavoid getting an electric shock,do not use a wornor damaged power cord.
Ifthepower cord becomes damagedorfrayed,replaceitimmediately.
Do not insert anything into the ventilation slots or openings on the printer.
Theprinterandpoweradaptershouldneverbeoperatedinalocationwhereeither
one can get wet. Personal injury could result.
Theprintheadbecomeshotwhileprinting.Toprotectfromdamagingtheprinthead
andriskofpersonalinjury,avoidtouchingtheprinthead.
Togetincreased printhead lifespanandhigherqualityprintouts,always use high
qualityapprovedlabels,tagsandthermaltransferribbons.Approvedsuppliescan
beorderedfromyourdealer.
Static electricity that accumulates on the surface of the human body or other s
urfacescan damage or destroytheprinthead or electronic componentsin this device.
DONOTtouchtheprintheador the electronic components with bare hands.
Place the printer on a flat, firm, solid surface.
Possible Corrective Action
Neverjamorblocktheairvents,oroperateinahightemperatureenvironment.
Turnoffthepowerwhennotinuseforextendedperiods.
Follow all recommendations and setup instructions included in this manual.
Preface
Welcometo cab’se-serieslabelprinter.The eSeriesisdesignedto providegeneral-purpose
andhigh-performanceprintingcapabilities.
cabe-seriesbarcodelabelprinterisanewgenerationofprintingequipmentfeaturinghigh
performanceandmultiplefunctions.
It stands out with its modern appearance and excellent functionality while utilizing a series
ofnewandcutting edge technologies. Relying onourwealthofexperience,wecarefully
designed the units to be not just rugged and durable but also easily operated and maintained.
We utilize a 32-bit embedded ARM CPU and a high-tech system platform to guarantee the
highestperformanceandqualitypossible.
This manual explains how to set up and begin using your G series printer.
Italsoprovidesdetailedinformationonconfiguringyourprinter,basicoperations,careand
troubleshooting.
Pleasereadthismanualcarefullybeforeusing.
cab Produkttechnik GmbH & Co KG
6
PRODUCT MARKING AND BARCODE IDENTIFICATION
6
Chapter 1 Introduction
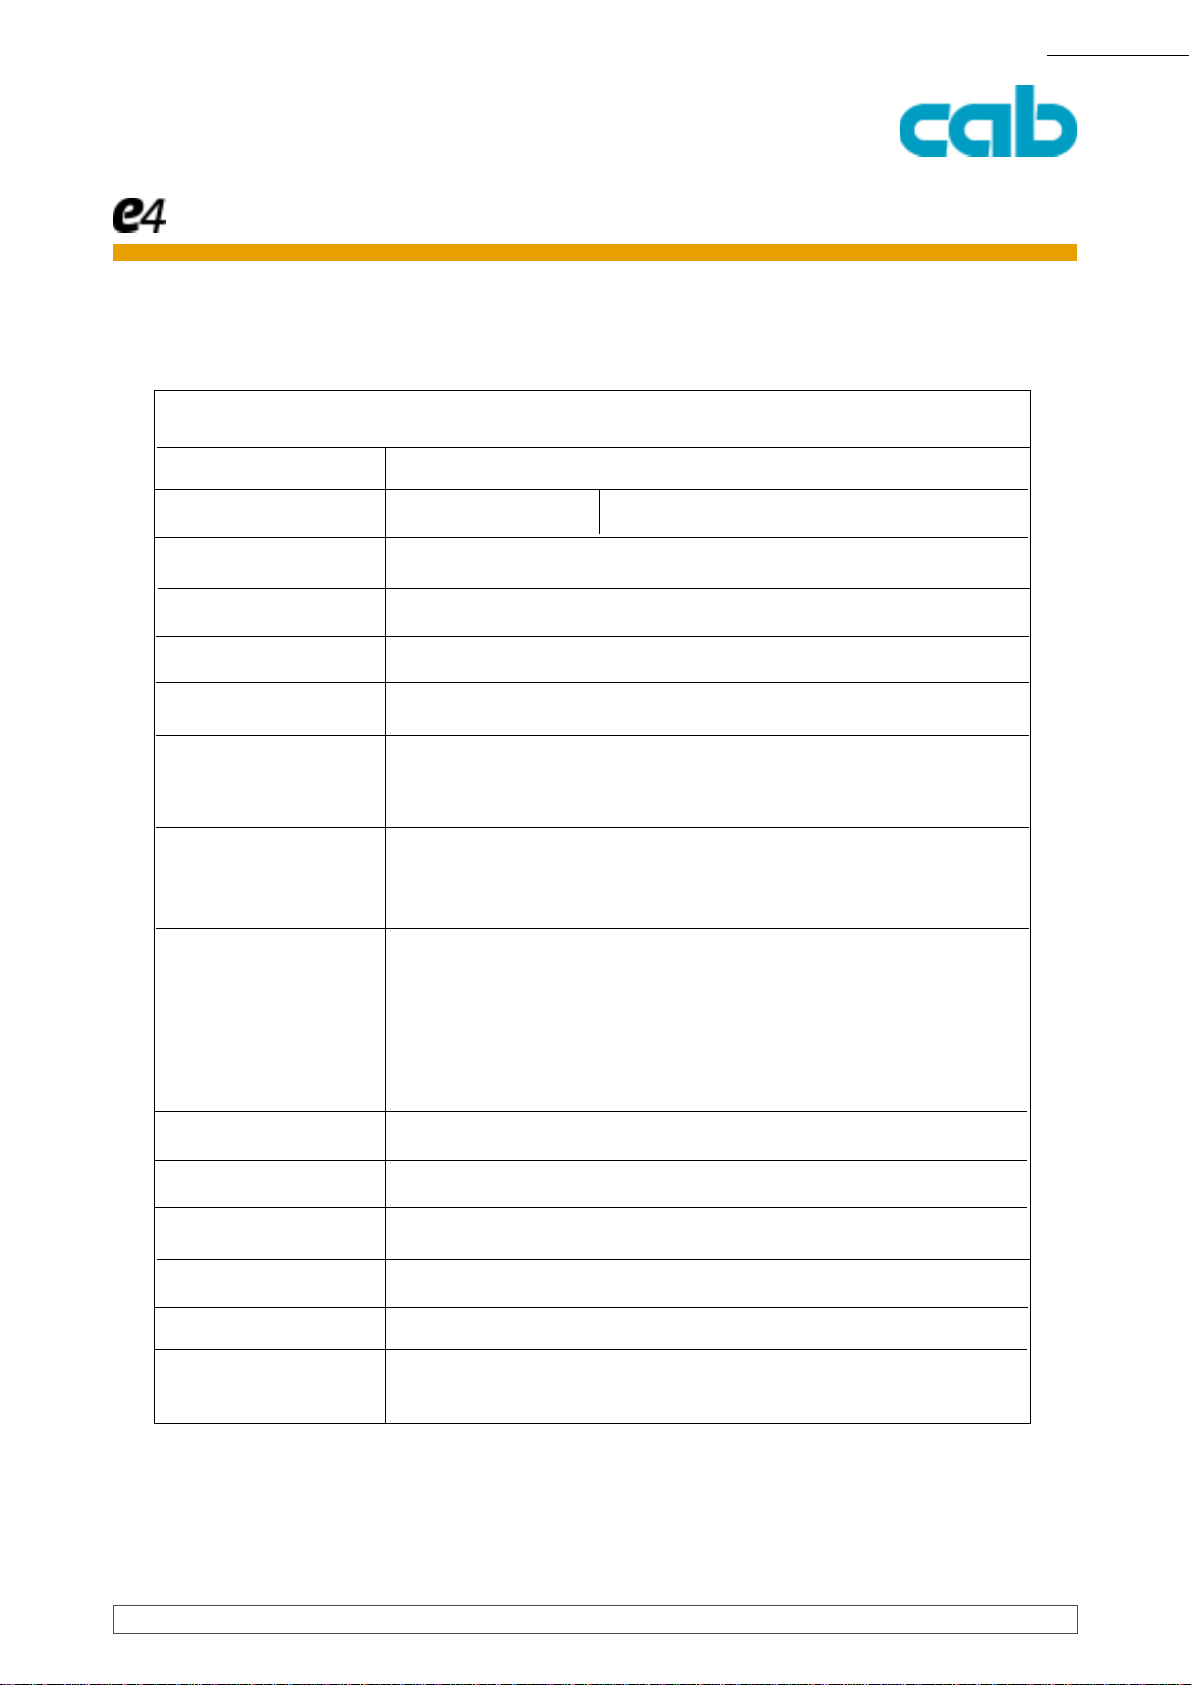
Printer Specifications
Model e4/200(203dpi ) e4/300 (300dpi )
Printingmethod Directthermal&Thermaltransfer
Printingresolution 203dpi(8dots/mm) 300dpi (11.8dots/mm)
Maxprinting speed 4ips (101.6mm/s) 3ips (76.2mm/s)
Maxprintingwidth 4.25”(108mm) 4.17? (106mm)
Maxprintinglength 40" (1016mm)
Memory 2MB FLASH ROM, 4MB SDRAM
Media Roll-feed,die-cut, continuous, fan-fold, tags, tickets in plain
paper or thermal paper - Width 110mm max. 27mm min.
Supply roll: OD 6" (152mm) max., ID 1" (25.4mm) min.
Ribbon Wax, Wax/Resin, Resin
Ribbon roll: OD 3" (76.2mm) max., ID 1" (25.4mm) core
Max width: 110mm; Max length: 360M
Fonts WindowsTrueTypeFonts(whenusingWindowsdrivers);Five
built-inASCII fonts and a 24x24 dot matrix Chinese font.
BarCodeTypes* 1D Barcode:Code39,Code93,Code 128/subsetA,B,C
Codabar,Interleave2of5,UPCA/E2and5add-on,
EAN-13/8/128,UCC-128,Postnet,Plessey,HBIC, Telepen,
FIMand so on»
2D Barcode : MaxiCode, PDF417, Data matrix and so on.
Mediasensor Reflective
Interfaces RS-232serial, Centronics , USB andEthernet
Powerrating 24VDC,2.0A**
Weight 3.5 kg
Dimensions W256 x D329 x H200mm
Operationenvironment Temperature:40°F–100°F(0°C–40°C)
Relativehumidity:5% - 85% non condensing
* Theoretically, the printer can print any type of barcode, as determined by the software you are
using.
** Powerfore4-seriesbarcodelabelprinterisprovidedviaanexternalpoweradaptor.
Specifications for Power Adapter
Input:AC100~240V,47~63HZ Output: DC 24V, 2.0 A Environment: 0°C ~ 40°C
cab Produkttechnik GmbH & Co KG
7
PRODUCTMARKINGANDBARCODEIDENTIFICATION
7
Printer
Power Adapter
RibbonSpindle
Sample Media Ribbon
MediaSpindle
CoreAdapter
Media Roll Guide
CD-ROM
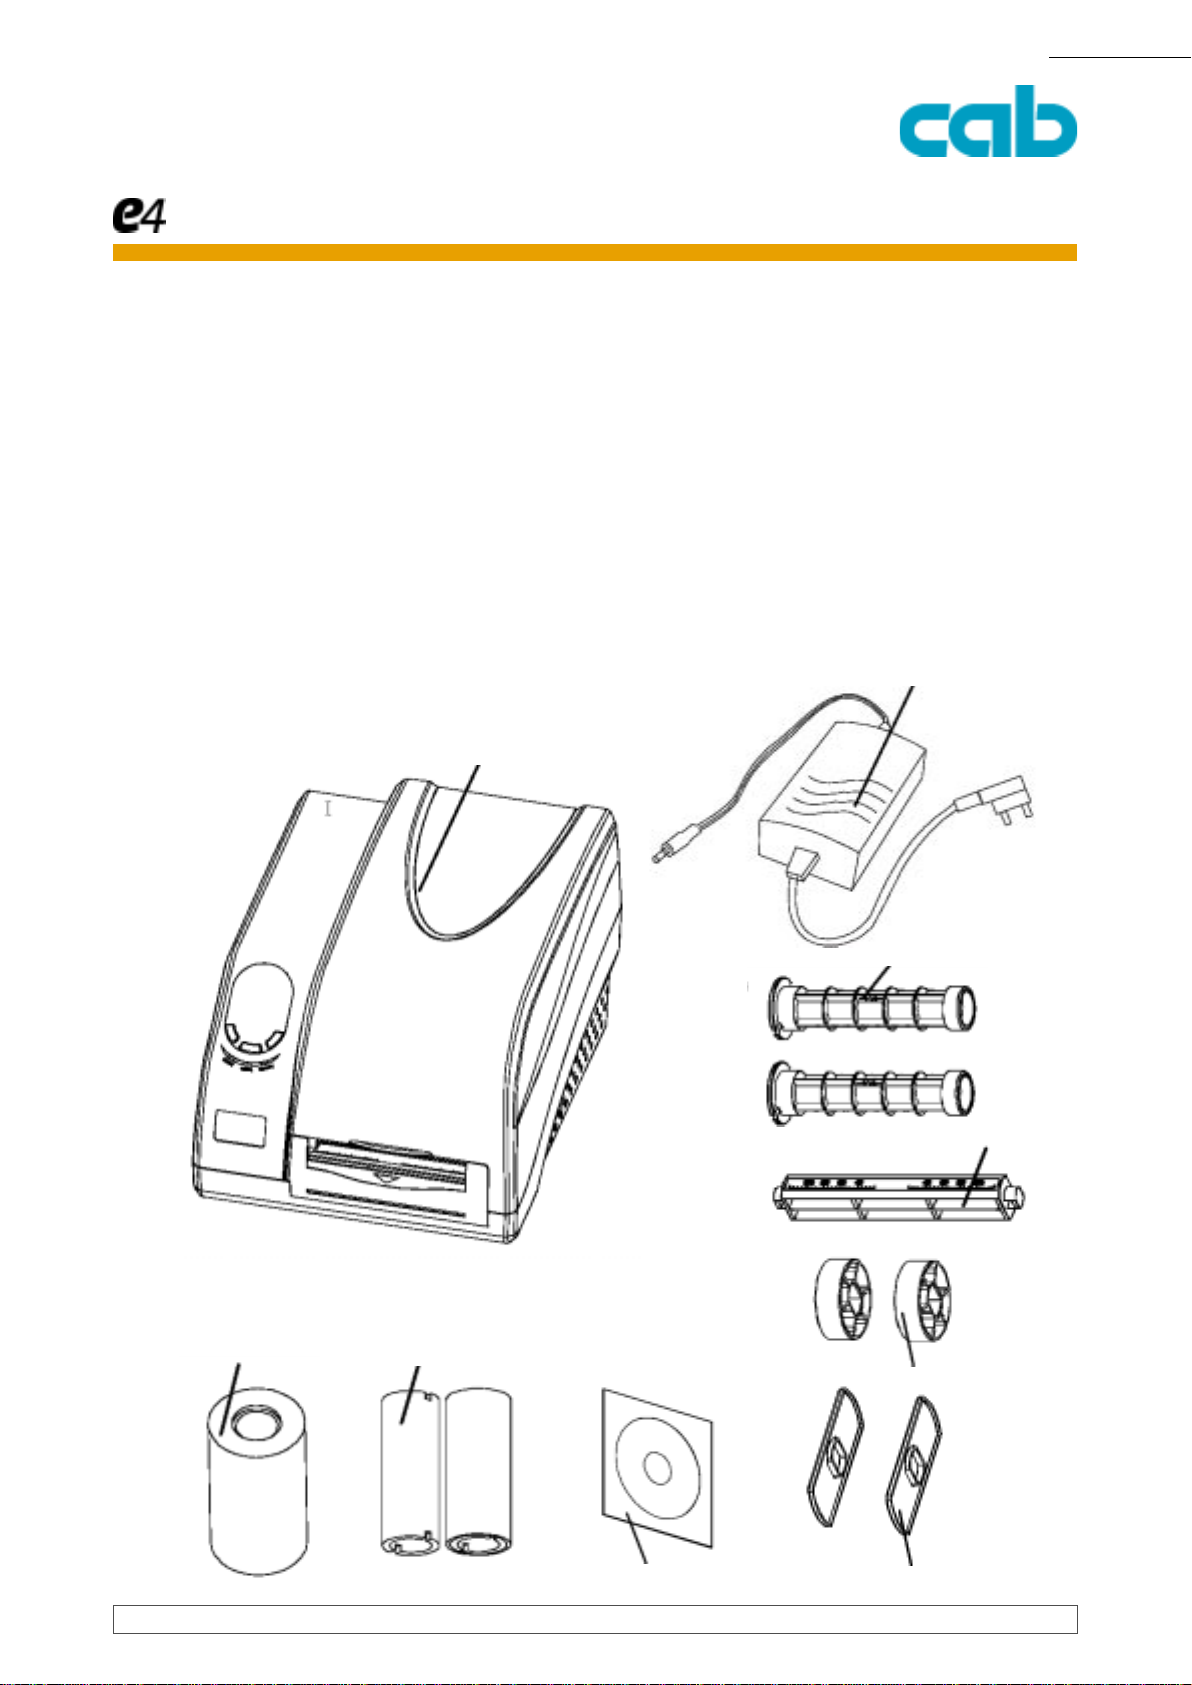
Unpacking and Inspection
Inspectthe shippingcontainer(s)forpossibleshipping damage,ifdamageisdiscovered,notifythe
shippingcompany to reportthe nature andextent of the damage.
Please check the items according to the Packing List. If there are any items missing, notify your
authorizedreseller.
Packing List¨Figure 1:
1. Printer 1 pcs 6. MediaRollGuide 2 pcs
2. Poweradapter 1 pcs 7. Ribbon 1 pcs
3. Ribbon Spindle 2 pcs 8. Sample Media 1 pcs
4. Media Spindle 1 pcs 9. CDROM 1 pcs
5. CoreAdapter 2 pcs
Figure 1 Printer and accessories

cab Produkttechnik GmbH & Co KG
8
PRODUCT MARKING AND BARCODE IDENTIFICATION
8
Chapter 2 Getting Started
Setting up
Beforesettinguptheprinteryoushouldconsiderthefollowing:
1. Makesure thereisadequatespacearound theprinterforloading
consumablesandproperventilation.
2. Make sure the printer is close to the host so the interface cable is
easily accessible to either end.
Connecting the Printer
Power Connection
Caution: (1)Useofthewrongadaptercoulddamageyourprinter.
cab assumes no liability for any damage in such case.
Therating fortheprinteris24VDC.
(2) Do not use the printer near liquids or corrosive chemicals.
1. Make sure the printer is switched OFF.
2.Connect the power cord to the Power Adapter.
3. Connect the Power Adapter’s DC output plug to the DC IN port on the back of the printer.
4. Plug the power cord into a live wall outlet.

cab Produkttechnik GmbH & Co KG
9
PRODUCTMARKINGANDBARCODEIDENTIFICATION
9
Interface Connection
CAUTION:MakesuretheprinterisswitchedOFFbeforeconnecting
theinterfacecable.
The interface between the printer and the host will use either a serial,parallel , USB cable or for Ethernet
connectionoptions.
1. Theprinteridentifiesthecommunicationportautomatically.
2. Thedefaultvaluesofprinterportcanbeobtainedfromtheself-test
report. (See Chapter 2 Operation Basics - System Mode - Self Test)
3. Cableconfigurationsforserial(RS-232C)andparallel
(Centronics)interfaces are shown inAppendixA of thismanual.
4. Please take the following measures to reduce cable noise.
a. Reduce the length of the interface cable (keep the cable length
under1.83meters/ 6 feet) if required.
b. Keep the communication cable separate from power cords.

cab Produkttechnik GmbH & Co KG
10
PRODUCT MARKING AND BARCODE IDENTIFICATION
10
Main Parts and Features
Figure 2
1.PAUSEButton 2.FEEDButton 3.CANCELButton
4.READYIndicator 5. MEDIA Indicator 6. RIBBONIndicator
7. Media Exit Path 8. Cover Handle 9. Bottom Case
10. Top Cover 11.Left Side Cover
Other manuals for e4
2
This manual suits for next models
2
Table of contents
Other CAB Printer manuals


