Unpacking the system
Congratulations on selecting the Cadwell Easy® Ambulatory system! It’s time
to unpack the contents of your system. As you unpack, please carefully check
to make sure the contents match the packing slip. If you have any questions,
please call Cadwell at 800-245-3001 within the United States. International
customers please contact your local distributor or call Cadwell at 800-245-3001.
You should receive the following as standard items: (see illustrations on page 5)
PEasy Ambulatory Amplier
PEasy Recorder
PEasy Battery Holder
PEasy System Pouch with Belt
PChest and Shoulder/Limb Straps
PConnecting Cables
PStarter Electrode Kit
PMoisture Protection Bags
PDesktop or Laptop Computer (if ordered with your system)
PVideo Monitor (if ordered with your system)
PEasyNet Modules (if ordered with your system)
PQ-Video Mobile (if ordered with your system)
Read the instructions carefully and verify that all components are present.
Cadwell recommends pre-assembly and testing of the system. Verify proper
understanding of the system and its modules prior to collecting clinical data.
System Setup
If you purchased a computer from Cadwell, all necessary Easy software has
been installed on your computer at the Cadwell factory. There is no need for
you to install any software. Put the back-up software CD in a safe place. You’ll
need it if reinstallation is required.
To connect the computer to the Easy recorder, follow the instructions below.
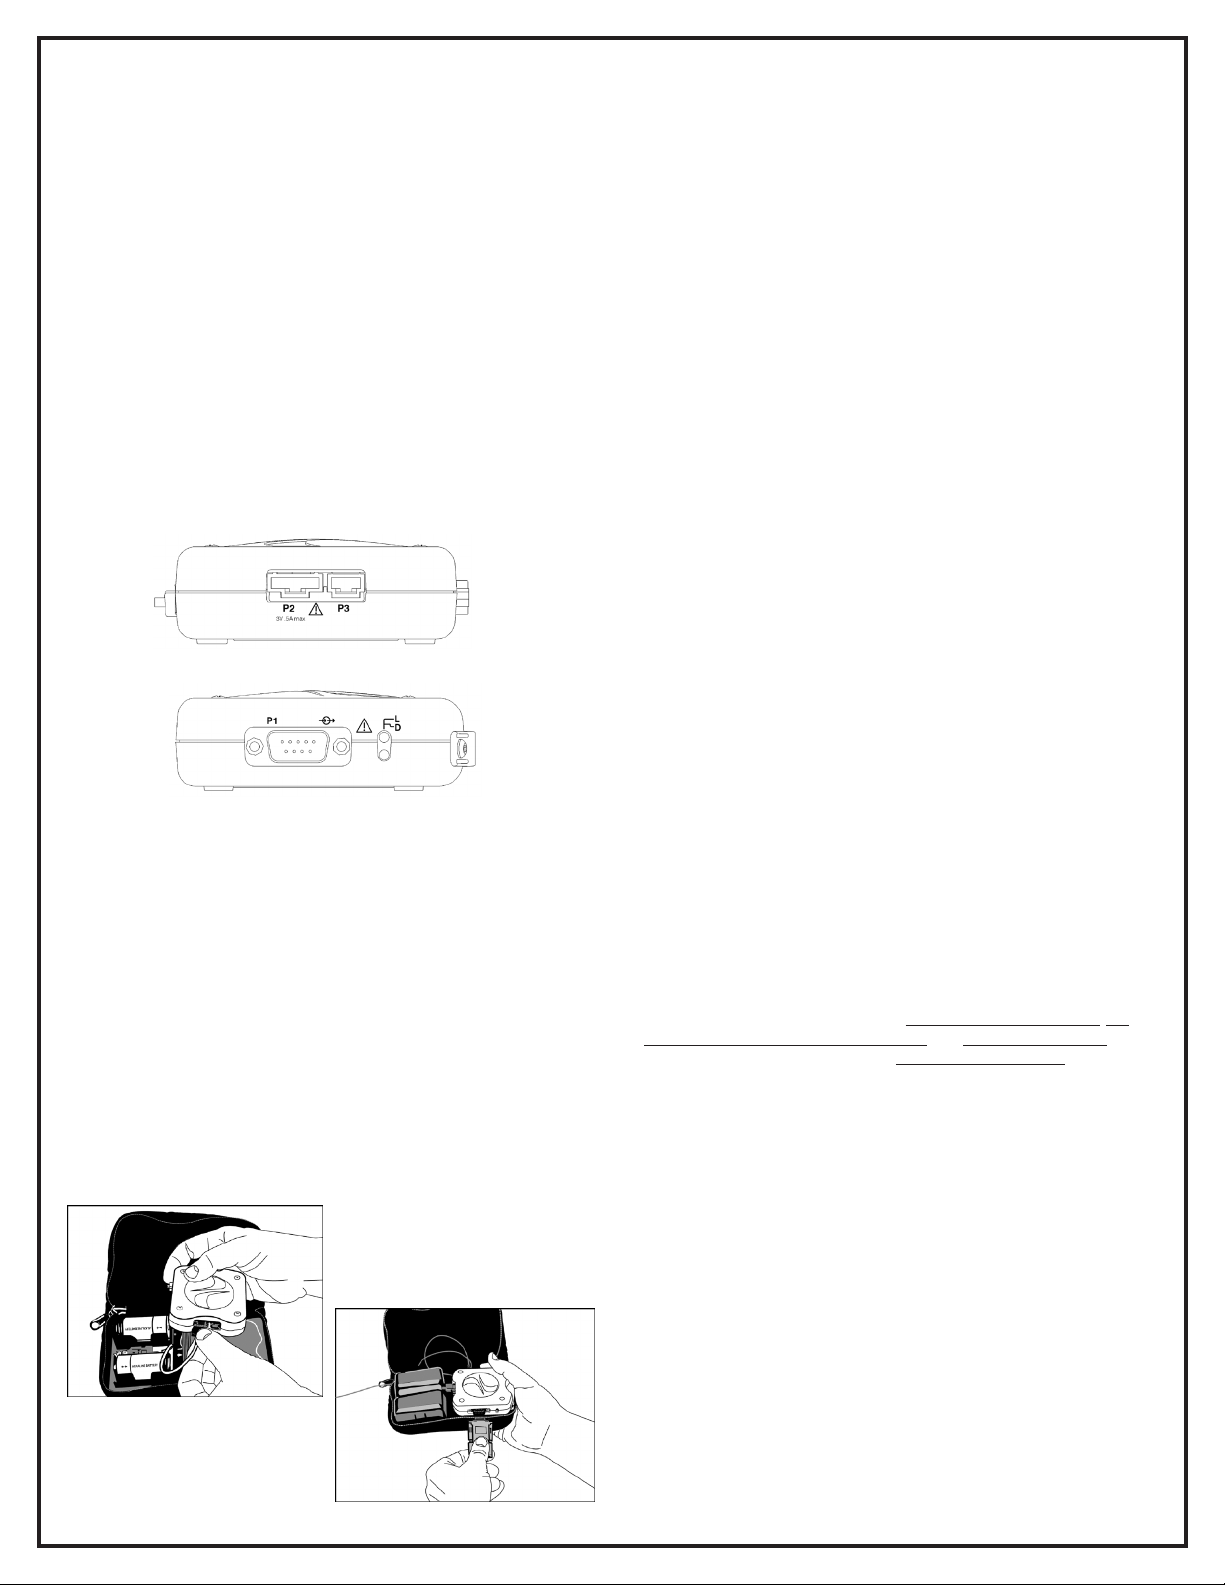
1. Place batteries in the Battery Holder. Plug the battery cable into the
connector labeled P2 on the recorder. See Figures 1 and 3 below.
2. Plug one end of the network cable into the Ethernet network card on the
back of the computer and the other end of the cable into the 9-pin
connector labeled P1. See Figures 2 and 4 below.
A copy of the Easy Ambulatory Operators manual is available on the Easy Install
CD. You will nd the manual saved in a Word (.doc) format in the folder named
Documents.
2
Computer System Startup
1. Turn on the computer.
2. Double-click the Easy Ambulatory software icon located on the Windows
desktop to start the program.
Conguring the Computer Network Card
for the Easy Ambulatory
The Easy Ambulatory recorder communicates with the PC over an Ethernet
link. A dedicated Ethernet Card must be installed in the PC and the card must
be congured to a specic IP address. If you have purchased a computer from
Cadwell, the network card is already congured in your PC. If you are using a
PC not supplied by Cadwell, you will need to congure the network card. The
following describes how to congure the IP address.
1. If necessary, install a network card in the computer. Follow the
manufacturer’s installation instructions.
2. Login as a User that had administrative access rights.
3. Click Start, then Control Panel, then Network and Internet Connections.
4. Click on Network Connections. The Network Connections window will
be displayed. A seperate icon will be displayed for each network card that is
installed in the PC. By default, the name given to each network card is“Local
Area Connection”. You can rename the icons to something more descriptive,
like Amb EEG, by right-clicking on the icon and selecting Rename.
5. To congure the network properties; Right click over the appropriate icon
and then select Properties. The properties window will be displayed.
6. First, remove the check marks next to Client for Microsoft Networks, File
and Printer Sharing for Microsoft Networks, and QoS Packet Scheduler. Be
sure to leave the check mark next to Internet Protocol (TCP/IP).
7. Select the Internet Protocol (TCP/IP) and then click on the Properties
button.
8. Select “Use the following IP address”. Enter 192.168.113.66 for the IP
address. Enter 255.255.255.0 for the subnet mask.
9. Click the Advanced button, then click the WINS tab. Remove the check
mark next to “Enable LM Hosts lookup” and then select “Disable NetBIOS
over TCP/IP”.
10. Click OK, click OK again, then click Close.
11. Right-click on the appropriate network card again and select Properties.
Click on the button called Congure next to the section labeled Connect
Using.
12. Select the Advanced Tab. In the Property window select Link Speed/
Duplex Mode. In the Value drop down menu select 10 Full Mode.
13. Select the Power Management tab. Uncheck the box labeled Allow the
computer to turn o this device to save power.
14. Click OK.
Figure 1 Amplier Power Connector
Figure 2 Amplier Ethernet Connector
Figure 1 Inserting Batteries and
Connecting the Power Cable
Figure 2 Connecting
Ethernet Cable to Recorder
Computer System Shutdown
Shutdown occurs the same as in any Windows 7 computer system.
1. Close all open applications, including Easy, by clicking on the “File” pull-down
menu and selecting Exit or, click on the “X” in the upper right hand corner of
all open windows until the Windows desktop appears.
2. Click on the Start button and select Shut Down from the menu.
If Q-Video Mobile Ordered with System
To connect the computer to the Q-Video Mobile device, follow the
instructions below.
1. Plug the USB B connection into the side of the Q-Video Mobile device.
2. Plug the USB end to a USB port on the computer.
3. Power on the device utilizing the tool provided by pressing in on the hole
on the bottom of the Q-Video Mobile device. Press and hold gently until the
display comes on.