Calex FibreMini series Manual

FibreMini
Fibre Optic Pyrometer
Operator's Guide

FibreMini
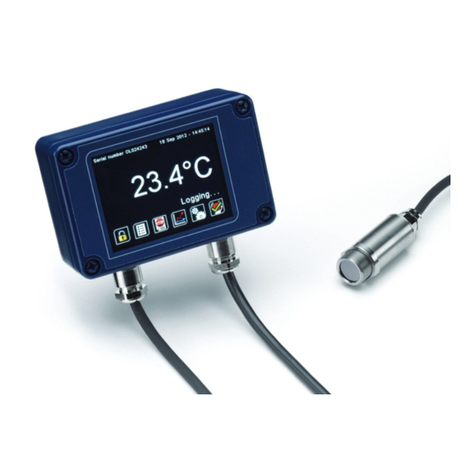
The FibreMini is an infrared temperature sensor (pyrometer) with a fibre optic sensing head
and separate electronics module.
The fibre optic sensing head withstands ambient temperatures of up to 200°C and contains no
electronics, so it may be used in areas of strong electromagnetic interference.
Continuous laser sighting illuminates the position and size of the measurement spot while
readings are being taken, without affecting the accuracy of the measurement.
A touch screen interface is built into the electronics module, with temperature display, sensor
configuration, data logging to optional MicroSD Card, and configurable alarm relay outputs.
The sensor works by detecting the infrared radiation emitted from a surface as a result of its
own temperature. The amount of radiation emitted is related to the temperature, and the
sensor uses this relationship to provide an accurate temperature output.
FibreMini sensors are ideal for measuring the surface temperature of many reflective metals in
high-temperature applications, including iron and steel, as well as non-reflective non-metals.
Specifications
Measurement Specifications
Temperature Range
MT models: 250°C to 1000°C
HT models: 450°C to 2000°C
Max. Temperature Span for 4-20
mA Output (-CRT models)
Full temperature range (up to 1550°C)
Min. Temperature Span for 4-20
mA Output (-CRT models)
100°C
Output
4-20 mA or RS485 Modbus (Up to 247 sensors may
be installed on a single Modbus network)
Field of View
Choice of wide-angle or narrow-angle optics (see
Field of View Diagrams below)
Accuracy
±1% of reading
Repeatability
±0.5% of reading
Emissivity Setting
Adjustable, 0.10 to 1.00
Emissivity Setting Method
-BRT models: via RS485 Modbus
-CRT and -BRT models: via touch screen
Response Time, t90
≥240 ms (90% response)
Spectral Range
2.0 to 2.6 μm
Supply Voltage
24 V DC ± 5%

Max. Current Draw
100 mA
Max. Loop Impedance (-CRT
models)
900 Ω (4-20 mA output)
Alarm Relays
2 x Single Pole Changeover alarm relays, rated 24 V
DC, 1 A, isolated 500 V DC
Data Logging Specifications
Data Logging Interval
1 to 86,400 seconds (1 day)
MicroSD Card
Max. capacity: 32 GB (not included)
Internal Clock Battery
1 x BR 1225 3V (not included)
Variables Logged
Target temperature, electronics module temperature,
max, min, average, emissivity setting, reflected energy
compensation temperature, alarm events
File format
.csv
Configurable Parameters
Sample period, number of samples, scheduled start date
and time
Touch Screen Interface Specifications
Touch Screen Display
Format
2.83” (72 mm) resistive touch TFT, 320 x 240 pixels,
backlit
Configurable Parameters
Temperature range, temperature units, emissivity setting,
reflected energy compensation, alarms, signal
processing, Modbus address (-BRT models), date and
time, data logging
Temperature Units
°C or °F configurable
Temperature Resolution
0.1°
Alarm Configuration
Two alarms with adjustable level, individually
configurable as HI or LO.
Signal Processing
Average, peak hold, valley hold, minimum, maximum

Mechanical Specifications
Sensing Head
Electronics Module
Construction
Stainless Steel 316
Die Cast Aluminium
Major
Dimensions
12 (dia.) x 48 (l) mm
98(w) x 64(h) x 36(d) mm
Mounting
M12 x 1.5 mm thread
Requires two M4 screws for wall
mounting (see Installation)
Fibre Optic Cable Length
(sensing head to electronics
module)
3 m, 5 m or 10 m
Cable Connections
Removable screw terminal blocks (see "Connections")
Conductor size: 28 AWG to 18 AWG
Output Cable Gland
Suitable for cable diameters 3.0 to 6.5 mm
Environmental Specifications
Sensing Head
Electronics Module
Environmental
Rating
IP65 (NEMA 4)
-
Ambient
Temperature
Range
0°C to 200°C
0°C to 60°C
Relative
Humidity
Maximum 95% non-condensing
This product is CE marked and RoHS compliant.
Electromagnetic Compatibility Standards
Conforms to EMC Directive EN61326-1:2006 (Electrical equipment for measurement, control
and laboratory use – Industrial) as well as industrial standards for electromagnetic immunity
and emissions.

Model Numbers
FM2.2 - 301 - MT - CRT - 3M
Fibre Optic
Cable Length
3M = 3 metres
5M = 5 metres
10M = 10 metres
Output and Interface
CRT = 4-20 mA output, two alarm
relay outputs, with touch screen
BRT = RS485 Modbus output,
two alarm relay outputs, with
touch screen
Temperature Range
MT = 250°C to 1000°C
HT = 450°C to 2000°C
Field of View
301 = 30:1 divergent optics
751 = 75:1 divergent optics
Series
FM2.2 = FibreMini pyrometer with 2.2 µm spectral response

Field of View Diagrams
Diagrams show the diameter of the measured spot at each distance, for 90% energy.
The sensor will also measure at longer distances than the diagrams show.
Measurement accuracy is not affected by distance, however the measured spot size will be
larger at longer distances.

Emissivity Adjustment
The default emissivity setting is 0.95. This may be adjusted via the touch screen interface:
Settings Emissivity & Compensation
Enter the emissivity of the target surface here. For more information on how to find the target
emissivity, contact Calex.
Reflected Energy Compensation
Settings Emissivity & Compensation
Some of the infrared energy detected by an infrared temperature sensor is not emitted by the
target, but is a reflection of its surroundings.
To ensure an accurate reading, the sensor needs to know the temperature of the source of
that reflected energy. In most applications, the surfaces that surround the target have the
same temperature as the sensor itself (e.g. the sensor and target are in the same room). The
sensor automatically compensates for the reflected energy, so this setting is not required and
should be switched off.
However, in some applications, the source of the reflected energy (the surroundings of the
target) is much hotter or colder than the sensor itself. In these cases, Reflected Energy
Compensation should be enabled and set to the temperature of the surroundings of the target.
For example: if the target is inside a furnace and the sensor is outside, the reflected energy is
coming from the inner walls of the furnace. Enter the furnace temperature into “Reflected
Temperature” and select “Enable Reflected Energy Compensation”.
For assistance, contact Calex.
Alarm Outputs
The sensor has two alarm relay outputs, rated 24 VDC, 1 A. They are individually
configurable via the touch screen interface.
Each alarm can be configured as Low or High, with set point and hysteresis.
For more information, see “Alarms”.
Touch Screen Interface
The backlit touch screen interface provides a large, bright display of the measured
temperature, two alarm relay outputs, and options for full configuration of the sensor.

Using the Touch Screen Interface
Main Screen
(Temperature
View)
Displays a large indication of the measured temperature. The
background turns bright red when an alarm is activated.
MicroSD Card Status
This icon is displayed when a MicroSD card is inserted, and
flashes when data logging is in progress.
Scheduled Logging
This icon is displayed when scheduled data logging is
enabled and has yet to begin.
Temperature Units °C and °F
Press “°C” to switch to °F and vice versa. The units are
changed throughout the interface.
Display Options
Press the measured temperature to select which reading is
shown:
Average Temperature: The measured
temperature with averaging, but without hold
processing.
Hold Temperature: The measured temperature,
with averaging and hold processing.
Unfiltered Temperature: The unprocessed
measured temperature.
Sighting On/Off
Switches the laser sighting light on or off. The light does not
affect the measurement accuracy.
Start/Stop Logging
Manually begins or ends data logging (requires MicroSD
Card, available separately).
If Scheduled Start is enabled in Settings > Data Logging,
then logging cannot be started manually.
To manually start logging, you must first disable Scheduled
Start.
Acknowledge Alarms
Switches the relay outputs for triggered alarms to their
normal, untriggered state. The background of the
Temperature View and Graph screen will stay red, and the
alarms will not be triggered again until they are reset (see
“Alarms” below). Alarms can be acknowledged while the
display is locked.

Lock/Unlock
Prevents settings being changed via a four-digit numerical code.
To unlock the sensor, enter the password and press the Unlock icon.
The default password is 1234.
Change Password
Enter, confirm and save a new four-digit code.
Graph
Displays the recent history of the Filtered Temperature and the Sensor
Temperature. To scroll backwards and forwards in time, touch the graph
and drag it. The graph stores the most recent 24 hours of temperature
data.
Reset Graph
Clears and restarts the graph.
Return to Scrolling View
Returns the graph to the real-time scrolling view, showing
the most recent measurements.
Settings
Access the configuration parameters. Press Apply to save the
settings, or Exit to leave the screen without saving.

Settings
Emissivity & Compensation
Adjust the emissivity setting and reflected energy compensation options.
4-20 mA Output (-CRT models)
Set the temperature range limits for the linear 4-20 mA analogue output.
RS485 Modbus Output (-BRT models)
Set the Modbus address.
Date & Time
Change the date and time for data logging purposes.
The clock is reset when the power is switched off, unless a battery is fitted.
Data Logging
Configure the storage of temperature data and alarm events. A MicroSD Card
(optional) must be inserted to use these features.
Alarms
Configure the settings for Alarm 1 and Alarm 2 individually.
Output Processing
Configure averaging and peak or valley hold processing.

Emissivity & Compensation Settings
Emissivity Setting
Enter the emissivity of the target surface. The emissivity setting
should match the target emissivity for maximum accuracy.
Enable Reflected Energy Compensation
Select to enable Reflected Energy Compensation, which
improves the measurement accuracy if there is significant
reflected energy, for example when measuring an object inside
a furnace with the sensor positioned outside.
In most applications, this setting should be disabled.
For more information, see the “Reflected Energy
Compensation” section of this guide.
Reflected Temperature
If reflected energy compensation is required, enter the
temperature of the surroundings of the target here.
4 to 20 mA Output (-CRT models)
Temperature at 4 mA
The lower temperature range limit.
Temperature at 20 mA
The upper temperature range limit.
Please note:
The difference between the temperatures at 4 mA and at 20 mA
must be at least 100°C. The temperature at 20 mA must be greater
than the temperature at 4 mA.
Modbus Address (-BRT models)
The Modbus address of the sensor is displayed. Enter a new
address, then press Apply to save it to the sensor. Cycle the power
to use the new address.
Minimum: 1. Maximum: 247.

Output Processing
Averaging Period
Select the required averaging period to smooth the output and slow
down the sensor’s response time.
Note: averaging prevents the sensor from following rapid
temperature changes.
Hold Mode
With Peak or Valley Hold, the sensor will continue to display or output
a peak or valley in the measured temperature for a certain time. This
feature is ideal for monitoring the temperature of individual objects on
a conveyor, and for ignoring unwanted low readings, such as when a
rotating stirring arm in a container of liquid passes the sensor.
Peak
The output returns to the measured temperature after the
Hold Period.
Valley
Valley Hold operates in the same way as Peak Hold,
except the sensor holds the lowest temperature measured
during the Hold Period.
Off
Disables hold processing.
Hold Period
The peak hold period.

Alarms
The settings for the Alarm 1 and Alarm 2 relay outputs are configured individually.
Manually Reset Alarms
If an alarm has been triggered, this allows both alarms to be
triggered again. Alarms will not be triggered again until they are
reset, either automatically or manually.
Alarm 1 and Alarm 2
Alarm Set Point
The temperature at which the alarm is triggered. Minimum: 200°C.
Maximum: 2000°C.
Hysteresis
The temperature difference between the Alarm Set Point and the
reset temperature. Hysteresis is only used when Automatic Reset is
enabled. Please see the diagrams below for more information.
Minimum: 0°C (hysteresis disabled). Maximum: 2000°C.
Filtered Temperature or Sensor Temperature (Alarm 2 only)
Select the temperature monitored by Alarm 2.
Alarm Type
High
The alarm is triggered when the temperature rises above
the Alarm Set Point.
Low
The alarm is triggered when the temperature drops below
the Alarm Set Point.
Off
The alarm is disabled.
Reset
Automatic
The alarm is acknowledged and reset automatically when
the temperature reaches the reset temperature (see
Hysteresis). It can also be acknowledged or reset
manually.
Manual
The alarm is acknowledged by pressing on the
Temperature View or List View, and reset by pressing
on the Alarms screen.

Alarms
Alarm Operation with Hysteresis and Automatic Reset

Data Logging
Data Logging Settings
Sample period
The time, in seconds, between samples.
Number of samples
The number of samples the unit will collect before logging
stops. Enter “0” to log data continuously until manually stopped.
Enable Scheduled Start
The sensor begins logging at the Date and Time specified.
Logging can also be started and stopped manually.
Date and Time
The date and time for scheduled logging to start.
Alarm Logging Settings
Alarm events can be logged to the MicroSD Card. Alarm log files and
settings are independent from Data Logging.
Log Trigger Time
The time that an alarm is triggered will be logged.
Log While Triggered
Data logging will start when an alarm is triggered. 1 sample is
logged per second. Logging stops when both alarms are reset.
Log Acknowledge Time
The time that the alarm is acknowledged will be logged.
Log Reset Time
The time that the alarm is reset will be logged.
Data Logging
The sensor can be used as a standalone data logger.
Data is stored on a MicroSD card in .csv format and can be viewed and edited easily using
spreadsheet software. The MicroSD card is available as an optional accessory, with an SD
Card adapter to transfer data to a PC.
With a 2 GB card, the user can store 28.4 million readings, which is almost 1 year’s worth of
data at 1 sample per second. Larger cards provide more storage.
The MicroSD card slot and battery holder are located on the touch screen circuit board in the
lid of the electronics module. Readings are time and date stamped using the unit’s internal
clock. The clock is reset when the power is disconnected, or it will continue if the optional
battery is fitted.

Using the Sensor as a Data Logger
1. Insert a MicroSD card into the holder on the circuit board inside the lid of the electronics
module.
2. To retain the date and time when the unit is switched off, fit a battery to the holder on the
circuit board inside the lid.
3. Replace the lid and connect the sensor power supply.
4. To set the number of samples to be logged, the time period between samples, and, if
required, to schedule data logging to automatically start, press to access the Settings
menu, then press to access the Data Logging options.
5. To save data logging settings, press
6. To manually start data logging, press on the Temperature View.
7. While logging is in progress, the logging icon flashes on the Temperature View.
8. To stop data logging, press
9. To transfer data to a computer, remove the MicroSD Card from the unit, insert the card into
the SD Card adapter (supplied with the MicroSD Card, accessory model MSD) and insert the
adapter into an SD Card reader.
Installation of MicroSD Card and Battery
The MicroSD Card and battery slots are located on the touch screen circuit board. Unscrew
the lid of the electronics module to access them.
The battery is optional. With a battery fitted, the internal clock will continue to run when the
power is off. Without a battery, the unit will request the date and time each time the power is
cycled.
All other settings are stored in permanent memory and will be preserved when it is switched

off, regardless of whether a battery is fitted.
Data Log Files
Data is saved to the MicroSD Card in .csv format. This file format can be opened or imported
by spreadsheet software such as Microsoft Excel.
A new folder is created on the MicroSD Card for each day that data is logged.
A new log file is created every time logging is started. The start time is used as the file name.
Accessories
A range of accessories to suit different applications and industrial environments is available.
These may be ordered at any time and added on-site. The following accessories are available
from Calex:
Fixed mounting bracket
Adjustable mounting bracket
Air purge collar: The air purge collar is used to keep dust, fumes, moisture, and other
contaminants away from the lens. It must be screwed fully onto the sensing head. Air flow
should be 5 to 15 l/min. Clean or ‘instrument’ air is recommended.
MicroSD Card: Stores logged data. Includes SD Card adapter.
Options
An optional Calibration Certificate is available if ordered at the same time as the sensor. This
UKAS traceable certificate shows the measured temperature at three points across the
sensor's temperature range. Contact Calex for details.

Installation

The installation process consists of the following stages:
- Preparation
- Mechanical installation
- Electrical installation
Please read the following sections thoroughly before proceeding with the installation.
Preparation
Distance and Spot Size
The size of the area (spot size) to be measured determines the distance between the sensor
and the target. The spot size must not be larger than the target. Choose a suitable mounting
distance so that the measured spot size is smaller than the target.
Reflections
The sensor must be installed in a location where energy from lamps, heaters and sunlight
cannot be reflected from the target into the lens. This is especially important for low-
temperature targets. Using shields may help in this respect. For further information and
assistance, contact Calex.
Ambient Temperature
The sensing head may be used between 0°C and 200°C ambient temperature.

The electronics module may be used between 0°C and 60°C ambient temperature. Ensure the
temperature of the electronics module remains stable, and allow 20 minutes for the unit to
adjust to large changes in ambient temperature.
Atmospheric Quality
Smoke, fumes, dust or steam can contaminate the lens and cause errors in temperature
measurement.
In these types of environment, the amount of contaminant should be minimised, and the air
purge collar should be used to help keep the lens clean.
Electrical Interference
The sensor is tested to industrial standards for electromagnetic compatibility (EMC). To
minimise electromagnetic interference or ‘noise’, the electronics module should be mounted
away from motors, generators and such like.
The fibre optic sensing head of this pyrometer contains no electronics and may be mounted
where electromagnetic interference prevents the other types of sensor from working properly.
Power Supply
The required supply voltage is 24 V DC. Ensure the power supply is of the correct voltage and
is capable of providing an output current of at least 100 mA.
Mechanical Installation
Affix the sensing head to its mounting. The sensor can be mounted on brackets of your own
design, or you can use the mounting bracket accessory.
- Switch on the laser sighting to illuminate the measured spot, and adjust the angle of
the sensor to aim it.
- Ensure the target is larger than the illuminated spot. If not, adjust the measurement
distance for a smaller spot size.
Note: The sensor housing must be connected to earth at one point, either the sensing head,
the electronics module, or the output cable shield termination. To avoid ground loops, please
ensure the sensor is grounded at only one of these points.
Electrical Installation
Check the distance between the sensing head and the electronics module, and between the
electronics module and the instrumentation. If necessary, the sensor can be ordered with a
longer fibre optic cable between the sensing head and the electronics module.
The cable from the electronics module should have an outer diameter between 3.0 and 6.5
mm, with conductors of size 28 to 18 AWG.
The terminal blocks may be removed from the electronics module for easy wiring.
This manual suits for next models
24
Table of contents
Other Calex Temperature Controllers manuals
Popular Temperature Controllers manuals by other brands

Honeywell
Honeywell FIRE-LITE ALARMS W-H355 Installation and maintenance instructions

Lake Shore Cryotronics
Lake Shore Cryotronics 372 quick start guide

Tempcube
Tempcube TC-3200 Lite instruction manual

Meade
Meade TS34C-M user manual

Sensored Life
Sensored Life MarCELL Pro quick start guide

Crestron
Crestron CNTS-N Operation guide