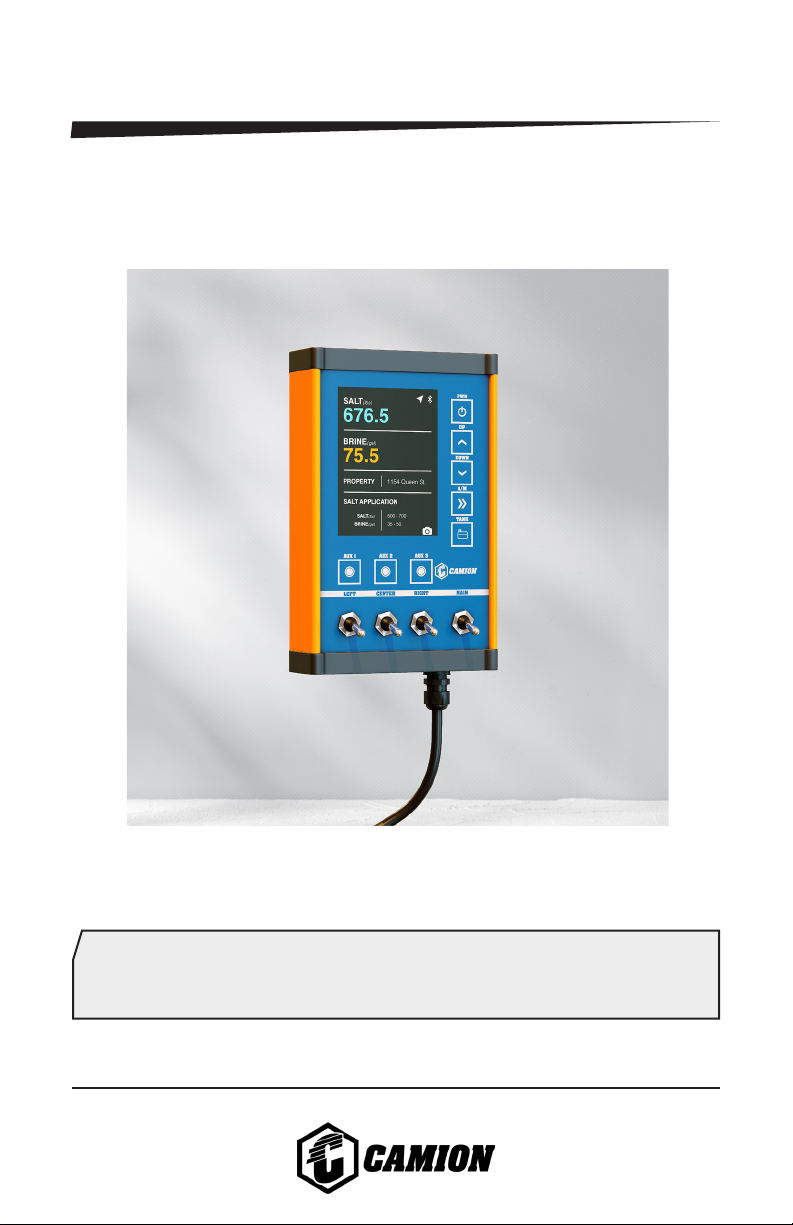
CAMION STORM COMMANDER CEC056 User manual

Version 1.1 Copyright © Enduraplas. All Rights Reserved.
Product Code:
CEC056
OWNER’S MANUAL
STORM COMMANDER
®

2Storm Commander®
English
CONTENTS
INTRODUCTION 3
OVERVIEW 4
OVERVIEW DESCRIPTION 5
WARNINGS 6
GETTING STARTED 7 - 15
MAINTAINING 16
TROUBLESHOOTING 17
WARRANTY 18 - 21
!

3Version 1.1
English
INTRODUCTION
Congratulations! You now own a Camion™ Storm
Commander®.
Take a look through this owner’s manual to learn how the
pros use their Camion™ Storm Commander®controller.

4Storm Commander®
English
1
2
3
4
5
6
7
8
9
10
11
12
13
14
1516
OVERVIEW

5Version 1.1
English
OVERVIEW DESCRIPTION
1. Synced Indicator Light (Red-not connected, Green
connected).
2. Target Rate Indicator, Shift/Site Totals.
3. Actual Rate Gallons per Acre (GPA)/Volume.
4. Geofence Location, gallons used/left, GPS speed.
5. Auxilary 1 (work light).
6. Left spray toggle switch.
7. Center spray toggle switch.
8. Right spray toggle switch.
9. Main boom activation toggle switch.
10. Tank ll button.
11. Auto GPS/manual mode button.
12. Target rate decrease adjustment button.
13. Target rate increase adjustment button.
14. Main power button.
15. Settings menu icon.
16. Display brightness icon.

6Storm Commander®
English
WARNINGS
1. Always make sure controller is in a safe place in the
vehicle and is secured in a location where it does not
obstruct view of surroundings.
2. Always pay attention when operating the controller when
vehicle is moving.
3. Always make sure Storm Commander® is hooked up to
the correct power supply.
!

7Version 1.1
English
Storm Commander Setup
GETTING STARTED
2) To power up the receiver box at the
back of unit, plug the RV socket into the
7 pin plug on back of truck.
1) Turn on vehicle key to power up the
RV plug so your Storm Commander®
has power.
3) The red light on the bottom of the
receiver box will blink red to signal
power is activated to the box.
4) Make sure your 3-way banjo valve
handle on your unit is pointing towards
the tank allowing the liquid return back
to the tank.

8Storm Commander®
English
6) Connect the power cable extension
harness into the contoller and plug the
other end into the cigarette lighter sock-
et on the vehicle.
GETTING STARTED
Storm Commander Setup
7) To adjust your screen brightness,
press the power button to power on the
controller then, press the light icon at the
top right of the screen to the left of the
settings icon.
5) Hook up Storm Commander®control
box arm to back of controller and install
controller mount into the cupholder of
the vehicle cab.
Important Tip:
The control unit in the cab needs an unobstructed view
to GPS signal and shouldn’t be covered or shielded with
objects. The drink holder is usually an ideal location.

9Version 1.1
English
1) Press the power button on the top
right corner of the controller to power up.
Pairing Storm Commander with Unit
GETTING STARTED
2) Press and hold settings button on
the top right corner of the screen for a
couple seconds or until it activates a
long beep.
3) Press ‘Liquid Control’ button to get to
liquid control menu.
4) Press ‘Control Box’ button to get to
the controller pairing screen.

10 Storm Commander®
English
GETTING STARTED
Pairing Storm Commander with Unit
5) Press ‘Resync’ button - your controller
will pair with the receiver box on the
sprayer. Controller display will now show
ID numbers above resync button.
6) X out of the screen by hitting the top
right-hand corner of the screen.
7) The top left-hand corner of the screen
will display a green circle showing the
unit is paired with the receiver box. (if
light is still red, repeat steps 2-6).

11Version 1.1
English
1) Turn the main boom activation toggle
switch on to activate spray control.
Conrming Controller is Synced to Unit
GETTING STARTED
3) Turn ‘Left’, ‘Center’, and ‘Right’ toggle
switches on to verify the unit is connect-
ed and then turn back o to close the
valves. You should be able to hear the
valves opening and closing.
2) Press the A/M button to activate
‘Manual’ mode allowing you to test
valves are operating.
4) Press the A/M button again to activate
’Auto’ mode. This will ensure your GPS
is activated.

12 Storm Commander®
English
GETTING STARTED
1) Before lling your unit with liquid,
press the tank ll button near the bottom
right of the controller screen. Then ll
your sprayer tank with liquid.
2) Once the tank is lled, key in the total
gallons in your tank and hit conrm. (e.g.
if you have a 500 gal tank, key in 500,
then press conrm).
Filling Unit with Liquid

13Version 1.1
English
1) Set your target spray rate by simply
pressing the up and down arrow
keys. This will change rate in 5 gallon
increments. Set your desired gallon per
acre (GPA) rate.
2) Ensure your pump motor is powered
on and running.
Electric - ensure power switch is on (as
shown in pic).
Gas - ensure engine is running.
Hydraulic - ensure hydraulics are en-
gaged.
Getting Ready to Spray
GETTING STARTED
Electric
3) Controller should now be activated
and ready to spray. Activate your desired
boom sections and begin spraying.

14 Storm Commander®
English
Resetting Shift/Site Settings.
GETTING STARTED
2) Shift total is the amount in gallons
that is sprayed over a length of time.
a. To reset shift total, wait for controller
to display ‘shift total’, then press icon.
b. Then, hit reset and x out of screen to
return to home screen.
3) Site total is the amount of gallons that
are sprayed per location.
a. To reset site total, wait for controller
screen to display ‘site total’, then press
icon.
b. Then, hit reset and x out of screen to
return to home screen.
1) The Shift/Site total alternates on
screen. To get to ‘shift total’, wait until
display shows ‘shift total’, then press the
shift icon. To get to ‘site total’, wait until
display shows ‘site total’, then press the
site icon. This will automatically take you
to the reset screen.

15Version 1.1
English
Add-On Option
GETTING STARTED
1) If your unit has an auxilary work light,
turn your toggle switch on at the work
light. This switch is located directly be-
low the work light.
2) To turn on you auxiliary work light
from the controller, ensure the toggle
switch in step 1 is on, then press the
AUX 1 button on the bottom left of the
screen. This button switches the light on
and o from the cab controller.

16 Storm Commander®
English
MAINTAINING
Keeping your Storm Commander controller in good condition
will help you lengthen the life of the components. Everyone
knows a well maintained piece of equipment ensures a
longer life span.
Discover More Helpful Tips:
www.IceControlTraining.com
Watch Instruction Videos:
www.youtube.com

17Version 1.1
English
TROUBLESHOOTING
CONDITION CAUSE REMEDY
Unit not
powering on.
Power supply. 1. Ensure your unit is
plugged in.
2. Make sure cable is
connected properly.
3. Make sure vehicle
key is on and there
is power at the plug
socket.
Insucient ow
rate.
1. Not applying
correct amount of
liquid.
2. Driving too fast for
your spray rate.
1. Ensure tank on unit
has sucient liquid
inside.
2. Slow vehicle speed
to get an eective
mph range.
Controller not
communicating
with spray unit.
1. Controller not
paired with unit.
2. No power to control
box on back of unit.
3. Harness
unplugged.
1. Walk through steps
to re-pair controller to
control box.
2. Check to verify that
there is power at 7
pin plug.
3. Check all harness
connections.
Screen too dark
or too bright.
Incorrect contrast
setting.
Tap the contrast light
icon and adjust to
desired lighting.

18 Storm Commander®
English
WARRANTY
LIMITED WARRANTY
1. Poly Tank Limited Warranty -Subject to other terms in this Limited
Warranty, Manufacturer warrants to the original end user that this
Tank will be free from material defects caused during the
manufacturing process for a period of 5 years from the Purchase
Date provided such warranty to the original end user shall be
extended to 10 years from the Purchase Date if the original end
user registers the Tank with Manufacturer within 30 days of the
Purchase Date. To register the Limited Warranty, registration must
be completed in accordance with the requirements set forth at
enduraplaswarranty.com
Other Products and Parts Limited Warranty -Subject to other
terms in this Limited Warranty, Manufacturer warrants to the
original end user that products and parts manufactured by
Manufacturer (other than tanks) will be free from material defects
caused during the manufacturing process for a period of 1 year
from the Purchase Date unless otherwise expressly stated in
writing by Manufacturer that an extended warranty applies.
2. Other Warranties Disclaimed and Excluded
THERE ARE NO WARRANTIES, EXPRESS OR IMPLIED,
WHICH EXTEND BEYOND THE LIMITED WARRANTY HEREIN
STATED, AND MANUFACTURER EXPLICITLY DISCLAIMS AND
EXCLUDES ANY AND ALL OTHER WARRANTIES INCLUDING
BUT NOT LIMITED TO WARRANTIES OF MERCHANTABILITY,
FITNESS FOR PARTICULAR PURPOSE, CUSTOM OR USAGE
OF TRADE, AND COURSE OF DEALING. NO AGENT,
EMPLOYEE OR REPRESENTATIVE OF MANUFACTURER HAS
AUTHORITY TO BIND MANUFACTURER TO ANY
REPRESENTATION OR WARRANTY EXCEPT AS STATED IN
THIS LIMITED WARRANTY.

19Version 1.1
English
3. Limitation of Liability under the Limited Warranty -In addition to
those warranties disclaimed and excluded in clause 2 above,
Manufacturer expressly further limits its warranty and liability
under the Limited Warranty as set forth below in this clause 3.
3.1. The liability of Manufacturer under this Limited Warranty is
excluded to the extent that any defect has been caused or
contributed to by:
a) any accident, contamination, tampering, willful damage,
abuse, modification, improper storage, improper use
(including but without limitation the storage of material) or
negligent act of, or omission by, any person other than
Manufacturer;
b) the improper installation of the Goods, or deterioration of
the base on which any of the Goods rest or are mounted
to;
c) any damage to the Goods caused by storm, wash away,
landslide, mudslide, lightning, or any other natural
phenomenon, vermin or other pests, and any
undermining of the base of the Tank through any cause
whatsoever;
d) the repositioning of the Goods from their original
installation;
e) weathering or degradation of the Goods due to extreme
climatic conditions;
f) improper installation of extra fittings;
g) any staining or discoloration, including from trees or ash
fall-out from fires or other causes;
h) a Tank not being placed on a base that is free of any
protruding objects of any kind;
i) a Tank being used for any purpose other than the storage
of suitable liquids at the ambient temperatures.

20 Storm Commander®
English
3.2. Without limiting the generality of clause 3.1:
a) Manufacturer will not be liable for any personal injury,
indirect or incidental damages, consequential losses, loss
of liquids, loss of profit or any like claims whatsoever
arising from any use of, or incidental to, or repairs to any
of the Goods by a party other than Manufacturer;
b) to the extent that any component or material (including,
but without limitation the polyethylene) used in the
manufacture of any of the Goods is supplied and/or
manufactured by a third party, the liability of Manufacturer
is limited to Manufacturer’s right of redress (if any)
against the third-party supplier/manufacturer;
c) Tanks feature a vented lid at the time of manufacture.
Any subsequent pressurization of the Tank by removing
the vent, sealing the vent, or otherwise will cause this
Limited Warranty as to such Tank to be null and void.
d) The liability of Manufacturer under this Limited Warranty
is limited to, at Manufacturer's discretion:
e) providing a replacement Good (including shipping but
excluding other replacement costs);
f) refunding an amount equal to a sum equal to the current
Retail price divided by the months in the warranty,
multiplied by the months remaining in the warranty
period;
g) repairing the Good at no cost.
4. Proof of Purchase -The original invoice or other similar proof of
purchase of the applicable must be provided by Purchaser to
Manufacturer when making a claim under this Limited Warranty.
Warranty claims must be received in writing by Manufacturer
within the Limited Warranty period.
Table of contents
Other CAMION Industrial Equipment manuals

CAMION
CAMION ICE MASTER E Series User manual

CAMION
CAMION BRINE MASTER 1600 User manual

CAMION
CAMION BRINE MASTER 3000 User manual

CAMION
CAMION BRINE MASTER 3000 User manual

CAMION
CAMION ICE MASTER T Series User manual

CAMION
CAMION ICE MASTER E Series User manual

CAMION
CAMION ICE MASTER T Series User manual