Candela ELR EDGE-LIT User manual

REV 2022 0929
SPECIFICATIONS AND DETAILS ARE SUBJECT TO CHANGE WITHOUT NOTIFICATION. CONTACT CANDELA LIGHTING FOR UP TO DATE DETAILS.
CANDELA LIGHTING • CANDELA.LIGHTING
Before you begin, read these instructions completely and carefully.
• Be certain electrical power is OFF before and during installation, maintenance and removal.
• Luminaire wiring must be properly grounded in accordance with the NEC and any applicable local code requirements.
• Use only UL or IEC approved wire for input/output connections.
• Verify that supply voltage matches voltage on luminaire label. Installation to any other connection may void the warranty.
• Wear gloves during installation to prevent injury and do not expose wiring to metal or sharp edges.
• Do not install in areas subject to combustible vapors or gases. Verify luminaire location ratings are suitable for installation environment (refer to specification sheet as needed).
• Do not restrict luminaire’s ventilation by covering with material that will cause luminaire to overheat and potentially shorten the life span.
• Ensure LED luminaire has the correct polarity before installation.
IMPORTANT SAFETY PRECAUTIONS
WARNING: To reduce the risk of personal injury or property damage from fire, electrical shock, falling parts, abrasions, burns
and all other hazards, read all provided warnings and follow installation instructions.
This product should be installed, inspected and maintained by a qualified and licensed electrician. Installation of luminaire
must be in accordance with NEC and local code requirements.
ELECTRIC SHOCK FALLING PARTS
ABRASIONS BURNS
ELR EDGE-LIT EXIT RECESSED LED
Installation Manual
SAVE THESE INSTRUCTIONS 1

REV 2022 0929
SPECIFICATIONS AND DETAILS ARE SUBJECT TO CHANGE WITHOUT NOTIFICATION. CONTACT CANDELA LIGHTING FOR UP TO DATE DETAILS.
CANDELA LIGHTING • CANDELA.LIGHTING
ELR EDGE-LIT EXIT RECESSED LED
Installation Manual
SAVE THESE INSTRUCTIONS 2
ELECTRICAL CONNECTIONS
Make the proper connections
A) For 120-277VAC, connect the black and white wires to the black and white supply wires.
B) Connect the green ground wire to the ground supply wire.
INSTALLATION INSTRUCTIONS
A) Turn off AC power.
B) Remove the front cover from the housing by gently prying it open with a flat head
screwdriver
DIMENSIONS
Ground Wire White Wire 120-277VAC
Input
REV 2022 0929
SPECIFICATIONS AND DETAILS ARE SUBJECT TO CHANGE WITHOUT NOTIFICATION. CONTACT CANDELA LIGHTING FOR UP TO DATE DETAILS.
CANDELA LIGHTING • CANDELA.LIGHTING
ELR EDGE-LIT EXIT RECESSED LED
Installation Manual
SAVE THESE INSTRUCTIONS 3
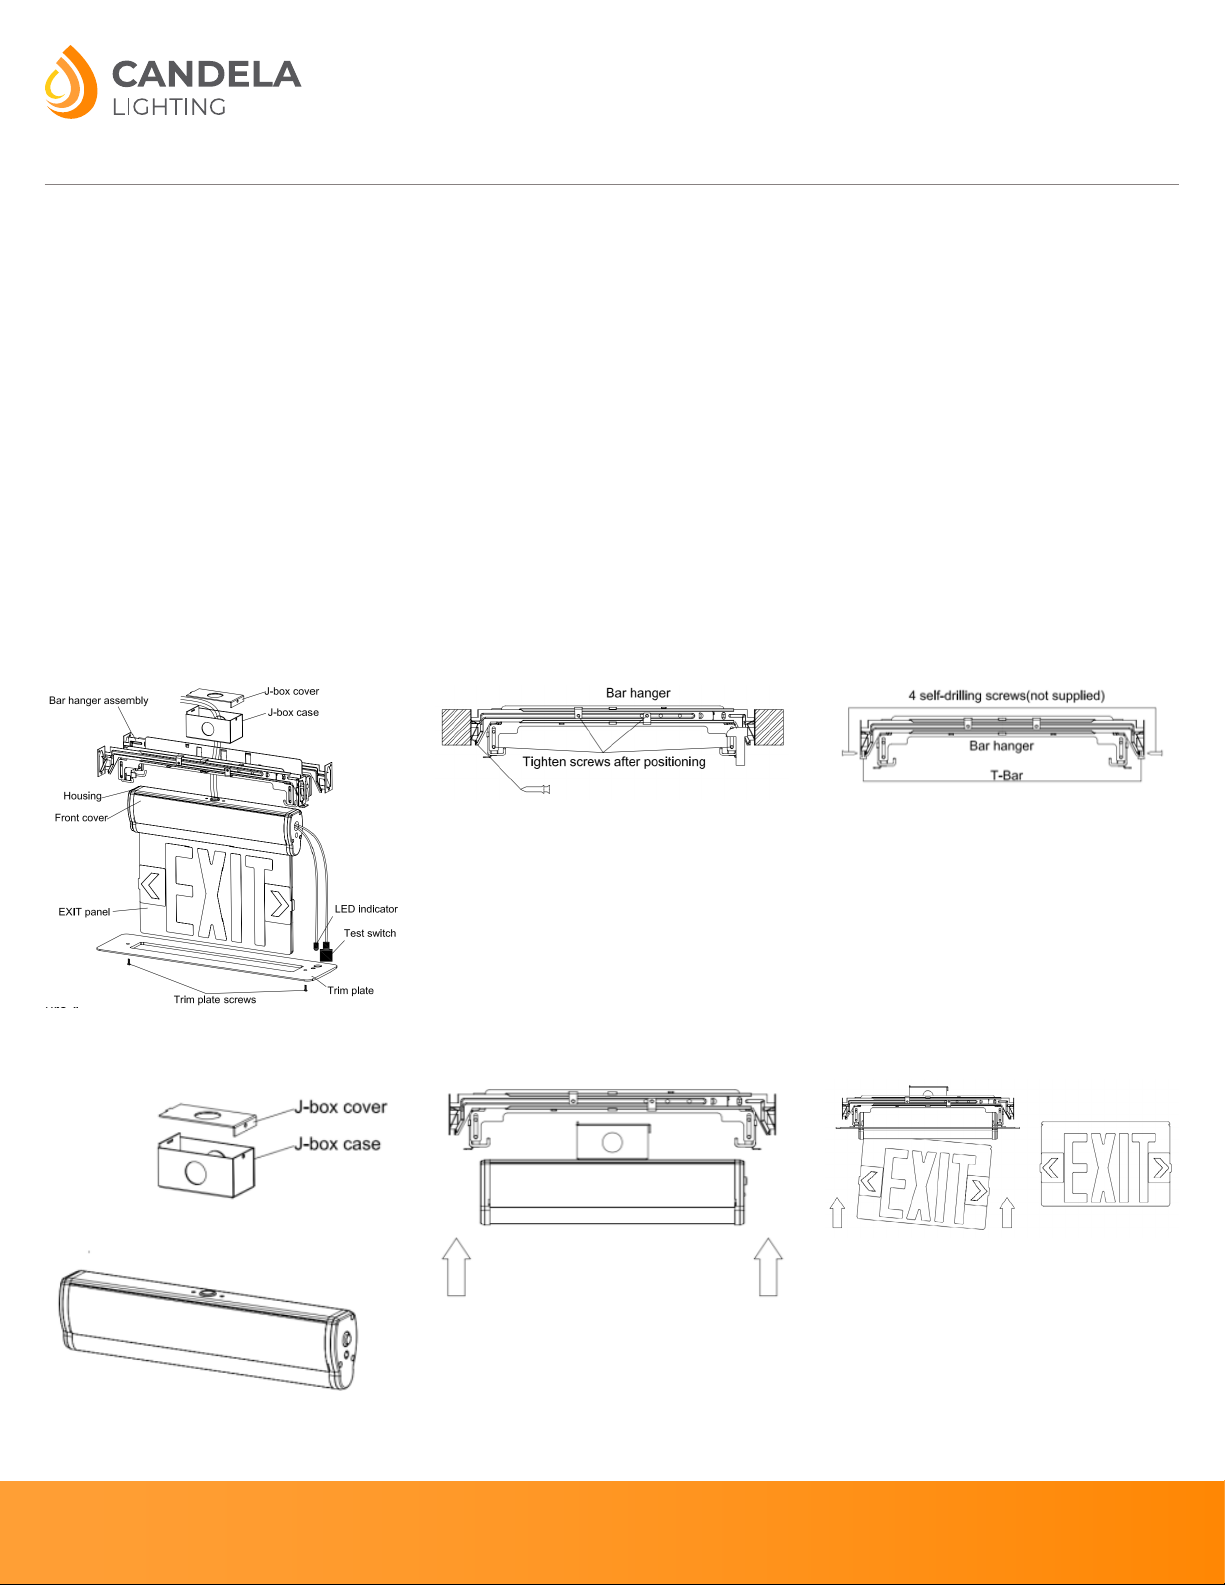
RECESSED CEILING MOUNT INSTALLATION INSTRUCTIONS
A) Refer to assembly drawing before starting installation (Figure 1).
B) Depending on your mounting type, install the bar hanger assembly as shown in Figures 2 or 3.
Note: When mounting onto a T-bar the bar hanger must be screwed into the T-bar with 4 self-drilling screws (not supplied) as shown in Figure 3.
C) Adjust height of bracket vertically using adjustable slots and tighten all screws on adjustable slots and bar hanger bracket to secure bar hanger bracket and bar hanger.
D) Remove J-Box cover and mount J-Box onto the housing using the provided screws (Figure 4).
E) Feed AC input wires out of the housing into the J-Box.
F) Connect the battery connectors together (emergency battery models only).
G) Reinstall the front cover.
H) Feed AC supply wires into the J-Box.
I) Make electrical connections (see ELECTRICAL CONNECTIONS section on page 2).
J) Reattach the J-Box cover to the J-Box.
K) Snap the housing assembly into the bar hanger assembly (Figure 5).
L) If applicable, connect the test switch connector and insert the LED indicator into the trim plate (emergency battery models only).
M) Secure the trim plate to the bar hanger assembly by using the provided screws.
N) Choose the appropriate EXIT panel and gently insert it into the housing assembly (Figure 6).
O) If a chevron is needed leave the chevron on and remove only the film. If no chevron is needed, remove the chevron and the film together.
P) This unit can be mounted on any flat surface. The EXIT panel can be rotated from 0° to 180°.
FIGURE 1 FIGURE 2 FIGURE 3
FIGURE 4 FIGURE 5 FIGURE 6

REV 2022 0929
SPECIFICATIONS AND DETAILS ARE SUBJECT TO CHANGE WITHOUT NOTIFICATION. CONTACT CANDELA LIGHTING FOR UP TO DATE DETAILS.
CANDELA LIGHTING • CANDELA.LIGHTING
ELR EDGE-LIT EXIT RECESSED LED
Installation Manual
SAVE THESE INSTRUCTIONS 4
SURFACE CEILING & WALL MOUNT INSTALLATION INSTRUCTIONS
SURFACE END MOUNT INSTALLATION INSTRUCTIONS
A) Attach the crossbar to the junction box with screws (Figure 7).
B) Snap the hole plug into the opened end of the housing (if applicable).
C) Feed AC input wires through canopy center hole. Make proper wiring connections.
D) Choose the appropriate EXIT panel and gently insert it into the housing assembly.
E) If a chevron is needed leave the chevron on and remove only the lm. If no chevron is needed, remove the chevron and the lm together.
F) This unit can be mounted on any flat surface. The EXIT panel can be rotated from 0° to 180° (Figure 8).
FIGURE 7 FIGURE 8
A) Attach crossbar to junction box with screws.
B) Using provided screws, tighten canopy to the crossbar (Figure 9).
C) Feed AC input wires through side hole.
D) Assemble canopy onto side of housing assembly with provided screws and make the proper wire connections.
E) Choose the appropriate EXIT panel and gently insert it into the housing assembly (Figure 10).
F) If a chevron is needed leave the chevron on and remove only the film. If no chevron is needed, remove the chevron and the film together.
G) This unit can be mounted on any flat surface. The EXIT panel can be rotated from 0° to 180°.
FIGURE 9 FIGURE 10
Table of contents
Other Candela Lighting Equipment manuals


