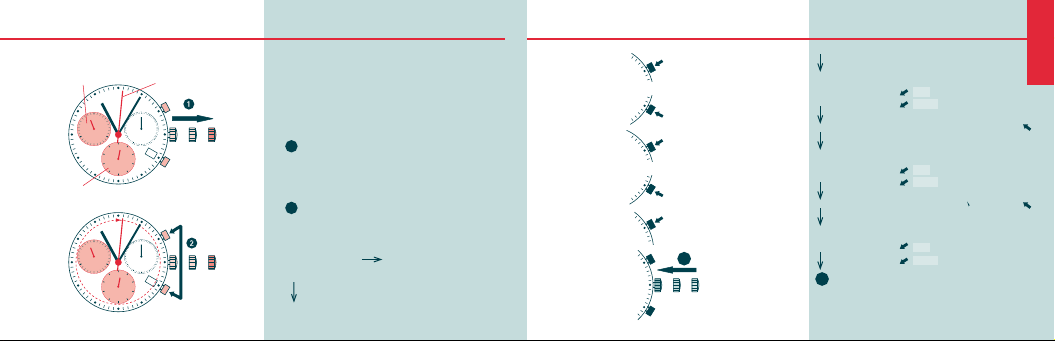
Candino C4472 User manual

IC5040D
FESTINA-CANDINO WATCH LTD
2501 Bienne Switzerland
a company of the Festina Group
www.candino.com

MANUAL DE INSTRUCCIONES
– Descripción de los elementos de visualización y control . . . . . . . . . . . . . . . . . . . . . . . . . . . . 2
– Cronógrafo. . . . . . . . . . . . . . . . . . . . . . . . . . . . . . . . . . . . . . . . . . . . . . . . . . . . . . . . . . . . . . . . . . . . 3
– Cómo ajustar la hora . . . . . . . . . . . . . . . . . . . . . . . . . . . . . . . . . . . . . . . . . . . . . . . . . . . . . . . . . . 8
– Cómo ajustar la fecha (modo rápido) . . . . . . . . . . . . . . . . . . . . . . . . . . . . . . . . . . . . . . . . . . . . 9
– Cómo ajustar la fecha y la hora . . . . . . . . . . . . . . . . . . . . . . . . . . . . . . . . . . . . . . . . . . . . . . . . .10
Español

Elementos de pantalla
Segundero
Manecilla minutos
Manecilla horas
Segundero con paro
en el centro
Contador minutos
Contador 1/10 segundos
(Contador de las horas
después de 30 minutos)
Fecha
Botones de control
Botón A
Corona
Botón B
1
2
3
CHRONOGRAFO: FUNCIÓN BÁSICA
INICIAR / DETENER / RESET
Ejemplo:
Iniciar: Pulsar el botón A.
Detener: para detener el cronómetro,
pulse de nuevo el botón A y lea las
tres manecillas del cronógrafo:
4 mn/38 s/ 7/10 s
Posicionamiento a cero:
Pulse el botón B. (Las tres manecillas
del cronógrafo volverán a su posición
de cero).
3
DESCRIPCIÓN DE LOS ELEMENTOS DE VISUALIZACIÓN Y CONTROL
2
Español
30
10
20
1012
3
4
5
6
7
89
15
60
30
45
21
10
20
30
1012
3
4
5
6
7
89
15
60
30
45
21
10
20
30
1012
3
4
5
6
7
89
15
60
30
45
21
Botón A
Botón B
Contador
de 1/10 segundos
Contador de
minutos

1
2
3
4
5
4
CRONÓGRAFO
TIEMPO ACUMULADO
4
CRONÓGRAFO:
TIEMPO INTERMEDIO O POR INTERVALOS
5
Ejemplo:
Iniciar: (empieza a cronometrar)
Detener: (p. ej. 15 mn. 5 seg.
después de .)
Reiniciar: (se retoma el cronómetro)
Detener: (p. ej. 13 mn. 5 seg. después
de ) = 28 min 10 sec
(Se muestra el tiempo acumulado)
Reset:
Las tres manecillas del cronógrafo
vuelven a su posición cero.
Atención:
* Despues de , la acumulación del
tiempo puede continuar pulsando el
Botón A (Reiniciar/detener,
Reiniciar/detener,...)
*
Ejemplo:
Iniciar: (empieza a cronometrar)
Mostrar intervalo: p.ej. 10 minutos,
10 segundos (se sigue cronometrando
en segundo plano).
Volver al tiempo cronometrado: (las
3 manecillas del cronógrafo avanzan
rápidamente a la hora que se está
cronometrando).
Detener: se muestra el tiempo final)
Reset:
Las 3 manecillas vuelven a la posición
cero.
Atención
* Después de , pueden mostrarse
más intervalos o intermedios pulsando
el Botón B (mostrar intervalo/volver
el tiempo cronometrado...)
Español
1
2
3
4
1
3
5
43
10
20
30
1012
3
4
5
6
7
89
15
60
30
45
21
10
20
30
1012
3
4
5
6
7
89
15
60
30
45
21
Botón A
Botón B
Contador
1/10 segundos
Contador
de minutos
10
20
30
1012
3
4
5
6
7
89
15
60
30
45
21
10
20
30
1012
3
4
5
6
7
89
15
60
30
45
21
Botón A
Botón B
Contador
1/10 segundos
Contador de
minutos

1
2
A
B
A
A
B
III III
3
3
Cómo ajustar la segudera con el
paro en el centro:
Un solo paso A1 x corto
Continuo Alargo
Para ajustar la siguiente manecilla B
Cómo ajustar la manecilla del contador
1/10 segundos (posición 6h)
Un solo paso A1 x corto
Continuo Alargo
Para ajustar la siguiente manecilla B
Cómo ajustar la manecilla del contador
de minutos (posición 9h)
Un solo paso A1 x corto
Continuo Alargo
CÓMO AJUSTAR LAS MANECILLAS DEL
CRONÓGRAFO A LA POSICIÓN CERO
6 7
Una o diversas de las manecillas del
cronógrafo no están en su posición cero
correcta y deben ajustarse (p. ej. después
de cambiar la pila).
Tire de la corona hasta la posición III
(las 3 manecillas del cronógrafo están
en su posición cero correcta o
incorrecta).
Mantenga pulsados los botones A y B
simultáneamente durante 2 segundos
el segundero con paro en el centro
rota 360ª modo correctivo
activado). Devolver la corona a la posición I.
Finalización del ajuste de las manecillas
del cronógrafo (puede efetuarse
en cualquier momento).
Español
10
20
30
1012
3
4
5
6
7
89
15
60
30
45
IIIIII
21
10
20
30
1012
3
4
5
6
7
89
15
60
30
45
21
III
Segundero con
paro en el centro
Botón B
Botón A
Contador
1/10 segundos
Contador
de minutos

1
2
3
1
3
1
2
3
CÓMO AJUSTAR LA HORA
8
COMO AJUSTAR LA FECHA
(modo rápido)
9
Tire de la corona hasta la
posición III (el reloj se detiene).
Haga girar la corona hasta que
alcance la hora correcta 8:45.
Vuelva a colocar la corona en la
posición I.
*
*
Atención:
* Para ajustar la hora en el segundo
exacto, debe tirar de la corona
cuando el segundero esté en la
posición “60” (I).
Una vez ajustadas las manecillas de los
minutos y las horas, debe volverse a
colocar la corona en posición , en
el segundo exacto.
Tire de la corona hasta la
posición II (el reloj sigue
funcionando)
Haga girar la corona hasta que
aparezca la fecha correcta.
Vuelva a colocar la corona en la
posición I.
Atención:
La fecha puede corregirse durante
la fase de arrastre del calendario de
21:00-24:00. Para ello hay que
ajustar la fecha en el día siguiente
ya que en ese caso el calendario no
avanza automáticamente de un día
a media noche.
Español
IIIIII
10
20
30
1012
3
4
5
6
7
89
15
60
30
45
21
IIIIII
10
20
30
1012
3
4
5
6
7
89
15
60
30
45
21
Segundero
III
10
20
30
1012
3
4
5
6
7
89
15
60
30
45
31
III
10
20
30
1012
3
4
5
6
7
89
15
60
30
45
1

1
2
3
4
5
17
4
3
6
CÓMO AJUSTAR LA FECHA Y LA HORA
10 11
Ejemplo
- Fecha/hora en el reloj: /1:25 AM
- Fecha/hora actual: /8:30 PM
Tire de la corona hasta la posición II
(el reloj sigue funcionando)
Haga girar la corona hasta que
aparezca la fecha de ayer, .
Tire de la corona hasta la posición III
(el reloj se detiene).
Haga girar la corona hasta que
aparezca la fecha correcta, .
Continúe dando vueltas a la corona
hasta que aparezca la hora correcta,
8:30 PM.
Vuelva a colocar la corona en la
posición I.
Atención:
* Si desea ajustar el reloj al segundo
exacto, consulte el apartado “Cómo
ajustar la hora”.
** Tenga en cuenta el ritmo del reloj
AM/PM.
*
**
Español
4
III
10
20
30
1012
3
4
5
6
7
89
15
60
30
45
17
III
10
20
30
1012
3
4
5
6
7
89
15
60
30
45
3
Corona
Fecha
IIIIII
10
20
30
1012
3
4
5
6
7
89
15
60
30
45
3
IIIIII
10
20
30
1012
3
4
5
6
7
89
15
60
30
45
4
Segundero

English
USER’S MANUAL
– Description of the display and control buttons . . . . . . . . . . . . . . . . . . . . . . . . . . . . . . . . . . 14
– Chronografh . . . . . . . . . . . . . . . . . . . . . . . . . . . . . . . . . . . . . . . . . . . . . . . . . . . . . . . . . . . . . . . . . 15
– Setting the time. . . . . . . . . . . . . . . . . . . . . . . . . . . . . . . . . . . . . . . . . . . . . . . . . . . . . . . . . . . . . . . 20
– Quickly changing the date . . . . . . . . . . . . . . . . . . . . . . . . . . . . . . . . . . . . . . . . . . . . . . . . . . . . . 21
– Setting the date and time . . . . . . . . . . . . . . . . . . . . . . . . . . . . . . . . . . . . . . . . . . . . . . . . . . . . . 22
En aplicación de la normativa sobre los desechos de equipos eléctricos y electrónicos,
los productos de relojería de cuarzo que se encuentran al final de su vida útil deben
ser sometidos a una recogida selectiva en vistas a su posterior tratamiento. También puede
depositar nuestros productos de relojería de cuarzo en uno de nuestros puntos de venta
autorizados, así como en cualquier punto de recogida habilitado. La recogida selectiva, el
tratamiento, la valoración y el reciclaje contribuyen a la salvaguarda de nuestro medio
ambiente y a la protección de nuestra salud.
Tipo de pila: 395 (Ø 9,5 mm x 2,6 mm / SR 927 SW)
Precisión de funcionamiento: +20/-10 segundos al mes

Display elements
Second hand
Minute hand
Hour hand
Second counter
in the Centre
Minute counter
1/10 second counter
(Hour counter after 30 minutes)
Date
Control buttons
Push button A
Crown
Push button B
1
2
3
CHRONOGRAFH: BASIC FUNCTION
START/STOP/RESET
Example:
Start: Press push-button A.
Stop: to stop the timing, press push-
button A again hand read the three
chronograph counters:
4 min/38 s/ 7/10 s
Zero positioning:
Press push-button B.
(The three hands of the
chronograph go back to zero).
15
DESCRIPTION OF THE DISLAY AND CONTROL BUTTONS
14
English
30
10
20
1012
3
4
5
6
7
89
15
60
30
45
21
10
20
30
1012
3
4
5
6
7
89
15
60
30
45
21
10
20
30
1012
3
4
5
6
7
89
15
60
30
45
21
Push-button A
Push-button B
1/10 second counter
Minute counter

1
2
3
4
1
3
5
CHRONOGRAPH:
ACCUMULATED TIMING
16
CHRONOGRAPH:
INTERMEDIATE OR INTERVAL TIMING
17
English
Example:
Start: (start timing)
Stop: (e.g. 15 min 5 sec following )
Restart: (timing is resumed)
Stop: (e.g. 13 min 5 sec following )
= 28 min 10 sec
(the accumulated measured time is shown)
Reset:
The three chronograph hands are
returned to their zero positions
Please note:
* Following , the accumulation of the
timing can be continued by pressing
push-button A
(Restart / Stop, Restart/Stop,...)
*
4
1
2
3
4
5
4
Example
Start: (start timing)
Display interval:
e.g. 10 minutes, 10 seconds
(timing continues in the background).
Making up the measured time:
(the 3 hands of the chronograph
quickly recover the timed time that
has gone by).
Stop: (The ending time is shown)
Reset:
The 3 hands of the chronograph go
back to zero..
Please note
* After , other timing intervals can
be timed by pressing push-button B
(display interva timel/recovered
timed time...)
3
10
20
30
1012
3
4
5
6
7
89
15
60
30
45
21
10
20
30
1012
3
4
5
6
7
89
15
60
30
45
21
Push button A
Push button B
1/10 second counter
Minute
counter
10
20
30
1012
3
4
5
6
7
89
15
60
30
45
21
10
20
30
1012
3
4
5
6
7
89
15
60
30
45
21
Push button B
Push button A
Push button B
1/10 second counter
Minute
counteur

1
2
A
B
A
A
B
III III
3
3
Adjusting the centre stop second
Singel step A1 x short
Continuous Along
Adjusting the next hand B
Adjusting the 1/10 second hand
counter (position 6h)
Single step A1 x short
Continuous Along
Adjusting the next hand B
Adjusting the minute counter hand
(position 9h)
Single step A1 x short
Continous Along
ADJUSTING THE HANDS OF THE
CRONOGRAPH TO THE ZERO POSITION
18 19
English
Example:
One or more of the hand of the
chronograph are not in their correct zero
position and must be adjusted (ex. after
changing the battery)
Pull out the crown to position III (all 3
hand of the chronograph go back to
their correct or incorrect zero
position).
Push press button A and B at the
same time for at least 2 sec (the
second counter hand in the centre
turns 360º à the corrective mode is
activated) Return the crown to position I
Finished adjusting the hands of the
chronograph (can be done at any
time).
10
20
30
1012
3
4
5
6
7
89
15
60
30
45
IIIIII
21
10
20
30
1012
3
4
5
6
7
89
15
60
30
45
21
III
Second counter
in the centre
Push button B
Push button A
1/10 second counter
Minute
counter

1
2
3
1
3
1
2
3
1
SETTING THE TIME
20
QUICKLY CHANGING THE TIME
21
English
Pull out the crown to position III
(the second hand stops).
Turn the crown until you reach the
correct time 8:45.
Return the crown to position I.
*
*
Please Note:
* In order to set the time to the
“approximate second”, must be
pulled out when the second hand is in
the “60” position (I). After setting hour
and minute hands, should be put
back in position Iat the “approximate
second”.
Pull out the crown to position II
(the watch continues to work).
Turn the crown until the correct date
.
Push the crown back into position I.
Please Note:
The date can be changed during the
date rollover phase between 9:00 pm
and midnight by setting the date of
the following day so that the automatic
date change does not move ahead
automatically from 1 day to midnight.
IIIIII
10
20
30
1012
3
4
5
6
7
89
15
60
30
45
21
IIIIII
10
20
30
1012
3
4
5
6
7
89
15
60
30
45
21
Second
hand
III
10
20
30
1012
3
4
5
6
7
89
15
60
30
45
31
III
10
20
30
1012
3
4
5
6
7
89
15
60
30
45
1

1
2
3
4
5
4
17
4
36
SETTING THE DATE AND TIME
22 23
English
Example:
- Date/time on the watch: /1:25 AM
- Current date/time: /8:30 PM
Pull the crown out to position II
(the watch continues to work).
Turn the crown until you reach
yesterday’s date .
Pull out the crown to position III
(the second hand stops).
Turn the crown until you reach the
current date .
Keep turning the crown until you
reach the current time 8:30pm.
Return the crown to position I.
Please note:
* In order to set the time to the
“approximate second”, see the note
in the “Setting the time” section.
**Please observe the AM/PM
clock rhythm.
*
**
2
III
10
20
30
1012
3
4
5
6
7
89
15
60
30
45
17
III
10
20
30
1012
3
4
5
6
7
89
15
60
30
45
3
Crown
Date
IIIIII
10
20
30
1012
3
4
5
6
7
89
15
60
30
45
3
IIIIII
10
20
30
1012
3
4
5
6
7
89
15
60
30
45
4
Second
hand

By virtue of the regulations pursuant to the handling of waste products deriving from electronic
and electrical equipment, end of lifecycle watch making products must be selectively collected
for processing. You may therefore dispose of your quartz watch making products at any of our retail
outlets or any other authorized collection point. The selective collection, processing, rating and
recycling of these products helps contribute to safeguarding the environment and protecting our
health.
MODE D’EMPLOI
– Description des organes d’affichage et de commande . . . . . . . . . . . . . . . . . . . . . . . . . . . 26
– Chronographe . . . . . . . . . . . . . . . . . . . . . . . . . . . . . . . . . . . . . . . . . . . . . . . . . . . . . . . . . . . . . . . . 27
– Réglage de l’heure. . . . . . . . . . . . . . . . . . . . . . . . . . . . . . . . . . . . . . . . . . . . . . . . . . . . . . . . . . . . .32
– Correction rapide de la date. . . . . . . . . . . . . . . . . . . . . . . . . . . . . . . . . . . . . . . . . . . . . . . . . . 33
– Réglage de la date et de l’heure . . . . . . . . . . . . . . . . . . . . . . . . . . . . . . . . . . . . . . . . . . . . . . . . 34
Type of battery: 395 (Ø 9.5 mm x 2.6 mm / SR 927 SW)
Accuracy of functioning: +20/-10 seconds per month

Organs d’affichage
Aiguille des secondes
Aiguille des minutes
Aiguille des heures
Compteur des
secondes au centre
Compteur
des minutes
Compteur des 1/10 secondes
(Compteur des heures après 30 minutes)
Date
Boutons de réglage
Poussoir A
Couronne
Poussoir B
1
2
3
CHRONOGRAPHE: FONCTION DE BASE
START/STOP/REMISE À ZÉRO
Example:
Start: Appuyer sur le poussoir A.
Stop: pour interrompre le
chronométrage, appuyer à nouveau
sur le poussoir A et lire les 3
compteurs du chronographe:
4mm / 38 s / 7/10 s
Mise à zéro:
Appuyer sur le poussoir B.
(Les 3 aiguilles du chronographe
sont remises à zéro).
27
DESCRIPTION DES ORGANES D’AFFICHAGE ET DE COMMANDE
26
30
10
20
1012
3
4
5
6
7
89
15
60
30
45
21
10
20
30
1012
3
4
5
6
7
89
15
60
30
45
21
10
20
30
1012
3
4
5
6
7
89
15
60
30
45
21
Poussoir A
Poussoir B
Compteur
des 1/10 secondes
Compteur
des minutes

1
2
3
4
1
3
5
CHRONOGRAPHE:
CHRONOMÉTRAGE AVEC TOTALISATION
28
CHRONOGRAPHE:
CHRONOMÉTRAGE DES TEMPS IMTERMÉDIAIRES
Exemple:
Start:
(Faire démarrer le chronométrage)
Stop: (P. ex.15 mm 5s après )
Restart: (Relancer le chronométrage)
Stop: (P. ex. 13 mn 5s après )
= 28 mn 10 s
(Le temps de chronométrage total est indiqué)
Mise à zéro:
Les 3 aiguilles du chronographe
sont remis à zéro.
Nota:
* Le chronométrage avec totalisation
peut se poursuivre après
Appuyer pour cela sur A
(Restart / Stop, Restart/Stop,...)
*
4
1
2
3
4
5
4
Exemple
Start: (Faire démarrer le chronométrage)
Affichage du temps intermédiaire:
P.ex. 10mn,10s (le chronométrage
continue à l’arrière-plan).
Rattrapage du temps chronométré:
(Les 3 aiguilles du chronographe
rattrapent à grande vitesse le
temps de chronométrage qui
s’est écoulé).
Stop: (Le temps final est affiché).
Mise à zéro:
Les 3 aiguilles du chronographe
sont remis à zéro
3
Nota:
* D’autres temps intermédiaires puevent
être chronométrés après . Appuyer
pour cela le poussoir B (affichage du
temps intermédiaire /rattrapage du
temps chronométré...)
29
10
20
30
1012
3
4
5
6
7
89
15
60
30
45
21
10
20
30
1012
3
4
5
6
7
89
15
60
30
45
21
Poussoir A
Poussoir B
Compteur
des 1/10 secondes
Compteur
des minutes
10
20
30
1012
3
4
5
6
7
89
15
60
30
45
21
10
20
30
1012
3
4
5
6
7
89
15
60
30
45
21
Poussoir B
Poussoir A
Poussoir B
Compteur
des 1/10 secondes
Compteur
des minutes

1
2
A
B
A
A
B
III III
3
3
Ajustage de l’aiguille du compteur des
secondes au centre:
Pas à pas:
1 pression brève
En continu:
1 pression maintenue
Ajustage de l’aiguille suivante B
Ajustage de l’aiguille du compteur des
heures (pos. 6 h)
Pas à pas: A1 pression brève
En continu: A
1 pression maintenue
Ajustage de l’aiguille suivante B
Ajustage de l’aiguille du compteur des
minutes (pos. 9 h)
Pas à pas: A1 pression brève
En continu: A
1 pression maintenue
AJUSTAGE DES AIGUILLES DU
CHRONOGRAPHE EN POSITION ZÉRO
30 31
Exemple:
Une ou plusieurs des aiguilles du
chronographe ne sont pas en position zéro
correcte et doivent être ajustées (p.ex. après
un changement de pile).
Tirer la couronne en position III (les
3 aiguilles du chronographe
viennent à leur position zéro,
correcte ou incorrecte).
Appuyer simultanément pendant
au moins 2 secondes sur les
poussoirs A et B (l’aiguille du
compteur des secondes au centre
tourne de 360º le mode
correction est activé).
Repousser les couronne en position I.
Fin de l’ajustage des aiguilles du
chronographe (possible à tout moment)
10
20
30
1012
3
4
5
6
7
89
15
60
30
45
IIIIII
21
10
20
30
1012
3
4
5
6
7
89
15
60
30
45
21
III
Compteur des
secondes au
centre
Poussoir B
Poussoir A
Compteur
des 1/10 secondes
Compteur
des minutes A
A

1
2
3
1
3
1
2
3
1
RÉGLAGE DE L’HEURE
32
CORRECTION RAPIDE DE LA DATE
33
Tirer la couronne en position III
(l’aiguille des secondes
s’immobilise).
Tourner la couronne jusqu’à ce
que l’heure actuelle 08:45 soit
indiquée.
Repousser la couronne en pos I.
*
*
Nota:
*Pour régler l’heure “à la seconde
près”, doit être tirée lorsque
l’aiguille des secondes est en position
“60” (I). Après avoir réglé l’aiguille des
heures et des minutes, doit être
repoussée en pos. I“à la seconde
près”.
Tirer la couronne en pos, II
(la montre continue de fonctionner)
Tourner la couronne jusqu’à ce que
la date actuelle apparaisse.
Repousser la couronne en pos I.
Nota:
La date peut être corrigée pendant la
phase d’entraînemet du calendrier de
21:00-24:00; il faut pour cela régler
la date sur le jour suivant car dans ce
cas le calendrier n’avance pas
automatiquement d’un jour à minuit.
IIIIII
10
20
30
1012
3
4
5
6
7
89
15
60
30
45
21
IIIIII
10
20
30
1012
3
4
5
6
7
89
15
60
30
45
21
Aiguille des
secondes
III
10
20
30
1012
3
4
5
6
7
89
15
60
30
45
31
III
10
20
30
1012
3
4
5
6
7
89
15
60
30
45
1

1
2
3
4
5
4
17
4
36
RÉGLAGE DE LA DATE ET DE L’HEURE
34 35
Exemple:
- Date/heure indiquée
par la montre /01:25 AM
- Date/heure actuelle: /20:30 PM
Tirer la couronne en pos. II (la montre
continue de fonctionner).
Tourner la couronne jusqu’à ce que la
veille de la date actuelle
apparaisse .
Tirer la couronne en position III
(l’aiguille des secondes s’immobilise)
Tourner la couronne jusqu’à ce que
la date actuelle apparaisse.
Continuer de tourner la couronne
jusqu’à ce que l’heure actuelle 20:30
soit affichée.
Repousser la couronne en position I.
Nota:
* Pour le réglage de l’heure “à la
seconde près”, voir nota au
chapitre “réglage de l’heure”.
**Respecter le rythme de 24 heures.
*
**
III
10
20
30
1012
3
4
5
6
7
89
15
60
30
45
17
III
10
20
30
1012
3
4
5
6
7
89
15
60
30
45
3
Couronne
Date
IIIIII
10
20
30
1012
3
4
5
6
7
89
15
60
30
45
3
IIIIII
10
20
30
1012
3
4
5
6
7
89
15
60
30
45
4
Aiguille des
secondes

BETRIEBSANLEITUNG
– Beschreibung der Anzeige- und Kontrollelemente . . . . . . . . . . . . . . . . . . . . . . . . . . . . . . . . 38
– Chronograph. . . . . . . . . . . . . . . . . . . . . . . . . . . . . . . . . . . . . . . . . . . . . . . . . . . . . . . . . . . . . . . . . 39
– Einstellung der Unrzeit. . . . . . . . . . . . . . . . . . . . . . . . . . . . . . . . . . . . . . . . . . . . . . . . . . . . . . . . 44
– Schnellkorrektur des datums . . . . . . . . . . . . . . . . . . . . . . . . . . . . . . . . . . . . . . . . . . . . . . . . . . 45
– Einstellen von Uhrzeit und Datum . . . . . . . . . . . . . . . . . . . . . . . . . . . . . . . . . . . . . . . . . . . . . . 46
En application de la réglementation sur les déchets des équipements électriques et électroniques,
les produits horlogers à quartz en fin de vie font l’objet dúne collecte sélective en vue de
leur traitement. Vous pouvez ainsi déposer nos produits horlogers à quartz dans l’un de nos points
de vente agréés, ainsi que dans tout point de collecte habilité. La collecte sélective, le traitement, la
valorisation et le recyclage contribuent à la sauvegarde de notre environnement et à la protection
de notre santé.
Type de pile: 395 (Ø 9,5 mm x 2,6 mm / SR 927 SW)
Précision de marche: +20/-10 secondes par mois
This manual suits for next models
1
Table of contents
Languages:
Other Candino Watch manuals