manuals.online logo
Brands
  1. Home
  2. •
  3. Brands
  4. •
  5. Canon
  6. •
  7. All In One Printer
  8. •
  9. Canon PIXMA MG8250 User manual

Canon PIXMA MG8250 User manual

1
2
©CANON INC.2011
2
3
1
(B)(A)
1
2
5
6
8
1
2
3
5
6
(M/BK/GY/PGBK/C/Y)
1
2
3
2
1
2
2
1
3
4
4
1
2
1
3
2
1
3
7
3
1
2
2
Uklonite traku.
Provjerite isporučene stavke.
Adapter za disk od
3,15 inča (8 cm)
Kabel napajanja
Posude s tintom
Ladica za disk
[Setup CD-ROM/CD-
ROM za postavljanje] Priručnici i drugi dokumenti [Matte Photo Paper/Mat fotopapir] MP-101
(za automatsko poravnavanje ispisne glave)
Mrežna veza: Po potrebi
pripremite Ethernet kabel ili
mrežne uređaje kao što su
usmjerivač i pristupna točka.
USB veza: Potreban je USB
kabel (nije u kompletu).
Pazite da nikakav predmet ne upadne u uređaj. To bi moglo uzrokovati kvar.•
Ladica za izlaz papira automatski će se otvoriti kada ispis započne. Pazite da ispred ladice ne bude •
nikakvih prepreka.
Nemojte još priključivati USB ili
Ethernet kabel.
Priključite kabel napajanja.
5
Prilagodite kut LCD zaslona,
a zatim pritisnite gumb [ON]
(Uključi).
Kada se prikaže zaslon 1, dodirnite
gumb [OK] (U redu).
8
Podignite jedinicu za skeniranje / poklopac.
1
Zakrenite i uklonite narančasti poklopac.
(A) Nemojte pritiskati strane dok je žlijeb oblika L blokiran.
(B) Nemojte dodirivati!
3
Umetnite posudu s tintom u utor odgovarajuće boje i gurnite je prema dolje.
Provjerite svijetli li lampica za tintu, a zatim umetnite sljedeću posudu s tintom.
4
Provjerite svijetle li sve lampice.
5
Ako se prikaže poruka o
pogrešci, provjerite je li
posuda s tintom pravilno
umetnuta.
Spustite jedinicu za skeniranje /
poklopac.
Pričekajte otprilike 4 minute da ovaj
zaslon nestane, a zatim nastavite.
6
Sljedeći su spremnici s tintom kompatibilni s ovim uređajem.
Ovdje se umeću posude s tintom.
Nemojte ih dodirivati dok se ne zaustave.
Početak Najprije pročitajte mene!
Držite me pri ruci za buduće potrebe.
Windows je zaštitni znak ili registrirani •
zaštitni znak tvrtke Microsoft Corporation
u SAD-u i/ili drugim državama.
Windows Vista je zaštitni znak ili •
registrirani zaštitni znak tvrtke Microsoft
Corporation u SAD-u i/ili drugim
državama.
Macintosh, Mac, Mac OS, AirPort •
i Bonjour su zaštitni znakovi tvrtke
Apple Inc. registrirani u SAD-u i drugim
državama.
Broj modela: K10370 (MG8250)
Kako biste postavili pisač, smjestite ga blizu pristupne točke
(bežični LAN) i računala.
HRVATSKI
Odaberite jezik, a zatim dodirnite
gumb [OK] (U redu).
7
Kako biste promijenili postavku jezika,
dodirnite gumb Povratak.
Otvorite ladicu za izlaz papira.
1
Podignite jedinicu za skeniranje / poklopac, zatim uklonite narančastu traku i zaštitni materijal.
Poklopac za dokumente mora biti spušten kako bi se jedinica za skeniranje / poklopac mogao podići!
3
Spustite jedinicu za skeniranje /
poklopac.
4
Priprema
Isporučene
stavke
Zamjena
posuda
s tintom
Gumb Povratak
Potpuno uklonite narančastu traku.
Uklonite zaštitni omot.
2
Otvorite poklopac za dokumente,
otključajte skener, a zatim zatvorite
poklopac za dokumente.
2
Remove the tape.
Check the included items. 3.15 inches (8 cm) disc
adapter
Network connection:
Prepare the Ethernet cable
or network devices such as a
router or an access point as
necessary.
USB connection: A USB
cable (not included) is
required.
Manuals and other documents
Power cord
Ink tanks
Setup CD-ROM Matte Photo Paper MP-101 (for Automatic
Print Head Alignment)
Disc tray
Do not allow objects to fall inside the machine. These could cause malfunction.•
The Paper Output Tray opens automatically as printing starts. Keep the front of the tray clear of any •
obstacles.
Do not connect the USB or Ethernet
cable yet.
Connect the power cord.
5
Adjust the angle of the LCD, then
press the ON button.
6
Open the Scanning Unit / Cover.
1
Twist and remove the orange cap.
(A) Do not press the sides when the L-shaped groove is blocked.
(B) Do not touch!
3
Insert and push down the ink tank into the matching color slot.
Check that the ink lamp is lit, then install the next ink tank.
4
Check that all lamps are lit.
5
If an error message
appears, check that
the ink tank is installed
correctly.
Close the Scanning Unit / Cover.
Wait for about 4 minutes until this screen
disappears, then proceed.
6
The following ink tanks are compatible with this machine.
When screen 1 is displayed, touch
the OK button.
8
Remove the orange tape completely.
Remove the protective wrap.
2
This is where the ink tanks are to be installed.
Do not touch it until it stops.
Getting Started Read me first!
Keep me handy for future reference.
Windows is a trademark or registered •
trademark of Microsoft Corporation in the
U.S. and/or other countries.
Windows Vista is a trademark or •
registered trademark of Microsoft
Corporation in the U.S. and/or other
countries.
Macintosh, Mac, Mac OS, AirPort •
and Bonjour are trademarks of Apple
Inc., registered in the U.S. and other
countries.
Model Number: K10370 (MG8250)
To perform setup, place the machine near the access point
(wireless LAN) and computer.
ENGLISH
Select your language, then touch
the OK button.
7
To change the language setting, touch
the Back button.
Open the Paper Output Tray.
1
Lift the Scanning Unit / Cover, then remove the orange tape and protective material.
Document Cover must be closed to lift Scanning Unit / Cover!
3
Close the Scanning Unit / Cover.
4
Preparation
Included Items
Replacing the
Ink Tanks
Back button
Open the Document Cover,
unlock the scanner, then close the
Document Cover.
2
M: CLI-526M
GY: CLI-526GY
C: CLI-526C
BK: CLI-526BK
PGBK: PGI-525PGBK
Y: CLI-526Y
3
4
5
1
2
3
1
2
3
5
4
3
2
6
1
4
5
2
3
1
2
3
1
2
1
2
3
1
1
4
1
2
3
2
Izvršite postupak poravnavanja ispisne glave.
Gurnite vodilicu za papir prema
oba ruba.
2
Uložite isporučeni MP-101 papir
u stražnju ladicu.
3
Kada se prikaže ovaj zaslon,
dodirnite gumb [OK] (U redu).
5
Kada se prikaže ovaj zaslon,
zatvorite produžetak izlazne ladice
i ladicu za izlaz papira. Zatim
izvucite kasetu.
1
Gurnite vodilicu za papir prema
stranama, a zatim prilagodite
prednju vodilicu prema veličini
papira.
2
Postavite papir na desnu stranu
i prilagodite lijevu vodilicu prema
veličini papira koji se koristi.
3
Dodirnite gumb [OK] (U redu).
5
Sada su dostupne funkcija kopiranja i druge funkcije za koje nije
potrebno računalo.
Nemojte još priključivati USB kabel.
Njegovo priključivanje zatražit će se tijekom instalacije kada se koristi [Setup CD-ROM/CD-ROM za
postavljanje].
Prije instalacije izađite iz svih programa.•
Prijavite se koristeći račun administratora.•
Tijekom instalacije možda će biti potrebna veza s internetom. Troškovi internetske veze se naplaćuju.•
Zasloni se temelje na sustavima Windows 7 Home Premium i Mac OS X v.10.6.x. Stvarni zasloni mogu se
razlikovati ovisno o verziji operacijskog sustava.
Pritisnite gumb [ON] (Uključi) kako
biste isključili uređaj.
Zvuk rada prekinut će se nakon otprilike
1 minutu.
1
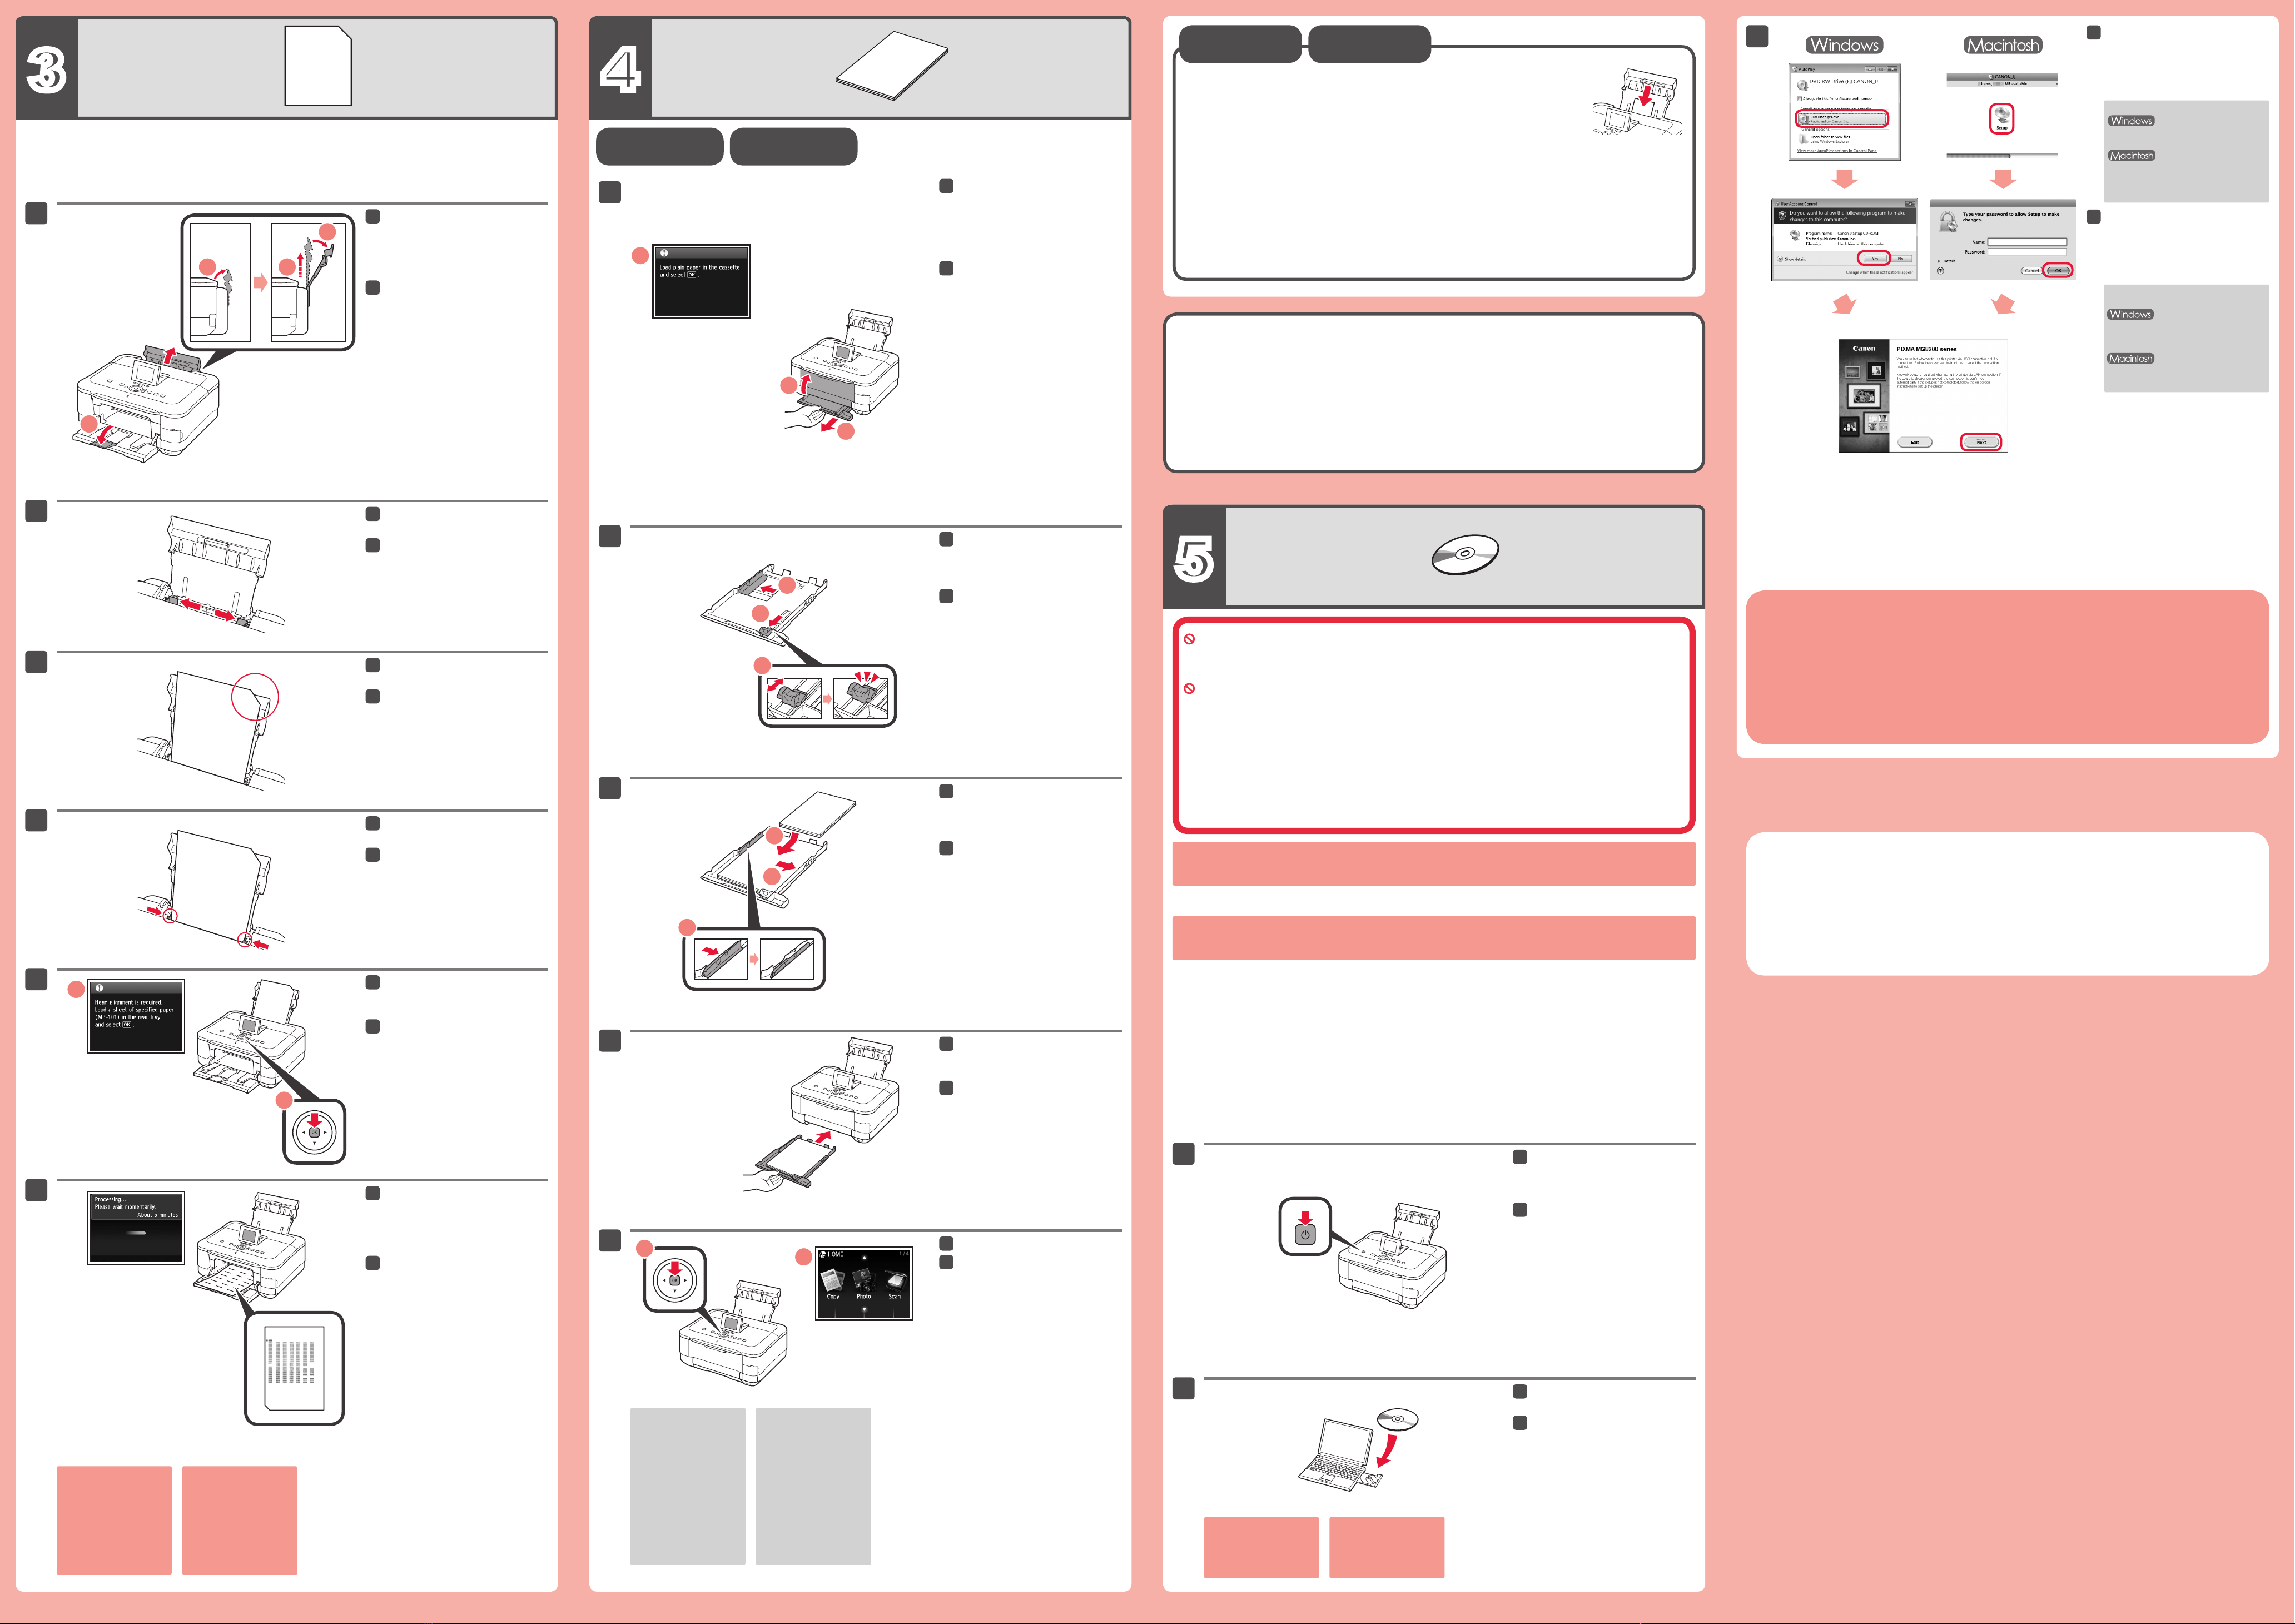
Umetnite CD-ROM u računalo.
2
Ako je USB kabel već
povezan, iskopčajte
ga. Ako se na računalu
prikaže poruka, pritisnite
[Cancel/Odustani].
Za nastavak slijedite upute na
zaslonu.
Ako se prikaže zaslon [Select Language/
Odabir jezika], odaberite jezik.
3
Ako se CD-ROM ne pokrene
automatski:
Dvaput pritisnite [(My) Computer/
(Moje) računalo] > ikonu CD-ROM-a >
MSETUP4.EXE.
Dvaput pritisnite ikonu CD-ROM-a na
radnoj površini.
Kako biste dovršili instalaciju, slijedite upute na zaslonu
računala.
Kako biste uređaj koristili s više računala, na svako od tih računala instalirajte softver s CD-ROM-a.•
Kako biste s USB veze prešli na mrežnu vezu, ponovo instalirajte softver s CD-ROM-a.•
Prilagodite vodilicu za papir tako
da odgovara širini papira.
4
Uložite fotopapir samo u stražnju ladicu. Kada se koristi fotopapir, treba prilagoditi postavke uređaja za
vrstu i veličinu medija.
Postavljanje
običnog papira
Ulaganje
fotopapira.
Otvorite i produljite stražnju ladicu,
a zatim je nagnite natrag na
mjesto.
Otvorite produžetak izlazne ladice.
1
Ako se prikaže poruka o
pogrešci, dodirnite gumb
[OK] (U redu), a zatim
nastavite do poglavlja 4.
Nakon instalacije ponovite
poravnavanje ispisne
glave.
Za otprilike 5 minuta ispisat će se
plavo-crni uzorak. Poravnavanje
ispisne glave je dovršeno.
6
Gurajte kasetu prema natrag dok
ne sjedne na mjesto.
4
LCD zaslon će se isključiti
ako se uređaj ne koristi
otprilike 5 minuta. Kako
biste ponovno uključili
zaslon, dodirnite bilo koji
gumb (osim gumba [ON]
(Uključi)) na upravljačkoj
ploči.
Notes for Energy Saving Setting
For purpose of energy saving, this product will be automatically turned off after designated
period without operation (The Auto Power Off function).
Napomene o postavci za štednju energije
Kako bi se uštedjela energija, ovaj će se proizvod automatski isključiti nakon određenog
vremena neaktivnosti (funkcija automatskog isključivanja).
Perform the Print Head Alignment.
Open and extend the Rear Tray,
then tilt it back in place.
Open the Output Tray Extension.
1
Slide the Paper Guide to both
ends.
2
Load the supplied MP-101 paper in
the Rear Tray.
3
Adjust the Paper Guide to fit the
paper width.
4
When this screen is displayed,
touch the OK button.
5
In about 5 minutes, the blue-black
pattern is printed. Print Head
Alignment is complete.
6
When this screen is displayed,
close the Output Tray Extension
and the Paper Output Tray. Then,
pull out the Cassette.
1
Slide the Paper Guide to the sides,
then adjust the front guide to the
paper size.
2
Place paper on the right side and
adjust the left guide to fit the paper
size used.
3
Slide the Cassette back in until it
clicks into place.
4
The LCD turns off if the
machine is not operated
for about 5 minutes. To
restore the display, touch
any button (except the ON
button) on the Operation
Panel.
Touch the OK button.
5
Copy and other functions that do not require a computer are now
available.
Do not connect the USB cable yet.
You will be prompted to connect it during the installation using the Setup CD-ROM.
Quit all applications before installation.•
Log on using an administrator account.•
Internet connection may be required during the installation. Connection fees apply.•
Screens are based on Windows 7 operating system Home Premium and Mac OS X v.10.6.x. Actual screens
may differ depending on the OS version.
Press the ON button to turn off the
machine.
Operating noise stops after about 1
minute.
1
Insert the CD-ROM into the
computer.
2
If the USB cable is already
connected, unplug it. If a
message appears on the
computer, click Cancel.
Follow the on-screen instructions
to proceed.
If the Select Language screen appears,
select a language.
3
If the CD-ROM does not autorun:
Double-click (My) Computer > CD-
ROM icon > MSETUP4.EXE.
Double-click the CD-ROM icon on the
desktop.
To complete the installation, follow the on-screen instructions
on the computer.
To use the machine from more than one computer, install the software from the CD-ROM on each computer.•
To switch from USB to network connection, reinstall the software from the CD-ROM.•
Load photo paper in the Rear Tray only. When using photo paper, machine settings
for media type and size should be adjusted.
Setting Plain
Paper
Loading Photo
Paper
If an error message
appears, touch the OK
button, then proceed to
Chapter 4. After installation
is complete, redo Print
Head Alignment.

Other Canon All In One Printer manuals

Canon PIXMA MX452 User manual

Canon

Canon PIXMA MX452 User manual

Canon IMAGERUNNER 2010F User manual

Canon

Canon IMAGERUNNER 2010F User manual

Canon imagerunner advance 4551i User manual

Canon

Canon imagerunner advance 4551i User manual

Canon LASER CLASS 2050P User manual

Canon

Canon LASER CLASS 2050P User manual

Canon iR2020 Series Product information sheet

Canon

Canon iR2020 Series Product information sheet

Canon PIXMA MG2920 User manual

Canon

Canon PIXMA MG2920 User manual

Canon imageRUNNER 2645i User manual

Canon

Canon imageRUNNER 2645i User manual

Canon ImageCLASS 2300 Installation and maintenance instructions

Canon

Canon ImageCLASS 2300 Installation and maintenance instructions

Canon imageCLASS D1650 User manual

Canon

Canon imageCLASS D1650 User manual

Canon PIXMA MG3660 Setup guide

Canon

Canon PIXMA MG3660 Setup guide

Canon D1300 Series User manual

Canon

Canon D1300 Series User manual

Canon PIXMA MX372 User manual

Canon

Canon PIXMA MX372 User manual

Canon MultiPASSTM C50 User manual

Canon

Canon MultiPASSTM C50 User manual

Canon LaserBase MF5770 User manual

Canon

Canon LaserBase MF5770 User manual

Canon PIXMA MG3170 User manual

Canon

Canon PIXMA MG3170 User manual

Canon FY8-13HW-000 User manual

Canon

Canon FY8-13HW-000 User manual

Canon MultiPASS F20 User manual

Canon

Canon MultiPASS F20 User manual

Canon PIXMA MX882 Series User manual

Canon

Canon PIXMA MX882 Series User manual

Canon Color imageCLASS MF8170c User manual

Canon

Canon Color imageCLASS MF8170c User manual

Canon imageRunner 2204F User manual

Canon

Canon imageRunner 2204F User manual

Canon PIXMA MP520 User manual

Canon

Canon PIXMA MP520 User manual

Canon FaxPhone L120 Setup guide

Canon

Canon FaxPhone L120 Setup guide

Canon iR3300 Series User manual

Canon

Canon iR3300 Series User manual

Canon PIXMA MX432 Manual

Canon

Canon PIXMA MX432 Manual

Popular All In One Printer manuals by other brands

Xerox WorkCentre 7132 Paper guide

Xerox

Xerox WorkCentre 7132 Paper guide

Sharp AL-1651CS Service manual

Sharp

Sharp AL-1651CS Service manual

Epson Expression Home XP-103 quick start guide

Epson

Epson Expression Home XP-103 quick start guide

Konica Minolta KM-7145 instruction manual

Konica Minolta

Konica Minolta KM-7145 instruction manual

Brother MFC-J4410DW Network user's guide

Brother

Brother MFC-J4410DW Network user's guide

Copystar CS 6550ci specification

Copystar

Copystar CS 6550ci specification

Ricoh Aficio 3030 operating instructions

Ricoh

Ricoh Aficio 3030 operating instructions

Brother DCP-9020CDN Advanced user's guide

Brother

Brother DCP-9020CDN Advanced user's guide

Ricoh Aficio 3025 Settings guide

Ricoh

Ricoh Aficio 3025 Settings guide

Epson WF-2830 user guide

Epson

Epson WF-2830 user guide

TASKalfa 6500i Brochure & specs

TASKalfa

TASKalfa 6500i Brochure & specs

Xerox VersaLink B615 user guide

Xerox

Xerox VersaLink B615 user guide

Konica Minolta bizhub C203 Series installation manual

Konica Minolta

Konica Minolta bizhub C203 Series installation manual

Xerox B1022 installation guide

Xerox

Xerox B1022 installation guide

Sharp FO-2080 Online manual

Sharp

Sharp FO-2080 Online manual

Xerox ApeosPort-II 5010 user guide

Xerox

Xerox ApeosPort-II 5010 user guide

Konica Minolta bizhub 25e Administrator's guide

Konica Minolta

Konica Minolta bizhub 25e Administrator's guide

Minolta DI2010 user manual

Minolta

Minolta DI2010 user manual

manuals.online logo
manuals.online logoBrands
  • About & Mission
  • Contact us
  • Privacy Policy
  • Terms and Conditions

Copyright 2025 Manuals.Online. All Rights Reserved.