manuals.online logo
Brands
  1. Home
  2. •
  3. Brands
  4. •
  5. Canyon
  6. •
  7. MP3 Player
  8. •
  9. Canyon CNR-MPV2 User manual

Canyon CNR-MPV2 User manual

0
You can press “RESET” button to recover the default setting if MP3
player is not functioning well.
Note: Please recharge the MP3 player before using it!
Please use your MP3 player properly in case of explosion, fire, electric shock, etc.
1.Do not leave the player in a place subject to moisture or temperature higher than
35℃or lower than 5℃.
2.Do not repair the player by yourself, or it will cause damage.
3.Do avoid getting the MP3 player wet or drop it in water.
4.As U-disk, it will be write-protected if you switch the【HOLD 】button to “Lock”
position.
5.Please backup important data onto your personal computer as repair or other
causes may result in data loss.
When using your MP3 player, pay attention to your health, especially the power of
hearing.
1.Do not use the earphones while driving or riding a bicycle.
2.It may cause traffic accident if you turn up the volume of the earphones while
1
walkingdownthestreet.
3.Do not turn up the volume too high, doctors warn against prolonged exposure to
high volume.
4.Stop using the device or turn down the volume if you have ringing in your ears.
5.Always use the accessories provided by or approved by our company, also do
not spray water on the player.
Function features
The player supports MP3 and WMA music file formats. Including WMA files with
DRM (Digital Rights Management) function.
Support USB 2.0 capability, much faster than USB 1.1, to enable faster
communication with your PC.
The player can record outside voice and FM radio.
The player has repeat functions.
The player has Video Playback, Photo Viewer, Game Mode, etc.
2
The player can power off automatically after a preset time.
Accessories
Installation CD USB Cable Earphones User Guide
3
Components and button functions
4
ChargingLi–polymerbatterysafely
1. Connect the PC USB port and the MP3 USB port with the provided USB cable.
2. The power sign is shown dynamic when charging, once full charged,, the power
sign will stop moving, power is full, please shut off the power. The charging time is
approximately 3.5 hours.
3. If the unit is being used during charging, it will take longer to charge.
4. To stop recharging, disconnect the USB cable.
Notes:
zBefore your first time use, please recharge your MP3 player.
zYour computer must be turned on while connected to your MP3 for charging.
CAUTION:
1. Danger of explosion if battery is incorrectly replaced. Replace only with the same
or equivalent type.
2. Do not disassemble, crush, short-circuit or incinerate your battery as it may cause
fire, injury, burns, or other hazards.
Basicoperations
Turn power on and play music
To Start:
1. Connect earphone to earphone jack.
2. Switch HOLD to unlock position
3. Press and hold button to turn on and enter “MUSIC” mode (the default mode is
5
“MUSIC” mode).
4. Short press button to play music.
5. To return main menu: Long press M button.
To Pause/Play: Short press button.
To change tracks: Short press /button.
To turn unit off: Press and hold button.
Volume Adjustment:
In music or MTV files playing, Voice, FM tuner mode, short press R/V button to pitch on
the volume rim, at this time press / button to turn down or turn up volume.
1. Connect the PC USB port and the MP3 USB port with the provided USB cable.
2. Add MP3 files/folders to the USB storage‘s folder.
Ⅰ. Open files/folders to transfer from your computer.
Ⅱ. Open My Computer →Removable Disk from the desktop.
Ⅲ. Select the files/folders to transfer from your computer and draw and put them to a
folder of your choice in the Removable Disk (you also can transfer files on your PC to the
player using the "Copy" and "Paste" functions).
6
3. Delete MP3 files from the removable USB storage (use the "Delete" command).
1. Click the left mouse button on the icon that is on the taskbar at the bottom
right corner of the desktop.
2. Click the "Safely remove USB Mass storage Device – Drive(G:)" column.
3. Disconnect the player from your computer.
CAUTION:
7
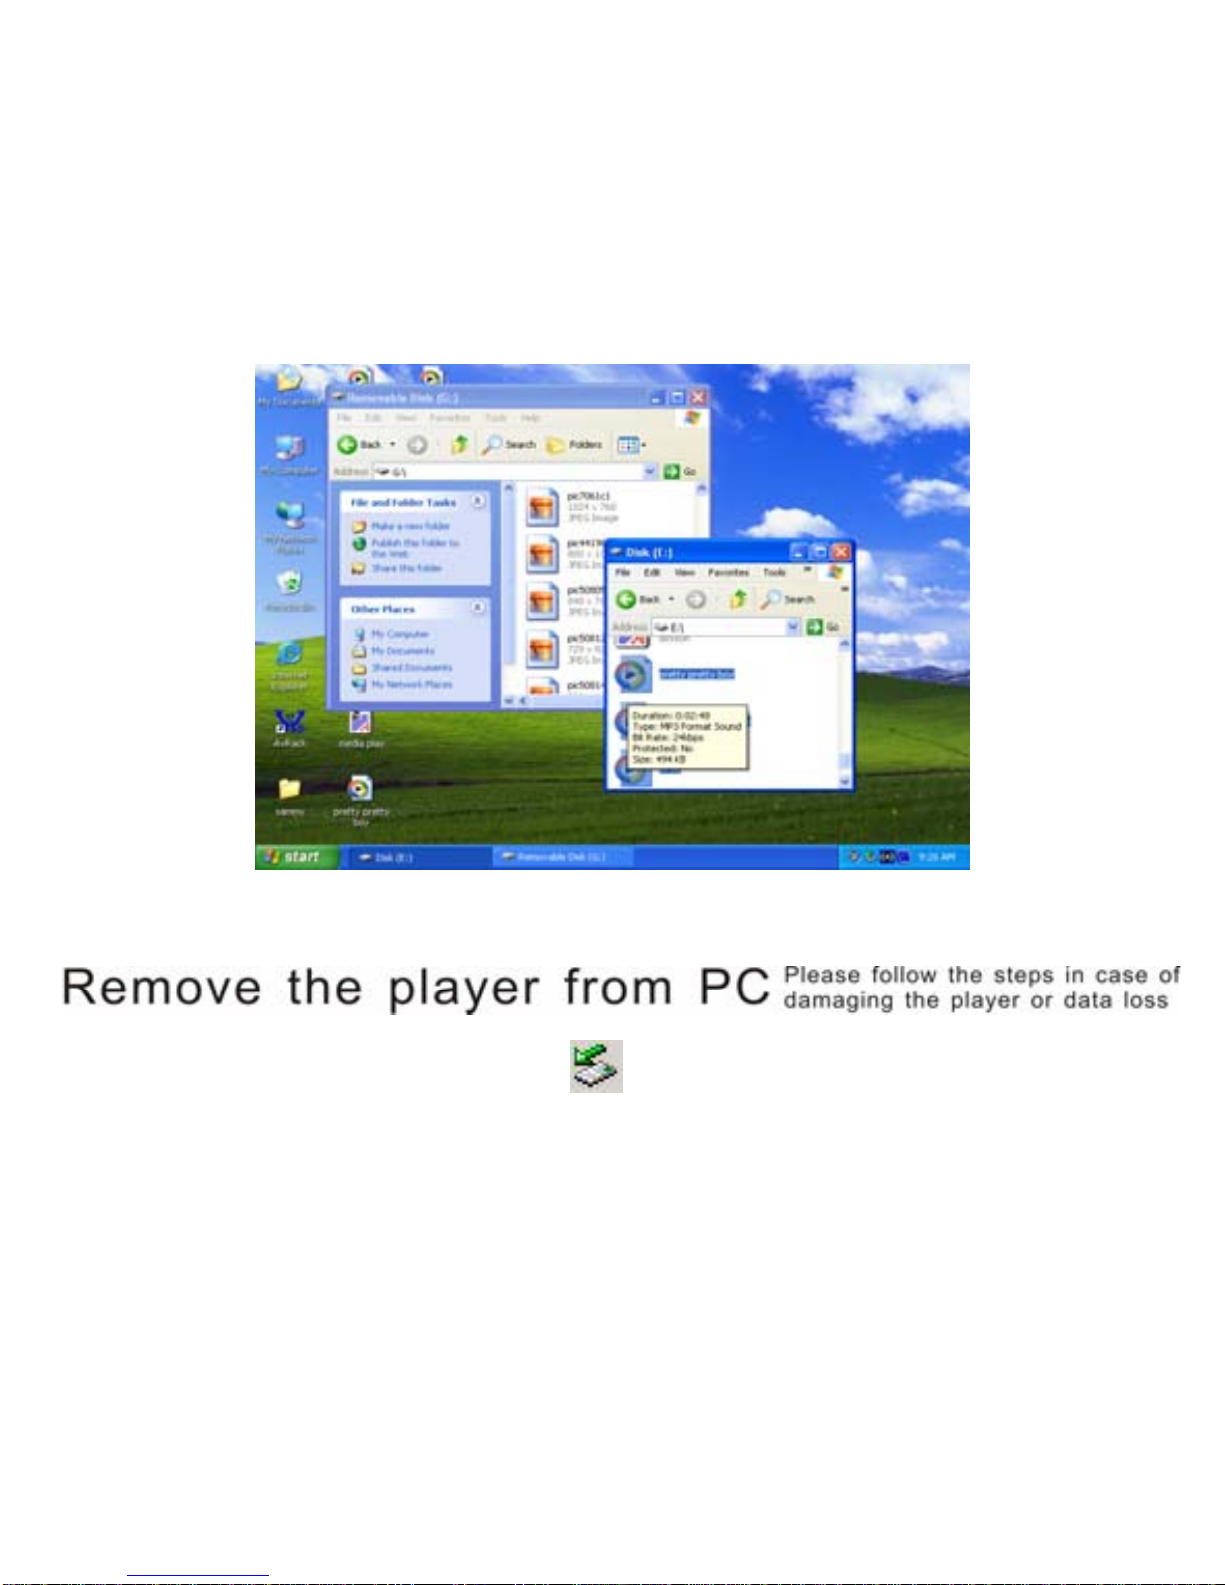
Do not remove the player while files within the USB Mass Storage are being
played on your computer.
Do not disconnect the player from your computer while transferring file, or it will
cause damage to the player or data loss.
MenuNavigation
M button: Enter main menu, submenu or return.
Skip button ( /): Shift menus.
Play/Pause button ( ): Play, Pause, or confirm.
1. Press and hold M button to enter main menu.
2. Press /buttons to select your desired option (e.g. MUSIC, FILE, VOICE,
PHOTO, FM, SETUP, VIDEO, EBOOK, GAME).
MUSIC
Press and hold button to turn unit on and enter “MUSIC” mode (the default mode is
“MUSIC” mode), then short press button to play music.
Music Playback Submenu
Short press M button to enter into submenu and short press / buttons to select
your desired Mode (e.g. Repeat, Equalizer, 3D, Play Rate, Intro, File Browse, A-B).
Repeat
1. Select Repeat mode and short press button to enter.
2. Short press / buttons to select your desired option (e.g. No Repeat, One,
8
All, RandomAll, DirRepOne, DirRep, DirRanAll).
3. Short press button to confirm.
Equalizer
1. Select Equalizer mode and short press button to enter.
2. Short press / buttons to select your desired option (e.g. Normal, Pop, Rock,
Classic, Jazz, Bass, Custom EQ).
3. Short press button to confirm.
3D
1. Select 3D mode and short press button to enter.
2. Short press /buttons to select your desired option (e.g. Off, On).
3. Short press button to confirm.
Play Rate
1. Select Play Rate mode and short press button to enter.
2. Short press / buttons to select your desired speed (e.g. 1.00X, 1.14X, 1.33X,
0.67X, 0.80X).
3. Short press button to confirm.
Intro
1. Select Intro mode and short press button to enter.
2. Short press / buttons to select your desired option (from “00’ second to “15”
seconds).
3. Short press button to confirm.
File Browse
1. Select File Browse mode and short press button to enter.
2. Short press /buttons to select your desired file.
9
3. Short press button to playback the file
A-B
1. Select A-B mode and short press button to enter.
2. Short press R/V button to select A point, short press R/V button again to start A-B
repeat mode, short press R/V button for the third time to cancel A-B repeat mode.
FILE
1. In main menu, short press /buttons to select FILE mode.
2. Short press button to enter into.
3. Short press /buttons to choose your desired file(including MTV files, music
files, photo files, and voice files, etc)
4. Short press R/V button to delete the file, and short press / buttons to select
No or Yes, then short press button to confirm.
5. Long press M button to return to main menu.
VOICE
1. In main menu, short press /buttons to select VOICE mode.
2. Short press button to enter into.
3. Short press /button to choose your desired recording file
4. Short press button to play the recording file.
5. Long press R/V button to enter record mode.
6. Short press Mbutton to save the record file, short press button to play the
10
record file.
7. Whilst in playback mode short press Mbutton to enter into submenu (e.g. Repeat,
Play Rate, Intro, Record, File Browse, A-B). this part please refer to <music
playback submenu>
8. Long press M button to return to main menu.
PHOTO
1. In main menu, short press /buttons to select PHOTO mode.
2. Short press button to enter into.
3. Short press /buttons to choose your desired photo file
4. Press R/V button to delete the photo file, press /buttons to select “No”or
“Yes”, then press button to confirm.
5. Short press button to scan your desired picture.
6. Short press button again to browse all photos, or short press /buttons to
scan previous or next picture
7. Long press M button to return to main menu.
FM
1. Short press /buttons to select “FM“ mode.
2. Short press button to enter “FM” mode.
3. Short press /button to tune your desired stations (at intervals of 0.1 MHz).
4. Long press R/V button to start recording FM.
5. Short press Mbutton to enter submenu (e.g. Preset, Auto Search, Manual Search,
11
Save, Exit).
6. Short press button to confirm.
SETUP
1. In main menu, short press /buttons to select “SETUP“ mode.
2. Short press button to enter into.
3. Short press /buttons to choose your desired mode(e.g. USB Mode, Power,
Language, Display, Record, Sys Tools, Storage)
4. Short press button to confirm.
USB Mode:
Short press /buttons to select USB Mode (MSC mode or MTP mode)
DRM 10(optional function)
What is DRM?
Stands for digital rights management, a technology used to protect digital products
from copyright infringement. When a customer buys a DRM-protected music download,
the download is encrypted specifically for that customer. To allow the customer to use the
file on a separate MP3 player they must link the DRM enabled player to Windows Media
Player 10 and link both applications. This allows the downloaded music file to then be
used on a separate digital music player.
How to synchronize the DRM songs into your MP3 player?
12
1. Purchase DRM songs from the internet, and download them into your computer.
2. Playback the songs that you downloaded, if it could be played, the download is
successful, or you need to download again.
3. To make DRM function, the computer OS must be Windows XP system SP2 or
higher version, installed with Windows Media player 10 or above, and have a valid
internet connection.
4. Connect the DRM MP3 player with your PC, your PC will display:
NOTE: There are 2 ways to set your MP3 player into MTP mode
13
(1) In “USB Mode” select “MTP mode” mode and short press button to confirm.
(2) After connecting the MP3 player with your PC, press【M】button to switch between
“ MSC mode” and “MTP (Media Transfer Protocol) mode” for DRM function.
5. Click “OK” to start synchronization, your PC will display:
6. Select “Manual” or “Automatic” as your requirement, for example, select ”Manual”
14
and click “Finish”, it will display:
7. Add the songs that you want to synchronize into the sync List.
15
8. You can select the synchronal media: NandFlash or SD/MMC card, as following
16
picture shows:
9. Click“StartSync”
17
18
10. The dexter frame will display the synchronized songs.
Power
1. Short press button to enter your desired option (e.g. Auto off:002, Always on).
2. Press R/V and /buttons to setup the auto off time.
Language
Short press /buttons to select your desired option (e.g. English, CHI (Simp), CHI
(Trad), French, German, Italian, Polish, Portuguese, Russian, Spanish).
19
Display
1. Short press /buttons to select “Brightness” or “Screen” menu, then short
press button to enter.
2. Short press /buttons to setup screen brightness or screen backlight time.
Record
Short press /buttons to select Quality mode ( e.g. High, Normal, Low).
Sys Tools:
Short press /buttons to select your desired opinion.(e.g. Format, Reset, Sys
Info.)
Storage
Short press /buttons to select Internal or SD/MMC Card, short press button to
confirm (the LCD will display: Checking…).
VIDEO
In order to play video files in this MP3 player, you must change the video files into MTV
video format files.

Other Canyon MP3 Player manuals

Canyon CNR-MPV4 User manual

Canyon

Canyon CNR-MPV4 User manual

Canyon CNR-MPV3 User manual

Canyon

Canyon CNR-MPV3 User manual

Canyon CN-MP3Sx User manual

Canyon

Canyon CN-MP3Sx User manual

Popular MP3 Player manuals by other brands

Blaupunkt Compact Drive MP3 operating instructions

Blaupunkt

Blaupunkt Compact Drive MP3 operating instructions

Irradio RF-42UC user manual

Irradio

Irradio RF-42UC user manual

Laser MP3-A9-4GB user manual

Laser

Laser MP3-A9-4GB user manual

Sony NW-ZX300 instruction manual

Sony

Sony NW-ZX300 instruction manual

Memoq MR-120 user manual

Memoq

Memoq MR-120 user manual

Sony NW-ZX300 Service manual

Sony

Sony NW-ZX300 Service manual

IRiver T5 2GB user guide

IRiver

IRiver T5 2GB user guide

Olympus MR500i - m:robe - Digital AV Recorder user manual

Olympus

Olympus MR500i - m:robe - Digital AV Recorder user manual

Oregon Scientific MP 100 user manual

Oregon Scientific

Oregon Scientific MP 100 user manual

Philips Expanium AZ 4000 Service manual

Philips

Philips Expanium AZ 4000 Service manual

Impecca CDP-72 user manual

Impecca

Impecca CDP-72 user manual

Memorex MPD8857 user guide

Memorex

Memorex MPD8857 user guide

Ricatech RC800 user guide

Ricatech

Ricatech RC800 user guide

Sony HAP-S1 quick start guide

Sony

Sony HAP-S1 quick start guide

IRiver T10 1GB instruction manual

IRiver

IRiver T10 1GB instruction manual

Philips GoGear SA3CNT08 user manual

Philips

Philips GoGear SA3CNT08 user manual

Demon MM211 user manual

Demon

Demon MM211 user manual

Logitech Squeezebox Touch quick start guide

Logitech

Logitech Squeezebox Touch quick start guide

manuals.online logo
manuals.online logoBrands
  • About & Mission
  • Contact us
  • Privacy Policy
  • Terms and Conditions

Copyright 2025 Manuals.Online. All Rights Reserved.