Caple CGC611 User manual

Wall Chimney Hood
Instruction Manual
CGC611
CGC711 CGC911
Contact Caple on 0117 938 7420 for spare parts or www.caple.co.uk

Instruction manual CGC611 CGC711 CGC911 Instruction manual CGC611 CGC711 CGC911
2 3
Please keep this instruction manual for future reference Please keep this instruction manual for future reference
CONTENTS
Introduction 3
Safety Instructions 4
Environmental Protection 9
Installation 10
Installing the Charcoal Filter 14
Operation 15
Care and Maintenance 16
Troubleshooting 17
Guarantee 19
INTRODUCTION
Thank you for choosing this Caple extractor hood.
To ensure that you get the best results from your
new extractor, we strongly suggest that you read this
instruction manual thoroughly before use. If treated with
care, your Caple extractor should give you years of trouble-
free use.
To register ownership, please ensure you complete and
return the guarantee card supplied with the appliance or
visit www.caple.co.uk and register here.
This instruction manual is designed to provide you with
all the required information related to the installation, use
and maintenance of the appliance.
This hood is designed to extract unpleasant odours from
the kitchen; it is not intended to extract steam. In order
to operate the unit correctly and safely, please read this
instruction manual carefully before installation and use.
The cooker hood uses high quality materials and is made
with a streamlined design. Equipped with an electric
motor and centrifugal fan, it provides strong extraction
with low noise. It also features non-stick grease filters and
an easy installation.

Instruction manual CGC611 CGC711 CGC911 Instruction manual CGC611 CGC711 CGC911
4 5
Please keep this instruction manual for future reference Please keep this instruction manual for future reference
IMPORTANT
This appliance must only be used for the purpose it is
intended. Other types of use are not permitted and may
prove dangerous. Caple will not be held liable for any
damage caused by the incorrect use of the appliance.
Do not use any accessories or attachments not
recommended by Caple as this may result in fire, electric
shock or injury.
To protect against fire, electrical shock and injury to
persons, do not immerse cords or plugs in water or any
other liquid.
Never touch the appliance with wet or damp hands.
Never pull the power cable as you could damage it.
If the appliance is faulty, do not attempt to repair it.
Isolate it from the mains electric supply and contact
Caple Service either by phone 0117 938 7420 or email
service@caple.co.uk
Keep all packaging (including plastic bags, polystyrene
foam etc) out of the reach and away from children.
Do not rest large or unstable objects on any part of the
appliance.
IMPORTANT
Caple cannot be held responsible for injuries or losses
caused by incorrect use or installation of this product.
Please note that Caple reserve the right to invalidate
the guarantee supplied with this product following
incorrect installation or misuse of the appliance. Under
no circumstances should any external covers be removed
for servicing or maintenance except by suitably qualified
personnel.
SAFETY INSTRUCTIONS
-Never let children operate the machine.
-The cooker hood is for home use only, not suitable for
barbecuing, restaurants or other commercial purposes.
-The cooker hood and its filter should be cleaned regularly
in order to keep in good working condition.
-Clean the cooker hood according to the instruction
manual to reduce the risk of fire.
-When using a gas hob, do not leave naked flames under
the extractor.
-Before connecting this appliance check that the power
supply cord is not damaged.
-If the room where the hood is to be used contains a fuel
burning appliance such as a central heating boiler then
its flue must be of the sealed or balanced flue type. If
other types of flue or appliances are fitted ensure that
there is an adequate supply of air to the room.

Instruction manual CGC611 CGC711 CGC911 Instruction manual CGC611 CGC711 CGC911
6 7
Please keep this instruction manual for future reference Please keep this instruction manual for future reference
-The air must not be discharged into a flue that is used
for exhausting fumes from appliances burning gas or
other fuels.
-Regulations concerning the discharge of air have to be
conformed to.
-Do not flambé under the cooker hood.
-Never leave frying pans unattended during use as over-
heated fats and oils may catch fire.
-To ensure the best performance, we recommend
switching on the extractor 15 minutes before cooking
and leave it running 15 minutes after. This will ensure
that the air in the kitchen is being circulated before
cooking commences and the air is being cleaned after
cooking has finished.
-The performance of your extractor will vary depending
on a number of factors. These include type of extraction,
room volume, length of ducting, ventilation available and
the cleanliness of the filters.
-This appliance is not intended for use by persons
(including children) with reduced physical, sensory or
mental capabilities, or lack of experience and knowledge,
unless they have been given supervision or instruction
concerning use of the appliance by a person responsible
for their safety.
-Children should be supervised to ensure that they do not
play with the appliance.
-Cleaning and user maintenance must not be made by
children without supervision.
-Never immerse the appliance in water.
-This product is not designed for commercial use, it is a
household appliance only. It is not intended to be used
in:
-Staff kitchen areas in shops, offices and other working
environments.
-Bed and breakfast type environments.
-By clients in hotels, motels and other residential type
environments.
-To avoid all risk, if the power cable is damaged, it must
only be replaced by a Caple appointed engineer.
-Appliances can be used by persons with reduced
physical, sensory or mental capabilities or lack of
experience and knowledge if they have been given
supervision or instruction concerning use of the
appliance in a safe way and understand the hazards
involved.
-Children must not play with this appliance.
-When not in use and before cleaning, always isolate the
appliance from the electrical supply.

Instruction manual CGC611 CGC711 CGC911 Instruction manual CGC611 CGC711 CGC911
8 9
Please keep this instruction manual for future reference Please keep this instruction manual for future reference
ELECTRICAL SHOCK HAZARD
-Only plug this unit into a properly earthed outlet. If in
doubt seek advice from a suitably qualified engineer.
-Failure to follow these instructions can result in death,
fire, or electrical shock.
-This appliance must be connected to the mains by a
competent person. We recommend that the appliance is
connected by a qualified electrician who is a member of
the N.I.C.E.I.C who will comply with the I.E.E and local
regulations. Electrical information can be found on the
rating plate.
ENVIRONMENTAL PROTECTION
Waste electrical products should not be disposed of with household waste. Please recycle where
facilities exist. Check with your Local Authority or retailer for recycling advice. This appliance is
marked according to the European directive on Waste Electrical and Electronic Equipment (WEEE).
By ensuring this product is disposed of correctly, you will help prevent potential negative
consequences for the environment and human health, which could otherwise be caused by
inappropriate waste handling of this product. The symbol on the product indicates that this
product may not be treated as household waste. Instead it shall be handed over to the applicable
collection point for the recycling of electrical and electronic equipment. Disposal must be carried
out in accordance with local environmental regulations for waste disposal.
For more detailed information about treatment, recovery and recycling of this product, please
contact your local council, your household waste disposal service or the retailer where you
purchased the product.
CE DECLARATIONS OF CONFORMITY
This appliance has been manufactured to the strictest standards and complies with all applicable
legislation, Low Voltage Directive (LVD) and Electromagnetic Compatibility (EMC).

Instruction manual CGC611 CGC711 CGC911 Instruction manual CGC611 CGC711 CGC911
10 11
Please keep this instruction manual for future reference Please keep this instruction manual for future reference
INSTALLATION
PREPARE FOR THE INSTALLATION:
If you have an outlet to the outside, your cooker hood can be connected
as per the below picture by means of an extraction duct with an interior
diameter of 150mm.
Before installation, turn the unit off and unplug it from the outlet.
The cooker hood should be placed at a minimum distance of 65~76cm
above the hob. It is the manufacturer of the hob who determines the
clearance required and the clearance quoted by the hob manufacturer
must be followed. In the absence of any instructions supplied with a gas
hob the minimum distance between the hob and the hood must be at
least 760mm.
INSTALLATION - DUCTED
ATTENTION OBSERVE THE WARNING CONCERNING THE OPERATION OF THE
APPLIANCE WHEN AIR IS DISCHARGED FROM THE ROOM.
When the cooker hood and appliance supplied with energy other than electricity are
simultaneously in operation, the negative pressure in the room must not exceed 4 Pa (4×10⁻⁵ Bar)
Drill 3 x 8mm holes to accommodate the bracket. Screw and tighten the bracket onto the wall with
the screws and screw plugs provided.
Level up the cooker hood and hang onto the wall bracket hook.
4
4
4
5
Instruction manual CGC
Please keep this instruction manual for future reference
11
INSTALLATION – DUCTED
Attention! Observe the warning concerning the operation of the appliance
when air is discharged from the room.
When the cooker hood and appliance supplied with energy other than electricity
are simultaneously in operation, the negative pressure in the room must not exceed
4 Pa (4×10⁻⁵ Bar)
Drill 3 x 8mm holes to accommodate the bracket. Screw and tighten the bracket
onto the wall with the screws and screw plugs provided.
Level up the cooker hood and hang onto the wall bracket hook.
5
5

Instruction manual CGC611 CGC711 CGC911 Instruction manual CGC611 CGC711 CGC911
12 13
Please keep this instruction manual for future reference Please keep this instruction manual for future reference
After hanging the hood on the bracket, remove the grease filters, mark 2 holes inside the hood for
safety screws. After marking, remove the hood, drill two holes and insert 2 wall plugs and finally
fix the safety screws with 2 screws (ST4x30mm).
Fix the one-way-valve to the air outlet of the cooker hood. Then, attach the exhaust pipe onto the
one-way-valve as shown below.
CHIMNEY INSTALLATION
The lower chimney bracket is used to fix the upper decorative chimney and lower decorative
chimney. Use 2pcs 4x8mm screws to attach lower chimney and lower chimney bracket together.
Put the lower chimney on the cooker hood and mark the location of lower chimney bracket fixing
holes on the wall.
Note: Do not fasten screws too much, make sure upper decorative chimney can be telescopically
adjusted after assembled.
Put the chimney on the cooker hood. Fix the lower chimney bracket on the wall by 2 screws
(4mm x 30mm).
Then pulling out the upper chimney upwards to the target height. Adjust to reach the height
required.
Fix the upper chimney on the upper chimney bracket by 2 screws (4x8mm). Then fix the upper
chimney bracket on the wall. Before fixing the bracket on the wall, you can decide the upper
chimney bracket fixing holes for installation.
6
Exhaust pipe
Cooker hood
7
The lower chimneybracket is used to fix the upper decorative chimney and lower decorative
chimney.
Use 2pcs 4x8mm screws to attach lower chimney and lower chimney bracket together. Put
the lower chimney on the cooker hood and mark the location of lower chimney bracket fixing
holes on the wall.
Noted: Do not fasten screws too much, make sure upper decorative chimney can be
telescopically adjusted after assembled.
Upper Chimney (Inner)
Lower Chimney bracket
3
Chimney installation
Put the chimney on the cooker hood. Fix the lower chimney bracketon the wallby 2 screws
(4mm x 30mm).
Thenpulling out the upper chimney upwards to the target height. Adjust to reach the height required.
Fix the upper chimney on the upper chimney bracketby 2
screws (4x8mm). Then fix the upper chimney bracketon the wall. Before
fixing the bracket on the wall, you can decide the upper chimney bracket fixing holes for
installation.
Use image from original manual here
Lower Chimney (Outer)

Instruction manual CGC611 CGC711 CGC911 Instruction manual CGC611 CGC711 CGC911
14 15
Please keep this instruction manual for future reference Please keep this instruction manual for future reference
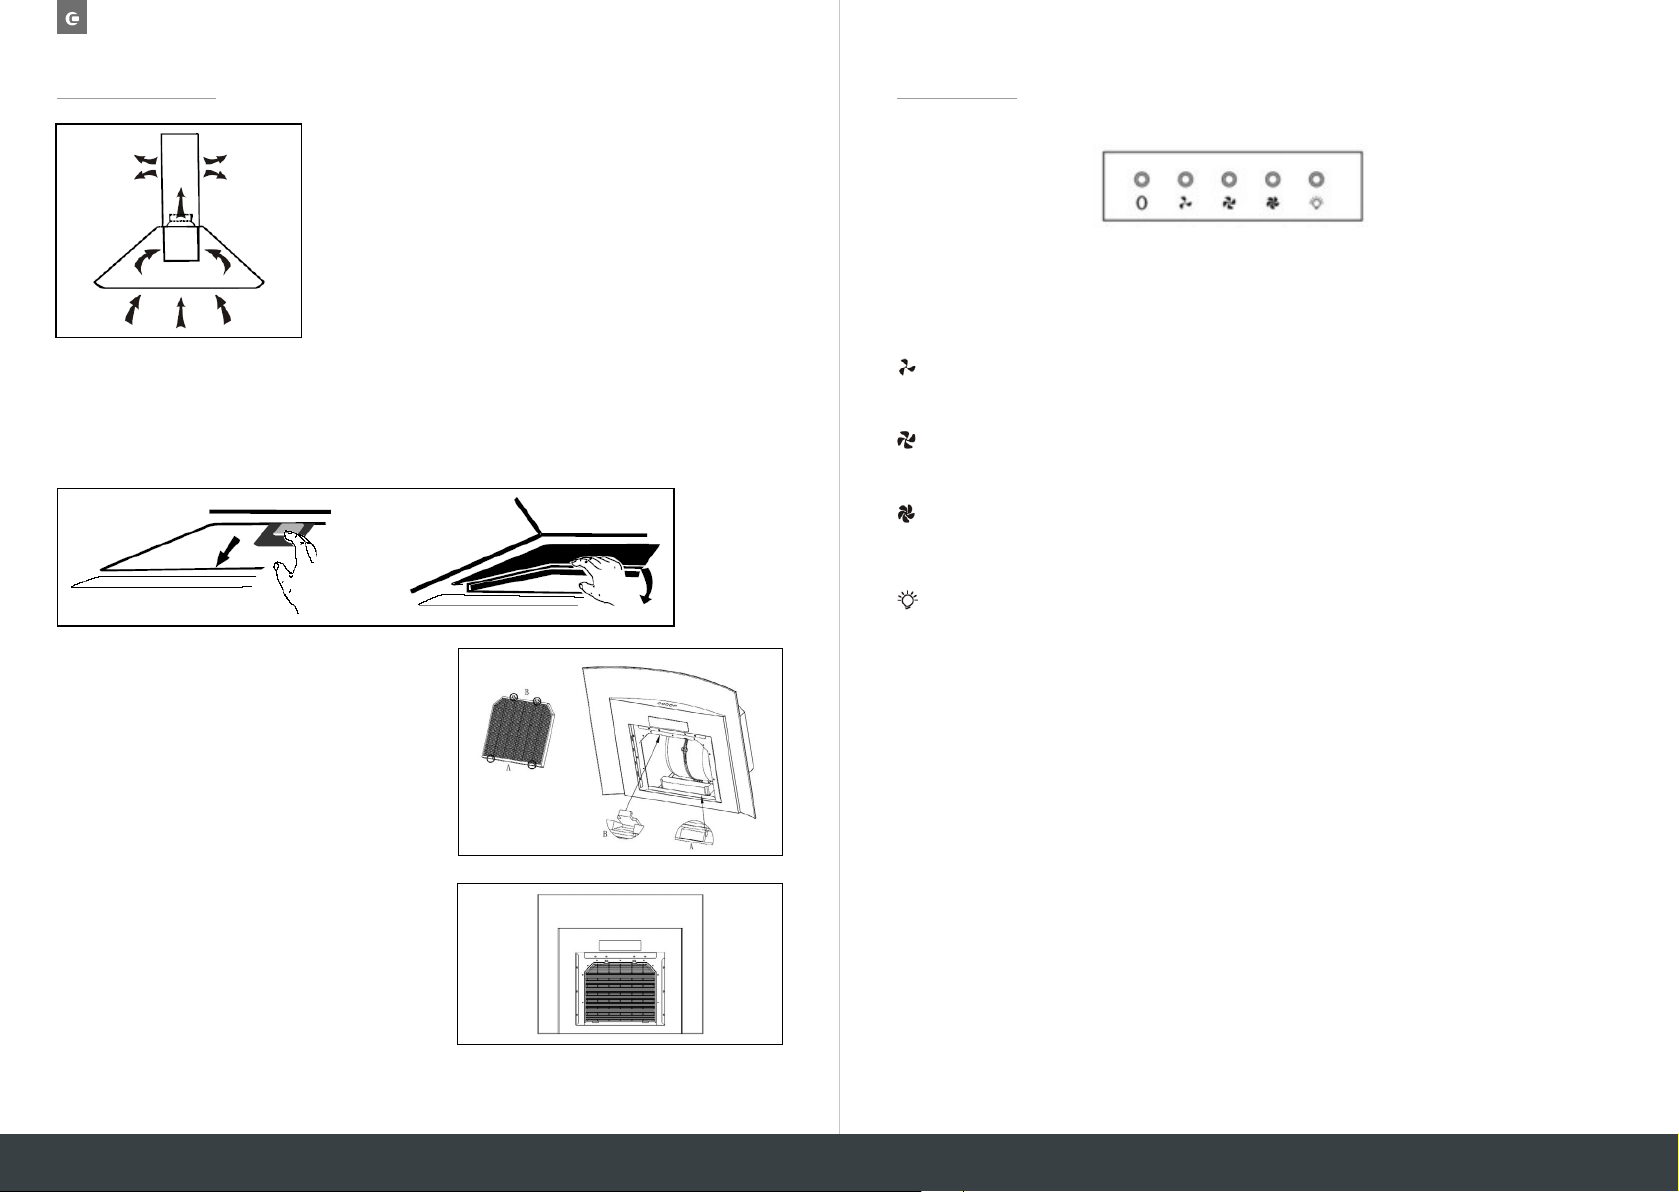
INSTALLATION – RECIRCULATION MODE
If you do not have an outlet to the outside, the exhaust
pipe is not required (as shown in the section “Installation -
ducted”), and charcoal filters must be installed.
INSTALLING THE CHARCOAL FILTER (CAP75CF)
An activated charcoal filter can be used to trap odours. In order to install the charcoal filter, the
grease filter should be detached first. Press the release button and pull it downward as shown
below.
To fit the charcoal filter, line up part A of the charcoal
filter with the rear bar, and part B of the filter with
the front of the hood. Push the filter into this space
to secure it. There are 2 clips on part B which lock the
filter into place once it has been pushed in.
After assembly, the charcoal filter should be as below:
NOTE:
Make sure the filter is securely fitted. Otherwise, it
could loosen and fall out. This could cause damage
to the appliance and danger to the user. When the
activated charcoal filter is used, the extraction rate
will be lower.
OPERATION
OFF BUTTON
Switches the extraction fan off.
LOW SPEED BUTTON
Is suitable for simmering and cooking which does not produce much odour.
MEDIUM SPEED BUTTON
Airflow speed is ideal for extracting with standard cooking.
HIGH SPEED BUTTON
When a high amount of smoke or odour is produced, press the high speed button
for the most effective extraction.
LIGHT BUTTON
Switches the light on and off.
8
, and
charcoal filters must be installed.
9
(CAP61CF)
We recommend replacing these filters every 6 months. Replacement
filters (CAP61CF) can be purchased directly from www.caple.co.uk
To fit the charcoal filter, line up part A of the charcoal filter with the rear bar, and part B
of the filter with the front of the hood. Push the filter into this space to secure it. There
are 2 clips on part B which lock the filter into place once it has been pushed in.
5
After assembly, the charcoal filter should be as below:
NOTE:
Make sure the filter is securely fitted. Otherwise, it could loosen and fall out. This could
cause damage to the appliance and danger to the user. When the activated charcoal filter
is used, the extraction rate will be lower.
Charcoal filter
10
10
10
10
10
10

Instruction manual CGC611 CGC711 CGC911 Instruction manual CGC611 CGC711 CGC911
16 17
Please keep this instruction manual for future reference Please keep this instruction manual for future reference
CARE AND MAINTENANCE
IMPORTANT
Before cleaning or maintenance please switch off the electricity supply and remove the plug from
the wall.
REGULAR CLEANING
Use a soft damp cloth with lukewarm mildly soapy water or household cleaning detergent. Never
use metal pads, chemicals, abrasive material, abrasive cleaning creams or stiff brushes to clean the
appliance.
CLEANING THE GREASE FILTER
Clean the filter every month to help minimise the risk of fire. The filter collects grease, smoke and
dust, therefore the filter is directly affecting the efficiency of the cooker hood. If not cleaned, the
grease residue (which is potentially flammable) will saturate the filter. It can be easily cleaned with
warm water and washing up liquid, alternatively the filters can be cleaned in your dishwasher.
Please ensure no other items are washed with the filters, they must be washed separately to
prevent food becoming trapped in the gauze. Cleaning the grease filters in the dishwasher may
lead to discolouration, this is normal and is a not a fault with the product.
REPLACING YOUR CHARCOAL FILTER
This only applies if you are using the hood in recirculation mode (not vented to the outside). The
charcoal filter traps your cooking odours and they need to be replaced, this can vary depending on
how frequently the cooker hood is used. We recommend replacing them at least every 6 months.
This extractor uses CAP75CF charcoal filters.
Filters can be purchased directly from www.caple.co.uk.
REPLACING THE BULB
1. Switch the unit off and unplug the appliance.
2. Remove the 4 screws on the curved glass panel, and take off
the glass carefully.
3. Unplug the light from the connector and then push the light out of the hood.
4. Replace with the same type and rated bulb/lamp fixing. LED lamp (max 2W)
5. Connect the replacement light and screw the glass panel back on securely.
TROUBLESHOOTING
FAULT CAUSE SOLUTION
The lights on, but the fan
does not work
The fan blade is jammed. Switch off the unit and contact
Caple Service. To be repaired by qualified
service personnel only.
The motor is damaged.
The lights and fan
do not work
A blown fuse. Replace the fuse.
The power cord is loose. Plug in to the power supply again.
Serious vibration of the unit
The fan blade is damaged.
Switch off the unit and contact
Caple Service. To be repaired by qualified
service personnel only.
The fan motor is not fixed tightly.
Switch off the unit and contact
Caple Service. To be repaired by qualified
service personnel only.
The unit is not hung correctly on the
bracket.
Take down the unit and check whether the
bracket is in the correct location.
The extraction performance
is not good The filter requires cleaning.
Clean the grease filter as directed in the
‘Care and maintenance’ section. Replace the
charcoal filter (if in recirculation mode).
If the above table has not solved the problem please contact Caple Service by phone on
0117 938 7420 or by email service@caple.co.uk
Bulb Replacement image
8

Instruction manual CGC611 CGC711 CGC911 Instruction manual CGC611 CGC711 CGC911
18 19
Please keep this instruction manual for future reference Please keep this instruction manual for future reference
PRODUCT DIMENSIONS GUARANTEE
Caple undertake that if within 2 years from the date of the purchase, this appliance or any part
thereof that is proved to be defective by reason only of faulty workmanship or materials, we will at
our option repair or replace the same free of any charge for labour or materials on condition that:
-Documentation must be provided before a guarantee repair commences to confirm that the
extractor is within the guarantee period.
-The appliance has been correctly installed and used only on the electrical supply stated on the
rating plate.
-The appliance has been used for normal domestic purposes only, and in accordance with the
operating and maintenance instructions.
-The appliance has not been serviced, maintained, repaired, taken apart or tampered with by any
person not authorised by us.
-All service work under this guarantee must be undertaken by Caple Service Centre.
-Any appliance or defective part replaced shall become the property of this company.
-If a service call is made and it is found that the installation has not been carried out correctly
or customer misuse/abuse is involved the cost of the service call has to be paid for by the user
before any service work is carried out.
EXCLUSIONS
THIS GUARANTEE DOES NOT COVER:
-Damage or calls resulting from transportation, improper use or neglect, the replacement of any
light bulbs or removable parts of glass or plastic.
-Costs incurred for calls to put right appliances improperly installed or calls to appliances outside
the United Kingdom.
-Appliances found to be in use within a commercial environment, plus those which are the
subject of rental agreements.
-This guarantee is in addition to and does not affect your statutory and legal rights.
DIMENSIONS
266mm
259mm
560-1040mm
500mm
90mm
895mm
DIMENSIONS
266mm
259mm
550-1030mm
500mm
56mm
695mm
DIMENSIONS
266mm
259mm
533-1013mm
500mm
64mm
595mm
CGC911BK
CGC911SS
CGC711BK
CGC711SS
CGC611BK
CGC611SS

Caple Service
Fourth Way
Avonmouth
Bristol
BS11 8DW
T: 0117 938 1900
E: service@caple.co.uk
www.caple.co.uk
Other manuals for CGC611
1
This manual suits for next models
2
Table of contents
Other Caple Ventilation Hood manuals

Caple
Caple BXC610 User manual

Caple
Caple ZEL900 User manual

Caple
Caple DD910BK User manual

Caple
Caple CSB606 User manual

Caple
Caple BODY/DD600BK User manual

Caple
Caple CSBCURVE605 User manual

Caple
Caple BUCHP4 User manual

Caple
Caple Orbit OI363 User manual

Caple
Caple DD912BK User manual

Caple
Caple ST520SS User manual