Caple FSCHSS7 User manual

Instruction manual for conventional hood
Model code: FSCHSS7

Contents
Introduction 2
Safety precautions 2
Installation 4
Air extraction setting 7
Operation 8
Care and maintenance 9
Troubles ooting 11
Guarantee 12
Environmental protection 13

2
Introduction
T ank you for c oosing t is Caple extractor ood.
To ensure t at you get t e best results from your new extractor, we
strongly suggest t at you read t is instruction manual t oroug ly before
use.
. .
. If treated wit care, your Caple extractor s ould give you years of
trouble-free use
To register owners ip, please ensure you complete and return t e
guarantee card supplied wit t e appliance.
T is instruction manual is designed to provide you wit all required
information related to t e installation, use and maintenance of t e
appliance.
T ese cooker oods are designed to extract unpleasant odours from t e
kitc en; t ey are not intended to extract steam.
In order to operate t e unit correctly and safety, please read t is
instruction manual carefully before installation and use.
T e cooker ood uses ig quality materials, and is made wit a
streamlined design. Equipped wit an electric motor and centrifugal fan,
it provides strong extraction wit low noise. It also features non-stick
grease filters and an easy installation.
Safety precautions
-
Never let t e c ildren operate t e mac ine.
-
T e cooker ood is for ome use only, not suitable for barbecuing,
restaurants or ot er commercial purposes.
-
T e cooker ood and its filter s ould be cleaned regularly in order to keep
in good working condition.
-
Clean t e cooker ood according to t e instruction manual to reduce t e
risk of fire.
-
W en using a gas ob, do not leave naked flames under t e extractor.
-
Before connecting t is appliance c eck t at t e power supply cord is not

3
damaged. A damage supply cord must be replaced by qualified service
personnel only. Please contact t e Caple service department.
-
If t e room w ere t e ood is to be used contains a fuel burning
appliance suc as a central eating boiler t en its flue must be of t e
sealed or balanced flue type. If ot er types of flue or appliances are fitted
ensure t at t ere is an adequate supply of air to t e room.
-
T e air must not be disc arged into a flue t at is used for ex austing
fumes from appliances burning gas or ot er fuels.
-
Regulations concerning t e disc arge of air ave to be conformed to.
-
T is appliance if not intended for use by persons (including c ildren) wit
reduced p ysical, sensory or mental capabilities, or lack of experience and
knowledge, unless t ey ave been given supervision or instruction
concerning use of t e appliance by a person slide for t eir safety.
-
C ildren s ould be supervised to ensure t at t ey do not play wit t e
appliance.
-
Do not flambé under t e cooker ood.
-
Never leave frying pans unattended during use as over- eated fats and
oils may catc fire.
-
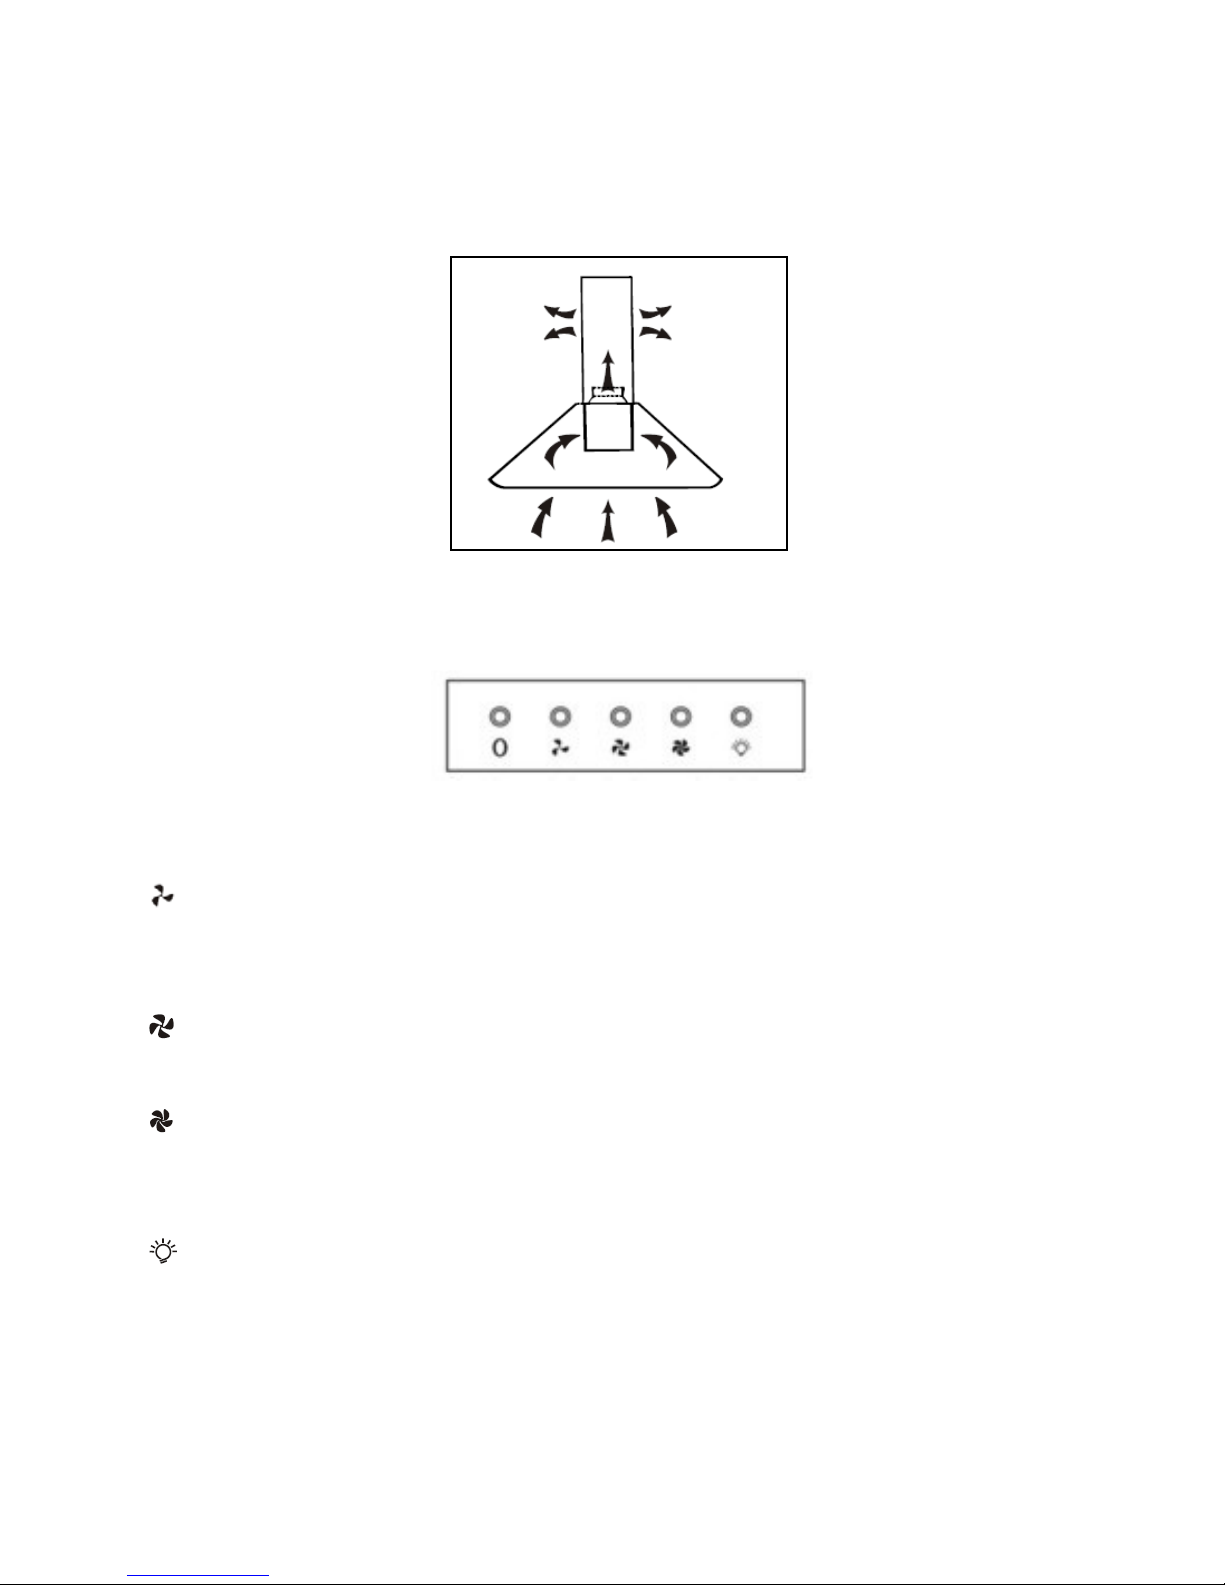
To ensure t e best performance, we recommend switc ing on t e
extractor 15 minutes before cooking and leave it running 15 minutes after.
T is will ensure t at t e air in t e kitc en is being circulated before
cooking commences and t e air is being cleaned after cooking as
finis ed.
-
T e performance of your extractor will vary depending on a number of
factors. T ese include type of extraction, room volume, lengt of ducting,
ventilation available and t e cleanliness of t e filters.
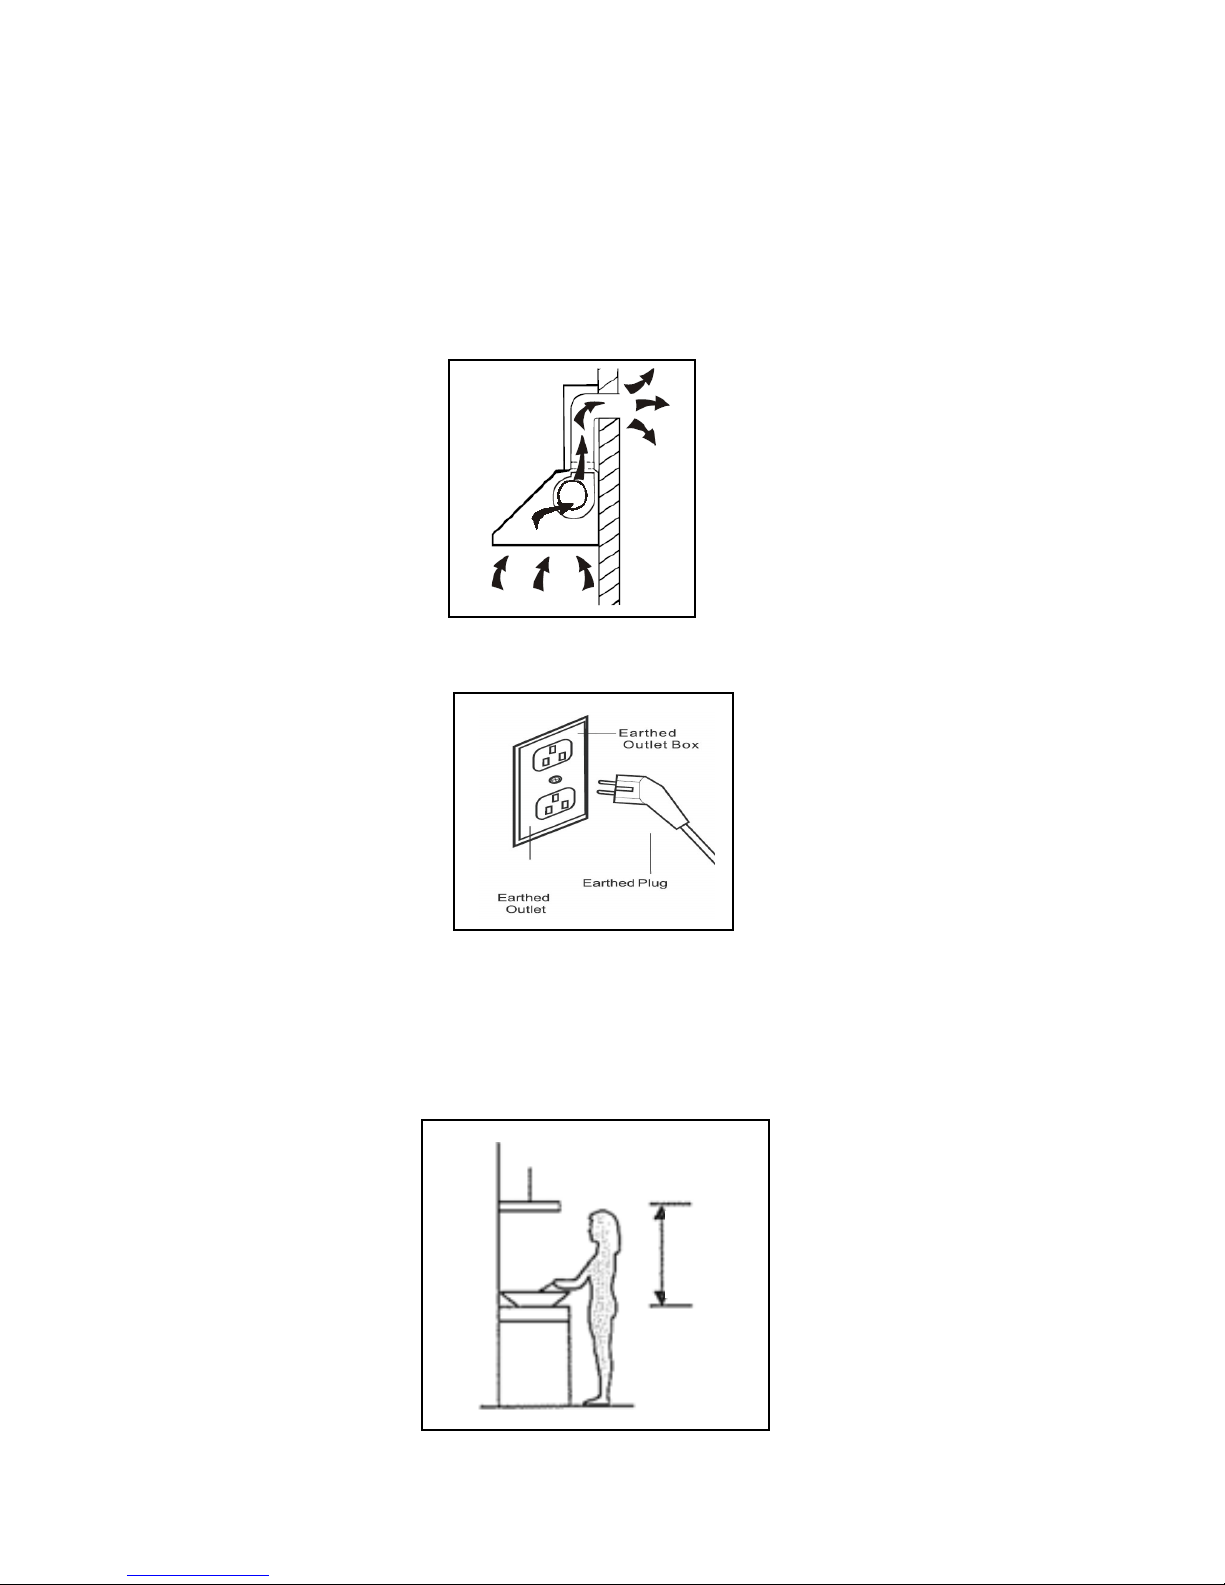
Electrical s ock azard
-
Only plug t is unit into a properly eart ed outlet. If in doubt seek advice
from a suitably qualified engineer.
-
Failure to follow t ese instructions can result in deat , fire, or electrical
s ock.
-
T is appliance must be connected to t e mains by a competent person.
We recommend t at t e appliance is connected by a qualified electrician
w o is a member of t e N.I.C.E.I.C. w o will comply wit t e I.E.E. and
local regulations. Electrical information can be found on t e rating plate.

4
Installation
Prepare for t e installation:
a. If you ave an outlet to t e outside, your cooker ood can be connected as
per t e
below picture by means of an extraction duct wit an interior
diameter of 120mm)
b. Before installation, turn t e unit off and unplug it from t e outlet.
c. T e cooker ood s ould be placed at a minimum distance of 65~76cm above
t e ob. It is t e manufacturer of t e ob w o determines t e clearance
required and t e clearance quoted by t e ob manufacturer must be
followed. In t e absence of any instructions supplied wit a gas ob t e
minimum distance between t e ob and t e ood must be at least 760mm.
65cm
- 76cm

5
Installation – ducted
Attent
AttentAttent
Attention! Observe t e warning
ion! Observe t e warning ion! Observe t e warning
ion! Observe t e warning concerning t e operation of t e appliance
concerning t e operation of t e appliance concerning t e operation of t e appliance
concerning t e operation of t e appliance
w en air is disc arged from t e room.
w en air is disc arged from t e room.w en air is disc arged from t e room.
w en air is disc arged from t e room.
Installation met od 1
Installation met od 1Installation met od 1
Installation met od 1:
To install onto t e wall drill 2 oles of Ø8mm in a suitable place
according wit t e centre distance of ole in t e back of t e cooker
ood.
Insert t e nut into t e oles.
Insert t e screws into t e nuts and tig ten. Put t e cooker ood onto
t e tig tened screws.
Fix t e cooker ood wit t e safety screws. T e two oles are
positioned on t e back casing, wit diameter of 6mm.
Attac t e one way valve to t e cooker ood.
Installation met od 2
Installation met od 2Installation met od 2
Installation met od 2:
Drill 4 oles of 6mm diameter at t e bottom of t e anging cupboard
Attac t e one way valve to t e cooker ood, t en install t e cooker
ood onto t e bottom of t e cupboard, tig ten t e ood wit t e 4
screws supplied.
Install t e adjusted board on t e bottom of t e ood in order to
reduce t e gap between t e back of t e ood and cupboard.

6
Note:
1.T e ducting tube is not supplied wit t e extractor.
2.Take off t e protective film before installation.
3.T ere are 2 met ods for ducting , including ' rear ventilation' and ' vertical
ventilation'. Please pay attention to t e ventilation met od w en installing.
Vertical ventilation: See Pic A, please use a tool take out t e round cover
before using, t e air can now be vented from top.
Rear ventilation: See Pic B, please use a tool to remove t e rectangular cover
before using, t e air can now be vented from back.
T e rectangular air outlet for orizontal ventilation is not supplied.

7
Air
Air Air
Air e
ee
extraction
xtractionxtraction
xtraction
setting
settingsetting
setting
D
DD
Ducted installation
ucted installationucted installation
ucted installation: Turn t e adjuster to t e ducted position, install t e
outlet, turn on t e cooker ood. T e air will be extracted to t e
outside outlet.
R
RR
Rec
ecec
eci
ii
irculation
rculationrculation
rculation: t e recirculation mode used a c arcoal filter. Turn t e
adjuster to t e indoor position, install t e outlet cover, turn on t e
cooker ood, t en t e air can be vented from t e inside outlet.
Note: T e c arcoal filter is mounted on t e back of t e grill and must
be c anged once every 6 mont s.
Warning: t e c arcoal filter cannot be was ed or recycled. It s ould be
c anged at most after 120 ours of use. T e c arcoal filter s ouldn’t
be exposed to eat.

8
Installation – recirculation mode
If you do not ave an outlet to t e outside, t e ex aust pipe is not required
(as s own in t e section “Installation - ducted”).
Operation
0 Off button
0 Off button0 Off button
0 Off button
It’s used for turning off t e fan.
Low Speed button
Low Speed button Low Speed button
Low Speed button
Is suitable for simmering and cooking w ic does not produce muc
odour.
Medium Speed button
Medium Speed button Medium Speed button
Medium Speed button
Airflow speed is ideal for extracting wit standard
Hig Speed button
Hig Speed button Hig Speed button
Hig Speed button
W en a ig amount of smoke or odour is produced, press t e ig
speed button for t e most effective extraction.
Lig t button
Lig t buttonLig t button
Lig t button
Switc es t e lig t on and off

9
Care and maintenance
IMPORTANT: Before cleaning or maintenance please switc off t e electricity
supply and remove t e plug from t e wall.
Regular
Regular Regular
Regular c
cc
cleaning
leaningleaning
leaning
Use a soft clot moistened wit lukewarm mildly soapy water or ouse old
cleaning detergent. Never use metal pads, c emicals, abrasive material,
abrasive cleaning creams or stiff brus es to clean t e appliance.
Cleaning
CleaningCleaning
Cleaning
t e g
t e gt e g
t e grease
rease rease
rease f
ff
filter
ilterilter
ilter
Clean t e filter every mont to elp minimise t e risk of fire.
T e filter collects grease, smoke and dust, t erefore t e filter is directly
affecting t e efficiency of t e cooker ood. If not cleaned, t e grease residue
(w ic is potentially flammable) will saturate t e filter. It can be easily
cleaned wit warm water and was ing up liquid, alternatively t e filters can
be cleaned in your dis was er. Please ensure no ot er items are was ed
wit t e filters, t ey must be was ed separately to prevent food becoming
trapped in t e gauze. Cleaning t e grease filters in t e dis was er may lead
to discolouration, t is is normal and is a not a fault wit t e product.
Replacing your
Replacing yourReplacing your
Replacing your
c arcoal
c arcoalc arcoal
c arcoal
f
ff
filter
ilterilter
ilter
T is only applies if you are using t e ood in recirculation mode (not vented to
t e outside). T e c arcoal filter traps your cooking odours and t ey need to be
replaced, t is can vary depending on ow frequently t e cooker ood is used.
We recommend replacing t em at least every 6 mont s.

10
Replacing t e bulb
Replacing t e bulbReplacing t e bulb
Replacing t e bulb
1.Switc t e unit off and unplug t e appliance.
2.Remove t e lamp cover by unscrewing t e 2 screws.
3.Unscrew t e incandescent bulb
4.Replace wit t e same type and rated bulb/lamp:
E14 Incandescent Bulb: (220V E14 Max 40W).

11
Troubles ooting
Fault
FaultFault
Fault Cause
CauseCause
Cause Solution
SolutionSolution
Solution
T e lig ts on,
but t e fan does
not work
T e fan blade is jammed.
Switc off t e unit and contact Caple
Service. To be repaired by qualified
service personnel only.
T e motor is damaged.
T e lig ts and
fan do not work
A blown fuse Replace t e fuse
T e power cord is loose. Plug in to t e power supply again.
Serious vibration
of t e unit
T e fan blade is damaged.
Switc off t e unit and contact Caple
Service. To be repaired by qualified
service personnel only.
T e fan motor is not fixed
tig tly.
Switc off t e unit and contact Caple
Service. To be repaired by qualified
service personnel only.
T e unit is not ung
correctly on t e bracket.
Take down t e unit and c eck w et er
t e bracket is in t e correct location.
T e extraction
performance is
not good
T e filter requires cleaning
Clean t e grease filter as directed in
t e ‘Care and maintenance’ section.
Replace t e c arcoal filter (if in
recirculation mode)
If t e above table as not solved t e problem please contact Caple Service by p one
on 0844 800 3830 or by email service@caple.co.uk

12
Guarantee
Caple undertake t at if wit in twelve mont s of t e date of t e purc ase t is
appliance or any part t ereof t at is proved to be defective by reason only of faulty
workmans ip or materials, we will at our option repair or replace t e same free of
any c arge for labour or materials on condition t at:
- Documentation must be provided before a guarantee repair commences to
confirm t at t e extractor is wit in t e guarantee period.
- T e appliance as been correctly installed and used only on t e electrical supply
stated on t e rating plate.
- T e appliance as been used for normal domestic purposes only, and in
accordance wit t e operating and maintenance instructions.
- T e appliance as not been serviced, maintained, repaired, taken apart or
tampered wit by any person not aut orised by us.
- All service work under t is guarantee must be undertaken by Caple Service
Centre.
- Any appliance or defective part replaced s all become t e property of t is
company.
- If a service call is made and it is found t at t e installation as not been carried
out correctly or customer misuse/abuse is involved THE COST OF THE SERVICE CALL
HAS TO BE PAID FOR BY THE USER BEFORE ANY SERVICE WORK IS CARRIED OUT.
Exclusions
T is Guarantee does not cover:
- Damage or calls resulting from transportation, improper use or neglect, t e
replacement of any lig t bulbs or removable parts of glass or plastic.
- Costs incurred for calls to put rig t appliances improperly installed or calls to
appliances outside t e United Kingdom.
- Appliances found to be in use wit in a commercial environment, plus t ose
w ic are t e subject of rental agreements.
- T is guarantee is in addition to and does not affect your statutory and legal rig ts.

13
Environmental protection
Waste electrical products s ould not be disposed of wit
ouse old waste. Please recycle w ere facilities exist. C eck wit
your Local Aut ority or retailer for recycling advice.
T is appliance is marked according to t e European directive 2002/96/EC on Waste
Electrical and Electronic Equipment (WEEE).
By ensuring t is product is disposed of correctly, you will elp prevent potential
negative consequences for t e environment and uman ealt , w ic could
ot erwise be caused by inappropriate waste andling of t is product.
T e symbol on t e product indicates t at t is product may not be treated as
ouse old waste. Instead it s all be anded over to t e applicable collection point
for t e recycling of electrical and electronic equipment.
Disposal must be carried out in accordance wit local environmental regulations for
waste disposal.
For more detailed information about treatment, recovery and recycling of t is
product, please contact your local council, your ouse old waste disposal service
or t e retailer w ere you purc ased t e product.
CE Declarations of Conformity
T is appliance as been manufactured to t e strictest standards and complies
wit all applicable legislation, Low Voltage Directive (LVD) and Electromagnetic
Compatibility Directive (EMC).
Caple
Fourt Way
Avonmout
BS11 8DW
www.caple.co.uk
Table of contents
Other Caple Ventilation Hood manuals

Caple
Caple AS610BK User manual

Caple
Caple 1MBUCH2 User manual

Caple
Caple OM600 User manual

Caple
Caple LC600WH User manual

Caple
Caple Aufero AUF900 User manual

Caple
Caple SP612 User manual

Caple
Caple P900 Parts list manual

Caple
Caple CGI910 User manual

Caple
Caple CGC710BK Manual

Caple
Caple DD520BK User manual
Popular Ventilation Hood manuals by other brands

Asko
Asko CD4634B/4000 Instructions for use

KitchenAid
KitchenAid KXW8730YSS0 Installation Instructions and Use & Care Guide

Vent-A-Kiln
Vent-A-Kiln Vent-A-Fume Assembly instructions

Horizon Technology
Horizon Technology SPE-DEX 3100 user guide

Schweigen
Schweigen UM-12UMS installation guide

ELICA
ELICA EMZ630S3 Use, care and installation guide