Caple DD901BK User manual

Downdraft Extractor
Instruction Manual
DD901BK
Contact Caple on 0117 938 7420 for spare parts or www.caple.co.uk

Instruction manual DD901BK
2Please keep this instruction manual for future reference
CONTENTS
Introduction 3
Safety Instructions and Warnings 4
Installation 8
Electrical Connection of the Downdraft Extractor 12
Appliance Description 14
Operating the Downdraft Extractor 15
Care and Maintenance 17
Troubleshooting 18

Instruction manual DD901BK 3
Please keep this instruction manual for future reference
INTRODUCTION
Thank you for choosing this Caple downdraft extractor.
To ensure that you get the best results from your new
downdraft extractor, we strongly suggest that you read
this instruction manual thoroughly before use. If treated
with care, your Caple product should give you years of
trouble-free use.
To register ownership, please ensure you complete and
return the guarantee card supplied with the appliance or
visit www.caple.co.uk and register here.
This instruction manual is designed to provide you with
all the required information related to the installation, use
and maintenance of the appliance.
This downdraft extractor is designed to extract unpleasant
odours and cooking vapours from the kitchen. In order
to operate the unit correctly and safely, please read this
instruction manual carefully before installation and use.
Please read this manual carefully before using your
appliance. It contains important safety advice; it explains
how to use and look after your appliance so that it will
provide you with many years of reliable service.
Should a fault arise, please first consult the
“Troubleshooting” section. You can often rectify minor
problems yourself, thus saving unnecessary service costs.
Please keep this manual in a safe place and pass it on to
new owners for their information and safety.

Instruction manual DD901BK
4Please keep this instruction manual for future reference
SAFETY INSTRUCTIONS
AND WARNINGS:
-These hoods have been designed for personal use in the
home. The appliance must be used by adults. Make sure
that the appliance is out of reach of children and that
they do not use it to play with. Make sure that children
do not operate the controls.
-When the appliance is delivered, check the overall
appearance of the packaging and the product, to ensure
there is no damage.
-Any damage should be reported to your retailer straight
away.
-Your appliance is designed for normal domestic use.
It is not designed for commercial or industrial use, or for
purposes other than those for which it was designed.
-Any consequences of or damage from incorrect
installation or incorrect use of the appliance will not be
covered by the manufacturer’s guarantee.
-Do not ever change or try to change the characteristics
of this appliance. This would be a danger. Repairs must
be performed only by an authorised technician.
-Always disconnect the hood before carrying out cleaning
or maintenance operations.
-Adequately ventilate the room when a cooker hood
and other appliances, powered by energy other than
electricity, are used simultaneously, so that the hood
does not suck any combustion fumes.

Instruction manual DD901BK 5
Please keep this instruction manual for future reference
-It is not allowed to cook food over open flames (flambé)
or operate gas hobs without pots or pans on them under
the hood itself (the flames sucked into the hood might
damage the appliance).
-Frying near the appliance must be done under constant
supervision as hot oils and fats may ignite.
-Respect the guidelines for cleaning and replacement of
grease filters. Accumulated deposits of grease are a fire
hazard.
-This appliance must not be used over cook tops powered
by wood or coal or in any case, over cook tops with
power levels that could damage the appliance.
-Never use steam or high-pressure devices for cleaning
your hood (regulations regarding electrical safety).
-Never use the cooker hood without the grease filters.
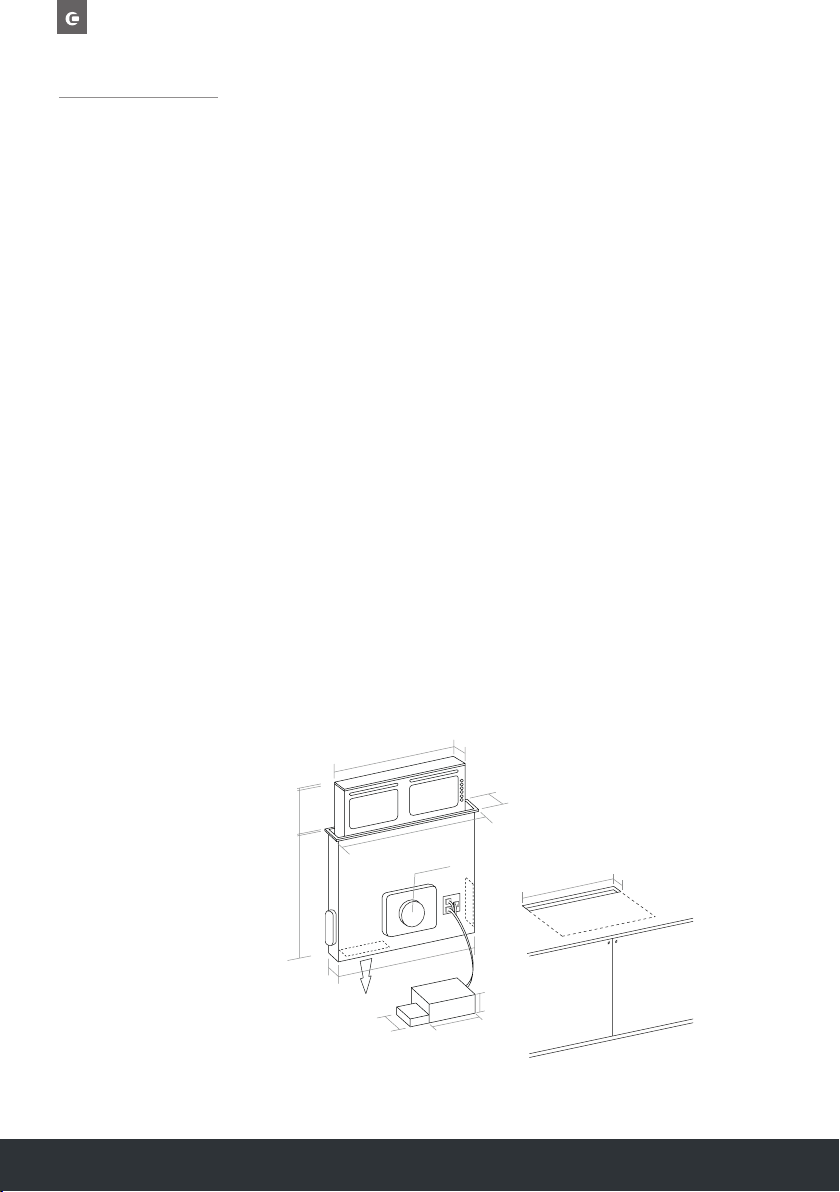
-The minimum distance between the Downdraft (closed)
and the surface above it must be at least 200mm.
-When handling the downdraft, never put your hands in
the field of action of the extractable unit.
-There must be a minimum space of 50mm between the
edge of a gas hob and the downdraft frame.
-Constantly seeking to improve our products, we reserve
the right to modify their technical, functional, or
aesthetic characteristics deriving from their upgrading.
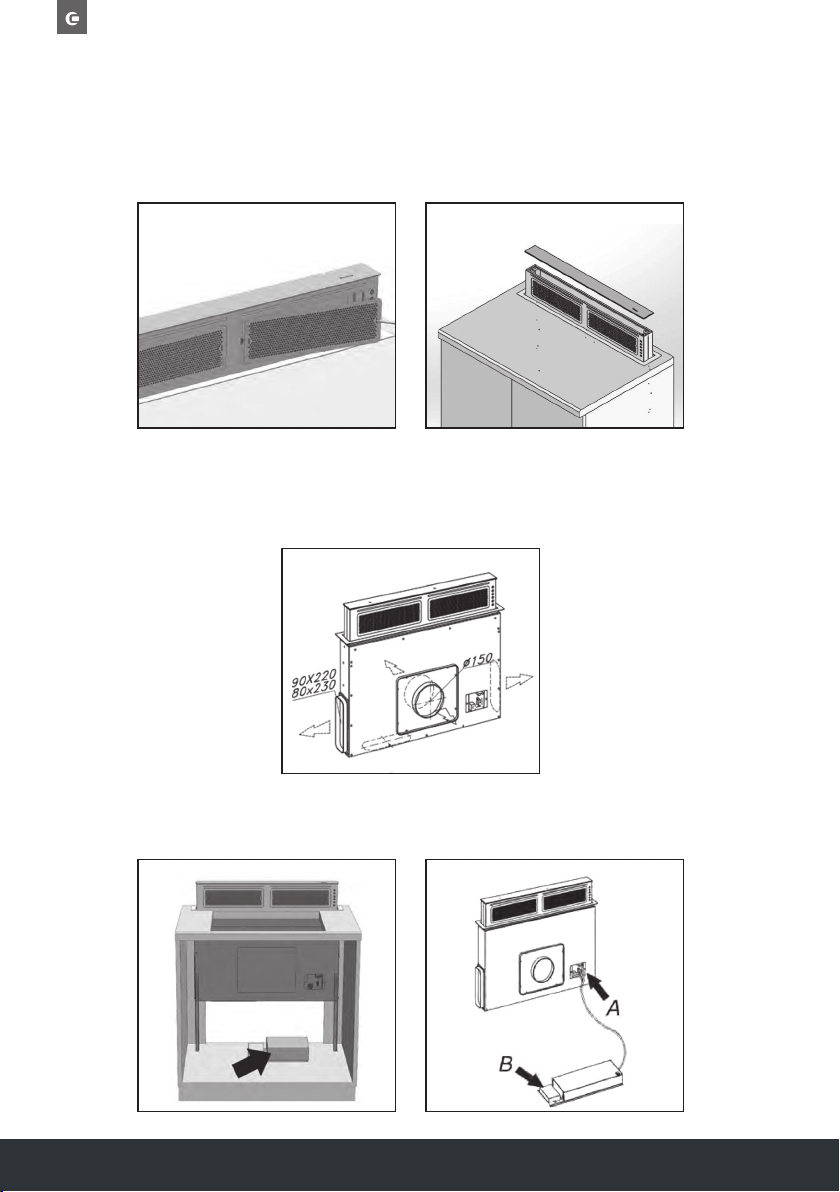
-In the case of the version with external motor, for normal
downdraft operation, it is necessary to use a suctioning
unit (external motor) made by the same manufacturer.

Instruction manual DD901BK
6Please keep this instruction manual for future reference
-The air collected must not be conveyed into a flue
used for smoke or fumes from appliances powered by
anything other than electricity (central heating systems,
etc.). As far as discharging exhaust air is concerned,
please follow the guidelines given by competent
authorities.
-This appliance is not intended for use by persons
(including children) with reduced physical, sensory or
mental capabilities, or lack of experience and knowledge,
unless they have been given supervision or instruction
concerning use of the appliance by a person responsible
for their safety.
-Children should be supervised to ensure that they do not
play with the appliance.
GENERAL INFORMATION ON
THE DOWNDRAFT EXTRACTOR:
-It is designed to work in both vented mode, with outside
evacuation, and recirculation mode.
-Keep these instructions for use with the appliance. If the
appliance should be sold or passed on to others, make
sure that the instructions are passed on with it. We thank
you for taking note of these suggestions before installing
and using the appliance. They have been written for your
personal safety and the safety of others.

Instruction manual DD901BK 7
Please keep this instruction manual for future reference
ENVIRONMENTAL PROTECTION
Waste electrical products should not be disposed of with household waste. Please recycle where
facilities exist. Check with your Local Authority or retailer for recycling advice. This appliance is
marked according to the European directive on Waste Electrical and Electronic Equipment (WEEE).
By ensuring this product is disposed of correctly, you will help prevent potential negative
consequences for the environment and human health, which could otherwise be caused by
inappropriate waste handling of this product. The symbol on the product indicates that this
product may not be treated as household waste. Instead it shall be handed over to the applicable
collection point for the recycling of electrical and electronic equipment. Disposal must be carried
out in accordance with local environmental regulations for waste disposal.
For more detailed information about treatment, recovery and recycling of this product, please
contact your local council, your household waste disposal service or the retailer where you
purchased the product
CE DECLARATIONS OF CONFORMITY
This appliance has been manufactured to the strictest standards and complies with all applicable
legislation, Low Voltage Directive (LVD) and Electromagnetic Compatibility (EMC).

Instruction manual DD901BK
8Please keep this instruction manual for future reference
INSTALLATION
Before carrying out the appliance installation, please check that all components are not damaged,
in such a case contact your retailer and do not carry out any installation operation.
Before the installation of the Downdraft, please remove all of the packaging. Furthermore, please
read carefully all of the following installation instructions.
»Use an air exhausting pipe whose maximum length does not exceed 5 meters.
»Limit the number of elbows in the piping, since each elbow reduces the air capacity of 1 linear
meter. (Eg: if you use no. 2 x 90˚ elbows, the length of piping should not exceed 3 meters).
»Avoid abrupt direction changes.
»Use a 150mm. constant diameter pipe for the whole length.
»Use piping approved by standards in force.
The manufacturer shall not be deemed responsible for air capacity or noise problems caused by
failure to comply with the above instructions and no warranty on the product shall be provided.
Before making the worktop cut out, check that there are no structural interference or other parts
inside the cabinet, where the appliance is to be placed, which could hinder a proper installation.
Check that the dimensions of the Downdraft and the ones of the hob are compatible with the
cabinet so that the installation can be carried out properly.
Make a rectangular
opening, 790 x 100mm
in size, at the back of
the hob. In the version
with the motor already
installed, remove
the screws and the
suctioning unit in order
to fit the downdraft in
the opening made.
DIMENSIONS
510mm
785mm
75mm
325mm
200mm
96mm
1.6mm
4mm
140mm
790mm
758mm
810mm
68mm
116mm
100mm
Downdraft cut-out can be
connected to hob cut-out*
Ø150mm
*For electric hobs only. Gas hobs will require a 50mm gap

Instruction manual DD901BK 9
Please keep this instruction manual for future reference
Fit the Downdraft in the opening, by inserting it from above as shown in (Fig. 1).
Secure the downdraft inside the cabinet, by using the special fixing brackets supplied with the
product (Fig. 2). Insert the brackets in the lower side of the downdraft, in such a way that there
is a 3mm gap between the lower side of the bracket and the bottom of the cabinet (Fig. 3).
This distance will allow to pull the appliance downwards during installation, in order to make
the stainless steel frame perfectly adhere with the worktop. Before inserting the screws into the
cabinet, please make sure that the appliance is perfectly perpendicular with the worktop.
After completing installation and connecting the appliance to the power supply, lift the downdraft
up by pressing on the top side, as shown in fig. 4.
Remove the felt protections as shown in fig. 14.
Fig.1 Fig.2 Fig.3
Fig.4 Fig.14

Instruction manual DD901BK
10 Please keep this instruction manual for future reference
If the appliance is used in the recirculation mode, fit the charcoal filters (charcoal filters are not
included and need to be ordered separately) and the grease filters (see fig. 10). Then fit the top
glass by sticking the magnets into the specific seats (see fig. 13).
NOTE: The top glass panel comes packaged separately and will need to be fixed onto the
downdraft during installation.
If the Downdraft is equipped with external motor, place the suctioning unit (external motor) in a
suitable area and fit the exhaust air flue. Then fit the air outlet ducts between the external motor
and the downdraft. Select the air outlet among the five available options (Fig. 6) and fit the spigot
supplied with the appliance.
Place the metal box containing the electronic components in an easily reachable area for possible
technical assistance operations. (Fig.7), by connecting the related connectors (fig. 8A).
Fig.7
Fig.6
Fig.10 Fig.13
Fig.8

Instruction manual DD901BK 11
Please keep this instruction manual for future reference
If the Downdraft is equipped with external motor, connect the motor unit cable to the specific
terminal board found on the plastic box shown in Fig. 8B.
Power the downdraft.
HOW TO USE THE DOWNDRAFT
This appliance is intended to extract cooking fumes, greases and vapours. It has been designed to
work in both vented mode, with outside evacuation, and recirculation mode.
VENTED MODE
The downdraft can be mounted in the version with outside discharge of suctioned air: in this case
it is necessary to connect the exhausting channel to the outside (exhausting pipes are not supplied
with the products.)
NON-RETURN VALVE BLOCKAGE
CAUTION: Before connecting the air exhaust hose, make sure that the non-return valves can
rotate freely.
In case of outside air discharge installation, fit a non-return valve to prevent wind and back air
from entering.
RECIRCULATION MODE
In case fumes and vapour cannot be evacuated outside, the
appliance can be used in the recirculation mode.
Activated charcoal filters are required for this type of
installation.
Air recycled through the charcoal filters is recirculated into
the kitchen, thanks to a duct conveying the air on one side
of the cabinet (Fig. 9).
Fig.9

Instruction manual DD901BK
12 Please keep this instruction manual for future reference
CAUTION: Installation must comply with the regulations in force regarding the ventilation of
enclosed environments. In particular, discharged air must not be conveyed into a duct used for
fumes discharge or discharge from appliances using gas or other combustible materials. The use of
discontinued ducts is not allowed without the approval of a qualified technician.
REMOVING THE GREASE FILTER, MOUNTING THE ACTIVATED
CHARCOAL FILTER
The removal and fitting of both the grease filter and the
charcoal filter shall be carried out with the downdraft open.
To open the downdraft, push the glass downwards so as to
make the opening of the appliance easier (Fig. 4). Remove
the metal grease filters, which are magnetically secured to the
appliance, by using either a hand tool or a knife edge.
Act in the slot found in the filter sides, as shown in Fig. 10.
As an alternative, you can remove the upper glass and push
the filters from the inside to outside. Fit the filters into their
seat, by bringing them close to the magnets until they keep
them into place . The charcoal filter is installed directly on the
grease filter rear side, (see Fig.11). Charcoal filters shall be
replaced accordingly to the effective use of the Downdraft,
and in any case at least once every 6 months.
NOTE: Replacement filters (CAP67CF) can be purchased at www.caple.co.uk.
WARNING: After having replaced the filters, reinstall the front stainless steel panel, otherwise
the Downdraft is not enabled to function.
ELECTRICAL CONNECTION OF THE DOWNDRAFT EXTRACTOR
WARNING: Place the metal box containing the electronic components at a distance of no less
than 65 cm from gas-operated cook tops or in any case, 65cm from the suctioning surface of the
cookerhood.
NOTE: We recommend installing the metal box containing the electronic components at least
10cm above floor level and at a suitable distance from all heat sources (e.g. oven sides or hob).
CAUTION: This appliance is fitted with an H05 VVF 3 conductor, 0.75mm2 (neutral, phase, and
ground) power cord.
This can be connected up to a 220 - 240V mono-phase electrical network through a CEI 60083
approved power socket, which must remain accessible after installation, in compliance with
installation regulations.

Instruction manual DD901BK 13
Please keep this instruction manual for future reference
We decline any responsibility in case of accidents caused by a lack of ground connection or
incorrect ground connection. The appliance must be fed through a differential protection device
(RCD), with a nominal residual current not exceeding 30mA. If the power cord is damaged,
call Caple service to avoid any risk.
WARNING: The downdraft connection to the electrical network must be carried out only by
professional and qualified technicians.
The downdraft must be connected to a properly installed and suitable electrical network.
The electrical system must comply with VDE0100 standard.
DANGER: If the downdraft presents any anomaly, disconnect the appliance or remove the fuse
corresponding to the appliance power disconnecting line.
If the appliance has no plug or if the plug is not easily accessible, then a device needs to be fitted
to cut it off from the electric network; this device must have an opening distance between contacts
on all poles of at least 3mm.
ELECTRICAL CONNECTION
While installing the appliance and carrying maintenance operation, make sure it is disconnected
from the electrical network or the fuses are cut out or removed.
Check that:
»Power is enough.
»Feeder lines (mains) are in good conditions.
»The cables diameter complies with installation regulations.

Instruction manual DD901BK
14 Please keep this instruction manual for future reference
APPLIANCE DESCRIPTION
NOTE: The Downdraft worktop cutout can be connected to the hob cutout, but only for electric
hobs.
For gas hobs, a minimum 50mm gap must be left beetween the edge of the gas hob and the
downdraft frame.
S-DD11-L16
EN
DESCRIPTION
OF THE APPLIANCE
INC
6
Note: The Downdraft worktop cutout can be connected to the hob cutout,
but only for electric hobs.
For gas hobs, a minimum 50mm gap must be left beetween the edge of
the gas hob and the downdraft frame
S-DD11-L16
EN
DESCRIPTION
OF THE APPLIANCE
INC
6
Note: The Downdraft worktop cutout can be connected to the hob cutout,
but only for electric hobs.
For gas hobs, a minimum 50mm gap must be left beetween the edge of
the gas hob and the downdraft frame

Instruction manual DD901BK 15
Please keep this instruction manual for future reference
The extractable unit is open manually by pushing the glass
downwards, as shown in (Fig.4); in the same way, push the glass
downwards to close it, until it is completely closed.
The motor and the lights are started by the push button panel (Fig.12).
The motor and the light are automatically switched off when the
extractable unit is closed, in case they are on.
TIMING
As a result of the new EU65 “Energy label” and EU66 “ Ecodesign”
regulations issued by the European Commission, which came into
force as from January 1st, 2015 , our products have been adapted to comply with these new
requirements.
All of the models complying with the energy label requirements, are equipped with new electronics
including a timer device for suction speeds control, when the air capacity exceeds 650m³/h.
Internal motor models, with maximum air capacity higher than 650m³/h, are equipped with a
timer device that automatically switches the suction speed from 4th to 3rd speed, after 6 minutes
operation.
External motor models are equipped with remote motors that, as for internal motor versions,
include a timer device that switches down the speed when it exceeds 650 m³/h. (See External
Motors Instructions).
Remote motors, whose air capacity exceeds 650m³/h at suction both 4th and 3rd speed, will
have the following by default timer control functions: The suction speed is automatically switched
1. Light ON / OFF key
2. Motor ON (1 speed) / OFF key
3. 2 speed key
4. 3 speed key
5. 4 speed key
6. 10 minutes timer
S-DD11-L 67
9
8
7
10
11 12
65
78
9 10
11 12
14
1 2 3 4 5 6
Fig.12
Fig.4
OPERATING THE DOWNDRAFT EXTRACTOR
6-KEY PUSH BUTTON PANEL

Instruction manual DD901BK
16 Please keep this instruction manual for future reference
from 4th to 2nd speed, after 6 minutes operation. If the appliance is working at 3rd speed, it is
automatically switched to 2nd speed, after 7 minutes operation. Operation speeds can also be
tchanged during operation.
The energy consumption of the appliance in stand-by mode is lower than 0.5W.
OTHER FUNCTIONS:
AUTOMATIC TURN OFF:
After 4 hours of continuous operation from the last setup, the appliance turns off automatically.
GREASE FILTERS SATURATION:
After 30 hours of operation, the speed indicators “D” will all flash simultaneously, signaling the
grease filters saturation. To reset this alarm, hold the “TIMER” button down for at least 3 seconds,
while the extractable unit is open.
SELF-CALIBRATION:
The downdraft will carry out a self-calibration every 3 complete cycles of its extractable unit. By
pushing the “TIMER” key 6 times consecutively (MAX break between one push and the other is 3
sec.) all the LEDs will flash and the calibration will be reset.
After the next 3 cycles the downdraft will carry out its self-calibration.
STAND-BY:
When the extractable unit is closed and the light is switched off, the control panel, after 6 seconds,
activates the Stand-by function, reducing the brightness of the leds.
This function can be stopped by pressing ON/ OFF or LIGHT key.

Instruction manual DD901BK 17
Please keep this instruction manual for future reference
CARE AND MAINTENANCE
Careful maintenance ensures proper operation and good performances over time.
The hood must be disconnected from the electrical network, both by unplugging the appliance
from the socket and activating the magnetic circuit breaker (safety cut-out), before removing the
metal grease filters. After cleaning operations, replace the metal grease filters as outlined in the
installation instructions.
MAINTENANCE HOW TO PROCEED? ACCESSORY PRODUCTS
TO USE
External surfaces and
accessories
Do not use metallic scrubbers, abrasive
products, or hard brushes.
To clean the external surfaces of the
cookerhood and the light housing screen
use only commercially available household
detergents diluted in water. Then rinse
with clean water and dry with a soft cloth.
Activated charcoal filter with
extractable unit open
After 30 hours of operation, the
downdraft will signal the grease
filter saturation.
The saturation is signaled by the
blinking of the 4 central leds.
To reset, hold down the timer button
S-DD11-L 67
9
8
7
10
11 12
65
78
9 10
11 12
14
for at least 3 seconds, while the
extractable unit is open.
The grease filters can be washed by hand
or in the dishwasher. These fil- ters need
to be cleaned on a regular basis, because
otherwise they may represent a fire risk.
Refit the grease filters and front panel,
making sure that the panel properly fitted
at the sides so that it it does not cause
the downdraft to stop operating.
Activated charcoal filter In the recirculation mode, the active
charcoal filter must be replaced
periodically.
To remove the charcoal filter first of all
it is necessary to remove the grease
filter and then pull the plastic key of
the panel itself, in order to disengage it
from its seating.
Follow these steps in reverse order to
insert the active charcoal filter.
Replace the used charcoal filter on an
average of every six months.

Instruction manual DD901BK
18 Please keep this instruction manual for future reference
TROUBLESHOOTING
AFTER SALES SERVICE
Any maintenance operation on your appliance should be carried out by:
- Either your retailer;
- A Caple approved engineer, or similarly qualified personnel.
PROBLEM SOLUTION
The cooker hood does not
work...
Check that:
- There is not a power outage.
- A specific speed has actually been selected.
- The 9 pole connection is inserted properly.
- The red reset key, found over the electrical system box, is pushed.
- Make sure that the wires of the 9 pole connection are inserted properly in the
connector itself (during the connection phase, an excessive pressure could bend the
contacts).
The cooker hood has low
performances...
Check that:
- The motor speed selected is sufficient for the quantity of fumes and vapors present
in the room.
- The kitchen is ventilated well enough to allow air for intake.
- The charcoal filter is not worn out.( filtering version cooker hood).
- The air outlet channel is free and compliant with paragraph no. 2.
- The non-return valves of the suctioning unit are free to rotate.
The cooker hood stops in the
middle of operation.
Check that:
- There is not a power outage.
- The omnipolar device has not tripped.

Instruction manual DD901BK 19
Please keep this instruction manual for future reference

Caple Service
Fourth Way
Avonmouth
Bristol
BS11 8DW
T: 0117 938 1900
E: service@caple.co.uk
www.caple.co.uk
Other manuals for DD901BK
1
Table of contents
Other Caple Ventilation Hood manuals