manuals.online logo
Brands
  1. Home
  2. •
  3. Brands
  4. •
  5. Carel
  6. •
  7. Controllers
  8. •
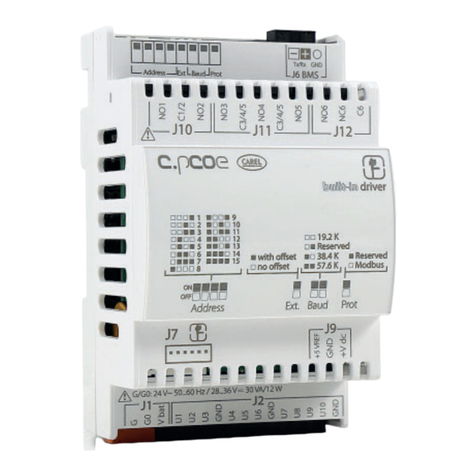
  9. Carel Carel c.pCOMini User manual

Carel Carel c.pCOMini User manual

c.pCOMini é un controllo elettronico programmabile sviluppato da Carel per applicazioni
di condizionamento, riscaldamento e refrigerazione e in generale del settore HVAC/R.
Assicura una notevole essibilità, consentendo di realizzare soluzioni speciche su richie-
sta del cliente. Attraverso l’utilizzo del software c.Suite sviluppato da Carel per i controlli
programmabili assicura la massima essibilità di programmazione adattabile per ogni
esigenza. c.pCOMini controlla la logica ingressi/uscite, la comunicazione con il terminale
della famiglia pGD1, oltre alla comunicazione con altri dispositivi grazie alla presenza di
tre porte seriali, una porta Canbus e una porta Ethernet. Gli ingressi/uscite universali (de-
nominati nello schema di connessione come U) possono essere congurati da program-
ma applicativo per collegare sonde attive e passive, ingressi digitali, uscite analogiche e
PWM. Ciò aumenta la possibilità di congurazione degli ingressi/uscite, aumentando la
essibilità di utilizzo dello stesso controllo per diverse applicazioni. L’utilizzo del software
c.Suite, installabile su PC, per la creazione e la personalizzazione del programma applica-
tivo, la simulazione, la supervisione e la denizione dell’intelligenza distribuita, permette
di sviluppare nuove applicazioni in breve tempo. Il caricamento del software applicativo
sul controllo tramite porta USB o Ethernet avviene tramite il programma c.Factory. La
gamma c.pCOMini è composta dai modelli DIN (con o senza display LCD), e dal modello
a pannello. Entrambi i modelli si dividono in 3 versioni (Basic, Enhanced e High-End) in
funzione della connettività e degli I/O a bordo (vedi Tab. 1).
CARATTERISTICHE DEGLI I/O
Ingressi Digitali
Tipo: ingressi digitali a contatto pulito
Numero di ingressi digitali (DI): 2
Massima corrente in uscita: 5mA
Massima tensione a contatto aperto: 12Vdc
Massima lunghezza del cavo di connessione: inferiore a 10m
Uscite analogiche
Tipo: 0...10 Vdc continui, PWM 0/10 V sincroni con l’alimentazione con controllo a
taglio di fase, PWM 0/10 V frequenza 100 Hz, PWM 0/10 V
frequenza 2 KHz, selezionabili da programma applicativo
Numero di uscite analogiche (Y): 2
corrente massima in uscita: 10mA
Duty Cycle uscita PWM selezionabile da programma applicativo: range operativo 0% -
10%...90% - 100% (valori nel range 1..9% - 91..99% non sono gestiti).
Precisione delle uscite analogiche: ± 3% del fondo scala
Massima lunghezza del cavo di connessione: inferiore a 10m
Canali Universali
Bit conversione analogico digitale: 14
Tipo di ingresso selezionabile da applicativo: NTC, PT1000, PT500, PT100, 4...20mA,
0...1 V, 0...5 V, 0...10 V, Ingresso digitale da 0 a 2KHz (risoluzione ± 1Hz) di tipo
ON/OFF o di tipo open collector (Rpullup 2Kohm)
Tipo di uscita selezionabile da applicativo: PWM 0/3,3 V 100 Hz, PWM 0/3,3 V
2 KHz, uscita analogica 0...10 V Massima corrente in uscita 2 mA
Numero di canali universali (U): 10
Precisione lettura ingressi analogici: ± 0,3% del fondo scala
Precisione uscite analogiche: ± 2% del fondo scala
Massima lunghezza del cavo di connessione: inferiore a 10m
Uscite digitali
Gruppo 1 (R1, R2); Gruppo 2 (R3, R4, R5): Potenza commutabile: NO EN 60730-1: 2(1) A
(100.000 cicli); UL60730: 5A resistivi, 250Vac, 30k cicli, 105°C, Denite Purpose, 1FLA,
6LRA, 250Vac, 30k cicli, 105°C, pilot duty C300, 250Vac, 30k cicli, 105°C.
Gruppo 3 (R6): Potenza commutabile: NO EN 60730-1: 1(1) A (100.000 cicli)
Massima tensione commutabile: 250Vac; UL 60730-1: 1A resistivo, 1A FLA, 6A LRA,
250Vac, D300 pilot duty, 30.000 cicli.
Potenza commutabile R2, R5 con montaggio SSR: 15 VA 110/230 Vac o 15 VA 24 Vac
secondo il modello acquistato.
Tra il Gruppo 1 e il Gruppo 2 è presente un isolamento di tipo principale. Il Gruppo 3
possiede un isolamento rinforzato rispetto agli altri due gruppi e può essere applicata
una diversa tensione di alimentazione.
Massima lunghezza del cavo di connessione: inferiore a 30m
Uscita Valvola Unipolare
Numero di valvole: 1
Massima potenza per ogni valvola: 8 W
Tipo di pilotaggio: unipolare
Connettore valvola: 6 pin sequenza ssa
Alimentazione: 13 Vdc ±5%
Corrente massima: 0.35 A per ogni avvolgimento
Minima resistenza avvolgimento: 40 Ω
Massima lunghezza cavo di connessione:
Ambiente residenziale/industriale =
2m senza cavo schermato. 6 m con utilizzo di cavo
schermato connesso a terra da entrambi i lati (E2VCABS3U0, E2VCABS6U0)
Ambiente domestico =
2m senza cavo schermato.
CARATTERISTICHE ELETTRICHE E MECCANICHE DEL CONTROLLO
Alimentazione:
Tensione di alimentazione del prodotto alimentato tra G e G0: 24 Vac +10%/-15% 50/60
Hz, 28 to 36 Vdc +10% to -15%;
Tensione di alimentazione del prodotto alimentato tra G0 e Vbat: +18Vdc unicamente
per alimentazione proveniente da modulo ultracap (EVD0000UC0).
NB: con alimentazione Vdc non è gestita la chiusura forzata dell’ExV in caso di man-
canza tensione.
Durata minima del prodotto correttamente funzionante connesso al modulo Ultracap: 60
secondi senza chiusura forzata valvola 40 secondi con chiusura forzata valvola
Massima Potenza assorbita: 18 VA / 7W nella versione Basic, 30 VA /12W nelle versioni
Enhanced e High-end (40 VA in caso di alimentazione combinata con modulo Ultra-
cap). Isolamento di tipo rinforzato tra alimentazione principale e controllo deve esse-
re garantito dal trasformatore esterno di alimentazione con isolamento di sicurezza
(IEC61558-2-6).
Protezione da cortocircuito: fusibile esterno da 2,5AT (IEC60127-1).
Massima tensione connettori (NO1…C6): 250 Vac;
Sezioni minime dei conduttori uscite digitali: 1,5 mm2
Sezioni minime dei conduttori di tutti gli altri connettori: 0,5 mm2
Coppia di serraggio viti: 0,2 N/m (passo 3,81mm), 0,4 N/m (passo 5,08mm)
ATTENZIONE/ATTENTION: Vedi nota (1) nel paragrafo “Avvertenze importanti/Avertissement
importants”.
Alimentazioni fornite dal prodotto
Tipo: +Vdc per alimentazione sonde esterne, +5 Vref per alimentazione sonde
esterne; +Vterm per alimentazione terminali
Tensione nominale +Vdc: 12 Vdc ±8%
Max corrente disponibile +Vdc: 50 mA, protetta da cortocircuito
Tensione nominale +5Vref: 5 Vdc ±3%
Massima corrente disponibile (+5 Vref ): 50 mA, protetta da cortocircuito
Tensione nominale +Vterm: da 24 a 36 Vdc ±5% in funzione della tensione di
alimentazione del prodotto.
Massima corrente disponibile 100 mA, adatta per alimentare il terminale pGD1,
pLDPRO e thTUNE CAREL, protetta da cortocircuito
Massima lunghezza del cavo di connessione: inferiore a 10m
CARATTERISTICHE OROLOGIO INTERNO
Precisione orologio interno: 50 ppm
Caratteristiche Batteria rimovibile: batteria Lithium bottone, BR2032, 3 Vdc
Durata della batteria: Minimo 5 anni in condizioni normali di funzionamento
Regole per la sostituzione della batteria: non sostituire la batteria, contattare Carel per
la sostituzione
Utilizzo della batteria: la batteria è utilizzata unicamente per il corretto funzionamento
dell’orologio quando il prodotto non è alimentato. L’utilizzo del prodotto ai range estre-
mi di temperatura di funzionamento riduce la durata della batteria.
Sostituire la batteria se l’ora non è aggiornata alla riaccensione del prodotto.
c.pCOMini is a programmable electronic controller developed by Carel for air-conditio-
ning, heating, refrigeration and HVAC/R applications in general. It ensures signicant
exibility, allowing specic solutions to be developed based on customer require-
ments. Indeed, the c.suite software developed by Carel for programmable controllers
ensures maximum programming exibility, creating application programs that are
adaptable to all needs. c.pCOMini controls input/output logic, communication with
pGD1 family terminals, and communication with other devices, using three serial ports,
a CANbus port and an Ethernet port. The universal inputs/outputs (marked as U in the
connection diagram) can be congured in the application program to connect active
and passive probes, digital inputs, analogue and PWM outputs. This allows additio-
nal input/output congurations, increasing the exibility of the controller in dierent
applications. The c.Suite software, installed on a PC, is used to create and customise
the application program, simulate operation and supervision, and dene distributed
intelligence, allowing new applications to development in a very short time. The ap-
plication programs are loaded onto the controller via USB Ethernet port, using the
c.Factory program. The c.pCOMini range comprises models for DIN rail mounting (with
or without LCD), and panel installation. Both models come in 3 versions (Basic, Enhan-
ced and High-End), diering in terms of connectivity and the number of I/Os on board
(see Tab. 1).
I/O SPECIFICATIONS
Digital inputs
Type: digital inputs with voltage-free contacts
Number of digital inputs (DI): 2
Maximum current output: 5 mA
Maximum voltage with the contact open: 12 Vdc
Maximum connection cable length: less than 10 m
Analogue outputs
Type: 0 to 10 Vdc continuous, PWM 0/10 V synchronous with power supply to with pha-
se cut control, PWM 0/10 V frequency 100 Hz, PWM 0/10 V frequency 2 kHz, selectable
from application program
Number of analogue outputs (Y): 2
Maximum current output: 10 mA
PWM output duty cycle selectable from application program: operating range 0% -
10%...90% - 100% (values in the range 1..9% - 91..99% are not managed).
Precision of analogue outputs: ± 3% of full scale
Maximum connection cable length: less than 10 m
Universal channels
Analogue/digital conversion: 14-bit
Type of input selectable from application program: NTC, PT1000, PT500, PT100, 4 to 20
mA, 0 to 1 V, 0 to 5 V, 0 to 10 V, 0 to 2 kHz (risolution ± 1Hz) on/o or open collector
digital input (Rpullup 2 kOhm)
Type of output selectable from application program: PWM 0/3.3 V 100 Hz, PWM 0/3.3 V
2 kHz, 0 to 10 V analogue output; Maximum current output 2 mA
Number of universal channels (U): 10
Precision of analogue input reading: ± 0.3% of full scale
Analogue output precision: ± 2% of full scale
Maximum connection cable length: less than 10 m
Digital outputs
Group 1 (R1, R2); Group 2 (R3, R4, R5): Switchable power: NO EN 60730-1: 2(1) A
(100,000 cycles); UL60730: 5 A resistive, 250 Vac, 30k cycles, 105°C, Dened Purpose,
1FLA, 6LRA, 250 Vac, 30k cycles, 105°C, pilot duty C300, 250 Vac, 30k cycles, 105°C.
Group 3 (R6): Switchable power: NO EN 60730-1: 1(1) A (100,000 cycles)
Maximum switchable voltage: 250 Vac; UL 60730-1: 1 A resistive, 1 A FLA, 6 A LRA, 250
Vac, D300 pilot duty, 30,000 cycles.
Switchable power R2, R5 with SSR assembly: 15 VA 110/230 Vac or 15 VA 24 Vac accor-
ding to the model purchased.
Between Group 1 and Group 2 there is basic insulation. Group 3 has reinforced insulation
from the two other groups and consequently a dierent power supply can be used.
Maximum connection cable length: less than 30 m
Single-pole valve output
Number of valves: 1
Maximum output for each valve: 8 W
Type of control: single-pole
Valve connector: 6-pin, xed sequence
Power supply: 13 Vdc ±5%
Maximum current: 0.35 A for each winding
Minimum winding resistance: 40 Ω
Maximum length connection cable:
Residential/industrial environment
= 2 m without shielded cable. 6 m using shielded
cable connected to earth at both ends (E2VCABS3U0, E2VCABS6U0)
Residential environment
= 2 m without shielded cable.
CONTROLLER ELECTRICAL AND PHYSICAL SPECIFICATIONS
Power supply:
Power supply to the product between G and G0: 24 Vac +10%/-15% 50/60 Hz, 28 to
36 Vdc +10% to -15%;
Power supply to the product between G0 and Vbat: +18 Vdc only for power supply
from the Ultracap module (EVD0000UC0).
NB: with Vdc power supply, forced closing of the ExV in the event of power failures is
not managed.
Minimum product functioning when correctly operating connected to the Ultracap modu-
le: 60 seconds without forced valve closing, 40 seconds with forced valve closing
Maximum power consumption: 18 VA / 7W in the Basic version, 30 VA /12W in the
Enhanced and High-end versions (40 VA for power supply combined with Ultracap
module). Reinforced insulation between main power supply and controller must be
guaranteed by the external safety power transformer. (IEC61558-2-6).
Protection against short-circuits: external 2.5 AT fuse (IEC60127-1).
Maximum connector voltage (NO1…C6): 250 Vac;
Minimum size of digital output wires: 1.5 mm2
Minimum size of all other connector wires: 0.5 mm2
Tightening torque: 0,2 N/m (pitch 3,81mm), 0,4 N/m (pitch 5,08mm)
WARNING/ ATTENTION: See note(1) paragraph“Important Warnings/ Avertiss. importants”.
Power supplied by the product
Type: +Vdc for external probe, +5 Vref for external probe; +Vterm for terminals
Rated voltage +Vdc: 12 Vdc ±8%
Max current available +Vdc: 50 mA, protected against short-circuits
Rated voltage +5Vref: 5 Vdc ±3%
Maximum current available (+5 Vref ): 50 mA, protected against short-circuits
Rated voltage +Vterm: from 24 to 36 Vdc ±5% according to product power supply
voltage.
Maximum current available 100 mA, suitable for powering the CAREL pGD1, pLDPRO
and thTUNE terminals, protected against short-circuits
Maximum connection cable length: less than 10 m
INTERNAL CLOCK SPECIFICATIONS
Internal clock precision: 50 ppm
Removable battery specications: lithium button battery, BR2032, 3 Vdc
Battery life: minimum 5 years in normal operating conditions
Instructions for replacing the battery: do not replace the battery, contact Carel for re-
placement
Battery use: the battery is only used for correct operation of the clock when the pro-
duct is not powered. Using the product at the limits of operating temperature reduces
battery life.
Have the battery replaced if the time is not updated when restarting the product.
P+D* and P+P*: c.pCOMini – Controllo Programmabile Integrato / Integrated Programmable Controller
+0500058IE - rel. 1.3 date 01.02.2018
Descrizione connettori / Connector’s description
Versione guida DIN
Fig. 1
Fig. 2
Ethernet
36mm
C.pCO n° (03)
33,6°C
Time 12:33
date: 07.06.2013
Basic Enhanced High-end
1 Connettore per l’alimentazione [G(+), G0(-), Vbat]   
2 Ingressi/uscite universali   
3 Valvola Unipolare  
4 DI: ingressi digitali a contatto pulito  
5 Uscite analogiche  
6+Vdc alimentazione per sonde attive
+5V alimentazione per sonde raziometriche   
7 Uscite digitali a relè   
8Connettore terminale esterno o BMS o Fieldbus
+Vterm: alimentazione per terminale   
9 Connettore FieldBus  
10 Connettore CANBus 
11 LED comunicazione CANBus 
12 Faston connessione a terra Ethernet 
13 Connettore Ethernet 
14 Connettore BMS 
15 Porta microUSB   
16 LED alimentazione   
17 Antenna NFC 
Tab.1
Basic Enhanced High-end
1 Power supply connectors [G(+), G0(-), Vbat]   
2 Universal inputs/outputs   
3 Valve Unipolar connector  
4 DI: digital inputs free contact  
5 Analogue outputs  
6+VDC: alimentazione per sonde attive
+5V power supply for raziometric probes   
7 Relay digital outputs   
8External terminal or BMS or Fieldbus connector
+Vterm: terminal power supply   
9 FieldBus connector  
10 CANBus connector 
11 CANBus communicationd LED 
12 Faston for Ethernet earth connection 
13 Ethernet connection 
14 BMS connector 
15 microUSB port   
16 Power supply LED   
17 Antenna NFC 
Tab.2
High-end
version
Enhanced
version
C.pCO n° (03)
33,6°C
Time 12:33
date: 07.06.2013
C.pCO n° (03)
33,6°C
Time 12:33
date: 07.06.2013
J6 BMS
8
1 2
7
15
6
4
9 1410 12
13
11
3
17
5
16
LEGENDA
CARATTERISTICHE GENERALI GENERAL CHARACTERISTICS
LEGEND
Versione a pannello
Dimensioni / Dimensions
70 63
110
45
147.3
81.3
70.5
81.0
59.5
38.1
+0500058IE - rel. 1.3 date 01.02.2018
CARATTERISTICHE PORTE DI COMUNICAZIONE
Tipo: tutti i terminali pGD1, pLDPRO, thTUNE e pGDTouch. Su DISPLAY PORT
Massima lunghezza dei cavi di connessione:
• 2m tramite cavo non schermato;
• 50 m tramite cavo schermato AWG24 con connessione a terra da entrambi i lati.
Numero massimo di terminali collegabili:
• un terminale della famiglia pGD1 o un pLDPRO se alimentati da c.pCOMini, massi-
mo 3 se alimentati esternamente.
• un terminale thTune se alimentato da c.pCOMini, massimo 8 se alimentati esterna-
mente.
• un terminale pGDTouch, sempre alimentato esternamente.
Linee di comunicazione disponibili
N.ro e tipo di linee disponibili:
• 1 linea RS485 Master non optoisolata per FieldBus (a seconda del modello)
• 1 linea RS485 Slave non optoisolata per BMS (a seconda del modello)
• 1 linea RS485 Slave non optoisolata per Display
• 1 linea Canbus non optoisolata per CAN; (a seconda del modello) [solo predisposi-
zione]. NB: Per un corretto funzionamento inserire due resistenze di terminazione da
120Ω agli estremi della rete CANBus
• 1 linea Ethernet RJ45 schermato (a seconda del modello). Alla porta Ethernet può
essere connesso solo 1 circuito di tipo SEL CIRCUIT.
Massima lunghezza del cavo di connessione
porta seriale: 2m tramite cavo non schermato
per porta FieldBus e Display, 500m tramite cavo
schermato AWG24 con connessione a terra da
entrambi i lati.
Per porta BMS utilizzare sempre cavo schermato
con connessione a terra da entrambi i lati.
Massima lunghezza del cavo di connessione
porta ETHERNET (a seconda del modello ac-
quistato): 100 m CAT-5 STP
Collegare a terra con Faston femmina da 6,3mm
come indicato in gura sottostante. Utilizzare
un faston senza capsula in plastica
Terminale integrato (ª seconda del modello acquistato):
132x64 pixel con tastiera 6 tasti retroilluminata
TAG NFC (nei modelli predisposti): permette lo scambio di informazioni con dispositi-
vi esterni dotati di questa tecnologia.
CONDIZIONI DI FUNZIONAMENTO
Versione senza LCD
Stoccaggio: -40T70 °C, 90% U.R. non-condensante
Funzionamento: -40T70 °C, 90% U.R. non-condensante.
Versione con display LCD
Stoccaggio: -30T70 °C, 90% U.R. non-condensante
Funzionamento: -20T60 °C, 90% U.R. non-condensante.
CARATTERISTICHE MECCANICHE
Dimensioni: modulo 4 DIN = 70 x 110 x 63 mm; pannello = 147,3 x 81,3 x 70,5 mm
Montaggio DIN: agganciabile su guida DIN secondo DIN 43880 CEI EN 50022
ALTRE CARATTERISTICHE
Inquinamento ambientale: livello III
Grado di protezione frontale (con porta USB chiusa):
versione DIN = IP40; versione pannello = IP65
Classe di protezione contro le scosse elettriche: da integrare/incorporare su
apparecchiature di Classe I e/o II (per Basic/Enhanced) - Classe I (High-End)
Materiale: tecnopolimero
Autoestinguenza: V2 (secondo UL94) e 850 °C (secondo IEC 60695-2-11)
PTI dei materiali per isolamento PCB: PTI250; Materiale isolante: PTI 175
Colore: bianco RAL 9016
Temperatura per la prova con la sfera: 125 °C
Periodo delle sollecitazioni elettriche delle parti isolanti: lungo
Tipo azioni: 1C; 1Y per versioni a SSR
Tipo disconnessione o microinterruzione: microinterruzione
Categoria di resistenza al calore e al fuoco: categoria D (UL94 - V2)
Immunità contro le sovratensioni: categoria III
Classe e struttura del software: Classe A
Non toccare o manomettere il dispositivo quando alimentato.
Nota: Le versioni con display LCD prevedono una funzione di autospegnimento dopo
30 minuti di inattività. Tale intervallo può essere modicato tramite programma appli-
cativo, ma NON DEVE essere disabilitato.
Per maggiori informazione riferirsi al manuale tecnico: +0300057IT
Display
C.pCO n° (03)
33,6°C
Time 12:33
date: 07.06.2013
31
tasto
indirizzo
pLAN
pLAN
address
key
Ethernet
36mm
C.pCO n° (03)
33,6°C
Time 12:33
date: 07.06.2013
LCD 4 DIN LED 4 DIN
LCD a pannello
Regole per lo smaltimento
• L’apparecchiatura (o il prodotto) deve essere ogget-
to di raccolta separata in conformità alle vigenti
normative locali in materia di smaltimento
• Non smaltire il prodotto come riuto solido urbano
ma smaltirlo negli appositi centri di raccolta.
• Il prodotto contiene una batteria ed è quindi necessario rimuoverla separandola dal
resto del prodotto seguendo le istruzioni riportate di seguito prima di procedere al
suo smaltimento.
• Un uso improprio o uno smaltimento non corretto potrebbe avere eetti negativi
sulla salute umana e sull’ambiente.
• In caso di smaltimento abusivo dei riuti elettrici ed elettronici sono previste sanzio-
ni stabilite dalle vigenti normative locali in materia di smaltimento.
Guidelines for disposal
• The appliance (or the product) must be disposed of
separately in accordance with the local waste dispo-
sal legislation in force.
• Do not dispose of the product as municipal waste;
it must be disposed of through specialist waste di-
sposal centres.
• The product contains a battery that must be removed and separated from the rest of
the product according to the instructions provided, before disposing of the product.
• Improper use or incorrect disposal of the product may negative eects on human
health and on the environment.
• In the event of illegal disposal of electrical and electronic waste, the penalties are
specied by local waste disposal legislation.
COMMUNICATION PORT SPECIFICATIONS
Type: all pGD1, pLDPRO, thTUNE and pGDTouch terminals. On DISPLAY PORT
Maximum length of the connection cables:
• 2 m with unshielded cable;
• 50 m with AWG24 shielded cable, earthed at both ends.
Maximum number of terminals connectable:
• one pGD1 family or one pLDPRO terminal if powered by c.pCOMini, maximum three
if powered externally.
• one thTune terminal if supplied by c.pCOMini, maximum eight if powered externally.
• one pGDTouch terminal, always supplied externally.
Communication lines available
No. and type of lines available:
• 1 Master RS485 line, not opto-isolated for FieldBus (depending on the model)
• 1 Slave RS485 line, not opto-isolated for BMS (depending on the model)
• 1 Slave RS485 line, not opto-isolated for Display
• 1 CANbus line, not opto-isolated for CAN; (depending on the model) [CAN-ready
only]. NB: For correct operation, install two 120Ω terminating resistors at the ends
of the CANbus network
• 1 shielded RJ45 Ethernet line (depending on the model). To the Ethernet port only
one circuit type SEL CIRCUIT can be connected.
Maximum serial port connection
cable length: 2 m with unshielded cable for
FieldBus and Display port, 500 m with AWG24
shielded cable earthed at both ends.
For the BMS port, always use shielded cable ear-
thed at both ends.
Maximum Ethernet port connection cable
length (according to the model purchased):
100 m CAT-5 STP
Earth with 6.3 mm female spade as shown in
the gure below. Use a spade without plastic
cap
Built-in terminal (according to the model purchased):
132x64 pixels with 6-button backlit keypad
NFC TAG (on models where featured): used to exchange information with external
devices featuring this technology.
OPERATING CONDITIONS
Version without LCD
Storage: -40T70 °C, 90% rH non-condensing
Operation: -40T70 °C, 90% rH non-condensing.
Version with LCD
Storage: -30T70 °C, 90% rH non-condensing
Operation: -20T60 °C, 90% rH non-condensing.
PHYSICAL SPECIFICATIONS
Dimensions: 4 DIN modules = 70 x 110 x 63 mm; panel = 147.3 x 81.3 x 70.5 mm
DIN mounting: tted on DIN rail in accordance with DIN 43880, CEI EN 50022
OTHER SPECIFICATIONS
Environmental pollution: level III
Front panel ingress protection (with USB port closed):
DIN version = IP40; panel version = IP65
Class of protection against electric shock: to be integrated into Class I and/or II applian-
ces (for Basic/Enhanced) - Class I (High-End)
Material: technopolymer
Flammability: V2 (UL94) and 850 °C (in accordance with IEC 60695)
PTI of the PCB insulating materials: PTI250; Insulating material: PTI 175
Colour: white RAL 9016
Ball pressure test temperature 125 °C
Period of stress across the insulating parts: long
Type of action: 1C; 1Y for SSR versions
Type of disconnection or microswitching: microswitching
Heat and re resistance category: category D (UL94 - V2)
Overvoltage category: category III
Software class and structure: Class A
Do not touch or tamper with the device when powered.
Note: The versions with LCD feature an auto-o function after 30 minutes of no activity.
This time can be changed in the application program, but MUST NOT BE disabled
For more details please refer to technical manual: +0300057EN
Key Description Retro
illum. Backlight Funzioni Functions
Alarm Bianco/
Rosso White/Red
• Premuto insieme Enter
permette di accedere al
menù di sistema
• Pressed together with Enter
accesses to the sistem’s menu
Prg Bianco
Giallo
White
Yellow - -
Esc Bianco White Ritorno livello superiore Return high level
UP Bianco White Aumento valore Increse value
Enter Bianco White Conferma valore Conrm value
DOWN Bianco White Diminuzione valore Decrease value
pLAN address
select. - -
• Pressione breve: visualizza-
zione indirizzo pLAN
• Pressione lunga (> 5s):
procedura di modica
indirizzo pLAN
• Short pressed: show pLAN
address;
• Long pressed (> 5s): proce-
dure for modifying the pLAN
address
LEGENDE
Per eseguire il montaggio in modo corretto, seguire le indicazioni riportate nel
disegno sottostante.
• Importante: in fase di montaggio assicurarsi che la cornice superiore aderisca
perfettamente su tutti e 4 i lati.
• Nel caso fosse necessario rimuovere la cornice, fare leva con un cacciavite nell’a-
pertura C.
• Per accedere alla porta USB aprire lo sportellino “B” e sollevare il tappo di gomma
“A”agendo sulla sua linguetta.
• Prima di richiudere lo sportellino “B”assicurarsi di aver inserito completamente il
tappo di gomma “A”(deve risultare complanare alla supercie della plastica esterna).
To install the product in proper way, please follow the instruction below the draw.
• Important: during the assembly, make sure of the upper frame is correctly inserted
in all its 4 sides.
• In case of upper frame removing, lever with a screwdriver on the C opening.
• To access to the USB port, opening “B”door and lift the rubber cap “A”pulling the tab.
• Before to close the“B” door make sure to have inserted completely the“A” cap (it
has to be coplanar with external plastic surface).
CAREL INDUSTRIES si riserva la possibilità di apportare modiche o cambiamenti ai propri prodotti senza alcun preavviso.
CAREL reserves the right to modify the features of its products without prior notice.
CAREL Industries HQs
Via dell’Industria, 11 - 35020 Brugine - Padova (Italy)
Tel. (+39) 0499716611 – Fax (+39) 0499716600 – www.carel.com – e-mail: [email protected]
MOUNTING
MONTAGGIO
AVVERTENZE IMPORTANTI
Il prodotto CAREL è un prodotto avanzato, il cui funzionamento è specica-
to nella documentazione tecnica fornita col prodotto o scaricabile, anche
anteriormente all’acquisto, dal sito internet www.carel.com. Il cliente (co-
struttore, progettista o installatore dell’equipaggiamento nale) si assume
ogni responsabilità e rischio in relazione alla fase di congurazione del pro-
dotto per il raggiungimento dei risultati previsti in relazione all’installazione
e/o equipaggiamento nale specico. La mancanza di tale fase di studio, la
quale è richiesta/indicata nel manuale d’uso, può generare malfunziona-
menti nei prodotti nali di cui CAREL non potrà essere ritenuta responsabile.
Il cliente nale deve usare il prodotto solo nelle modalità descritte nella do-
cumentazione relativa al prodotto stesso. La responsabilità di CAREL in re-
lazione al proprio prodotto è regolata dalle condizioni generali di contratto
CAREL editate nel sito www.carel.com e/o da specici accordi con i clienti.
NO POWER
& SIGNAL
CABLES
TOGETHER
READ CAREFULLY IN THE TEXT!
ATTENZIONE: l’installazione del prodotto deve obbligatoriamente comprende-
re la connessione di messa a terra, usando l’apposito morsetto giallo-verde
in morsettiera. Non utilizzare il neutro come connessione a terra.
ATTENZIONE (1): Utilizzare un trasformatore con collegamento di G0 a terra obbligatorio
nella versione di prodotto con porta di comunicazione ETHERNET. L’alimentazione del
prodotto si deve eettuare unicamente tra G e G0.
Il morsetto Vbat è utilizzato unicamente per la connessione con il modulo
ultracap come alimentazione di backup in caso di mancanza di alimentazione
IMPORTANT WARNINGS
The CAREL product is a state-of-the-art product, whose operation is spe-
cied in the technical documentation supplied with the product or can
be downloaded, even prior to purchase, from the website www.carel.com.
- The client (builder, developer or installer of the nal equipment) assu-
mes every responsibility and risk relating to the phase of conguration the
product in order to reach the expected results in relation to the specic
nal installation and/or equipment. The lack of such phase of study, which
is requested/indicated in the user manual, can cause the nal product to
malfunction of which CAREL can not be held responsible. The nal client
must use the product only in the manner described in the documentation
related to the product itself. The liability of CAREL in relation to its own
product is regulated by CAREL’s general contract conditions edited on the
website www.carel.com and/or by specic agreements with clients.
NO POWER
& SIGNAL
CABLES
TOGETHER
READ CAREFULLY IN THE TEXT!
WARNING: separate as much as possible the probe and digital input signal
cables from the cables carrying inductive loads and power cables to avoid
possible electromagnetic disturbance. Never run power cables (including
the electrical panel wiring) and signal cables in the same conduits.
IMPORTANT (1): Use a transformer with G0 earthed (compulsory) in the version with
ETHERNET communication port. Power supply to the product must only be connected
between G and G0. The Vbat terminal is only used for connection to the Ultracap module
as emergency power supply in the event of power failures.
vista da dietro
controller
side
view from behind
A
B
C
C
Coppia di serraggio / tightening torque: 0,4 N/m
ISTRUZIONI PER IL MONTAGGIO
MOUNTING INSTRUCTIONS
AVERTISSEMENTS IMPORTANTS
Le produit CAREL est un produit avancé dont le fonctionnement est spécié
dans la documentation technique fournie avec le produit ou télécharge-
able, même avant l’achat, du site Internet www.carel.com. Le client (con-
structeur, concepteur ou installateur de l’équipement nal) assume toutes
les responsabilités et risques quant à la conguration du produit pour
l’obtention des résultats prévus quant à l’installation et/ou à l’équipement
nal spécique. L’absence de cette phase d’étude qui est requise/indiquée
dans le manuel d’instructions peut provoquer des dysfonctionnements des
produits nals dont CAREL ne pourra en aucun cas être jugée responsable
Le client nal doit utiliser le produit exclusivement selon les modes décrits
dans la documentation correspondant au produit. La responsabilité de CA-
REL en ce qui concerne son produit est réglée par les conditions générales
de contrat CAREL publiées sur le site www.carel.com et/ou par des accords
spéciques stipulés avec les clients.
NO POWER
& SIGNAL
CABLES
TOGETHER
READ CAREFULLY IN THE TEXT!
ATTENTION: Le produit doit être installé avec la connexion terre branchée,
en utilisant la signalisation et les bornes spéciques (jaune/vert) à la mise à
la terre. Ne pas utiliser le neutre comme mise à la terre.
ATTENTION (1):Utiliser un transformateur avec raccordement de G0 à la terre, obligatoire
dans la version de produit avec port de communication ETHERNET. L’alimentation du pro-
duit doit être eectuée uniquement entre G et G0. La borne Vbat est utilisée uniquement
pour le raccordement avec le module Ultracap comme alimentation de sauvegarde en
cas de coupure de l’alimentation.

Other Carel Controllers manuals

Carel MRK0000000 User manual

Carel

Carel MRK0000000 User manual

Carel uC2 User manual

Carel

Carel uC2 User manual

Carel Heez Manual

Carel

Carel Heez Manual

Carel PSOPZKEY00/A0 User manual

Carel

Carel PSOPZKEY00/A0 User manual

Carel c.pCOMini User manual

Carel

Carel c.pCOMini User manual

Carel FCS Series User manual

Carel

Carel FCS Series User manual

Carel FCR3 User manual

Carel

Carel FCR3 User manual

Carel ir33+ User manual

Carel

Carel ir33+ User manual

Carel Easy PJEZS Series User manual

Carel

Carel Easy PJEZS Series User manual

Carel uChiller UCHBP00000190 User manual

Carel

Carel uChiller UCHBP00000190 User manual

Carel FCPM0420A0 User manual

Carel

Carel FCPM0420A0 User manual

Carel c.pCOMini User manual

Carel

Carel c.pCOMini User manual

Carel pCO3 series Manual

Carel

Carel pCO3 series Manual

Carel AT-th Tune Series User manual

Carel

Carel AT-th Tune Series User manual

Carel k.Air User manual

Carel

Carel k.Air User manual

Carel pCO2 Series User manual

Carel

Carel pCO2 Series User manual

Carel PJS6 User manual

Carel

Carel PJS6 User manual

Carel IRMPX00000 User manual

Carel

Carel IRMPX00000 User manual

Carel pRack pR300 User manual

Carel

Carel pRack pR300 User manual

Carel PJEZ G Series User manual

Carel

Carel PJEZ G Series User manual

Carel pRack pR300T User manual

Carel

Carel pRack pR300T User manual

Carel IR Series User manual

Carel

Carel IR Series User manual

Carel FCS Series User manual

Carel

Carel FCS Series User manual

Carel ir33 smart User manual

Carel

Carel ir33 smart User manual

Popular Controllers manuals by other brands

AP BM000N Specification & installation instructions

AP

AP BM000N Specification & installation instructions

Anaheim Automation Bilevel Step Motor Driver BLD72 user guide

Anaheim Automation

Anaheim Automation Bilevel Step Motor Driver BLD72 user guide

AMERITRON SDC-105 instruction manual

AMERITRON

AMERITRON SDC-105 instruction manual

Mitsubishi Electric MELSEC Q Series Programming manual

Mitsubishi Electric

Mitsubishi Electric MELSEC Q Series Programming manual

Mueller ISOBUS SPRAYER-Controller MAXI 3.0 operating instructions

Mueller

Mueller ISOBUS SPRAYER-Controller MAXI 3.0 operating instructions

DMX4ALL DMX-LED-DIMMER X9 HR user manual

DMX4ALL

DMX4ALL DMX-LED-DIMMER X9 HR user manual

Emerson unidrive sp user guide

Emerson

Emerson unidrive sp user guide

Beck 42-107 Replacement instructions

Beck

Beck 42-107 Replacement instructions

Curtiss-Wright EL30 Installation and service manual

Curtiss-Wright

Curtiss-Wright EL30 Installation and service manual

X10 PMC01 manual

X10

X10 PMC01 manual

Kramer RC-43SL user manual

Kramer

Kramer RC-43SL user manual

Black Stone BL 983314-0 instruction manual

Black Stone

Black Stone BL 983314-0 instruction manual

Vestax PMC-05PRO3VCA owner's manual

Vestax

Vestax PMC-05PRO3VCA owner's manual

Elation ART SSC Setup guide

Elation

Elation ART SSC Setup guide

Baumuller BUS 6-T Series Technical description and operations manual

Baumuller

Baumuller BUS 6-T Series Technical description and operations manual

LOXONE NFC Code Touch Tree quick guide

LOXONE

LOXONE NFC Code Touch Tree quick guide

AQ-Tron BAT/48344 user manual

AQ-Tron

AQ-Tron BAT/48344 user manual

CHART MVE TS Quick reference guide

CHART

CHART MVE TS Quick reference guide

manuals.online logo
manuals.online logoBrands
  • About & Mission
  • Contact us
  • Privacy Policy
  • Terms and Conditions

Copyright 2025 Manuals.Online. All Rights Reserved.