Caretero HUGGI User manual

HUGGI 15-36 kg
FOTELIK SAMOCHODOWY/CAR SEAT/KINDERSITZ
INSTRUKCJA UŻYTKOWANIA/USER MANUAL/
BEDIENUNGSANLEITUNG
WAŻNE! Prosimy o uważne przeczytanie niniejszej instrukcji użytkowania przed pierwszym użyciem produktu.
Instrukcję należy zachować na wypadek potrzeby ponownego z niej skorzystania.
IMPORTANT! Please read these instructions carefully before the first use of the product. This manual should
be kept for future use.
WICHTIG! Wir bitten um genaues Durchlesen dieser Bedienungsanleitung vor der ersten Anwendung des
Produkts. Die Bedienungsanleitung ist für den Fall der Notwendigkeit ihrer erneuten Nutzung aufzubewahren.
www.caretero.pl

Dziękujemy za zakup fotelika samochodowego Caretero HUGGI.
Kupili Państwo nowoczesny produkt wysokiej jakości.
Jesteśmy przekonani, że zapewni on Państwa maluchowi bezpieczeństwo i pomoże
w jego harmonijnym rozwoju.
Zachęcamy do zapoznania się z naszą kompletną ofertą na stronie www.caretero.pl.
Czekamy również na wszelkie uwagi dotyczące użytkowania naszych produktów.
Zespół marki Caretero.
Thank you for choosing the Caretero HUGGI car seat.
You purchased a modern and high-quality product.
We are sure that it will provide your child with safety and will ensure hir or her
proper, harmonous growth.
We encourage you to learn about our full offer by visiting our website
www.caretero.pl.
We are also eager to hear your opinions on our products. Should you have any
remarks, feel free to share them with us.
Caretero brand Team.
Wir danken Ihnen für den Kauf des Kindersitzes Caretero HUGGI.
Sie haben ein modernes Produkt von hoher Qualität erworben.
Wir sind überzeugt, dass es Ihrem Kind Sicherheit garantiert und es bei der
harmonischen Entwicklung unterstützt. Wir laden Sie herzlich dazu ein, sich mit
unserem vollständigen Angebot auf der Website www.caretero.pl bekannt zu
machen. Außerdem nehmen wir gern Anmerkungen und Hinweise zur Nutzung
unserer Produkte entgegen.
Caretero Mannschaft.

1ELEMENTY FOTELIKA/CAR SEAT ELEMENTS/AUFBAU DES AUTOSITZES
1. Przycisk regulacji wysokości zagłówka/
headrest height adjustment button/
Knopf zur Höhenverstellung der Kopfstütze
2. Zagłówek/headrest/Kopfstütze
3. Oparcie/backrest/Rückenlehne
4. Zaczepy ISOFIX/ISOFIX anchor/Isofix-Raste-
rarme
5. Siedzisko/seat/Sitz
6. Prowadnica pasa piersiowego/shoulder belt
guide/Diagonalgurt-Führung
7. Tapicerka/upholstery/Polsterung
8. Prowadnica pasa biodrowego/lap belt
guide/Beckengurt-Führung
9. Uchwyt do przenoszenia/carrying handle/Tra-
gegriff
10. Prowadnica pasa biodrowego/lap belt
guide/Beckengurt-Führung
11. Nakładka na pas piersiowy/shoulder belt
pad/Diagonalgurtauflage
1
9
5
10
11

2
4.1
3.2
3.1
3.3
4.2 4.3

3
5.2
5.3 5.4
5.5 5.6
5.1
up

4
6.2
6.1
6.3 6.4
5.7 5.8

5
7.1
7.2 7.3
6.5
6.7
6.6
CLICK

6
2WSKAZÓWKI BEZPIECZEŃSTWA
PONIŻSZE INSTRUKCJE OBSŁUGI SĄ WAŻNE.
PRZED UŻYTKOWANIEM NALEŻY PRZECZYTAĆ NINIEJSZĄ INSTRUKCJĘ I ZACHOWAĆ JĄ NA PRZYSZŁOŚĆ.
BEZPIECZEŃSTWO DZIECKA MOŻE BYĆ ZAGROŻONE, JEŚLI ZALECENIA NINIEJSZEJ INSTRUKCJI NIE BĘDĄ
STOSOWANE.
Dziecięcy fotelik samochodowy - grupa II, III, odpowiedni dla dzieci o wadze od 15 do 36 kg (w przybliże-
niu od 4 do 12 lat).
UWAGA!!!
1. Jest to „Uniwersalne" ograniczenie dotyczące fotelików dziecięcych, zgodne z Przepisem ECE (Europejska Komisja
Gospodarcza ONZ) 44.04 dotyczącym ogólnego użytkowania fotelików w pojazdach. Foteliki tego typu pasują do
większości siedzeń samochodowych.
2. Odpowiedni montaż fotelika w samochodzie możliwy jest, jeśli producent samochodu zadeklarował w instrukcji
obsługi pojazdu, że pojazd jest przystosowany do „Uniwersalnych" ograniczeń dotyczących fotelików dziecięcych tej
grupy.
3. Ograniczenie to funkcjonuje jako „Uniwersalne" na surowszych warunkach niż te zastosowane wobec wcześniej-
szych modeli, które nie posiadały tej adnotacji.
4. W razie wątpliwości należy skontaktować się z producentem albo sprzedawcą detalicznym.
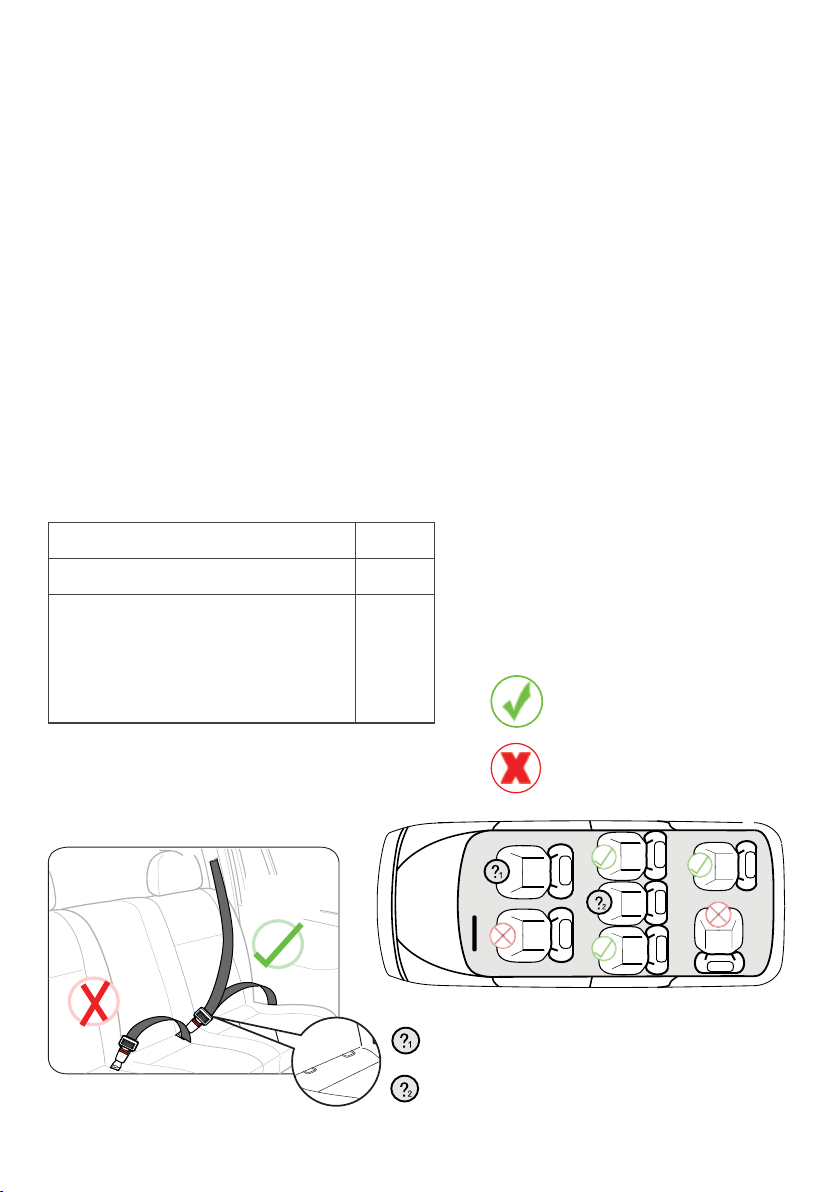
Fotelik tego typu nadaje się tylko do pojazdu wyposażonego w pasy bezpieczeństwa z 3-punktową blokadą i 3-punkto-
wym elementem zwijającym, co jest zgodne z Przepisem UN/ECE nr 16 lub innymi równoznacznymi standardami.
NIEBEZPIECZEŃSTWO! Dla ochrony dziecka:
• Stosować fotelik Caretero Huggi wyłącznie do zabezpieczenia dziecka w pojeździe.
• Fotelik samochodowy należy montować w grupie II oraz III (15-36kg) jedynie przodem do kierunku jazdy używając
do tego 3-stopniowego pasa bezpieczeństwa na biodra i ukośnego na klatkę piersiową lub 3-stopniowego pasa
bezpieczeństwa na biodra i ukośnego na klatkę piersiową oraz zaczepów ISOFIX.
• Nie należy umieszczać fotelika na siedzeniu z włączoną poduszką powietrzną.
• Przed każdą podróżą należy sprawdzić, czy fotelik samochodowy jest dobrze umocowany.
• Najbezpieczniejszym miejscem do montażu fotelika w samochodzie jest tylne siedzenie.
• Należy upewnić się, że wszystkie elementy są zapięte prawidłowo, a fotelik nie jest zatrzaśnięty przez składane
siedzenia lub drzwi.
• Fotelik nie może być używany, jeśli szelki zabezpieczające dziecko w foteliku nie zostały poprawnie zapięte.
• Nie wolno używać ani przewozić fotelika bez zapięcia go na siedzeniu samochodu.
• Nie należy używać kontaktowych punktów nośnych innych niż te opisane w instrukcji i oznaczone na foteliku
samochodowym dla dziecka.
• Zabrania się użytkowania fotelika w domu jako siedziska lub zabawki.
• Podczas wypadku, w przypadku którego prędkość w chwili uderzenia przekracza 10 km/h, może dojść do
uszkodzenia fotelika, które niekoniecznie musi być widoczne. W takim przypadku fotelik należy wymienić.
• Należy pamiętać o prawidłowym przeprowadzeniu utylizacji.
• Zawsze zlecać kontrolę fotelika dla dziecka w przypadku jego uszkodzenia (np. upadku na ziemię).
• Regularnie sprawdzać wszystkie istotne elementy fotelika pod kątem uszkodzeń. Upewnić się, że w szczególności
wszystkie części mechaniczne są w pełni funkcjonalne.
• Zabrania się smarowania jakichkolwiek części fotelika.
• Nigdy nie pozostawiać dziecka znajdującego się w foteliku w pojeździe bez opieki.
• Dopilnować, aby dziecko wsiadało i wysiadało z pojazdu wyłącznie od strony chodnika.
• Chronić fotelik dla dziecka przed nadmiernym działaniem promieni słonecznych, gdy nie jest użytkowany.
• Fotelik dziecięcy może się bardzo nagrzać w wyniku bezpośredniego działania promieni słonecznych. Skóra dziecka
jest bardzo delikatna i może zostać w łatwy sposób uszkodzona.
• Im ciaśniej pasy przylegają do ciała dziecka, tym większy jest jego poziom bezpieczeństwa. Dlatego też należy uniknąć
zakładania dziecku grubej odzieży.
• Robić regularnie odpoczynki w trakcie dłuższych podróży, aby dać dziecku możliwość zabawy po wyjęciu go z fotelika.
• Użycie na tylnym siedzeniu: Przesunąć przednie siedzenie do przodu na tyle, aby dziecko nie sięgało stopami do
oparcia przedniego siedzenia (aby uniknąć niebezpieczeństwa zranienia).

7
OSTRZEŻENIE! Dla bezpieczeństwa mocującego fotelik:
• Przy otwieraniu lub zamykaniu nic nie może wejść pomiędzy siedzisko i podstawę fotelika. Mogłoby to doprowadzić
do przycięcia palców.
• W celu uniknięcia uszkodzeń uważać, aby nie zaklinować fotelika pomiędzy twardymi elementami pojazdu (drzwi,
prowadnice siedzenia itp.).
• Przechowywać fotelik dla dziecka w bezpiecznym miejscu jeżeli nie jest użytkowany. Unikać kładzenia na nim ciężkich
przedmiotów i nie przechowywać w pobliżu źródeł ciepła lub w bezpośrednim nasłonecznieniu.
OSTRZEŻENIE! Dla ochrony pojazdu:
• Na niektórych obiciach siedzeń samochodowych wykonanych z delikatnego materiału (np. z weluru, skóry itp.)
mogą wystąpić ślady zużycia powstałe na skutek użytkowania fotelika. W celu zapewnienia odpowiedniej ochrony
obić foteli, zalecamy stosowanie ochraniaczy na siedzenia samochodowe z oferty Akcesoria Caretero.
Nie umieszczaj fotelika na siedzisku z aktywną
poduszką powietrzną.
Dozwolone użytkowanie wyłacznie na siedzisku
wyposażonym w pas 3-punktowy.
Pas biodrowy
Pas biodrowy
i piersiowy
NIEBEZPIECZEŃSTWO!
W razie jakichkolwiek modyfikacji fotelika certyfikacja zostanie unieważniona.
Tylko producent ma prawo do wprowadzania zmian do fotelika bezpieczeństwa.
NIEBEZPIECZEŃSTWO!
Prosimy postępować zgodnie z instrukcjami dotyczącymi korzystania z systemów zabezpieczających dzieci w instrukcji
użytkownika danego pojazdu.
Fotelik może być instalowany w następujących konfiguracjach:
Zgodnie z kierunkiem jazdy Tak
W kierunku przeciwnym do kierunku jazdy Nie
Na fotelach wyposażonych w systemy moco-
wania ISOFIX (znajdujące się pomiędzy sie-
dzeniem, a oparciem fotela samochodowego) Tak 1)
oraz 3-punktowe pasy samochodowe
Należy przestrzegać stosownych przepisów obowiązujących na terenie danego kraju.
1) W przypadku przedniej poduszki powietrznej -
przesunąć siedzenie pasażera daleko do tyłu, postępując zgodnie
z instrukcją użytkowania pojazdu.
Montaż poprawny
Montaż niedozwolony

8
7DEMONTAŻ TAPICERKI
Demontaż tapicerki zobrazowany jest na ilustracjach 7.1-7.3.
Ponowna instalacja tapicerki odbywa się w odwrotnej kolejności.
8 CZYSZCZENIE I KONSERWACJA
Należy pamiętać, aby stosować wyłącznie oryginalny pokrowiec (tapicerkę) Caretero Huggi, ponieważ stanowi on
integralny element fotelika i odgrywa ważną rolę w prawidłowym jego funkcjonowaniu.
• zabronione jest używanie fotelika dziecięcego bez pokrowca
• zalecane jest pranie ręczne pokrowca w wodzie z dodatkiem delikatnego detergentu (w temperaturze do 30°C)
• elementy z tworzywa sztucznego można czyścić, używając wody z mydłem (zabrania się stosowania agresywnych
• środków czyszczących, np.: rozpuszczalników)
• pasy można czyścić przy użyciu letniej wody z mydłem
• wkładki naramienne można czyścić przy użyciu letniej wody z mydłem
• części plastikowe fotelika należy czyścić wilgotną szmatką
• nie wolno używać silnych detergentów do czyszczenia elementów plastikowych fotelika, gdyż może to prowadzić do
• degradacji i uszkodzenia tych elementów
Nakładka na pas piersowy ma na celu zapewnić prawidłowy przebieg pasa oraz lepiej rozłożyć siły działające na
dziecko podczas hamowania czy kolizji. Nakładka znajduje się z tyłu oparcia fotelika (4.1). Przeprowadź nakładkę przez
szczelinę pod zagłowkiem od strony napinacza pasów samochodowych (4.2). Rozepnij zapięcie nakładki i umieść w
niej pas piersiowy (4.3). Zapnij zapięcie nakładki.
4UŻYCIE NAKŁADKI NA PAS BEZPIECZEŃSTWA
6INSTALACJA W GRUPIE II, III (15-36 kg) ZA POMOCĄ PASÓW
3REGULACJA WYSOKOŚCI ZAGŁÓWKA
Wysokość zagłówka należy dostosować do wzrostu dziecka tak, aby prowadnice pasa piersiowego znajdowały się tuż
nad linią barków dziecka, a głowa dziecka znajdowała się na środku zagłowka (3.3).
Aby wyregulować wysokość zagłówka, wciśnij przycisk znajdujący się na górze zagłowka i przesuń zagłówek do góry
lub na dół. Puść przycisk aby zablokować pozycję zagłówka (3.1, 3.2).
Przed instalacją załóż plastikowe nakładki na zaczepy na kotwice ISOFIX w samochodzie (5.1). Ułatwi to prawidłowy
montaż fotelika. Wysuń zaczepy isofix poprzez wciśnięcie przycisku znajdującego się po bokach prowadnic na foteliku
i przesunięcie szyny z zaczepem do tyłu fotelika (5.2). Wsuń zaczepy ISOFIX w kotwice ISOFIX znajdujące się w
samochodzie (5.3). Prawidłowe zamocowanie zostanie zasygnalizowane 'kliknięciem' (5.4) oraz zmianą koloru
wskaźnika prawidłowego montażu z czerwonego na zielony (5.5). Jeśli mimo wsunięcia zaczepu, kolor wskaźnika nie
zmienił się na zielony, wyjmij zaczepy poprzez wciśnięcie przycisku na prowadnicy i wyjmij zaczepy z kotwic. Spróbuj
ponownie wsunąć zaczepy. Po zamocowaniu zaczepów ISOFIX, mocno dociśnij fotelik do oparcia fotelika samocho-
dowego (5.6).
Aby dokończyć prawidłową instalację fotelika, postępuj zgodnie z punktem 6.
Wyjmowanie zaczepów ISOFIX następuje poprzez wciśnięcie przycisków znajdujących się z boku prowadnic po
bokach fotelika, odpowiadających za zwolnienie blokad (5.7) i pociągnięcie fotelika do siebie (5.8).
5INSTALACJA FOTELIKA Z UŻYCIEM ISOFIX (OPCJA)
Umieść fotelik na siedzisku fotela samochodowego. Posadź dziecko w foteliku (6.1). Dopasuj wysokość zagłówka do
wzrostu dziecka (Patrz pkt. 3). Przeciągnij 3-punktowy pas samochodowy przed dzieckiem (6.2). Upewnij się, że pas
biodrowy przebiega nad prowadnicami po bokach siedziska, pod podłokietnikami (6.3). Umieść górną część pasa
piersiowego w prowadnicy w zagłówku po stronie napinacza pasów samochodowych (6.4). Umieść nakładkę na pas
na ramieniu dziecka (6.5). Zapnij klamrę pasa w sprzączce (6.6). Napnij pasy pociągając pas piersiowy w kierunku
napinacza pasów samochodowych (6.7).

9
2SAFETY INSTRUCTIONS
THE INSTRUCTIONS BELOW ARE IMPORTANT.
PLEASE READ THESE INSTRUCTION CAREFULLY AND KEEP IT FOR FUTURE REFERENCE. THE SAFETY OF
YOUR CHILD MAY BE IN DANGER IF THESE INSTRUCTIONS WILL NOT BE COMPLIED WITH.
WARNING!
Only suitable for use in vehicles fitted with approved 3-point safety belts that conform with ECE Regulation No. 16 or
comparable standards.
This is a seat in the Weight Class II, III for babies from 4 to about 12 years weighing from 15 up to 36 kgs.
These Assembly and Usage Instructions must be given to the client.
Subject to printing errors, mistakes and technical changes.
WARNING! For the safety of the person installing the car seat:
• The shoulder belt pads are important in keeping the child safe. Please use them at all times.
• While installing or uninstalling the seat no object may be able to slide between the car seat and the child seat base.
It could trap the person’s fingers.
• In orded to avoid damage, take care not to jam the seat between solid elements of the car (doors, seat guides etc.).
• Store the car seat in a safe place when not in use. Avoid putting heavy objects on the seat and do not store near heat
sources or in direct sunlight.
WARNING! For the safety of the car:
• Some car seat covers are made of delicate fabrics (velour, leather etc.) and may become worn-out due to the child
seat use. In order to protect the upholstery, we recommend using car seat covers available as accessories.
DANGER! For the safety of your child:
• Please use the Caretero Huggi seat only to secure your child in the car.
• The seat is to be installed forward-facing with a 3-point car safety belt or with a 3-point car safety belts and ISOFIX
anchors for weight groups II and III (15-36 kg) only.
• It is forbidden to use the car seat as a chair or a toy.
• During a car crash at speed higher than 10 km/h the car seat may become damaged without clear visual marks. In
such case the car seat should be scrapped and replaced with a new one.
• Please remember to recycle the seat properly when it won’t be used anymore.
• Commision a full check of the car seat after a possible damaging (eg. when the seat falls to the ground).
• Regularly check all vital elements of the car seat for signs of damage. Make sure all mechanical parts of the seat are
functioning properly.
• It is forbidden to lubricate any parts of the seat.
• Check if the car seat is installed properly before each trip.
• Do not use or transport the car seat when it is not properly installed in the car.
• Do not use other fixing points other than those described in this manual and marked on the car seat itself.
• Regularly check the seat belts, especially the fixing points, stitchings and adjustment devices.
• Never leave the child in the car seat unattended.
• Make sure that the child enters and exits the car on the sidewalk side of the street.
• Protect the car seat against sunlight while it’s not in use.
• The car seat may become very hot while under direct sunlight. The child’s skin is very delicate and may become
easily damaged during contact with a hot car seat.
• The closer the car seat belts are to the child’s body, the higher the safety level. Therefore do not put thick clothes on
the child.
• Make regular stops during longer trips, so the child may play and rest after removing it from the car seat.
• When using the car seat in the rear passenger seats: slide the front passenger seat to the front, so the child will not
reach the backrest with its feet (this will prevent from damaging the legs during an accident).
• Not complying with these instruction may cause danger.

10
This car seat has been designed, tested and certified according to the European Norm for baby car seats (ECE R
44/04). The evaluation mark E(in a circle) and the certificate number are located on an orange sticker placed on the
seat shell.
DANGER!
In case of any modifications done to the car seat, the warranty will become void.
Only the manufacturer may apply any changes to the car seat.
DANGER!
Please comply with safety regulations present in your car manual.
The child seat may be installed in the following configurations:
Forward-facing Yes
Rearward-facing No
On car seats equipped with ISOFIX
(found between the seating and backrest of Yes1)
a car seat) and 3-point car safety belts
Regulations obligatory in the territory of a given country must be obeyed.
1) In case of presence of a frontal airbag -
move the passenger car seat as far back as possible.
DANGER! For the safety of car passengers.
In case of an accident or emergency braking, persons or objects that are not secured properly, may damage other
users of the car. Therefore it is important to ensure the following:
• The backrests of the seats are fixed (make sure the foldable rear seat backrests have been locked properly).
• All heavy objects or objects with sharp edges have been secured (eg. objects on the rear window shelf are not
loose).
• All persons in the car have fastened their seat belts.
• The child seat is always secured, even when there is no child in the seat.
Installation of the child seat is FORBIDDEN if the
passenger seat is equipped with a 2-point seat belt
only.
Installation of the child seat is not recommended if the
passenger seat airbag is active.
Proper placement
Forbidden placement
3-point
shoulder
and lap belts
2-point
lap belt

11
7REMOVING THE UPHOLSTERY
To remove the upholstery, follow the guides shown in pictures 7.1-7.3.
To install the upholstery again, follow the same steps in reversed order.
8 CLEANING AND MAINTENANCE
Remember to ONLY use the original upholstery for the Caretero Huggi seat, as it is an integral part of the seat and
plays an important role in its proper functioning.
The upholstery may be removed for washing (hand wash or machine wash - delicate fabrics programme, max 30°C).
Do not tumble dry. Use only mild detergents.
Plastic parts of the seat may be cleaned with a damp cloth with addition of soap.
Never use strong detergenst such as bleaches etc.
Never iron the uphostery.
The belt pad is to ensure a proper placement of the shoulder belt and reduce the forces that are applied on the child.
The belt pad is located at the back of the backrest (4.1). Thread the belt pad through the slot in the headrest on the
side of the car belt tensioner (4.2). Unfasten the pad and place the car shoulder belt inside (4.3). Fasten the belt pad
again.
4USING THE PAD FOR CAR SAFETY BELT
6INSTALLATION FOR GROUPS II, III (15-36 kg)
3HEADREST HEIGHT ADJUSTMENT
The headrest height needs to be adjusted in such a way that the shoulder belt guides should be placed just above
the child’s shoulders and the child’s head should be located in the middle of the headrest (3.3).
To adjust the headrest height, press the red button on top of the headrest and move the headrest up or down.
Release the button to secure the headrest’s position (3.1, 3.2).
Before the installation, place the plastic ISOFIX guides onto the ISOFIX fixing points in the car (5.1). This will make
the installation easier. Slide the ISOFIX anchors out by pressing buttons on the sides of the anchor rails (5.2). Insert
the tips of the ISOFIX anchors into the ISOFIX fixing points in the car (5.3). The correct locking of the ISOFIX
anchors will be indicated by a click (5.4) and a change of the installation indicator to green (5.5). If the indicator will
not turn green, release the ISOFIX anchors by pressing buttons on the sides of the anchor rails and remove the
anchors. Try to install the seat again. After the ISOFIX anchors lock, push the seat against the backrest (5.6).
To continue the installation, follow the steps described in point 6.
To remove the seat, release the ISOFIX anchors by pressing buttons on the sides of the anchor rails (5.7) and pulling
the seat forwards (5.8).
5ISOFIX INSTALLATION (OPTION)
Place the seat on a passenger seat. Place the child in the seat (6.1). Adjust the headrest height (see point 3).
Thread the 3-point car belt in front of the child (6.2). Make sure the lap belt is placed on the lap belt guides under the
armrests (6.3). Place the top part of the shoulder belt in the upper belt guide on the side of the car belt tensioner
(6.4). Place the belt pad on the child’s shoulder (6.5). Fasten the car safety belts (6.6). Tighten the belts by pulling
them towards the car belt tensioner (6.7).

12
2SICHERHEITSANWEISUNGEN
WICHTIG: FÜR SPÄTERES NACHSCHLAGEN AUFBEWAHREN!
UM DIE SICHERHEIT IHRES KINDES ZU GEWÄHRLEISTEN, LESEN SIE BITT E DIESE ANLEITUNG AUFMERK-
SAM, BEVOR SIE DAS PRODUKT VERWENDEN.
1. Dies ist ein „Universal“-Kinderrückhaltesystem. Es ist nach der Regulierung Nr. 44,04 inklusive aller Anhänge für den
allgemeinen Gebrauch in Fahrzeugen zugelassen und passt auf die meisten, aber nicht auf alle Fahrzeugsitze.
2. In Fahrzeugen, für die der Hersteller im Fahrzeughandbuch erklärt, dass das Fahrzeug für die Aufnahme von „Univer-
sal“ Kinderrückhaltesystemen für diese Altersgruppe vorbereitet ist, wird der Sitz sehr wahrscheinlich passen.
3. Die Einstufung dieses Kinder-Rückhaltesystems als „Universal“-Rückhaltesystem erfolgte unter strengeren
Bedingungen, als bei früheren Modellen, die nicht mit diesem Hinweis versehen sind.
4. Falls Sie Zweifel haben, fragen Sie bitte den Hersteller des Kinderrückhaltesystems oder den Händler.
Dieses Produkt ist eine universale Rückhalteeinrichtung und geeignet für Kinder mit einem Körpergewicht von 15 bis
36 kg (Gruppe II und III).
WARNUNG!
• Verwenden Sie diesen Kindersitz nicht zu Hause. Er ist nicht für die Verwendung im Haus vorgesehen und sollte nur
in einem Fahrzeug verwendet werden.
• Dieser Kindersitz kann mit 3-Punkt-Gurten oder mit 3-Punkt-Gurten und ISOFIX (Gruppe II, III, 15-36kg) in
Fahrt-richtung installiert werden.
• Lassen Sie Ihr Kind zu keiner Zeit unbeaufsichtigt, während es in diesem Kindersitz sitzt.
• Aus Sicherheitsgründen muss der Kindersitz in einem Fahrzeug gesichert werden, auch wenn Sie Ihr Kind nicht
in den Sitz setzen.
• Beachten Sie bitte, dass sämtliche Gurte nach unten gezogen werden müssen, damit das Becken sicher gehalten
wird. Sämtliche Gurte, mit denen das Kind gesichert wird, müssen an den Körper des Kindes angepasst werden.
Dabei ist sicherzustellen, dass die Gurte nicht verdreht sind.
• Um einem Sturz vorzubeugen, sollten Sie Ihr Kind immer mit den Gurten sichern, wenn Sie es in diesen Kindersitz
setzen.
• Das Kinderrückhaltesystem darf nicht ohne den Stoffbezug verwendet werden.
• Der Sitzbezug sollte mit keinem anderen als den vom Hersteller empfohlenen Bezügen ersetzt werden, da der
Bezug einen wesentlichen Teil der Rückhaltefunktion übernimmt.
• Die festen Teile sowie sämtliche Kunststoffteile des Kinder-Rückhaltesystems müssen so positioniert und installiert
werden, dass sie im täglichen Gebrauch des Fahrzeugs nicht von einem verschiebbaren Sitz oder einer Tür des
Fahrzeugs eingeklemmt werden können.
• Der Kindersitz darf nicht direkter Sonneneinstrahlung ausgesetzt werden, wenn der Sitz nicht mit einem textilen
Bezug ausgestattet ist. Andernfalls kann der Sitz zu heiß für die Haut Ihres Kindes werden.
• Wir empfehlen, diesen Kindersitz nach großen Belastungen bei einem Unfall zu ersetzen.
• Es ist gefährlich, die Rückhalteeinrichtung in irgendeiner Weise ohne Genehmigung der zuständigen Behörde zu
verändern, zu ergänzen und die vom Hersteller angegebenen Einbauanleitungen für Rückhalteeinrichtungen nicht
genau zu befolgen.
• Sichern Sie Gepäckstücke oder andere Gegenstände ausreichend, die im Falle eines Zusammenstoßes Verletzun-
gen verursachen könnten.
Der Auto-Kindersitz wurde gemäß Anforderungen der Europäischen Norm für Rückhaltesysteme für Kinder (ECE R
44/04) entwickelt, geprüft und zugelassen. Das Prüfzeichen E (in einem Kreis) und die Zulassungsnummer befinden
sich auf dem orangefarbenen Zulassungsetikett (Aufkleber am Auto-Kindersitz).
GEFAHR!
Diese Zulassung verliert ihre Gültigkeit, wenn Sie irgendwelche Änderungen am Kindersitz vornehmen. Änderungen
an dem Kindersitz darf ausschließlich der Hersteller vornehmen.
GEFAHR!
Verwenden Sie den Kindersitz ausschließlich nach den in der Betriebsanleitung des jeweiligen Fahrzeugs angeführten
Anweisungen für die Nutzung von Rückhaltesystemen für Kinder.

13
Die richtige
Platzierung
Platzierung Verboten
3-Punkt-
Schulter
und Beckengurte
2-Punkt-
Beckengurt
Der Kindersitz kann in folgenden Einbaurichtungen im Fahrzeug platziert werden:
In Fahrtrichtung Ja
Entgegen der Fahrtrichtung Nein
Auf Fahrzeugsitzen, die über Isofix-
Befestigungssysteme (zwischen Sitzfläche und
Rückenlehne des Fahrzeugs) Ja1)
Vorschriften im Hoheitsgebiet eines Landes zwingend zu beachten.
Der Einbau des Kindersitzes ist VERBOTEN, wenn
der Sitz nur über einen Beckengurt verfügt.
Der Kindersitz darf nicht eingebaut werden, wenn der
Frontairbag am Beifahrersitz aktiviert ist.

7ENTFERNEN DER POLSTERUNG
Um die Polsterung zu entfernen, folgen Sie den Richtlinien in Bildern 7.1-7.3.
Um die Polsterung wieder zu installieren, folgen Sie den gleichen Schritten in umgekehrter Reihenfolge.
8 REINIGUNG UND PFLEGE
Bitte sorgen Sie dafür, dass Sie ausschließlich Original-Sitzbezüge von Caretero Huggi verwenden, da der Sitzbezug
ein integraler Bestandteil des Auto-Kindersitzes ist und wichtige Funktionen zur Sicherstellung der einwandfreien
Funktionsweise des Systems erfüllt.
• Der Auto-Kindersitz darf nicht ohne Bezug verwendet werden.
• Der Bezug sollte von Hand mit einem milden Waschmittel (bei 30°C) gewaschen werden.
• Die Kunststoffteile können mit Seifenlauge gereinigt werden. (Verwenden Sie keine scharfen Reinigungsmittel wie
Lösungsmittel).
• Die Kunststoffteile des Kindersitzes können mit einem feuchten Tuch gereinigt werden.
• Verwenden Sie keine scharfen Reinigungsmittel zur Reinigung der Kunststoffteile des Kindersitzes, denn das kann
zur Beeinträchtigung und Beschädigung dieser Teile führen.
Die Gurtauflage sorgt für eine richtige Platzierung des Schultergurtes und reduziert die Kräfte, die auf das Kind
angewendet werden. Die Gurtauflage befindet sich auf der Rückseite der Rückenlehne (4.1). Führen Sie die
Gurtauflage durch den Schlitz in der Kopfstütze auf der Seite des Fahrzeuggurtstraffers (4.2). Öffnen Sie die
Gurtauflage und legen Sie den Auto Schultergurt innen (4.3). Schließen Sie die Gurtauflage wieder.
4VERWENDUNG DES GURTAUFLAGES FÜR DEN AUTOGURT
6INSTALLATION FÜR GRUPPEN II, III (15-36 kg)
3KOPFSTÜTZE HÖHENVERSTELLUNG
Die Kopfstützenhöhe muss so eingestellt werden, dass die Schultergurtführungen knapp über den Schultern des
Kindes liegen und der Kopf des Kindes in der Mitte der Kopfstütze liegen sollte (3.3).
Um die Kopfstützenhöhe einzustellen, drücken Sie die rote Taste oben auf die Kopfstütze und bewegen Sie die
Kopfstütze nach oben oder unten. Lassen Sie die Taste los, um die Position der Kopfstütze zu sichern (3.1, 3.2).
Vor dem Einbau stellen die ISOFIX Führungen auf die ISOFIX Befestigungspunkte im Auto (5.1). Schieben Sie die
ISOFIX-Anker heraus - drücken Sie die Knöpfe an den Seiten der Ankerschienen (5.2). Setzen Sie die Spitzen der
ISOFIX-Anker in die ISOFIX-Befestigungspunkte im Fahrzeug ein (5.3). Die korrekte Verriegelung der ISOFIX-Anker
wird durch einen Klick (5.4) und eine Änderung der Installationsanzeige auf grün (5.5) angezeigt. Wenn die Anzeige
nicht grün wird, lösen Sie die ISOFIX-Anker und entfernen Sie die Anker. Versuchen Sie den Sitz wieder zu
installieren. Nachdem die ISOFIX-Anker verriegelt sind, drücken Sie den Sitz gegen die Rückenlehne (5.6).
Um die Installation fortzusetzen, folgen Sie den in Punkt 6 beschriebenen Schritten.
Um den Sitz zu entfernen, lösen Sie die ISOFIX-Anker durch Drücken der Knöpfe an den Seiten der Ankerschienen
(5.7) und ziehen Sie den Sitz nach vorne (5.8).
5ISOFIX INSTALLATION (OPTIONAL)
Legen Sie den Autoitz auf den Beifahrersitz. Legen Sie das Kind in den Sitz (6.1). Stellen Sie die Kopfstützenhöhe
ein (siehe Punkt 3). Führen Sie den 3-Punkt-Gürtel vor dem Kind (6.2). Vergewissern Sie sich, dass der Beckengurt
auf den Beckengurtführungen unter den Armlehnen platziert ist (6.3). Legen Sie den oberen Teil des Schultergurtes
in die obere Gürtelführung auf der Seite des Fahrzeuggurtstraffers (6.4). Lege die Gurtanlage auf die Schulter des
Kindes (6.5). Befestigen Sie die Autosicherheitsgurte (6.6). Ziehen Sie die Gurte in Richtung des Gurtstraffers, um
sie festzuziehen (6.7).
Stellen Sie sicher, dass die Gurte nicht verdreht sind.
14

KARTA GWARANCYJNA
www.caretero.pl
Imię:
Nazwisko:
Kod pocztowy:
Miejscowość:
Telefon (wraz z kierunkowym):
Adres e-mail:
Produkt:
Model:
Kolor/wzór:
Akcesoria:
Data zakupu:
Kupujący (podpis):
Sprzedawca:
Dowiedz się więcej o tym produkcie i marce Caretero.
DYSTRYBUTOREM MARKI JEST:
IKS 2 Mucha Sp. J.
ul. Rybnicka 9, 43-190 Mikołów, Polska
+48 32 226 06 06
e-mail: caretero@caretero.pl, www.caretero.pl

WARUNKI GWARANCJI
data sprzedaży
IKS 2 Mucha Sp. J. udziela gwarancji na zakupiony produkt w okresie 12 miesięcy od daty zakupu.
Gwarant zapewnia nabywcy prawidłowe działanie produktu przy użytkowaniu zgodnym z jego przeznaczeniem
i instrukcją użytkowania.
Wady produktu wykryte w okresie gwarancji będą bezpłatnie usuwane w terminie 21 dni od daty dostarczenia
go, za pośrednictwem Sprzedawcy, do Serwisu. Okres gwarancji zostanie przedłużony o czas naprawy.
W przypadku wykrycia wady lub wystąpienia problemów z użytkowaniem, należy zwrócić się do punktu sprzedaży
detalicznej z reklamowanym produktem, wypełnioną kartą gwarancyjną oraz przypiętym paragonem lub innym
dowodem zakupu.
Reklamowany produkt należy oddać do naprawy w stanie czystym.
Podstawowym sposobem załatwienia reklamacji jest naprawa produktu przywracająca jego wartość użytkową.
Fakt i datę wykonania naprawy gwarancyjnej Serwis poświadcza na uniwersalnej karcie gwarancyjnej.
Gwarancja obowiązuje na terenie Rzeczypospolitej Polskiej.
Gwarancja przysługuje jedynie pierwotnemu nabywcy i nie podlega przeniesieniu na inne osoby lub podmioty.
Gwarancja na sprzedany produkt nie wyłącza, nie ogranicza ani nie zawiesza uprawnień kupującego wynikających
z niezgodności towaru z umową.
Wszelkie inne sprawy i spory będą rozstrzygane przez odpowiedni sąd.
Zalecamy przechowywanie oryginalnego opakowania w celu zabezpieczenia produktu przed uszkodzeniami
mogącymi nastąpić podsczas transportu do Serwisu.
Gwarancja nie obejmuje:
•uszkodzeń powstałych w wyniku niewłaściwego przechowywania
•uszkodzeń mechanicznych i termicznych powstałych w wyniku niewłaściwego użytkowania, bądź użytkowania
niezgodnego z instrukcją użytkowania
•zmiany koloru (odbarwienia) tkaniny przy silnym nasłonecznieniu lub stosowaniu niewłaściwych środków
chemicznych
•rozdarcia tkaniny wynikającego z winy nabywcy
•naturalnego zużycia elementów będącego wynikiem eksploatacji
•sytuacji, w której produkt nie został dostarczony do Serwisu w komplecie z oryginalnym dowodem zakupu
•uszkodzeń powstałych w wyniku upadku
•prób naprawy produktu lub jakichkolwiek zmian konstrukcyjnych wykonywanych przez osoby trzecie
1.
2.
3.
4.
5.
6.
7.
8.
9.
10.
11.
12.
13.
pieczątka i podpis sprzedawcy
pieczątka serwisudata naprawydata zgłoszenia opis uszkodzenia


Dowiedz się więcej o tym produkcie i marce Caretero.
DYSTRYBUTOREM MARKI JEST:
IKS 2 - Centrum Dystrybucji Artykułów Dziecięcych
ul. Rybnicka 9, 43-190 Mikołów, Polska
+48 32 226 06 06
e-mail: caretero@caretero.pl, www.caretero.pl
www.facebook.com/CareteroBrand •www.youtube.com/CareteroChannel
Learn more about brand Caretero.
Scan the code QR.
DISTRIBUTOR:
IKS 2 - Children’s Goods Distribution Centre
9 Rybnicka Street, 43-190 Mikolow, Poland
+48 32 226 06 06
e-mail: caretero@caretero.pl, www.caretero.pl
Erfahren Sie mehr über das Produkt und die Marke!
Scannen Sie den QR -Code
VERTREIBER:
IKS 2 - Children’s Goods Distribution Centre
9 Rybnicka Str., 43-190 Mikolow, Polen
+48 32 226 06 06
e-mail: caretero@caretero.pl, www.caretero.pl
Table of contents
Languages:
Other Caretero Car Seat manuals

Caretero
Caretero Sport Classic User manual

Caretero
Caretero Mokki User manual

Caretero
Caretero KAMPTOS User manual

Caretero
Caretero DIABLO XL User manual

Caretero
Caretero FALCON FRESH User manual

Caretero
Caretero Mokki User manual

Caretero
Caretero EGIS User manual

Caretero
Caretero VOLANTE FIX User manual

Caretero
Caretero Vivo Fresh User manual

Caretero
Caretero NIMBUS User manual