Caretero FALCON FRESH User manual

FALCON FRESH
www.caretero.pl
FOTELIK SAMOCHODOWY/CAR SEAT/KINDERSITZ
WAŻNE! Prosimy o uważne przeczytanie niniejszej instrukcji użytkowania przed pierwszym użyciem produktu.
Instrukcję należy zachować na wypadek potrzeby ponownego z niej skorzystania.
IMPORTANT! Please read these instructions carefully before the first use of the product. This manual should
be kept for future use.
WICHTIG! Wir bitten um genaues Durchlesen dieser Bedienungsanleitung vor der ersten Anwendung des
Produkts. Die Bedienungsanleitung ist für den Fall der Notwendigkeit ihrer erneuten Nutzung aufzubewahren.
INSTRUKCJA UŻYTKOWANIA/USER MANUAL/
BEDIENUNGSANLEITUNG

Dziękujemy za zakup fotelika samochodowego Caretero Falcon Fresh.
Kupili Państwo nowoczesny produkt wysokiej jakości.
Jesteśmy przekonani, że zapewni on Państwa maluchowi bezpieczeństwo i pomoże
w jego harmonijnym rozwoju.
Zachęcamy do zapoznania się z naszą kompletną ofertą na stronie www.caretero.pl.
Czekamy również na wszelkie uwagi dotyczące użytkowania naszych produktów.
Zespół marki Caretero.
Thank you for choosing the Caretero Falcon Fresh car seat.
You purchased a modern and high-quality product.
We are sure that it will provide your child with safety and will ensure hir or her
proper, harmonous growth.
We encourage you to learn about our full offer by visiting our website
www.caretero.pl.
We are also eager to hear your opinions on our products. Should you have any
remarks, feel free to share them with us.
Caretero brand Team.
Wir danken Ihnen für den Kauf des Kindersitzes Caretero Falcon Fresh.
Sie haben ein modernes Produkt von hoher Qualität erworben.
Wir sind überzeugt, dass es Ihrem Kind Sicherheit garantiert und es bei der
harmonischen Entwicklung unterstützt. Wir laden Sie herzlich dazu ein, sich mit
unserem vollständigen Angebot auf der Website www.caretero.pl bekannt zu
machen. Außerdem nehmen wir gern Anmerkungen und Hinweise zur Nutzung
unserer Produkte entgegen.
Caretero Mannschaft.

2
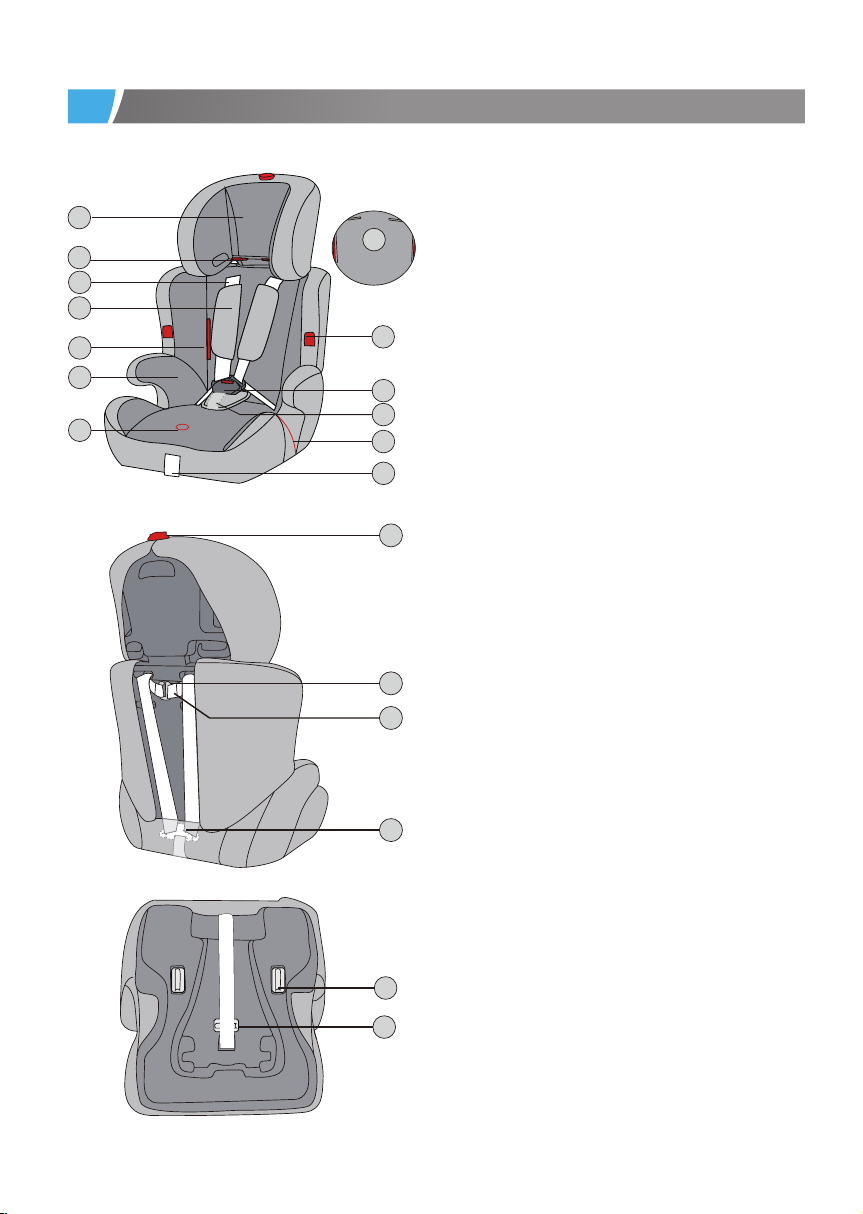
1. Zagłówek/headrest/Kopfstütze
2. Prowadnica pasa piersiowego (Grupa II) /Shoulder belt
guide (Group II) /Schultergurtführung (Gruppe II)
3. Pasy naramienne/shoulder belts/Schultergurte
4. Nakładki naramienne/shoulder pads/Schultergurtpolster
5. Szczelina boczna na pas/Side slot for belt/ Seitlicher
Schlitz für Gürtel
6. Podłokietnik/armrest/Armlehne
7. Przycisk luzowania pasów naramiennych/5-point belt
loosening button/Taste zur Lockerung des Schultergurts
8. Pasek do napinania pasów naramiennych/
5-point belt tightening strap/Spanngurt für die Schultergurte
9. Prowadnica pasa biodrowego/Shoulder belt guide/
Beckengurt-Führung
10. Nakładka na pas krokowy/crotch pad/Schrittgurtpolster
11. Klamra pasów naramiennych/shoulder belt
buckle/Schultergurt-Schlosszunge
12. Prowadnica pasa piersiowego (Grupa I) /Shoulder belt
guide (Group I) /Schultergurtführung (Gruppe I)
13. Szczeliny na pasy naramienne/Slots for shoulder
belts/Schlitze für Schultergurte
14. Dźwignia regulacji wysokości zagłówka/Headrest height
adjustment lever/Höhenverstellbare Kopfstütze Hebel
15. Łącznik pasów naramiennych/Shoulder belt connector/
Schultergurtanschluss
16. Końcówki pasów naramiennych/The ends of the
shoulder belts/Die Enden der Schultergurte
17. Metalowy łącznik pasów/Metal belt yoke/Riemenbügel
aus Metall
18. Zaczep pasa naramiennego/Retainer for shoulder belt/
Halter für Schultergurt
19. Zaczep pasa krokowego/Retainer for crotch belt/ Halter
für Schrittgurt
1ELEMENTY FOTELIKA/CAR SEAT ELEMENTS/LISTE DER BAUTEILE
1
2
3
4
5
6
7
8
9
10
11
12
14
13
15
16
17
19
18

3
9-18 KG - GROUP I 15-36 KG - GROUP II,III
22-36 KG - GROUP III

4
A-4
A-3
A-6
A-5
A-2A-1

5
B-4
B-3
B-2B-1
B-5

6
14
C-4
C-3
C-2C-1

7
D-4
D-3
D-6
D-5
D-2D-1

8
E-1 E-2 E-3
F-1 F-2 F-3

9
G-1 G-2 G-3
G-4 G-5 G-6
H-1 H-2

10
2WSKAZÓWKI BEZPIECZEŃSTWA
PONIŻSZE INSTRUKCJE OBSŁUGI SĄ WAŻNE.
PRZED UŻYTKOWANIEM NALEŻY PRZECZYTAĆ NINIEJSZĄ INSTRUKCJĘ I ZACHOWAĆ JĄ NA PRZYSZŁOŚĆ.
BEZPIECZEŃSTWO DZIECKA MOŻE BYĆ ZAGROŻONE, JEŚLI ZALECENIA NINIEJSZEJ INSTRUKCJI NIE BĘDĄ
STOSOWANE.
UWAGA!!!
1. Jest to „Uniwersalne" ograniczenie dotyczące fotelików dziecięcych, zgodne z Przepisem ECE (Europejska Komisja
Gospodarcza ONZ) 44.04 dotyczącym ogólnego użytkowania fotelików w pojazdach. Foteliki tego typu pasują do
większości siedzeń samochodowych.
2. Odpowiedni montaż fotelika w samochodzie możliwy jest, jeśli producent samochodu zadeklarował w instrukcji
obsługi pojazdu, że pojazd jest przystosowany do „Uniwersalnych" ograniczeń dotyczących fotelików dziecięcych tej
grupy.
3. Ograniczenie to funkcjonuje jako „Uniwersalne" na surowszych warunkach niż te zastosowane wobec wcześniej-
szych modeli, które nie posiadały tej adnotacji.
4. W razie wątpliwości należy skontaktować się z producentem albo sprzedawcą detalicznym.
Fotelik tego typu nadaje się tylko do pojazdu wyposażonego w pasy bezpieczeństwa z 3-punktową blokadą i 3-punkto-
wym elementem zwijającym, co jest zgodne z Przepisem UN/ECE nr 16 lub innymi równoznacznymi standardami.
OSTRZEŻENIE! Dla bezpieczeństwa mocującego fotelik:
• Przy otwieraniu lub zamykaniu nic nie może wejść pomiędzy siedzisko i podstawę fotelika. Mogłoby to doprowadzić
do przycięcia palców.
• W celu uniknięcia uszkodzeń uważać, aby nie zaklinować fotelika pomiędzy twardymi elementami pojazdu (drzwi,
prowadnice siedzenia itp.).
• Przechowywać fotelik dla dziecka w bezpiecznym miejscu jeżeli nie jest użytkowany. Unikać kładzenia na nim ciężkich
przedmiotów i nie przechowywać w pobliżu źródeł ciepła lub w bezpośrednim nasłonecznieniu.
OSTRZEŻENIE! Dla ochrony pojazdu:
• Na niektórych obiciach siedzeń samochodowych wykonanych z delikatnego materiału (np. z weluru, skóry itp.) mogą
wystąpić ślady zużycia powstałe na skutek użytkowania fotelika. W celu zapewnienia odpowiedniej ochrony obić foteli
zalecamy stosowanie ochraniaczy na siedzenia samochodowe z oferty Akcesoria Caretero.
OSTRZEŻENIE! Dla ochrony wszystkich pasażerów pojazdu.
W razie gwałtownego hamowania lub wypadku osoby lub przedmioty, które nie zostały odpowiednio zabezpieczone,
mogą być przyczyną urazów pozostałych pasażerów pojazdu. Z tego powodu należy się upewnić, że:
• Oparcia siedzeń pojazdu są zablokowane (np. upewnić się, że zatrzask na tylnym siedzeniu składanym jest
zablokowany).
• Wszelkie ciężkie lub posiadające ostre krawędzie przedmioty w pojeździe zostały zabezpieczone (np. przedmioty
znajdujące się na półce pod tylnym oknem).
• Wszystkie osoby w pojeździe mają zapięte pasy.
• Fotelik znajdujący się w samochodzie jest zawsze zabezpieczony, nawet jeśli dziecko nie znajduje się w foteliku.
NIEBEZPIECZEŃSTWO! Dla ochrony dziecka:
• Stosować fotelik Caretero Falcon Fresh wyłącznie do zabezpieczenia dziecka w pojeździe.
• Fotelik samochodowy dla dzieci o wadze od 9 do 18 kg (Grupa I) należy używać z pasami 5-punktowymi fotelika.
• Fotelik samochodowy należy montować jedynie przodem do kierunku jazdy, używając do tego 3-punktowego pasa
bezpieczeństwa na biodra i ukośnego na klatkę piersiową (Grupa I, II, III 9-36 kg)
• Nie należy umieszczać fotelika na siedzeniu z włączoną poduszką powietrzną.
• Przed każdą podróżą należy sprawdzić, czy fotelik samochodowy jest dobrze umocowany.
• Najbezpieczniejszym miejscem do montażu fotelika w samochodzie jest tylne siedzenie.
• Należy upewnić się, że wszystkie elementy są zapięte prawidłowo, a fotelik nie jest zatrzaśnięty przez składane
siedzenia lub drzwi.
• Fotelik nie może być używany, jeśli szelki zabezpieczające dziecko w foteliku nie zostały poprawnie zapięte.
• Nie wolno używać ani przewozić fotelika bez zapięcia go na siedzeniu samochodu.

3INFORMACJE OGÓLNE
Fotelik samochodowy został zaprojektowany, przetestowany i certyfikowany według wymogów Normy Europejskiej dla
sprzętu ochronnego dla dzieci (ECE R 44/04). Znak testowy E(w kółku) oraz numer certyfikacji są umieszczone na
pomarańczowej nalepce identyfikacyjnej (na foteliku).
NIEBEZPIECZEŃSTWO!
W razie jakichkolwiek modyfikacji fotelika certyfikacja zostanie unieważniona.
Tylko producent ma prawo do wprowadzania zmian do fotelika bezpieczeństwa.
NIEBEZPIECZEŃSTWO!
Prosimy postępować zgodnie z instrukcjami dotyczącymi korzystania z systemów zabezpieczających dzieci w instrukcji
użytkownika danego pojazdu.
11
• Nie należy używać kontaktowych punktów nośnych innych niż te opisane w instrukcji i oznaczone na foteliku
samochodowym dla dziecka.
• Nakładki na pasy są ważne dla bezpieczeństwa dziecka, prosimy o używanie ich przez cały czas.
• Należy okresowo sprawdzać pasy bezpieczeństwa, zwracając szczególną uwagę na punkty łączenia, szwy oraz
urządzenia regulujące.
• W nagłych przypadkach ważne jest szybkie odpięcie dziecka z fotelika. Oznacza to, że zapięcie szelek nie jest
bardzo odporne na manipulowanie przez dziecko. Należy nauczyć dziecko, aby nie bawiło się nim.
• Nie należy używać fotelika samochodowego, jeśli jego części uległy zniszczeniu lub poluzowały się po wypadku.
• Fotelika nie wolno używać bez pokrycia. Pokrycie fotelika nie może być zastąpione innym niż to rekomendowane
przez wytwórcę, ponieważ pokrycie jest integralną częścią fotelika.
• Nie zaleca się używania fotelików dłużej niż 5 lat od daty produkcji, gdyż niektóre właściwości produktu mogą ulec
zmianie (np. starzenie się plastiku).
• Zabrania się użytkowania fotelika w domu jako siedziska lub zabawki.
• Podczas wypadku, w przypadku którego prędkość w chwili uderzenia przekracza 10 km/h, może dojść do
uszkodzenia fotelika, które niekoniecznie musi być widoczne. W takim przypadku fotelik należy wymienić.
• Należy pamiętać o prawidłowym przeprowadzeniu utylizacji.
• Zawsze zlecać kontrolę fotelika dla dziecka w przypadku jego uszkodzenia (np. upadku na ziemię).
• Regularnie sprawdzać wszystkie istotne elementy fotelika pod kątem uszkodzeń. Upewnić się, że w szczególności
wszystkie części mechaniczne są w pełni funkcjonalne.
• Zabrania się smarowania jakichkolwiek części fotelika.
• Nigdy nie pozostawiać dziecka znajdującego się w foteliku w pojeździe bez opieki.
• Dopilnować, aby dziecko wsiadało i wysiadało z pojazdu wyłącznie od strony chodnika.
• Chronić fotelik dla dziecka przed nadmiernym działaniem promieni słonecznych, gdy nie jest użytkowany.
• Fotelik dziecięcy może się bardzo nagrzać w wyniku bezpośredniego działania promieni słonecznych. Skóra dziecka
jest bardzo delikatna i może zostać w łatwy sposób uszkodzona.
• Im ciaśniej uprząż przylega do ciała dziecka, tym większy jest jego poziom bezpieczeństwa. Dlatego też należy
uniknąć zakładania dziecku grubej odzieży.
• Robić regularnie odpoczynki w trakcie dłuższych podróży, aby dać dziecku możliwość zabawy po wyjęciu go z
fotelika.
• Użycie na tylnym siedzeniu: Przesunąć przednie siedzenie do przodu na tyle, aby dziecko nie sięgało stopami do
oparcia przedniego siedzenia (aby uniknąć niebezpieczeństwa zranienia).

12
4WSKAZÓWKI WŁAŚCIWEGO UMIEJSCOWIENIA FOTELIKA W SAMOCHODZIE
Fotelik tego typu nadaje się tylko
do pojazdu wyposażonego w pasy
bezpieczeństwa z 3-punktową blokadą
i 3-punktowym elementem zwijającym,
co jest zgodne z Przepisem UN/ECE nr 16
lub innymi równoznacznymi standardami.
Montaż poprawny Montaż niedozwolony
3-punktowy
pas piersiowy
z biodrowym
Montaż fotelika jest ZABRONIONY,
jeśli siedzisko jest wyposażone
tylko w pas biodrowy.
Nie należy montować fotelika, jeśli
poduszka powietrzna na przednim
fotelu pasażera jest aktywna.
?1
?2
?
2
?1
2-punktowy
pas biodrowy
5INSTALACJA FOTELIKA W GRUPIE I (9-18 kg)
Umieść fotelik na siedzeniu samochodowym przodem do kierunku jazdy. Przełóż pas samochodowy przez boczną
szczelinę na pas upewniając się ze pas znajduje się w prowadnicach (A-1). Wyjmij pas z tylnej strony fotelika i przełóż
go przez kolejną boczną szczelinę fotelika (A-2). Pociągnij pas, przełóż go przez prowadnice tak jak wskazano na
obrazku (A-3) a następnie przypnij fotelik pasem. Upewnij się ze pas nie jest skręcony. Dociągnij pas ramieniowy aby
upewnić się ze fotelik jest bezpiecznie zamocowany (A-4). Umieść dziecko w foteliku i zapnij klamrę fotelika składając
ze sobą boczne części zapęcia i wpinając je w klamrę na pasie krokowym (A-5). Ostrożnie pociągnij za pas
napinający aby upewnić się że dziecko jest bezpiecznie zapięte w foteliku (A-6).
Upewnij się, że fotelik przylega do oparcia fotela samochodowego oraz, że pasy są odpowiednio napięte i nie są
poskręcane.

13
Aby zainstalować fotelik w grupie II i III należy wymontować z fotelika 5-punktowe pasy (B-1) - instrukcja luzowania
pasów pokazana jest w rozdziale 10, punkty od G-1 do G-2.
Wymontuj zaczepy pasów znajdujące się od spodu fotela, przełóż je przez otwory w foteliku (B-2). Wyjmij poluzowa-
ne elementy z tapicerkli fotelika (B-3). Umieść fotel na siedzeniu w samochodzie wyposażonym w 3-punktowe pasy
(B-4). Posadź dziecko w foteliku, przypnij je pasami tak aby przechodziły przez prowadnice fotelika (B-5).
8DEMONTAŻ 5-PUNKTOWYCH PASÓW I TAPICERKI
Poluzuj pasy naramienne, poprzez wciśnięcie przycisku z przodu siedziska i jednoczesne pociągnięcie obu pasów
naramiennych (D-1). Aby dopasować pasy ramieniowe należy wymontować je z metalowego łącznika pasów z tyłu
fotelika (D-2). Pociągnij za pasy wystające z przedniej części fotelika (D-3). Wymontuj zaczepy pasów znajdujące się
od spodu fotela, przełóż je przez otwory w foteliku (D-4). Wyjmij poluzowane elementy z tapicerkli fotelika (D-5). Teraz
możesz zdjąć tapicerkę z fotelika (D-6).
Ponowny montaż należy wykonanć poprzez odwrócenie kolejności wykonywanych czynności.
9ZAPINANIE 5-PUNKTOWYCH PASÓW
Złóż ze sobą prawy i lewy element klamry (E-1). Włóż złączone ze sobą części do zapięcia znajdującego się na pasie
krokowym (E-2). Pasy są odpowiednio zapięte jeśli słyszalne jest „kliknięcie”. Aby rozpiąć pasy należy wcisnąć
przycisk na klamrze (E-3).
11 REGULACJA WYSOKOŚCI ZAGŁÓWKA
Aby dopasować wysokość zagłówka należy użyć dźwigni regulacji znajdującej się u samej góry fotelika (H-1). Odwróć
dźwignię w tył aby móc regulować zagłówek. Powinien być ustawiony tak aby dolna krawędź zagłówka znajdowała się
powyżej ramion dziecka, jak wskazanoi na obrazku (H-2).
10 REGULACJA 5-PUNKTOWYCH PASÓW
Aby zacieśnić pasy należy pociągnąć za napinacz znajdujący się na przedzie fotelika (F-1). Pasy są odpowiednio
napięte jesli pomiędzy pas a klatkę piersiową dziecka można włożyć 2 palce (F-2). Aby poluzować pasy należy
najpierw wcisnąć przycisk luzowania pasów, znajdujący się nad napinaczem pasów, a następnie pociągnąć za pasy
(F-3).
Pasy mogą być zamontrowane na oparciu w 2 pozycjach. Powinny być zamontowane na wysokości najbardziej
zbliżonej do wysokości ramion dziecka. Jeśli wysokość ramion dziecka znajduje się pomiędzy pozycjami na foteliku,
należy wybrać wyższą pozycję. Aby zmienić wysokość pasów w odcinku ramieniowym, należy wcisnąć przycisk
luzowania pasów, znajdujący się nad napinaczem pasów, a następnie pociągnąć za pasy (G-1). Następnie, należy
wymontować pasy z metalowego łącznika pasów z tyłu fotelika (G-2). Wyjmij zaczepy pasów przez otwory w tapicerce
(G-3). Umieść zaczepy pasów w otworach w tapicerce które odpowiadsają wysokością dziecku (G-4). Zamontuj pasy
w metalowym łączniku w tyłu fotelika (G-5). Upewnij się że na pasach nie ma skręceń oraz ze wszystkie elementy są
dobrze zamontowane (G-6).
6 INSTALACJA FOTELIKA W GRUPIE II, III (15-36 kg)
Aby zainstalować fotelik w grupie II i III należy wymontować z fotelika 5-punktowe pasy - proces przedstawiony jest w
rozdziale 6.
Wychyl oparcie fotelika w tył tak aby odłączył się od siedziska fotelika (C-1). Umieść siedzisko fotelika na siedzeniu w
samochodzie wyposażonym w 3-punktowe pasy (C-2, C-3). Posadź dziecko w foteliku, przypnij je pasami tak aby
przechodziły przez prowadnice fotelika (C-4).
7 INSTALACJA FOTELIKA W GRUPIE III (22-36 kg)

12 CZYSZCZENIE I KONSERWACJA
Prawidłowe działanie klamry pasa ma niezwykle ważny wpływ na bezpieczeństwo dziecka podczas jazdy.
Najczęstszą przyczyną wadliwego funkcjonowania klamry pasów są zanieczyszczenia w postaci kurzu lub ciał obcych.
Powoduje to takie problemy jak:
• zaczepy pasów uwalniane są powoli po naciśnięciu czerwonego przycisku zwalniającego
• nie można skutecznie zapiąć pasów (zaczepy wysuwają się po próbie zapięcia pasów)
• zaczepy pasów łączą się z pozostałą częścią zapięcia, jednak nie słychać kliknięcia
• pojawiają się trudności przy próbie zapięcia pasów (wyczuwalny jest opór)
• odblokowanie zapięcia pasów jest możliwe tylko przy użyciu dużej siły
Jeśli występują wyżej opisane problemy, należy wyczyścić zapięcie pasów, aby zapewnić jego prawidłowe działanie.
Czyszczenie klamry pasów:
1. Otworzyć zapięcie pasów (wcisnąć czerwony przycisk).
2. Wyjąć klamrę z ochraniacza krokowego.
3. Wychylić fotelik maksymalnie do przodu.
4. Przeciągnąć metalową płytkę służącą do mocowania klamry pasów przez otwór w siedzisku fotelika (od spodu fotelika).
5. Włożyć zapięcie pasów do ciepłej wody wymieszanej z płynem do mycia naczyń na co najmniej godzinę. Następnie
opłukać i pozostawić do całkowitego wyschnięcia.
Należy pamiętać, aby stosować wyłącznie oryginalny pokrowiec (tapicerka) Caretero Falcon Fresh, ponieważ
stanowi on integralny element fotelika i odgrywa ważną rolę w prawidłowym jego funkcjonowaniu.
• zabronione jest używanie fotelika dziecięcego bez pokrowca
• zalecane jest pranie ręczne pokrowca w wodzie z dodatkiem delikatnego detergentu (w temperaturze do 30°C)
• elementy z tworzywa sztucznego można czyścić, używając wody z mydłem (zabrania się stosowania agresywnych
środków czyszczących, np.: rozpuszczalników)
• pasy można czyścić przy użyciu letniej wody z mydłem
• wkładki naramienne można czyścić przy użyciu letniej wody z mydłem
• części plastikowe fotelika należy czyścić wilgotną szmatką
• nie wolno używać silnych detergentów do czyszczenia elementów plastikowych fotelika, gdyż może to prowadzić do
degradacji i uszkodzenia tych elementów
Tapicerkę można wyprać ręcznie w niskiej temperaturze i przy użyciu delikatnych środków piorących. Aby zdjąć
tapicerkę, postępuj zgodnie z rysunkami (J-1-J-4).
14

15

16
2SAFETY INSTRUCTIONS
THE INSTRUCTIONS BELOW ARE IMPORTANT.
PLEASE READ THESE INSTRUCTION CAREFULLY AND KEEP IT FOR FUTURE REFERENCE. THE SAFETY OF
YOUR CHILD MAY BE IN DANGER IF THESE INSTRUCTIONS WILL NOT BE COMPLIED WITH.
WARNING!
Only suitable for use in vehicles fitted with approved 3-point safety belts that conform with ECE Regulation No. 16 or
comparable standards.
This is a seat in the Weight Class I, II, III for babies weighing from 9 to 36 kg.
These Assembly and Usage Instructions must be given to the client.
Subject to printing errors, mistakes and technical changes.
WARNING! For the safety of the person installing the car seat:
• While installing or uninstalling the seat no object may be able to slide between the car seat and the child seat base.
It could trap the person’s fingers.
• In orded to avoid damage, take care not to jam the seat between solid elements of the car (doors, seat guides etc.).
• Store the car seat in a safe place when not in use. Avoid putting heavy objects on the seat and do not store near heat
sources or in direct sunlight.
WARNING! For the safety of the car:
• Some car seat covers are made of delicate fabrics (velour, leather etc.) and may become worn-out due to the child
seat use. In order to protect the upholstery, we recommend using car seat covers available as accessories.
DANGER! For the safety of your child:
• Please use the Caretero Sport Classic car seat only to secure your child in the car.
• This car seat must be installed forward-facing only for the I, II, III (9-36kg) weight groups with use of 3-point car
seat belts
• This car seat should be used with the integrated 5-point seat belts for weight group from 9 to 18 kg (approx. from 9
months up to about 4 years).
• Do not place the car seat on a passanger seat with active air bag.
• Check if the car seat is installed properly before each trip.
• The rear passenger seats are the safest place to install the car seat.
• Please make sure that all the elements are properly installed and that the car seat is not jammed by foldable seats or
doors.
• This car seat may not be used if the seat belts securing the child have not been properly engaged.
• Do not use or transport the car seat when it is not properly installed in the car.
• Do not use other fixing points other than those described in this manual and marked on the car seat itself.
• The shoulder belt pads are important in keeping the child safe. Please use them at all times.
• Regularly check the seat belts, especially the fixing points, stitchings and adjustment devices.
• In urgent cases it is necessary to unfasten the child quickly. This means the 5-point seat belt buckle is not very
resistant to tinkering by your child. Please teach the baby not to play with the belt buckle.
• Do not use the car seat if any parts of it have been damaged or became loose during an accident.
• It is important to ensure that all lap belts are running low enough, to keep the child’s pelvis secure.
• Please take special notice that all the belts securing the child car seats are tightened, that the child seat belts are
adjusted to the child’s body and are not twisted.
• Stiff points and plastic elements must be placed and fixed in such manner, as not to be jammed by moving car seats
or doors during everyday use of the car seat.
• Do not modify the car seat’s construction in any way or install additional elements to it without the permission of
appropriate authorities.
• After installing the seat and securing the child, make sure that the car seat belt buckle is located properly, which
guarantees safe fixing of the seat. The belt buckle should not be placed directly near the shell of the seat or in any
openings of the seat shell. If such situation happens, try a different fixing place in the car or shorten the buckle belt by
twisting it.
• The car seat may not be used without the fabric cover. The cover may not be replaced with a different one, which is
not recommended by the manufacturer, as the cover is an integral part of the seat.
• It is not recommended to use the seat for a longer period of time than 5 years since the production date, as the
physical properties of the product may detoriate (eg. plastic aging).

17
• It is forbidden to use the car seat as a chair or a toy.
• During a car crash at speed higher than 10 km/h the car seat may become damaged without clear visual marks. In
such case the car seat should be scrapped and replaced with a new one.
• Please remember to recycle the seat properly when it won’t be used anymore.
• Commision a full check of the car seat after a possible damaging (eg. when the seat falls to the ground).
• Regularly check all vital elements of the car seat for signs of damage. Make sure all mechanical parts of the seat are
functioning properly.
• It is forbidden to lubricate any parts of the seat.
• Never leave the child in the car seat unattended.
• Make sure that the child enters and exits the car on the sidewalk side of the street.
• Protect the car seat against sunlight while it’s not in use.
• The car seat may become very hot while under direct sunlight. The child’s skin is very delicate and may become
easily damaged during contact with a hot car seat.
• The closer the car seat belts are to the child’s body, the higher the safety level. Therefore do not put thick clothes on
the child.
• Make regular stops during longer trips, so the child may play and rest after removing it from the car seat.
• When using the car seat in the rear passenger seats: slide the front passenger seat to the front, so the child will not
reach the backrest with its feet (this will prevent from damaging the legs during an accident).
• Not complying with these instruction may cause danger.
DANGER! For the safety of car passengers.
In case of an accident or emergency braking, persons or objects that are not secured properly, may damage other
users of the car. Therefore it is important to ensure the following:
• The backrests of the seats are fixed (make sure the foldable rear seat backrests have been locked properly).
• All heavy objects or objects with sharp edges have been secured (eg. objects on the rear window shelf are not
loose).
• All persons in the car have fastened their seat belts.
• The child seat is always secured, even when there is no child in the seat.
3GENERAL INFORMATION
This car seat has been designed, tested and certified according to the European Norm for baby car seats (ECE R
44/04). The evaluation mark E(in a circle) and the certificate number are located on an orange sticker placed on the
seat shell.
DANGER!
In case of any modifications done to the car seat, the warranty will become void.
Only the manufacturer may apply any changes to the car seat.
DANGER!
Please comply with safety regulations present in your car manual.

18
5INSTALLATION OF THE SEAT IN GROUP I (9-18 kg)
Place the car seat on the car seat facing forward. Pass the car belt through the side belt slot, making sure the belt is
in the guides (A-1). Remove the belt from the back of the seat and pass it through the next side slot of the seat (A-2).
Pull the belt, pass it through the guides as shown in the picture (A-3) and then fasten the seat with the belt. Make
sure the belt is not twisted. Tighten the shoulder strap to make sure the seat is securely fastened (A-4). UPlace the
child in the seat and fasten the seat buckle by folding the side parts of the fastener together and connecting them to
the buckle on the crotch strap (A-5). Pull the tension belt carefully to ensure that your child is securely fastened in the
seat (A-6). Make sure that the car seat is snug against the backrest of the car seat and that the belts are properly
tightened and not twisted.
?1
?2
?
2
?1
4ADVICE ON PROPER CHILD SEAT PLACEMENT IN YOUR CAR
Proper placement Forbidden placement
A car seat of this type may be used only in a car
equipped with seat belts with a 3-point tensor and
a 3-point rolling-up element, which complies with
the UN/ECE Regulation nr 16 or other equivalent
standards.
3-point
shoulder
and lap belts
2-point
lap belt
Installation of the child seat is
FORBIDDEN if the passenger seat is
equipped with a 2-point seat belt
only.
Installation of the child seat is NOT
RECOMMENDED if the passenger
seat airbag is active.

19
To install the seat in group II and III, remove the 5-point belts (B-1) from the seat - the instructions for loosening the
belts are shown in chapter 10, points G-1 to G-2.
Remove the belt hooks located at the bottom of the seat, put them through the holes in the seat (B-2). Remove loose
parts from seat upholstery (B-3). Place the seat on the seat of the car equipped with 3-point seat belts (B-4). Put
the child in the seat, fasten it with the belts so that they go through the seat's guides (B-5).
8REMOVING THE 5-POINT BELTS AND UPHOLSTERY
Loosen the shoulder straps by pressing the button on the front of the seat and pulling both shoulder straps at the
same time (D-1). To adjust the shoulder belts, remove them from the metal belt connector at the back of the seat
(D-2). Pull the straps extending from the front of the seat (D-3). Remove the belt hooks located at the bottom of the
seat, put them through the holes in the seat (D-4). Remove loose parts from seat upholstery (D-5). Now you can
remove the seat cover (D-6).
Reassembly should be done by reversing the order of the steps.
95-POINT HARNESS FASTENING
Fold the right and left buckle pieces together (E-1). Insert the joined parts into the fastener located on the crotch
strap (E-2). The seat belts are properly fastened when a "click" is heard. To unfasten the belts, press the button on
the buckle (E-3).
11 HEADREST HEIGHT ADJUSTMENT
To adjust the height of the headrest, use the adjustment lever at the top of the seat (H-1). Flip the lever back to adjust
the headrest. It should be adjusted so that the lower edge of the head restraint is above the child's shoulders as
shown in the picture (H-2).
10 5-POINT HARNESS ADJUSTMENT
To tighten the belts, pull the tensioner located at the front of the seat (F-1). The belts are properly tensioned if 2
fingers can be inserted between the belt and the child's chest (F-2). To loosen the belts, first press the belt release
button located above the belt tensioner, and then pull the belts (F-3).
The belts can be mounted on the backrest in 2 positions. They should be mounted at the height closest to the height
of the child's shoulders. If your child's shoulder height is between the positions on the seat, choose the higher
position. To change the height of the shoulder belts, press the belt release button located above the belt tensioner,
and then pull the belts (G-1). Next, remove the straps from the metal strap connector at the back of the seat (G-2).
Remove the belt hooks through the holes in the upholstery (G-3). Place the belt hooks in the holes in the upholstery
that correspond to the height of the child (G-4). Install the straps in the metal connector at the back of the seat (G-5).
UMake sure there are no twists in the straps and that all components are securely attached (G-6).
6 INSTALLATION OF THE SEAT IN GROUP II, III (15-36 kg)
To install the seat in group II and III, remove the 5-point harness from the seat - the process is presented in chapter 6.
Tilt the seat back so that it disengages from the seat (C-1). Place the seat of the car seat on the seat of the car
equipped with 3-point belts (C-2, C-3). Put the child in the seat, fasten it with the belts so that they go through the
seat's guides (C-4).
7 INSTALLATION OF THE SEAT IN GROUP III (22-36 kg)
Table of contents
Languages:
Other Caretero Car Seat manuals

Caretero
Caretero Sport Classic User manual

Caretero
Caretero EGIS User manual

Caretero
Caretero Mokki User manual

Caretero
Caretero Vivo Fresh User manual

Caretero
Caretero NIMBUS User manual

Caretero
Caretero DIABLO XL User manual

Caretero
Caretero HUGGI User manual

Caretero
Caretero Mokki User manual

Caretero
Caretero KAMPTOS User manual

Caretero
Caretero VOLANTE FIX User manual