manuals.online logo
Brands
  1. Home
  2. •
  3. Brands
  4. •
  5. Carrin
  6. •
  7. Thermometer
  8. •
  9. Carrin KW5012 User manual

Carrin KW5012 User manual

1
User manual
KW5012
Features:
zWeather Forecast with Sunny, Slightly Cloudy, Rainy and Cloud Burst.
z433MHz RF receiving frequency.
zMaximum three selectable RF channels with wireless Thermo Sensor.
(One Wireless Thermo Sensor Included)
zTransmission range: 30 meters ( open area ).
zMeasuring range:
Indoor temperature : 0°C ~ +50°C
Humidity : 30%~90%
Outdoor temperature : -20°C ~ +50°C
zTemperature Alert function.
zMax/Min Memory for Humidity, Indoor and Outdoor Temperature.
zMoon Phase Display.
zHigh Tide, Medium Tide and Low Tide Indication.
zLow-battery indicator for Outdoor Remote Sensor.
zPerpetual Calendar Up to Year 2069.
z12/24Hour time display selectable.
zDay of week in 8 Languages Selectable.
zWall Mount or Table Stand Selectable.
zBattery:
Main Unit : DC 1.5 VAA size x 2 pcs
Thermo Sensor Unit : DC 1.5 VAAA size x 2 pcs
zSize : 160 x 92 x 26 mm
2
Main UnitAppearance
Part A- LCD
A1: Weather Forecast A2: Outdoor Temperature
A3: Indoor Temperature. A4: Indoor Humidity
A5: Moon Phase & Tide Indicator. A6: Time Display
Part B- Buttons
B1: “SNOOZE/LIGHT” button B2: “MODE” button.
B3: ”-(°C/°F)”button B4:“+(12/24)”&“HOLDPa”button
B5: “MAX/MIN” button B6: “CHANNEL “ button
B7: “ALARM ON/OFF” button B8: “ALERT” button
B9: “RESET” button
Part C- Structure
C1: Wall Mount Hole C2: Battery Compartment
C3:. Stand
3
KW9010
Thermo Sensor Unit Appearance.
D1: Transmission Indication LED D2: Outdoor Temperature
D3: Wall Mount Hole D4: Channel Select Switch
D5:BatteryCompartment D6:°C/°F”button
D7:“TX”button D8:Stand
Manual Time Setting:
zHold “ MODE” button for 3 seconds to enter Clock/Calendar setting Mode .
zPress “+” or “-” buttons to adjust the setting and press “MODE” button to confirm
each setting.
zThe setting sequence is shown as follow: Hour, Minutes, Second, Year,
Month/Day sequence, Month, Day, Time Zone, Day-of-week language.
z8 languages can be selected in Day-of-week, they are: German, English, Russian,
Denmark, Dutch, Italian Spanish and French,. The languages and their selected
abbreviations for each day of the week are shown in the following table.
Language
Sunday
Monday Tuesday Wednesday Thursday Friday Saturday
German, GE SO MO DI MI DO FR SA
English, EN SU MO TU WE TH FR SA
Russian, RU BC NH BT CP HT NT CY
4
Denmark, DA SO MA TI ON TO FR LO
Dutch, NE ZO MA DI WO DO VR ZA
Italian, IT DO LU MA ME GI VE SA
Spanish, ES DO LU MA MI JU VI SA
French, FR DI LU MA ME JE VE SA
zThe zone is used for the countries where can receive the DCF signal but the time
zone is different from the German time.
zWhen the country time is faster than the German time for 1 hr, the zone should be
set to 1. Then the clock will automatically set 1 hour faster from the signal time
received.
zThe Time Setting Mode will automatically exit in 5 seconds without any
adjustment.
SnoozeAlarm Clock Function:
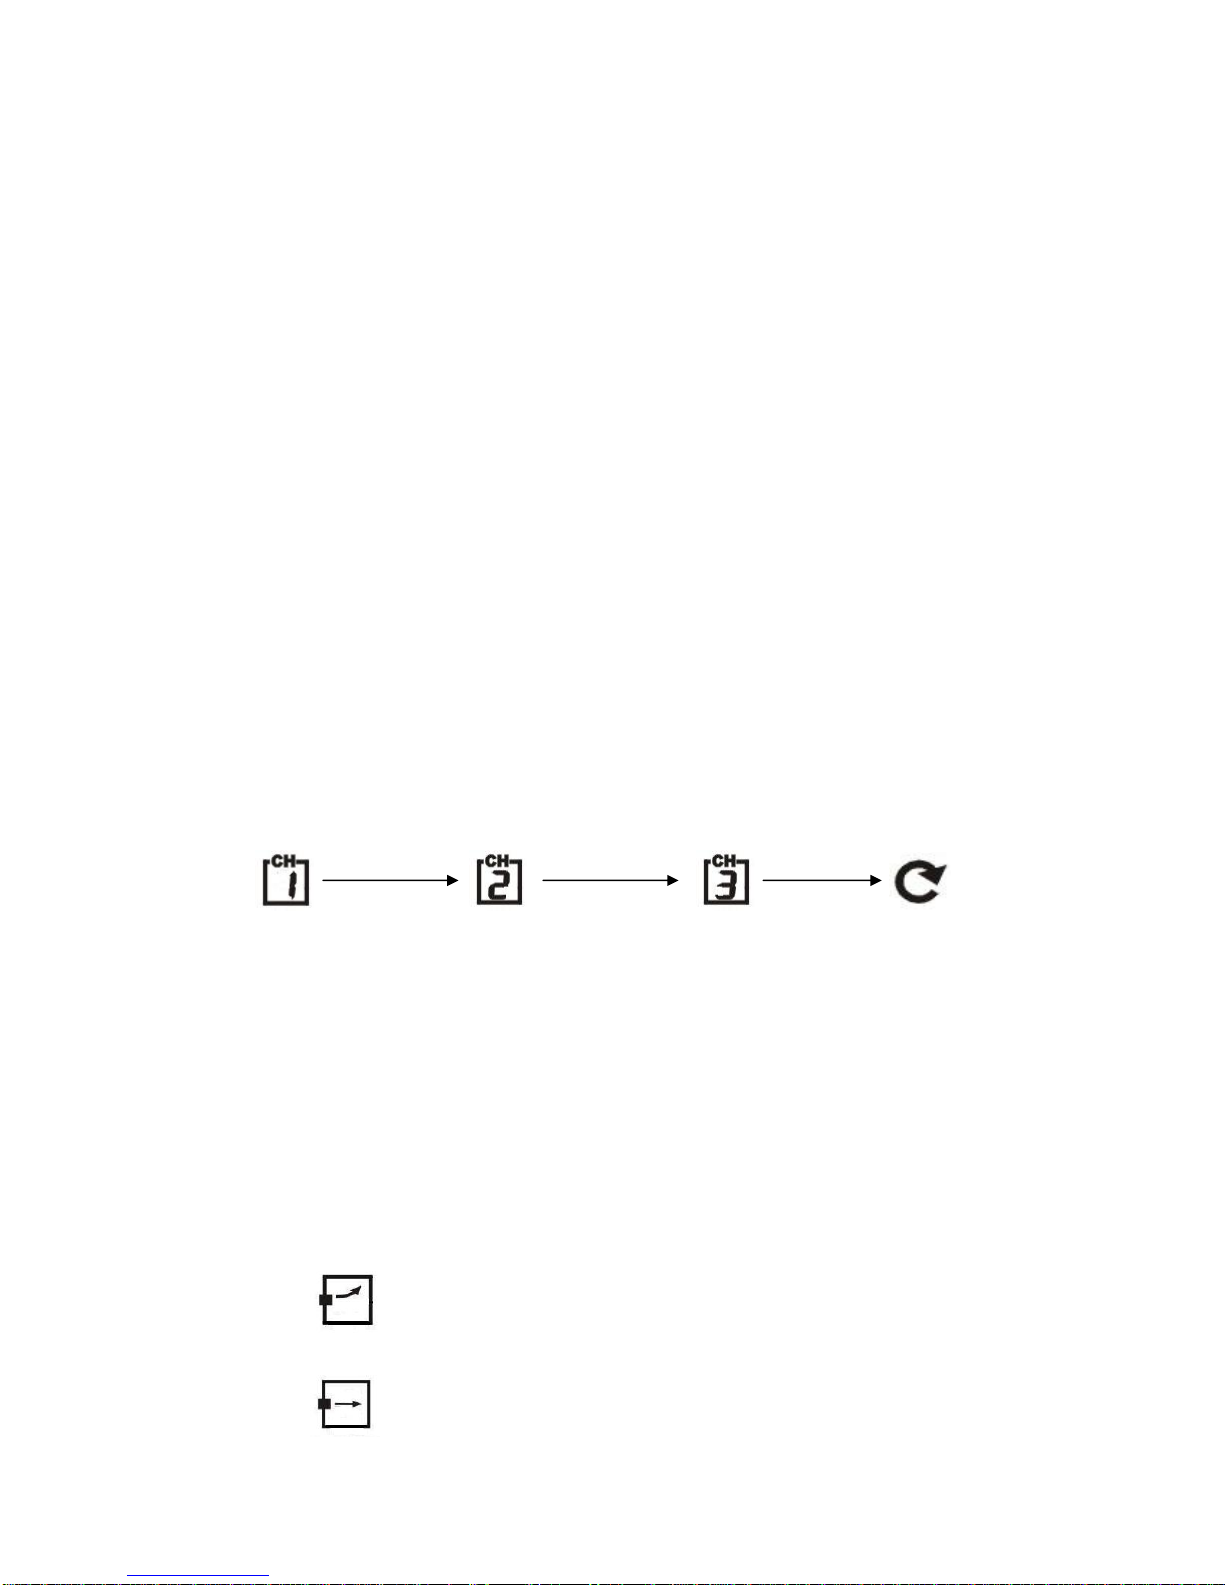
zPress “ MODE” button to select to view :
Time Date/Month /Weekday Alarm Time (“ “ Shown on the LCD)
zWhen viewing the Alarm Time, hold “MODE” button for 3 seconds to enter
Alarm Time setting. Press “ +” or “-” buttons to adjust the alarm time.
zPress “ALARM ON/OFF” button to switch alarm on or off. If it is on, “ ”
shown on the LCD.
zSnooze alarm snoozes for 5 minutes, then it alarms again.
zPress any button to stop the snooze alarm.
Weather Forecast Function:
zAfter Batteries inserted, or holding “Hold Pa” button for 3 seconds, weather icon
Flash (LCD-A1). Enter the current weather pressing “ + “ or “- “ buttons. Press
“MODE” button to confirm the setting. The weather forecast may not be accurate
if the current weather entered is not correct.
zTotally 5 different weather in the weather forecast.
“ ” means Sunny .
“ ” means Slightly Cloudy.
5
“ ” means Cloudy.
“ ” means Rainy
“” means Cloudburst.
zIf there is any inconsistency of weather forecast between Local Weather Station and this unit, the
Local Weather Station's forecast should prevail.
zThe trend pointer displayed on the LCD indicates the trend of the Barometric
pressure.
“” indicates the barometric pressure trend is increasing.
“” indicates the barometric pressure trend is steady.
“” indicates the barometric pressure trend is decreasing.
Maximum/Minimum Indoor /Outdoor Temperature and Humidity Recording
Function:
zPress “MAX/MIN” button to show the maximum recorded Indoor /Outdoor
Temperature and Humidity.
“” is shown on the LCD
zPress “MAX/MIN” button again to show the minimum recorded Indoor/Outdoor
Temperature and Humidity.
“” is shown on the LCD.
zHold “MAX/MIN” button for 3 seconds to clear the recorded maximum and
minimum reading.
6
Thermometer:
zPress “-(°C / °F)” button to select Indoor/Outdoor Temperature in Celsius mode/
Fahrenheit mode.
Outdoor Thermo Sensor Unit Registration Procedure:
zThe weather station automatically starts receiving transmission from Outdoor
Thermo Sensor for outdoor temperature after new batteries are inserted.
zThe sensor will automatically transmit temperature to the weather station after
batteries inserted. Batteries compartment of thermo sensor is locating behind the
back cover, unscrews to open.
zFor having more than one external transmitter (Maximum3), select the Channel,
CH1, CH2 or CH3 to ensure each sensor is transmitting difference channel before
inserting batteries. The channel select switch is at the back of the thermo sensor.
zPress “ TX “ button on the thermo sensor unit to transmit temperature to the
weather station manually. The weather station gives a “beep” sound if it received
the temperature.
Display outdoor temperature :
zPress “ CHANNEL” button to view the 3 Channels’temperature. The sequence is
shown as follow:
Press Press Press
“CHANNEL” button “CHANNEL” button “CHANNEL” button
Display the three
channels alternatively
zHold “ CHANNEL” button for 3 seconds to cancel unused channel manually. It
will automatically register a new channel again if a new channel is received.
If there is no temperature displayed in existing channel ( “ - - . –“ is displayed on
the LCD ), press “CHANNEL” button for 3 seconds to cancel that channel and
receive the channel again.
zThe trend pointer displayed on the LCD indicates the trend of the outdoor
temperature.
“ ” indicates the outdoor temperature is increasing.
“ ” indicates the outdoor temperature is steady.
7
“ ” indicates the outdoor temperature is decreasing.
zPress “ °C /°F” button, on the Thermo Sensor unit, to select Thermo Sensor
displayed in Celsius mode or Fahrenheit mode.
Temperature Alert function:
zHold “ ALERT” button for 3 seconds to enter Temperature Alert setting,
Temperature’s digits flash.
zPress “ +” or “-” button to select Indoor or Outdoor CH1, CH2 and CH3
temperature alert. Press “ALERT “button to confirm the setting.
zPress “ +” or “-” button to set the upper ” ” and lower “ ” limit of the
temperature. Press “ALERT “button to confirm the setting.
zPress “ ALERT” button to set the Temperature Alert function on or off ( “ ”
appears on the LCD if this function is on).
Moon Phase and Tide Indication
The Moon Phase of each day is shown on the LCD.
A: New Moon B: Waxing Crescent C: First Quarter
D: Waxing Gibbous E: Full Moon F: Waning Gibbous
G:LastQuarter H:WaningCrescent
Tide Status :
H:HighTide M:MediumTide L:LowTide
Low batteries indicator:
yLow battery icon “ “ appear at outdoor temperature row in particular channel
indicating the external transmitter of the channel in low battery status.
Back Light:
yPress “ SNOOZE/LIGHT” button, back light states for 5 seconds.
8
FCC Compliance Statement:
Changes or modifications not expressly approved by the party responsible for
compliance could void the user's authority to operate the equipment.
FCC rule:
This device complies with part 15 of the FCC Rules. Operation is subject to the
following two conditions: (1) This device may not cause harmful interference, and (2)
this device must accept any interference received, including interference that may
cause undesired operation.

Popular Thermometer manuals by other brands

Milwaukee MI 805 user manual

Milwaukee

Milwaukee MI 805 user manual

GREISINGER GMH 3710 operating manual

GREISINGER

GREISINGER GMH 3710 operating manual

Haushalt International 70176 instructions

Haushalt International

Haushalt International 70176 instructions

Hubert 70741 instruction manual

Hubert

Hubert 70741 instruction manual

Renkforce 1380331 operating instructions

Renkforce

Renkforce 1380331 operating instructions

strex SP95 user manual

strex

strex SP95 user manual

Fluke 1551A Ex user manual

Fluke

Fluke 1551A Ex user manual

TFA 35.1087 instruction manual

TFA

TFA 35.1087 instruction manual

ThermoPro TP-10 manual

ThermoPro

ThermoPro TP-10 manual

Williams-Sonoma MAV219 user manual

Williams-Sonoma

Williams-Sonoma MAV219 user manual

Microlife IR 150 manual

Microlife

Microlife IR 150 manual

Chino TP-S Easy Thermo instruction manual

Chino

Chino TP-S Easy Thermo instruction manual

Roadpro Ice Warner 3172 installation instructions

Roadpro

Roadpro Ice Warner 3172 installation instructions

Braun BFH175 manual

Braun

Braun BFH175 manual

General AQ150 user manual

General

General AQ150 user manual

TPI 380 manual

TPI

TPI 380 manual

Brannan 11/015/2 Product data sheet

Brannan

Brannan 11/015/2 Product data sheet

Fluke 62 MAX user manual

Fluke

Fluke 62 MAX user manual

manuals.online logo
manuals.online logoBrands
  • About & Mission
  • Contact us
  • Privacy Policy
  • Terms and Conditions

Copyright 2025 Manuals.Online. All Rights Reserved.