CarShow CS-GM1012 GM Series Operating manual

CarShow Copyright 2012 All Rights Reserved
Multi-Media Navigation System Installation Guide Rev C
GM Series
Installation Guide
NOTICE OF INTENDED INSTALLATION AND USE
THE CAR SHOW MULTI-MEDIA NAVIGATION SYSTEMS CONTAIN AN INTERNAL VIDEO PLAYER, WHICH
IS NOT INTENDED FOR VIEWING BY THE DRIVER. THE VIDEO PLAYER IS DISABLED WHEN THE
VEHICLE IS IN MOTION THROUGH A CONNECTION TO THE PARKING BRAKE.
THE INSTALLER OF THIS PRODUCT MUST INSURE THE VIDEO DISABLE CONNECTION IS
WORKING PROPERLY PRIOR TO DELIVERY OF THE VEHICLE.
IMPROPER INSTALLATION COULD DISTRACT THE DRIVER OR INTERFERE WITH SAFE OPERATION
OF THE VEHICLE, WHICH COULD RESULT IN SERIOUS INJURY OR DEATH, AND COULD ALSO
VIOLATE STATE AND/OR FEDERAL LAW.
CAR SHOW DISCLAIMS ANY LIABILITY FOR ANY BODILY INJURY OR PROPERTY DAMAGE THAT MAY
RESULT FROM ANY IMPROPER OR UNINTENDED INSTALLATION AND/OR USE.
STOP
Damage to the vehicle may occur
Do not proceed until process has been completed
CAUTION
CAUTION
Process must be carefully observed in order to reduce
the risk of damage to the accessory or vehicle
CRITICAL
Process must be carefully observed in order to ensure a
quality installation
TOOLS and EQUIPMENT
Specific tools and equipment recommended for this
process
SAFETY RISK
Observe safe practices, this process can be dangerous
and there is a risk of personal injury
TESTING and TROUBLESHOOTING
Content specific testing and troubleshooting points
CS-GM1012 GM Series

CarShow Installation Guide –GM Series
CarShow Copyright 2012 All Rights Reserved
Installation Guide CS-GM1210-12
Page 2
PREPARING FOR THE INSTALLATION
Before you start, please read these critical steps below
STEP
1
BEFORE YOU START THE
INSTALLATION,
READ THIS GUIDE!
CHECK THE BATTERY
Test the battery voltage to make sure it’s fully charged
This only takes seconds and can save hours of
troubleshooting later.
TURN THE VEHICLE
OFF
Keep the Vehicle Off during the installation to avoid
setting various Vehicle Faults
Keep the Vehicle OFF during the
installation
Failure to follow this may cause the AIRBAG FAULT
SENSOR to become enabled. Dealer Service
Departments charge a significant fee to reset the Fault
Sensor.

CarShow Installation Guide –GM Series
CarShow Copyright 2012 All Rights Reserved
Installation Guide CS-GM1210-12
Page 3
REMOVE THE FACTORY RADIO
2012 GMC Sierra Shown
You will need to remove multiple interior trim components prior to removing the factory radio.
The following steps will help guide you through this process.
STEP
2
Tools Required:
7mm nut-driver
Panel pry tool
Carefully Remove Right Dash Trim
Remove the right side dash trim using thin pry tool
Carefully Remove Upper Left Dash Trim
Remove the upper Left dash trim using thin pry tool
Lower Shift Lever
Make sure parking brake is engaged!!
Carefully pull shift lever down to ease dash panel
removal.
Remove Dash Trim
Cautiously remove dash trim using caution not to break
plastic. Pull dash trim towards you.
CAUTION
CAUTION
CAUTION
CAUTION

CarShow Installation Guide –GM Series
CarShow Copyright 2012 All Rights Reserved
Installation Guide CS-GM1210-12
Page 4
Unplug Dash Panel Harnesses
Carefully unplug dash panel harnesses
Remove Climate Controls
Use 7mm socket to remove 2 x 7mm bolts to remove
climate control assembly
Unplug Climate Controls
Carefully unplug climate control assembly
Remove Radio Mounting Bolts
Use 7mm socket to remove 4 x 7mm radio
mounting bolts
Unplug radio Harnesses
Carefully unplug all harnesses at back of radio
CAUTION
CAUTION

CarShow Installation Guide –GM Series
CarShow Copyright 2012 All Rights Reserved
Installation Guide CS-GM1210-12
Page 5
LOCATING REMOTE COMPONENTS
You will need to mount the GPS and Optional Satellite Radio Antennas on the exterior of the vehicle.
STEP
3
Use Caution around SRS Components
It is the installer’s responsibility to ensure that the safety
equipment in the vehicle is NOT adversely affected by
installation of this system. Ensure that the routing of the
harnesses do NOT obstruct airbags, SRS or other safety
devices.
Mount the GPS and Sat Radio antenna
on the EXTERIOR of the Vehicle
Route the GPS harness away from other power harnesses
in the vehicle.
This will help to ensure optimum performance of the GPS
system.
INSTALL THE CAR SHOW NAVIGATION SYSTEM
You will need to prepare the Navigation System for installation in the vehicle.
STEP
4
Connect the Power and GPS Harnesses
The GPS Harness must be properly seated into connector.
Also be sure steering wheel control connector is securely
connected.
Failure to follow this step may result in poor GPS signal
and steering wheel controls being inop.
Connect Optional Harnesses such as
iPod, Satellite Radio, Camera
These harnesses must be fully engaged prior to the system
installation.
See the Main Harness Diagram below for more information

CarShow Installation Guide –GM Series
CarShow Copyright 2012 All Rights Reserved
Installation Guide CS-GM1210-12
Page 6
CarShow PP-GM-1210-2 Main harness comes pre-
wired for NON-Amplified (Non-Bose) systems.
If your vehicle is equipped with Bose amplification
(Bose will be on speaker grills), you will need to
connect the PP-GM-1210-8
amp harness (shown at right). This harness connects
to “amp pre-out” port on back of CarShow unit.
Chime Module Placement
Be sure to install chime module with speaker facing
down
Harness Connections
Be sure to securely connect all harnesses
Re-install Radio Mounting Bolts
Use 7mm socket to re-install 4 x 7mm radio
mounting bolts
Reconnect Climate Controls
Carefully reconnect climate control assembly

CarShow Installation Guide –GM Series
CarShow Copyright 2012 All Rights Reserved
Installation Guide CS-GM1210-12
Page 7
Re-install Climate Control Bolts
Use 7mm socket to re-install 2 x 7mm radio
mounting bolts
Turn the vehicle ON and confirm the
unit is fully operational
With the connectors Fully Engaged, turn the vehicle
on and press the RESET located at lower right corner
of radio face
Reconnect Dash Panel Harnesses
Carefully reconnect dash panel harnesses
Re-install Dash Trim
Cautiously re-install dash trim using caution not to
break plastic.
ENABLE INSTALLER SETTINGS
You will need to select certain Installer setting based on any Optional Equipment that you may have
installed
STEP
5
Launch the Installer Setting Screen
From any screen with the Menu Button, follow these
steps to display the Installer Setting Screen:
1) From any Screen, select “Menu”
2) From the Menu Screen, select “Settings”
3) Press “Keypad,” Press “1120” and “Enter”
CAUTION

CarShow Installation Guide –GM Series
CarShow Copyright 2012 All Rights Reserved
Installation Guide CS-GM1210-12
Page 8
Select the individual Settings as needed
for the installed components
Selectable options vary by product and installation.
Select the options as applicable for the installed
optional components.
ResLink Sat Radio Settings
Be sure that OE Sat option is configured properly.
If OEM Sat radio is desired, “Factory Sat” option needs
to be set to “ON.”
If “aftermarket” Sirius tuner (SCC1) is being used, set
“Factory Sat” option to “Off.”
BLUETOOTH PHONE NOTICE
If this Vehicle is equipped with FACTORY BLUETOOTH, the “BT” option must be set
to “OFF”in the Installer Setting Menu.
ONLY ONE BT System can be Paired at a time (either Factory GM OR CarShow)
Perform Pre-Delivery Tests
You will need to perform several Pre-Delivery Tests to ensure customer satisfaction
Some equipment may be optional
STEP
6
Turn the vehicle ON and System ON
Confirm the unit starts up properly
Troubleshooting
1) Reset the System while the Vehicle is ON
2) Confirm all connectors are properly installed
3) Check the Vehicle and System Fuses
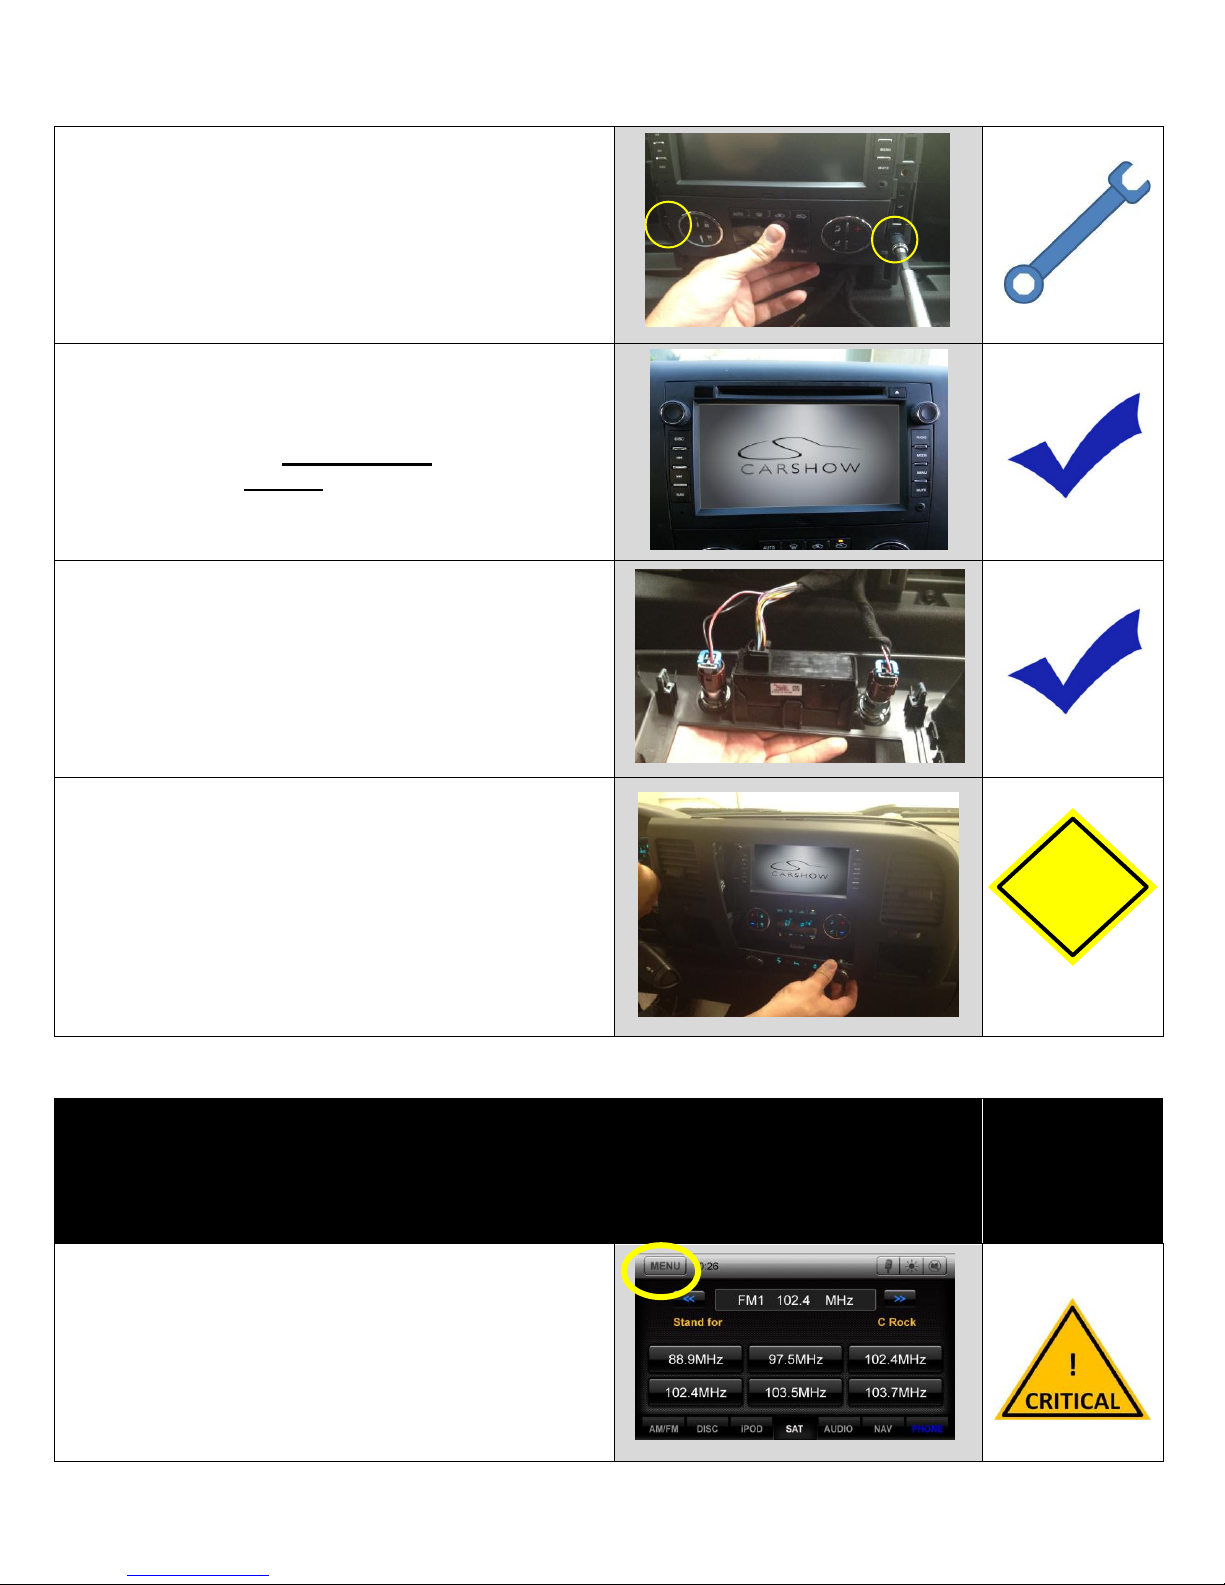
Select RADIO as the Source
Confirm that the AM and FM reception are as expected
Troubleshooting
1) Confirm Antenna is properly connected.
2) Reset the System

CarShow Installation Guide –GM Series
CarShow Copyright 2012 All Rights Reserved
Installation Guide CS-GM1210-12
Page 9
Select SATELLITE RADIO as the Source
Troubleshooting
1) Confirm the antenna has unobstructed view of the sky
2) Confirm the antenna is located on the outside of the
vehicle
Select iPod as the Source
Confirm iPod is communicating and playback is OK
Troubleshooting
1) Confirm the harnesses are properly engaged
2) Reset the System
Select CD as the Source
Confirm CD audio playback is OK
Troubleshooting
1) Confirm the disc is store bought and in good condition
2) Reset the system
Select DVD as the Source
Confirm DVD video playback is OK
Troubleshooting
1) Ensure the Park Brake is set to view video
2) Confirm the disc is store bought and in good condition
3) Reset the system
Confirm the Video Disable Circuit is
properly Operating.
The Brake Wire must be connected to the Park Brake
Indicator Wire to complete a ground when the brake is
engaged.
Select Phone as the Source
Confirm Phone Pairing is successful
Consult Quick Start Guide for Bluetooth pairing instructions
Note: This screen will NOT appear if OEM BT is being used

CarShow Installation Guide –GM Series
CarShow Copyright 2012 All Rights Reserved
Installation Guide CS-GM1210-12
Page 10
Select NAV as the Source
Confirm the Navigation loads and signal strength is OK
Troubleshooting
1) Confirm the antenna has an unobstructed view of the
sky
2) Confirm the antenna is located on the outside of the
vehicle
3) Confirm the antenna is properly connected
Select Reverse Camera
Confirm the backup camera screen shows in reverse
Troubleshooting
1) Confirm “Reverse Trigger” is set to ON in the Installer
Settings
2) Confirm the Reverse Trigger wire is attached properly
3) Confirm the Camera is receiving 12VDC as required
Select OnStar (If Equipped)
Confirm OnStar Operator is heard
Troubleshooting
1) Confirm the OnStar Connector is engaged in the unit
Reset the System
Steering Wheel Controls
Test Steering Wheel Controls

CarShow Installation Guide –GM Series
CarShow Copyright 2012 All Rights Reserved
Installation Guide CS-GM1210-12
Page 11
Service and Optional Parts List
Part Number Description
PP-GM1210-2 Harness, GM-Series Main
CS-GM1012-12 Installation Guide, GM-Series
CS108 Quick Start Guide. GM-Series
PP-GM1210-5 Control, Remote GM-Series
PP-GM1210-6 Harness, Rear Video
PP-GM1210-7 Harness, Bose Subwoofer (Centerpoint)
PP-GM1210-8 Harness, STD Bose
PP-SW-RESLink GM Can Module
PP1005 Antenna, GPS, 5 meters
PP1006 Ground Plate, GPS Antenna
PP1007 Harness, Line Level Pre-Out w/ Sub
PP1008 Harness, AUX IN/Cam In**
PP1009 Harness, AUX Out**
PP1011 Harness, External BT Mic
PP1012 Harness, AUX in 3.5/RCA
PP1014 Display Cleaning Cloth
PP1010 Harness, Sirius Tuner*
DP-1047 GPS Antenna Windshield Mount*
DP-1066 Camera, License Plate Black*
DP-1067 Camera, License Plate Chrome*
DP-1068 Camera, Universal Black*
* Optional Accessories
** Cannot be used in vehicles equipped with OEM Rear Seat Entertainment
Harness Diagram
Back Of CarShow Unit

CarShow Installation Guide –GM Series
CarShow Copyright 2012 All Rights Reserved
Installation Guide CS-GM1210-12
Page 12

CarShow Installation Guide –GM Series
CarShow Copyright 2012 All Rights Reserved
Installation Guide CS-GM1210-12
Page 13
Table of contents
Other CarShow Car Video System manuals