Setting Guide
Thank you for purchasing a G’zOne TYPE-L (hereinafter “G’zOne” or the
“product” ).
This guide covers settings for using your G’zOne and notes on use.
For explanations of the individual functions, refer to the “Instruction
Manual” app (in Japanese).
September 2012, 1st Edition
Sales: KDDI CORPORATION ·
OKINAWA CELLULAR TELEPHONE COMPANY
Manufactured by: CASIO COMPUTER CO., LTD.
Google, the Google logo, Android, Google Play, the Google Play logo, Gmail, the Gmail logo,
Google Maps, the Google Maps logo, the Google Voice Search logo, Google+, the Google+
logo, Google Talk are trademarks or registered trademarks of Google Inc.
Wi-Fi®, Wi-Fi logo, Wi-Fi CERTIFIED logo, and Wi-Fi Protected Setup logo are registered
trademarks of Wi-Fi Alliance. Wi-Fi CERTIFIED™, Wi-Fi Protected Setup™, WPA™ and WPA2™
are trademarks of Wi-Fi Alliance.
AOSS™ is a trademark of BUFFALO Inc.
“らくらく無線スタート” is a registered trademark of NEC AccessTechnica, Ltd.
Facebook®is a registered trademark of Facebook, Inc.
“GREE” is a registered trademark or trademark of Gree, Inc. in Japan.
Copyright © 2010-2011 Three Laws of Mobility. All Rights Reserved.
Bluetooth and the Bluetooth logo are registered trademarks of Bluetooth SIG, Inc. NEC CASIO
Mobile Communications, Ltd. is granted a license for their use from Bluetooth SIG, lnc. Other
trademarks and names belong to their respective owners.
“ATOK” is a registered trademark of JustSystems Corporation.
Microsoft®Exchange ActiveSync®is a trademark or registered trademark of Microsoft
Corporation in the United States and/or other countries.
G’zOne is a trademark of Casio Computer Co., Ltd.
The product includes pictograms licensed by NTT DOCOMO, INC.
This product uses “FontAvenue” of NEC Corporation.
Other company names or product names are registered trademarks or trademarks of those
companies.
Basic Operations
Initial Settings
Wi-Fi®Settings
Settings for Protection
in Case of Loss
E-mail Settings
Making Calls
Receiving Calls
Backing Up E-mail
Infrared
Communications
Saving Battery Power
Importing/Exporting
Contacts
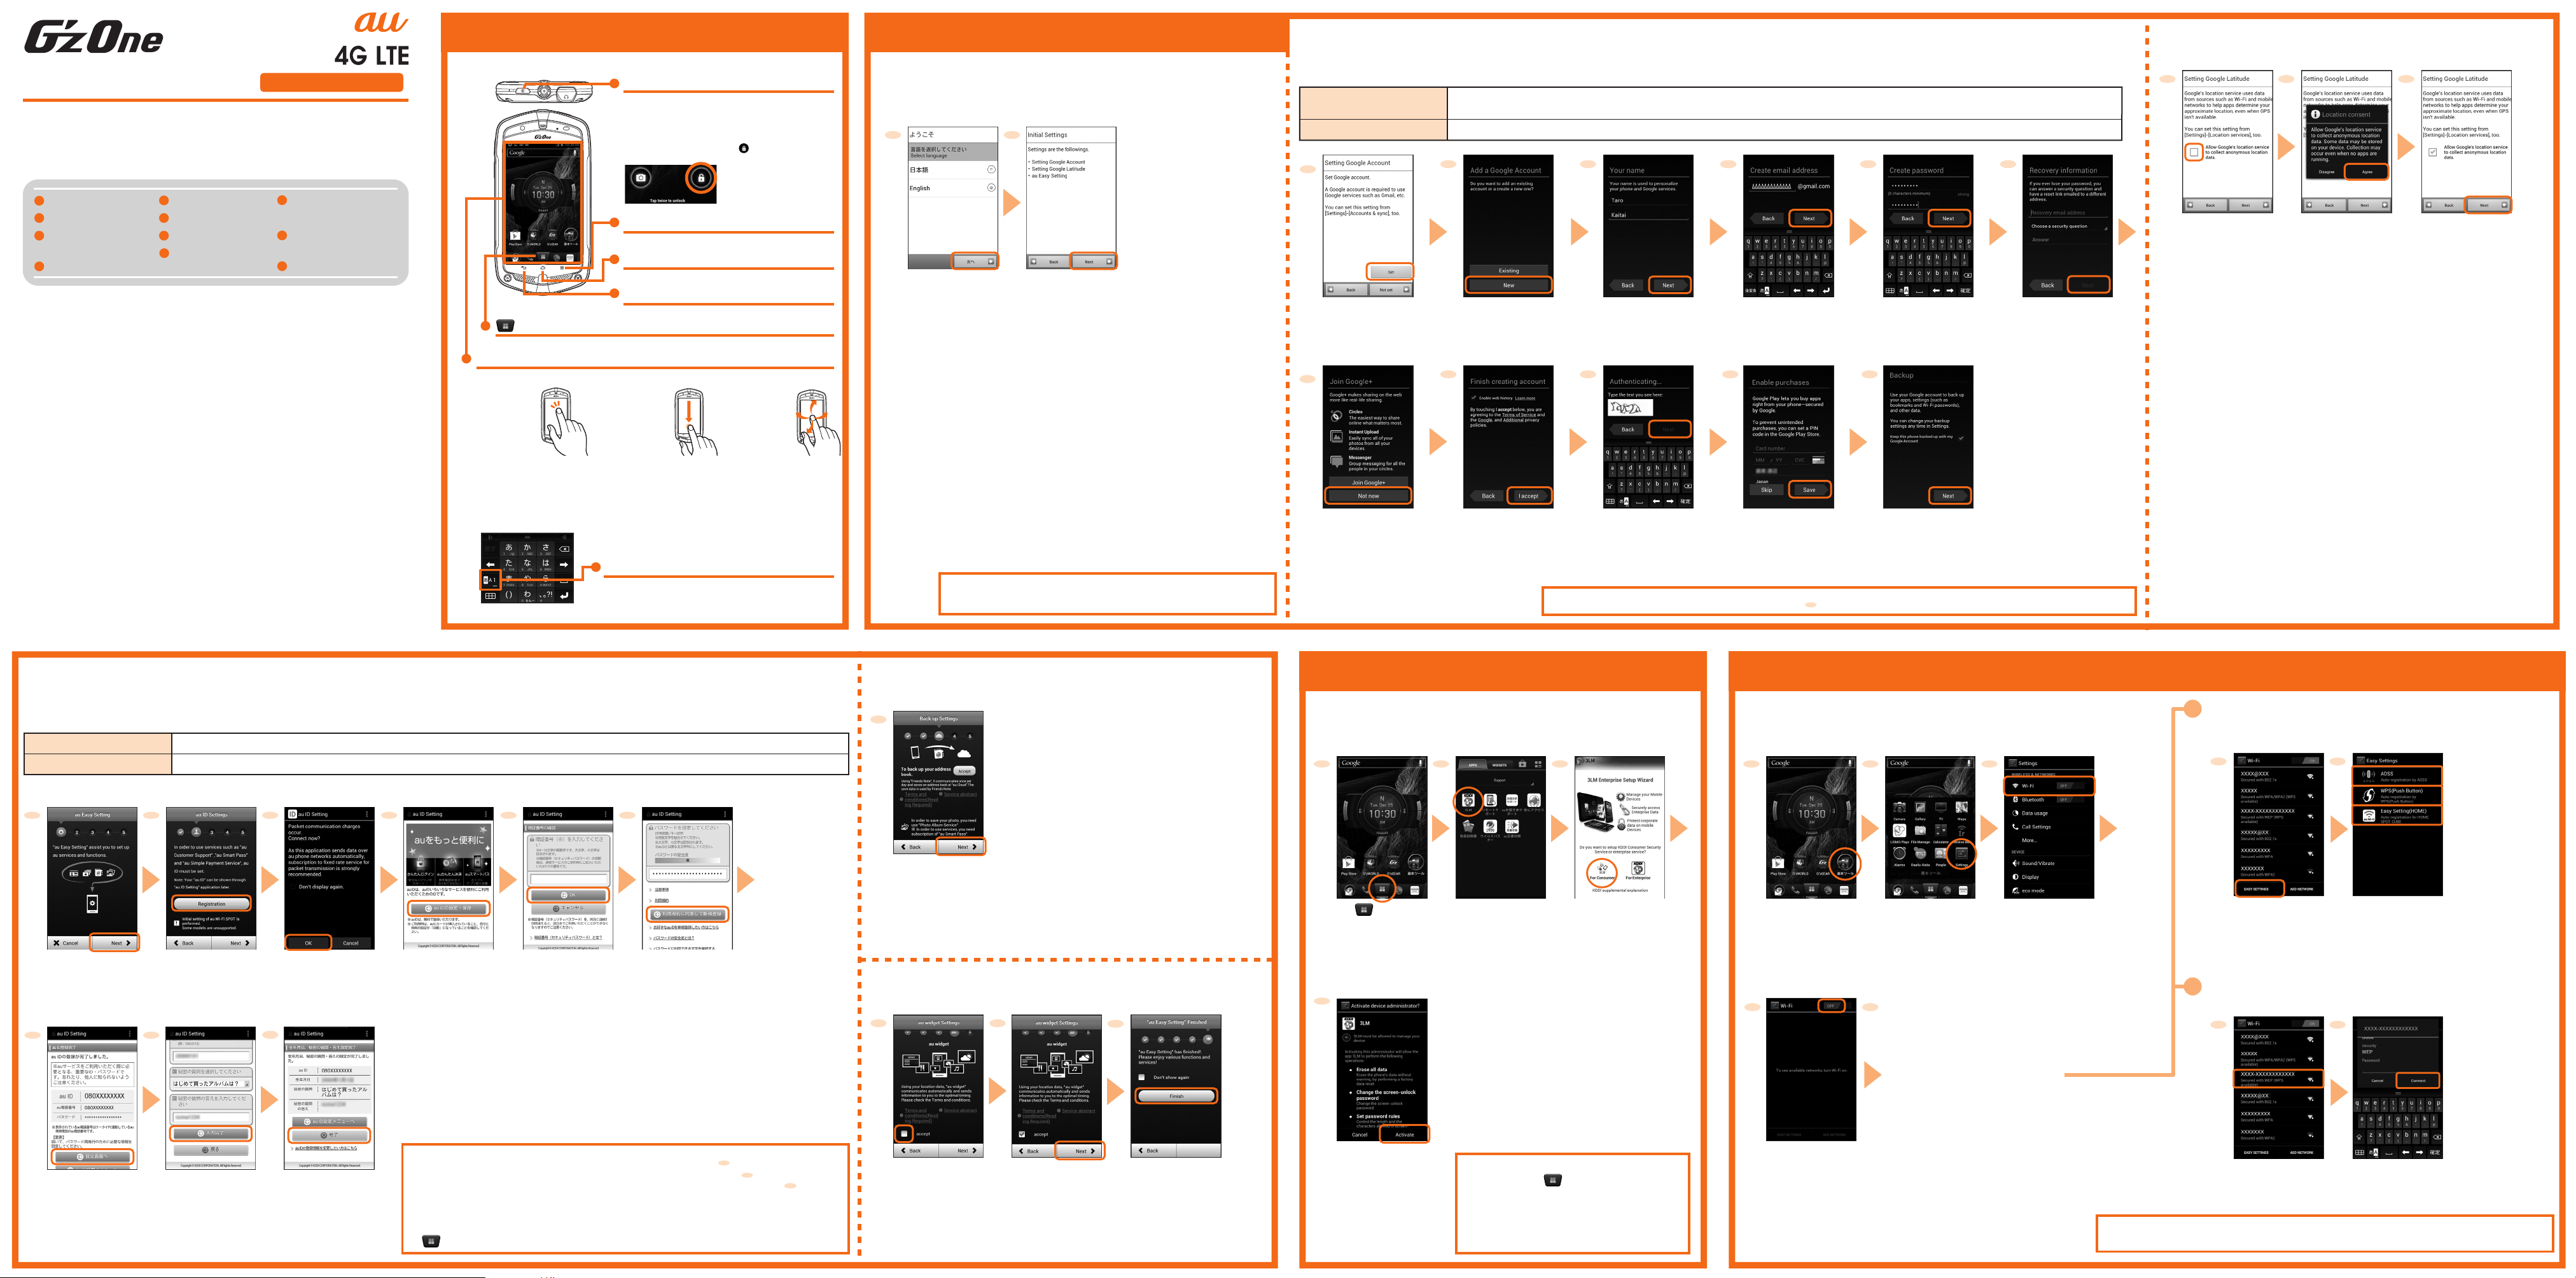
Initial Settings
The initial settings screen is displayed automatically the first time you turn on the
product after purchasing.
If using Easy Settings
You can use AOSS, WPS (Push Button), or Easy Setting (HOME).
If selecting a detected Wi-Fi®network
(for example, with an access point protected by “WEP” security)
Basic Operations
Display
PPower key
Tap
Touch the
display lightly,
then release
immediately.
HHome key
Tap to return to the home screen.
BBack key
Tap to return to the previous screen.
《Numeric keypad》
Flick
Swipe the
display left,
right, up, or
down with your
finger.
To turn power on
Press and hold Pfor 5 sec. or longer.
To unlock screen
Press P, and then tap twice to unlock.
Touch the display with your finger to make operations.
Drag
While touching
the display
lightly, slide your
finger to the
desired position.
Character type switching key
Tap to change the type of characters input by
keypad operations.
Apps button
Tap to display the APPS tray or WIDGET tray.
MMenu key
Tap to display the options menu.
For detailed operating instructions, refer to the “Instruction Manual” app (in Japanese).
Settings for Protection in Case of Loss
If you use 3LM Security, you can search for and lock the phone remotely if it is lost.
Wi-Fi®Settings
These settings allow you to use your home wireless LAN (Wi-Fi®) or a public wireless service
to connect to the Internet.
* Set in a condition where you can receive signals from the access point you will connect to.
Numeric keypad input
Repeatedly tap keys assigned with the character you wish to input until the
desired character displays.
■Inputting text
You can input text by repeatedly tapping keys.
If the access point you want to connect to cannot be detected or if you are setting when unable to
receive signals, tap [ADD NETWORK], and then add the access point manually.
The Hkey is disabled during initial settings. You cannot display the
home screen until initial settings are complete.
Please read this first
1
4
2 3
Tap [For Consumer].
Tap [Activate].
Tap [3LM].
123
Tap [Settings]. Tap [Wi-Fi].
Follow the onscreen
instructions in
subsequent steps.
■STEP 1: Setting the language
1 2
1
1 2
Tap [Next].
To use in English,
tap [English], and
then tap [次へ]
(Next).
Tap [Next].
1 2 3
■STEP 3: Setting to use Google’s location service
Set whether to allow Google’s location service to collect anonymous location data.
Confirm the content
displayed, and then
tap [Agree].
Tap [Next].Tap the box to add
a checkmark if you
agree.
Tap [EASY SETTINGS].
Wi-Fi®turns on, and the phone will
detect available Wi-Fi®networks.
When a Wi-Fi®network is detected, its
network name and security settings
will be displayed.
45
Tap [OFF].
Tap [AOSS],
[WPS(Push Button)] or
[Easy Setting(HOME)].
Enter the password
(security key), and
then tap [Connect].
Tap the Wi-Fi®network to
connect to.
■STEP 4: au Easy Setting
au Easy Setting, an app that allows you to make setting such as au ID settings, will start up. Confirm the onscreen content, tap [Next], and make au ID settings.
①Setting au ID
Setting an au ID allows you to use “au Simple Payment Service” to purchase apps on au Market and Google Play as well as use various other services provided by au.
②Setting to use backup function
You can use Friends Note to automatically back up user contacts.
Tap [Next]. Tap [Finish].
Tap the checkbox to
add a checkmark if
using this service.
③Setting to use au widget
Agree to the terms of service if using au widget
au ID*
au ID password
Register your au phone number or a string of text to use for your au ID (user ID).
Register a password to use your au ID.
* You cannot register an au ID already in use by another user.
1 2 3 45 6
* The default setting is
the four-digit security
code at subscription.
Tap [Next].
* Your au ID will not be
set if you tap [Next].
Tap [Registration]. Confirm the content
displayed, and tap
[OK].
Tap [au IDの設定・保存]
(Set/Save au ID).
Enter your security
code and tap [OK]
to confirm your
identity.
Set an au ID password,
and then tap [利用規約
に同意して新規登録]
(Agree to terms of
service and register).
7 8 9
Enter your date of
birth and secret
question and answer,
tap [入力完了] (Entry
complete), and then
tap [設定] (Set).
Registration of your
date of birth and
secret question and
answer is complete.
Tap [終了] (End).
au ID setting is complete.
Now, tap [設定画面へ]
(Go to setting screen)
and register information
need to reissue a
password.
If you wish to cancel setup after tapping [Set] in procedure (Setting Google Account screen), tap Buntil you return to that screen.
■STEP 2: Google™ account settings
Setting up a Google account allows you to use Google apps such as Gmail™, Google Play™, and Google Talk™.
The main settings are as follows. (Additionally, you need to set your first name, last name, and a security question/answer to use if you forget your password. Leave the recovery e-mail address
field blank if you do not have another e-mail address.)
User name
Password
Register a string of text to use for your Google account (user ID) and e-mail address. You can register a username of your choice as long as it is not
already in use by another user.
Register a password you will use to access your Google account.
4
* If you already have a
Google account, tap
[Existing].
8 109
* If you tap [Not set], you can
skip the Google account
setup.
32 5 6
11
7
76
7
6
1
* To join Google+™, tap
[Join Google+].
* Tap [Terms and conditions
(Reading Required)] first
and read the terms of
service.
* Tap [Terms and conditions
(Reading Required)] first
and read the terms of
service.
*Add a checkmark to
“Don’ t show again”, and
au Easy Setting will no
longer start when you turn
on the power.
Read the terms of service
if they are displayed, and
tap [I Accept].
Tap [Not now].
* Tap the box to remove the
checkmark if you wish to
disable the web history.
Read the terms of service and
other necessary information,
and then tap [I accept].
* Tap the box to remove the
checkmark if you do not wish
to use the backup function.
Follow onscreen instructions
for subsequent procedures.
Confirm the content
displayed, and then
tap [Next].
* If you do not wish to make
Google Play settings, tap
[Skip].
Enter the text displayed
on the screen, and then
tap [Next].
Tap [Set]. Tap [New]. Enter your first name
and last name, and
then tap [Next].
Enter your username,
and then tap [Next].
Enter your password,
and then tap [Next].
Enter your recovery
e-mail address and a
security question/answer
to use if you forget your
password, and then tap
[Next].
Make Google Play
settings if needed, and
then tap [Save].
3
Tap on the home
screen.
• Follow the procedure below to start.
Home screen→→[auお客さまサポート]
(au Customer Support) →[サポート&サービス]
(Support & Service) →[安心セキュリティパッ
ク] (Anshin Security Pack) →[3LM Security]
• For details of 3LM Security, refer to the
“Instruction Manual” app (in Japanese).
On the home screen,
tap [基本ツール]
(Basic tools).
• If you wish to cancel setting after tapping [Registration] in procedure , tap [Cancel] at the
next screen or tap Bto return to the “Registration” screen for procedure .
• If you set a new au ID of your choice other than your au phone number in procedure
(registering a new au ID screen), register from “お好きなau IDを新規登録したい方はこちら”
(Registering a new au ID of your choice).
If you already have an au ID, set in “au IDをお持ちの方はこちら” (If you already have an au ID).
• You can set an au ID later, even if you skipped setting one at time of purchase. In that case, tap
on the home screen, and then tap [au Easy Setting] or [au ID Setting].
2
6
1
2


