Casio C781 User manual

User Guide
C781

2
3
CHAPTER 1. BEFORE USING
BEFORE USING ...............................................................................................7
INSIDE THE PACKAGE ................................................................................................8
HANDSET DESCRIPTIONS .........................................................................................9
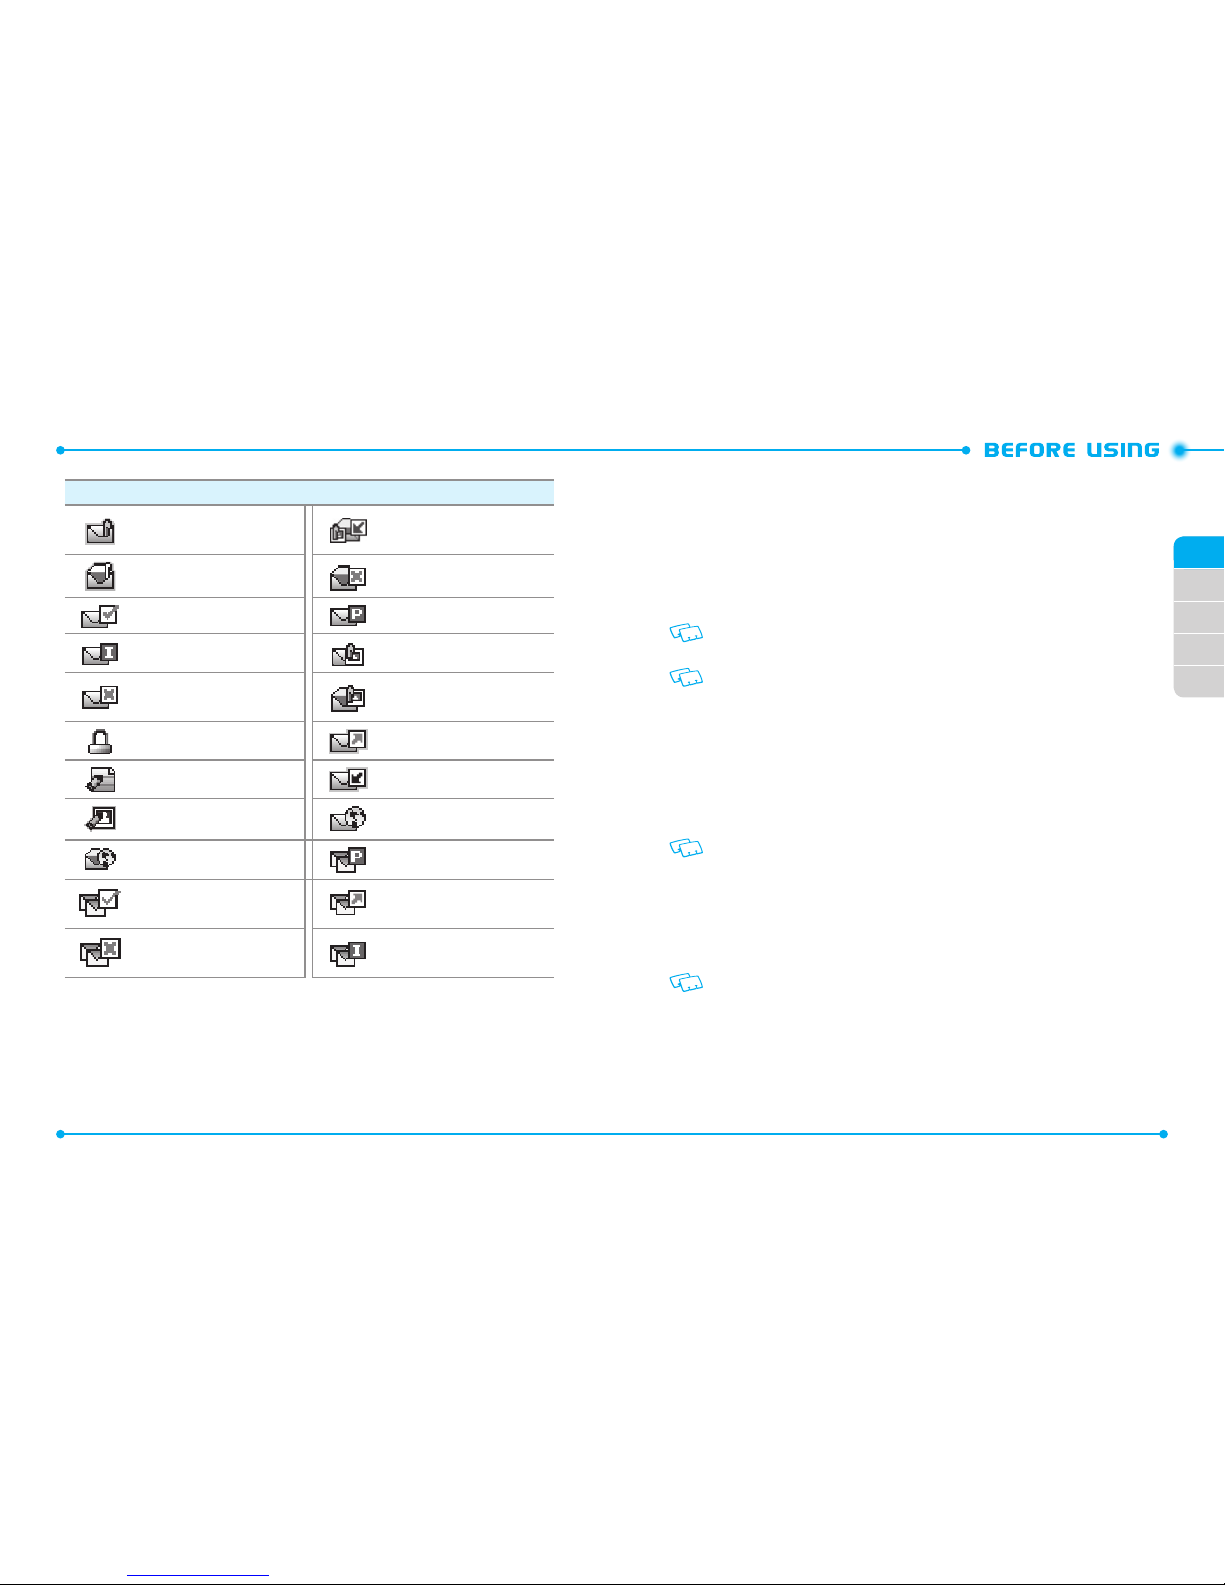
DISPLAY INDICATORS ............................................................................................ 12
FEATURT OVERVIEW .............................................................................................19
INSTALLING THE SIM CARD AND BATTERY ........................................................... 20
REMOVING THE BATTERY ...................................................................................... 22
CHARGING THE BATTERY....................................................................................... 23
BATTERY HANDLING INFORMATION ..................................................................... 24
USING A MEMORY CARD ....................................................................................................25
CONNECTING TO THE HAEDSET ..........................................................................................26
CHAPTER 2. BASIC OPERATION
BASIC OPERATION ........................................................................................29
TURNING THE PHONE ON AND OFF....................................................................... 30
MENU ACCESS ....................................................................................................... 30
MENU SUMMARY.................................................................................................. 31
MAKING A CALL..................................................................................................... 33
ABOUT PUSH TO TALK ........................................................................................... 34
USING A PUSH TO TALK (PTT) ALERT ....................................................................34
USING A PUSH TO TALK (PTT) BARGE ...................................................................35
ANSWERING CALLS ............................................................................................... 36
ANSWERING PTT CALLS ........................................................................................ 37
ENDING A CALL ..................................................................................................... 37
MISSED CALL NOTIFICATION ................................................................................. 37
WAIT/PAUSE .......................................................................................................... 38
MAKING AN INTERNATIONAL CALL ...................................................................... 39
3 WAY CALLING ..................................................................................................... 39
CALL WAITING .......................................................................................................39
VOLUME QUICK ADJUSTMENT .............................................................................. 40
CALLER ID .............................................................................................................. 40
VIBRATE MODE ......................................................................................................40
MUTE FUNCTION ...................................................................................................40
SPEAKERPHONE ....................................................................................................41
FLASHLIGHT ..........................................................................................................41
VOICE DICTATION ................................................................................................... 41
TEXT TO SPEECH .................................................................................................... 42
AVAILABLE OPTIONS DURING A CALL ................................................................... 43
MAKING AN EMERGENCY CALL ............................................................................43
MOTION DETECTION ..............................................................................................44
CHAPTER 3. MEMORY FUNCTION
MEMORY FUNCTION .....................................................................................47
STORING A PHONE NUMBER ................................................................................. 48
TEXT INPUT ............................................................................................................54
USING THE TEXT INPUT MODE .............................................................................. 54
ONE, TWO, THREE DIGIT SPEED DIALING ..............................................................57

4
5
CHAPTER 4. MENU FUNCTION
MENU FUNCTION..........................................................................................59
CONTACTS ..............................................................................................................60
MESSAGING ...........................................................................................................68
SETTINGS ...............................................................................................................75
OPTIONS ................................................................................................................ 78
RECENT CALLS .......................................................................................................78
MEDIA CENTER ......................................................................................................81
VZ NAVIGATOR ....................................................................................................... 86
SETTINGS & TOOLS ................................................................................................ 87
CHAPTER 5. SAFETY AND WARRANTY
SAFETY AND WARRANTY ...........................................................................131
SAFETY INFORMATION FOR WIRELESS HANDHELD PHONES ............................. 132
SAFETY INFORMATION FOR FCC RF EXPOSURE ..................................................137
SAR INFORMATION ..............................................................................................138
HEARING AID COMPATIBILITY (HAC) FOR WIRELESS TELECOMMUNICATIONS
DEVICES ............................................................................................................... 140
FDA CONSUMER UPDATE ....................................................................................141
AVOID POTENTIAL HEARING LOSS ......................................................................150
FCC COMPLIANCE INFORMATION ........................................................................152
12 MONTH LIMITED WARRANTY ........................................................................153

C781
CHAPTER 1. BEFORE USING
1
INSIDE THE PACKAGE
HANDSET DESCRIPTIONS
DISPLAY INDICATORS
FEATURT OVERVIEW
INSTALLING THE SIM CARD AND BATTERY
REMOVING THE BATTERY
CHARGING THE BATTERY
BATTERY HANDLING INFORMATION
USING A MEMORY CARD
CONNECTING TO THE HAEDSET
This chapter provides important information about using the
C781 including:
BEFORE USING

Standard
Battery
SIM Card
(Pre-installed)
PRODUCT SAFETY
& WARRANTY
GUIDE
Handset QRG
(Quick Reference
Guide)
Product Safety &
Warranty Guide
Battery Cover Wall Charger USB Cable Global Support
Kit
8
02
03
04
05
01
9
HANDSET DESCRIPTIONS
1. Earpiece:
Allows you to hear
the other caller.
2. Main Display Screen
:
Displays all the information
needed to operate your
phone.
3. [ B ] Directional Key
:
Allows you to scroll through
phone menu options and
provides a shortcut to phone
functions from idle mode.
4. [ C ] Left Soft Key
: Press to
access the messaging menu
or access the function listed
above the key.
5. [ E ]
Camera & Video Key:
In idle mode, press once
to start taking a picture. If
pressed one more time, it
toggles to the video recording
mode.
6. [ G ] SEND Key
: Press to
make or receive a call. In idle
mode, press to access the all
calls list.
@
1
2
4
3
14
13
12
11
10
9
15
5
7
6
8
INSIDE THE PACKAGE
This package should include all items pictured below. If any are missing or different,
immediately contact the retailer where you purchased the phone.

10
02
03
04
05
01
11
11. [ H ] END/PWR Key
: Press and hold to turn the phone on/off or press to
end a call or browser session. Within a menu, press to return to idle mode.
12. [ F ] Speakerphone / Flashlight Key
: With the flip open, press to turn
speakerphone on or off.
13. [ A ] OK Key
: Press to access the menu from idle mode. It also allows you to
accept choices when navigating through the menu.
14. [ D ] Right Soft Key
: Press to access the contacts menu in idle mode or
access the function listed above the key.
15. Microphone
: Allows the other caller to hear you.
16. External Speaker
: Allows you to listen to music, sounds or ringtones.
20
22
21
23
24
25
26
7. [ 1 ] Voicemail Key
: In idle mode, press and hold to automatically connect
to your voicemail box.
8. [ K ] Shift Key
: Press to enter an asterisk (*) character for calling features.
In text entry mode, press to change the character input type. Press and hold to
display the plus sign (+) for international dialing.
9. [ J ] Vibrate Mode Key
: Press and hold to activate/deactivate vibrate
mode in idle mode.
Press to enter the (#) character for calling features. In text entry mode, press
to add a space.
10. [ I ] CLR Key
: Press to clear a character from the display. Press and hold
to clear all characters. Within a menu, press to return to the previous menu.
Press and hold to activate the G’zGEAR function in idle mode.
16
15
17
18
19

12
02
03
04
05
01
13
Main Indicator Icons
Airplane Mode
: Transmitting and receiving information is restricted.
1x and PTT services are available.
3G and PTT services are available.
Roaming
: The phone is outside of the home service area.
Femto Cell
: The phone is connected to the network extender.(Femto
Cell).
SSL (Secured Socket Layer)
: Indicates that secure communication
between client and server has been established during data communica-
tion using encryption.
Voice Privacy
: Indicates Voice Privacy mode is active.
Data Call
: Data Session is in progress.
Dormant
: Phone is in a dormant state during a data call. Phone reverts to
Dormant mode when there hasn’t been activity on a page for some time.
The connection is still active and you can make and receive calls.
No Service
: Phone cannot receive a signal from the system.
TTY
: TTY mode is active.
Voice Call
: A call is in progress.
* No icon indicates the phone is in idle mode.
GPS E911 Icon
: Location Service of your phone is E911.
GPS Location On Icon
: Location Service of your phone is Location On.
17. Front Display Screen
: Displays incoming calls, messages, signal, battery
strength, time and date.
18. Camera
: Built-in camera lens.
19. Sim Card Slot
: Allows you to insert a SIM card. The SIM Card comes pre-
installed in the device (located under the battery).
20. Headset Jack
: Allows you to plug in an optional headset for convenient,
hands-free conversations.
21. [N] PTT Key
: Press to activate the PTT mode in idle mode.
22. [ L
M ] Volume Keys
: Press to adjust the master volume in idle mode or adjust
the voice volume during a call.
23. Voice Command Key
: Press to activate the voice command function in idle
mode.
24. Charging / Data Jack
: Plug in a wall charger or USB cable (USB cable sold
separately).
25. SD Card Slot
: Allows you to insert a SD card.
26. Charging Terminals
DISPLAY INDICATORS
Main Indicator Icons
1X Signal Strength
: 1X service is available.
3G Signal Strength
: 3G service is available.
D Signal Strength
: Digital service is available.
GSM Signal Strength
: GSM service is available.
GPRS Signal Strength
: GPRS service is available.

14
02
03
04
05
01
15
Main Indicator Icons
Voicemail
: Indicates you have voicemail messages.
Alarm On
: Appears when an alarm is set.
DST
: DST (Daylight Saving Time) is active.
PTT Icons
PTT Individual Available
PTT Group Available
PTT Unavailable
Do Not Disturb_ Single
Do Not Disturb_ Group
PTT Number
PTT Group
PTT Alert
PTT Missed calls
PTT Connecting to Individual
PTT Connected to Individual
Main Indicator Icons
Bluetooth
: Indicates Bluetooth mode.
Bluetooth Active
: Indicates Bluetooth Active mode.
Bluetooth Connected
: Indicates a Bluetooth Device is connected.
Battery Level
: Battery charging level - the more blocks, the stronger
the charge.
AVR Active
: AVR mode is active.
AVR Listening
: Indicates AVR listening.
SIM Card
: Indicates SIM Card memory in use.
All Sounds O
: All sounds are set to o.
Alarm Only
: Phone will alert you only with an alarm alert.
Vibrate Only
: Phone will vibrate when call is received.
Speakerphone
: Speakerphone mode is active.
Missed Calls
: Indicates you have missed calls.
Message
: Indicates you have a new message.
Email
: Indicates you have received a new email.
Calendar Appointment
: Event Alarm is active.

16
02
03
04
05
01
17
New Contact Icons
Mobile1 Ringtone
Mobile2 FAX
Home Speed Dial
Business Voice Dial
Personal Email Address
Business Email WL Messenger
Group AIM
Picture Yahoo!
Message Tone Title
IM Screen Name Birthday
Company Notes
Message Icons
New/Unread Message Priority
Opened/Read Message Unopened Message
Notication
PTT Icons
PTT Connecting to Group
PTT Connected to Group
PTT Listening to Individual
PTT Talking to Individual
PTT Listening to Group
PTT Talking to Group
PTT Call Ended
PTT Enterprise Group Dialed
PTT Enterprise Group Received
PTT Individual DND
PTT Group DND
PTT Enterprise Group DND
Recent Call Icons
Dialed Call Missed Call
Received Call

18
02
03
04
05
01
19
FEATURT OVERVIEW
WATER RESISTANCE
The C781 is water resistant. It provides reliable performance for outdoor activities, and
in wet conditions such as driving rain or high humidity.
The tested devices meets the requirements of the MIL-STD-810G (Rain & immersion
1m, 30min) standard.
CAUTION:
The Water Resistance feature does not guarantee protection against the
usage of this device underwater. Do not use the handset underwater.
To maintain water resistance:
• Securely close the Charging/Data Port cover and the Headset Jack cover.
• Completely close the battery cover and slide the battery cover lock to the LOCK
position.
ShOCk RESISTANCE
The rugged construction of the Ravine™ provides outstanding shock and vibration
resistance. The tested device meets the requirements of the MIL-STD-810G (Drop 1.5m)
standard.
CAUTION:
The shock and vibration resistance features do not guarantee protection
against every type of shock and vibration. Your handset may be damaged or
malfunction depending on the severity of the shock or vibration.
DUST RESISTANCE
For additional peace of mind, the Ravine™ is also dust resistant. The device was tested
using silica flour at a temperature of 95°F and meets the MIL-STD-810 (Dust) standard.
•
Your handset can be rinsed with clean water when dirty. To ensure water resistance,
make sure that all covers are securely closed before rinsing.
• Periodically, clean the Charging Terminals and Battery Terminals with a dry cloth
or cotton swab. Dust may cause electrical connection problems. Avoid wiping with
excessive force, which can damage the terminals.
Message Icons
Unread EMS Opened Download Picture
Message
Read EMS Corrupt Message
Message Delivered Pending Message Sent
Incomplete Delivery Unread MMS
Sent Message Delivery
Failed Read MMS
Message Locked Sent Message
Text Message Draft Received Message
Picture Message Draft Unread WAP Push
Read WAP Push Multiple Message Pending
Multiple Message
Delivered
Multiple Message
Sent
Multiple Message Failed Multiple Message
Incomplete

20
02
03
04
05
01
21
2. Slide the battery into the slot by aligning the
contacts (1) and press down until you hear
“click (2).”
3. Insert the battery cover into the slots (1) and
press the battery cover in the direction of the
arrow (2).
4. Press down firmly on the side of the battery
cover at each arrow points, as shown in the
figure.
5. Slide the battery cover latch to the LOCK
position in the direction of the arrow shown
in the figure.
Charging Terminals Battery Terminals
CAUTION
• Do not clean terminals inside the handset, or they may be damaged.
• If mud or sand is adhered to the handset, do not use it until wiping completely.
• Do not place the handset directly on sand. If sand gets into the Earpiece or Speaker,
sounds may be difficult to hear. Sand getting into the handset’s hinge can cause
problems such as overheating.
INSTALLING THE SIM CARD AND BATTERY
Your wireless device comes with a SIM card installed which along with a Global Feature
on your account, enables you to make calls and access email in GSM Networks while
traveling overseas.
Should your SIM card be lost or damaged, please follow these instructions for the
installation of your new SIM.
1. Slide the SIM card into the slot in the direction
of the arrow shown in the figure.
- To remove the SIM card, pull out the SIM
card in the opposite direction of the arrow.

22
02
03
04
05
01
23
CHARGING THE BATTERY
1. Connect the USB data cable into the cableless
wall adapter.
2. Plug the USB data cable into the phone’s
charging/data jack and the wall adapter end
into an electrical outlet.
If the battery connector is not properly aligned, damage could occur to the charging
connector and the phone may not be charged.
Correct Incorrect
Correct Incorrect
REMOVING THE BATTERY
1. Slide the battery cover latch to the FREE
position in the direction of the arrow as
shown in the figure.
2. Insert your finger in the groove and pull up
the battery cover in the direction of the arrow.
3. Remove the battery by pulling the tab up.

24
02
03
04
05
01
25
3. To remove the wall charger, unplug the USB
data cable from the phone’s charging/data
jack.
•
When you charge the battery with the handset
powered off, you will see a charging status
screen. After charging is completed, the Charge
Complete message appears and you cannot
operate the phone until it is powered on. To turn
your phone on, press and hold the Power Key
until your display turns on.
• The battery may not be fully charged at the time of purchase. Fully charge the
battery before using.
• It is more efficient to charge the battery with the handset powered off.
• Battery operating time gradually decreases over time.
• If the battery fails to perform normally, you may need to replace the battery.
BATTERY HANDLING INFORMATION
DO’S
•
Only use the battery and charger approved for use with the C781.
• Only use the battery for the system for which it is specified.
• Only use or replace the battery with a charging system or another battery that has been qualified with the
system per this standard, IEEE-Std-1725-2006. Use of an unqualified battery or charger may present a risk of
fire, explosion, leakage, or other hazard.
• Only use the battery for its original purpose. As an improper battery use may result in a fire, explosion or
other hazard.
• Try to keep batteries in a temperature between 41°F (5°C) and 95°F (35°C). If the battery is stored in
temperatures above or below the recommended range, give it time to warm up or cool down before using.
• Store the discharged battery in a cool, dark, and dry place.
• Purchase a new battery when its operating time gradually decreases after fully charging.
• Properly and promptly dispose of the battery according to local laws.
• Battery usage by children should be supervised.
DON’TS
•
Don’t attempt to disassemble or open the battery – it is a sealed unit with no serviceable parts.
•
Don’t crush, bend or deform, puncture or shred the battery.
•
Don’t drop the phone or battery. If the phone or battery is dropped, especially on a hard surface, and the user
suspects damage, take it to a service center for inspection.
•
Don’t leave the battery in extremely hot or cold temperatures. Otherwise, it could significantly reduce the
capacity and lifetime of the battery.
•
Don’t modify or remanufacture, attempt to insert foreign objects into the battery, immerse or expose to water
or other liquids, expose to fire, explosion or other hazard.
•
Don’t accidentally short-circuit the battery by carrying it in your pocket or purse with other metallic objects
such as coins, clips and pens. This may critically damage the battery.
•
Don’t short-circuit a battery or allow metallic conductive objects to contact battery terminals.
•
Don’t dispose of the battery by placing into a fire.
USING A MEMORY CARD
The C781 supports the use of a microSD™ memory card as a source of external memory.
USING A MICROSDTM CARD
By using a microSDTM card, you can store sounds, videos, images, photos, music, and
other files.
USING A MICRO SD
TM
CARD (OPTIONAl)
1. Open the microSD
TM
card cover, and insert
the microSD
TM
card into the slot with the gold
contacts facing up.
2. Press the microSD
TM
card into the slot until
you hear the “click”, then close the microSD
TM
card cover.
3.
“SET MEMORY CARD AS DEFAULT STORAGE
LOCATION?”
will appear on the display.

26
02
03
04
05
01
27
4. Press the OK Key to confirm.
To prevent possible damages, please keep the microSDTM card slot closed at all times
regardless of whether a microSDTM card is inserted or not.
REMOVING A MICROSD
TM
CARD
1. Open the microSD
TM
card cover, and use your
thumb to press and release the microSD
TM
card.
2. Press the memory card inward, gently, until it
pops out.
3. Remove the microSD
TM
card and close the
microSD
TM
card cover.
• Do not remove the microSDTM card while reading or writing files. Otherwise it could
be damaged.
• To ensure the proper function of removable memory, please use a microSDTM card.
CONNECTING TO THE HAEDSET
You can connect a compatible device equipped with a standard 2.5mm plug to your handset for
safe, convenient, hands-free conversations.
1. To open the headset jack cover, insert your
fingertip into the notch and open the cover.
2. Plug the connector into the headset jack.
CAUTION
• Do not forcibly insert/remove the connector
into/from the headset jack. Carefully insert/
remove it.
• Failure to completely reseal the headset jack
cover after use may result in damage if the
handset is exposed to water.

C781
CHAPTER 2. BASIC OPERATION
2
TURNING THE PHONE ON AND OFF
MENU ACCESS
MENU SUMMARY
MAKING A CALL
ABOUT PUSH TO TALK
USING A PUSH TO TALK (PTT) ALERT
USING A PUSH TO TALK (PTT) BARGE
ANSWERING CALLS
ANSWERING PTT CALLS
ENDING A CALL
MISSED CALL NOTIFICATION
WAIT/PAUSE
MAKING AN INTERNATIONAL CALL
3 WAY CALLING
CALL WAITING
VOLUME QUICK ADJUSTMENT
CALLER ID
VIBRATE MODE
MUTE FUNCTION
SPEAKERPHONE
FLASHLIGHT
VOICE DICTATION
TEXT TO SPEECH
AVAILABLE OPTIONS DURING A CALL
MAKING AN EMERGENCY CALL
MOTION DETECTION
This chapter addresses and explains the basic features for
C781 including:
BASIC OPERATION

30
01
02
31
02
03
04
05
MENU SUMMARY
Main Menu 2nd DEPTH 3rd DEPTH
Contacts
1. New Contact
2. Contact list
3. Groups
4. New PTT Contact
5. PTT Contact List
6. PTT Group
7. Backup Assistant
8. Speed Dials
9. In case of Emergency
10. My Name Card
Messaging
1. New Message
Text Message
Picture Message
Video Message
Voice Message
2. Inbox
3. Sent
4. Drafts
5. Voicemail
6. Mobile IM
7. Mobile Email
Recent Calls
1. Missed
2. Received
3. Dialed
4. All
5. View Timers
TURNING THE PHONE ON AND OFF
TURNING ON
1. Press and hold the END/PWR Key
H
until the phone display turns on.
2. Enter your 4-digit lock code if the phone is locked.
The default lock code is the last 4 digits of your phone number.
TURNING OFF
1. Press and hold the END/PWR Key
H
until the phone display turns off.
•
Immediately change or recharge the battery when BATTERY LOW appears on the
display.
Memory may possibly be damaged if the phone turns off due to the battery
completely draining.
•
Turn the phone off before removing or replacing the battery. If the phone is on,
unsaved data may be lost.
MENU ACCESS
Your phone can be customized via the menu. Each function can be accessed by scrolling
with the Directional Key or by pressing the number that corresponds with the menu
item.
1. To access the menu, press the OK key [
MENU
].
2. To scroll through the menu, press the Directional key
B
up, down, left or
right.
3. To return to the previous page, press the CLR key
I
.
4. To exit the current menu, press the END/PWR Key
H
.
5. To access the messaging menu, press the Left Soft Key
C
[
Message
].
6. To access the contact list, press the Right Soft key
D
[
Contacts
].
All directions in this manual are based on the list and communicator menu layout and
the world display theme. If you have changed the settings, the directions may vary.

32
01
02
33
02
03
04
05
Main Menu 2nd DEPTH 3rd DEPTH
12. USB Mode
13. Phone Info
14. SIM Info
15. Data Manager
16. Tutorial
17. Set Up Wizard
MAKING A CALL
BY DIAlING ThE PhONE NUMBER
1. First, gently open the folding cover of the phone.
2. Enter the phone number including the area code if needed and press the SEND
Key
G
.
3. To end the all, press the END Key
H
.
When you place or receive a call from phone numbers stored in your Contact List, the
name will be displayed.
USING ThE SPEED DIAlING FUNCTION
1. If the speed dial is set, press the speed dial number you wish to connect to, and
hold the last digit number you have assigned for the speed dial.
“
Speed Dial
” message appears, and your call is connecting to the contact.
2. To end the all, press the END Key
H
.
USING ThE CONTACT lIST
1. Press the Right Soft Key
D
[
Contacts
].
2. Select the contact and press the SEND Key
G
.
3. To end the call, press the END Key
H
.
Main Menu 2nd DEPTH 3rd DEPTH
Media Center
1. Apps
2. Mobile Web
3. Tunes & Tones 1. My Ringtones
2. My Sounds
4. Picture & Video
1. V CAST Videos
2. My Pictures
3. My Videos
4. Take Picture
5. Record Video
6. Online Album
Mobile Email
Apps
My Pictures
Settings & Tools
1. My Verizon
2. Master Volume
3. Tools
4. Bluetooth
5. Keyguard Settings
6. PTT Settings
7. Sound Settings
8. Display Settings
9. Phone Settings
10. Call Settings
11. Memory

34
01
02
35
02
03
04
05
3. Keep pressing the PTT Key
N
while talking and then release the
PTT Key
N
.
Release the PTT Key
N
to let the other party talk.
USING ThE SPEED DIAlING FUNCTION
1. If the speed dial is set, press the speed dial number you wish to connect to.
“Assisted dialing On”
message appears.
2. Press the PTT Key
N
on your left hand side of the phone to alert.
3. Keep pressing the PTT Key
N
while talking and then release the
PTT Key
N
.
You can hear the response while the PTT Key
N
is released.
For information about using the speed dial, see page 63.
USING ThE CONTACT lIST
1. Press the Right Soft Key
D
[
Contacts
].
2. Select the contact and press the Left Soft Key
C
[
Alert
].
“Press PTT Key To Alert”
message appears on your main display screen.
3. Keep pressing the PTT Key
N
while talking and then release the
PTT Key
N
.
You can hear the response while the PTT Key
N
is released.
The phone number you are trying to alert must be saved in the PPT Contact List.
USING A PUSH TO TALK (PTT) BARGE
A barge call automatically connects to the other party. The called party does not have
the option to ignore the call.
BY DIAlING ThE PhONE NUMBER
1. Enter the phone number including the area code if needed.
2. Press and hold the PTT Key
N
on your left hand side of the phone.
ABOUT PUSH TO TALK
Push to Talk calls may only be made with other Verizon Wireless Push to Talk
subscribers, and only from the National Enhanced Services Rate and Coverage
Area. A Push to Talk call is terminated by pressing the End/Power Key
H
or
will automatically time out after 10 seconds of inactivity. While you are on a
Push to Talk call, voice calls received will go directly to Voice Mail. When you are
on a voice call, you cannot receive a Push to Talk call. You cannot prevent others
who have your wireless phone number from entering you into their Push to
Talk Contact List. Only one person can speak at a time during Push to Talk calls.
When using your phone keypad to make a Push to Talk call, you must enter the
10-digit phone number of the called party. Your Push to Talk service cannot be
used for any applications that tether your phone to computers or other devices
for any purpose. Push to Talk-capable phone and Calling Plan required. If you
wish to switch from a Push to Talk Calling Plan to another Calling Plan, you must
first stop using your Push to Talk-capable phone and purchase or provide another
compatible phone.
USING A PUSH TO TALK (PTT) ALERT
The Push To Talk (PTT) feature allows you to use your phone like a walkie-Talkie to
communicate with Verizon Wireless PTT subscribes.
An alert call is a call to notify a called party that the calling party wants to talk using a
tone. The called party has option to answer or ignore the call.
BY DIAlING ThE PhONE NUMBER
1. Enter the phone number including the area code if needed and press the Left
Soft Key [
Alert
].
“Press PTT Key To Alert”
message appears on your main display screen.
The Left Soft Key [Alert] is not available when PTT Mode is set to Off.
2. Press the PTT Key
N
on your left hand side of the phone to alert.

36
01
02
37
02
03
04
05
ANSWERING PTT CALLS
INCOMING A BARGE CAll
When you receive a barge call, you will hear the calling party speaking through the
speakerphone. The calling party’s phone number will appear on your display. If the
calling party’s number has already been registered in your PTT Contact List, the contact
name will replace the phone number on the display.
1. Press and hold the PTT Key
N
to talk.
2. Release the PTT Key
N
to let the other party talk.
3. Press the End Key
H
to end the call.
INCOMING AN AlERT CAll
When you receive an alert, you will hear the “
PTT Alert
” tone. The message “Incoming
Alert” will be displayed with the phone number or contact name of the calling party.
The PTT Alert tone repeats every 1 second until you answer or ignore the call. If you
do not answer an incoming alert within 10 seconds, the PTT call will be automatically
disconnected.
1. Answer or ignore the alert.
To answer the alert, press and hold the PTT Key
N
and begin talking.
To ignore the alert, press the Right Soft Key
D
[
Ignore
].
2. Release the PTT Key
N
to let the other party talk.
3. Press the End Key
H
to end the call.
ENDING A CALL
1. Press the END/PWR Key
H
.
MISSED CALL NOTIFICATION
When an incoming call is not answered, the missed call notification appears on the
display.
3. Wait until the “OK to Talk’ tone sounds and the message “Talking to” appears on
the display. Speak while pressing down PTT Key
N
.
4. Release the PTT Key
N
to let the other party talk.
5. Press the END Key
H
to end the call.
USING ThE SPEED DIAlING FUNCTION
1. If the speed dial is set, press the speed dial number you wish to connect to.
“
Assisted dialing On
” message appears.
2. Press and hold the PTT Key
N
on your left hand side of the phone.
3. Wait until the “
OK to Talk
” tone sounds and the message “
Talking to
” appears
on the display. Speak while pressing down PTT Key
N
.
4. Release the PTT Key
N
to let the other party talk.
5. Press the END Key
H
to end the call.
For information about using the speed dial, see page 63.
USING ThE CONTACT lIST
1. From the idle mode, press the PTT Key
N
to access your PTT contact List.
2. Press and hold the PTT Key
N
on your left hand side of the phone.
3. Wait until the “
OK to Talk
” tone sounds and the message “
Talking to
” appears
on the display. Speak while pressing down PTT Key
N
.
4. Release the PTT Key
N
to let the other party talk.
5. Press the END Key
H
to end the call.
The phone number you are trying to alert must be saved in the PPT Contact List.
ANSWERING CALLS
1. Press the SEND Key
G
to answer the incoming call.
Depending on your phone’s settings, you may also answer incoming calls by opening
the phone or by pressing any key.
2. To ignore incoming calls, press the Right Soft Key
D
[
Ignore
].

38
01
02
39
02
03
04
05
MAKING AN INTERNATIONAL CALL
1. Press and hold the Shift Key
K
.
- The “+” symbol, required for international calls appears.
2. Enter the country code, area code, and phone number.
3. Press SEND Key
G
to make a call.
When Assisted Dialing is set to On, the inputted phone numbers may change to the
wrong number by the auto-correct function.
3 WAY CALLING
You can talk to two participants at the same time. During the call, the normal airtime
rates will be applied for each of the two calls.
1. Enter the phone number and press the SEND Key
G
.
2. When you have connected, enter the second phone number to call and press
the SEND Key
G
.
3. When you’re connected to the second party, press the SEND Key
G
again to
begin your 3-Way call.
If one of the participants hangs up during the call, you and the remaining participant
stay connected. If you initiated the call and are the first one to hang up, all three calls
are disconnected.
CALL WAITING
If you are on a call and you receive another incoming call, you will hear one beep and
the caller’s phone number will appear on the display. With Call Waiting, you may put
the active call on hold while you answer the other incoming call.
1. Press the SEND Key
G
to answer the other call. The first call will
automatically be placed on hold. To switch back, press the SEND Key
G
again.
DISPlAY ThE MISSED CAll FROM ThE NOTIFICATION
1. Select
View Now
and press the OK Key.
2. To dial the phone number, press the SEND Key
G
.
DISPlAY A MISSED CAll FROM IDlE MODE
1. Press the OK Key [
MENU
], select
Recent Calls
and press the OK Key.
2. Select
Missed
and press the OK Key.
3. Select the missed call and press the OK Key [
OPEN
].
4. To dial the phone number, press the SEND Key
G
.
WAIT/PAUSE
Pauses are used for automated systems (i.e., voice mail or calling cards). The numbers
entered after the pause will automatically be dialed after the pause. It is useful for
dialing into systems that require a code.
WAIT
The phone stops dialing until you press the SEND Key
G
to dial the next number.
1. Enter the phone number.
2. Press the Right Soft Key
D
[
Options
].
3. Select and select
Add Wait
and press the OK Key.
4. Enter additional number(s).
5. Press the SEND Key
G
to dial.
2-SEC PAUSE
The phone waits 2 seconds before sending the next digits automatically.
1. Enter the phone number.
2. Press the Right Soft Key
D
[
Options
].
3. Select
Add 2-Sec Pause
and press the OK Key.
4. Enter additional number(s) (pin number or credit card number).
5. Press the SEND Key
G
to dial.
Table of contents
Other Casio Cell Phone manuals

Casio
Casio W51CA User manual

Casio
Casio GzOne CA002 Installation guide

Casio
Casio G'zOne Rock User manual

Casio
Casio Exilim W53CA User manual

Casio
Casio GzOne User manual

Casio
Casio EXILIM CA003 Installation guide

Casio
Casio G'zOne Ravine C781R3 User manual

Casio
Casio Ravine 2 User manual

Casio
Casio EXILIM C721 User manual

Casio
Casio G'zOne Commando User manual

Casio
Casio W63CA Installation guide

Casio
Casio BOULDER GzOne User manual

Casio
Casio A5512CA Installation guide

Casio
Casio verizon User manual

Casio
Casio W41CA Assembly instructions

Casio
Casio W43CA User manual

Casio
Casio G'zOne Brigade User manual

Casio
Casio CA007 User manual

Casio
Casio GZONE TYPE-S User manual

Casio
Casio EXILIM C721 User manual