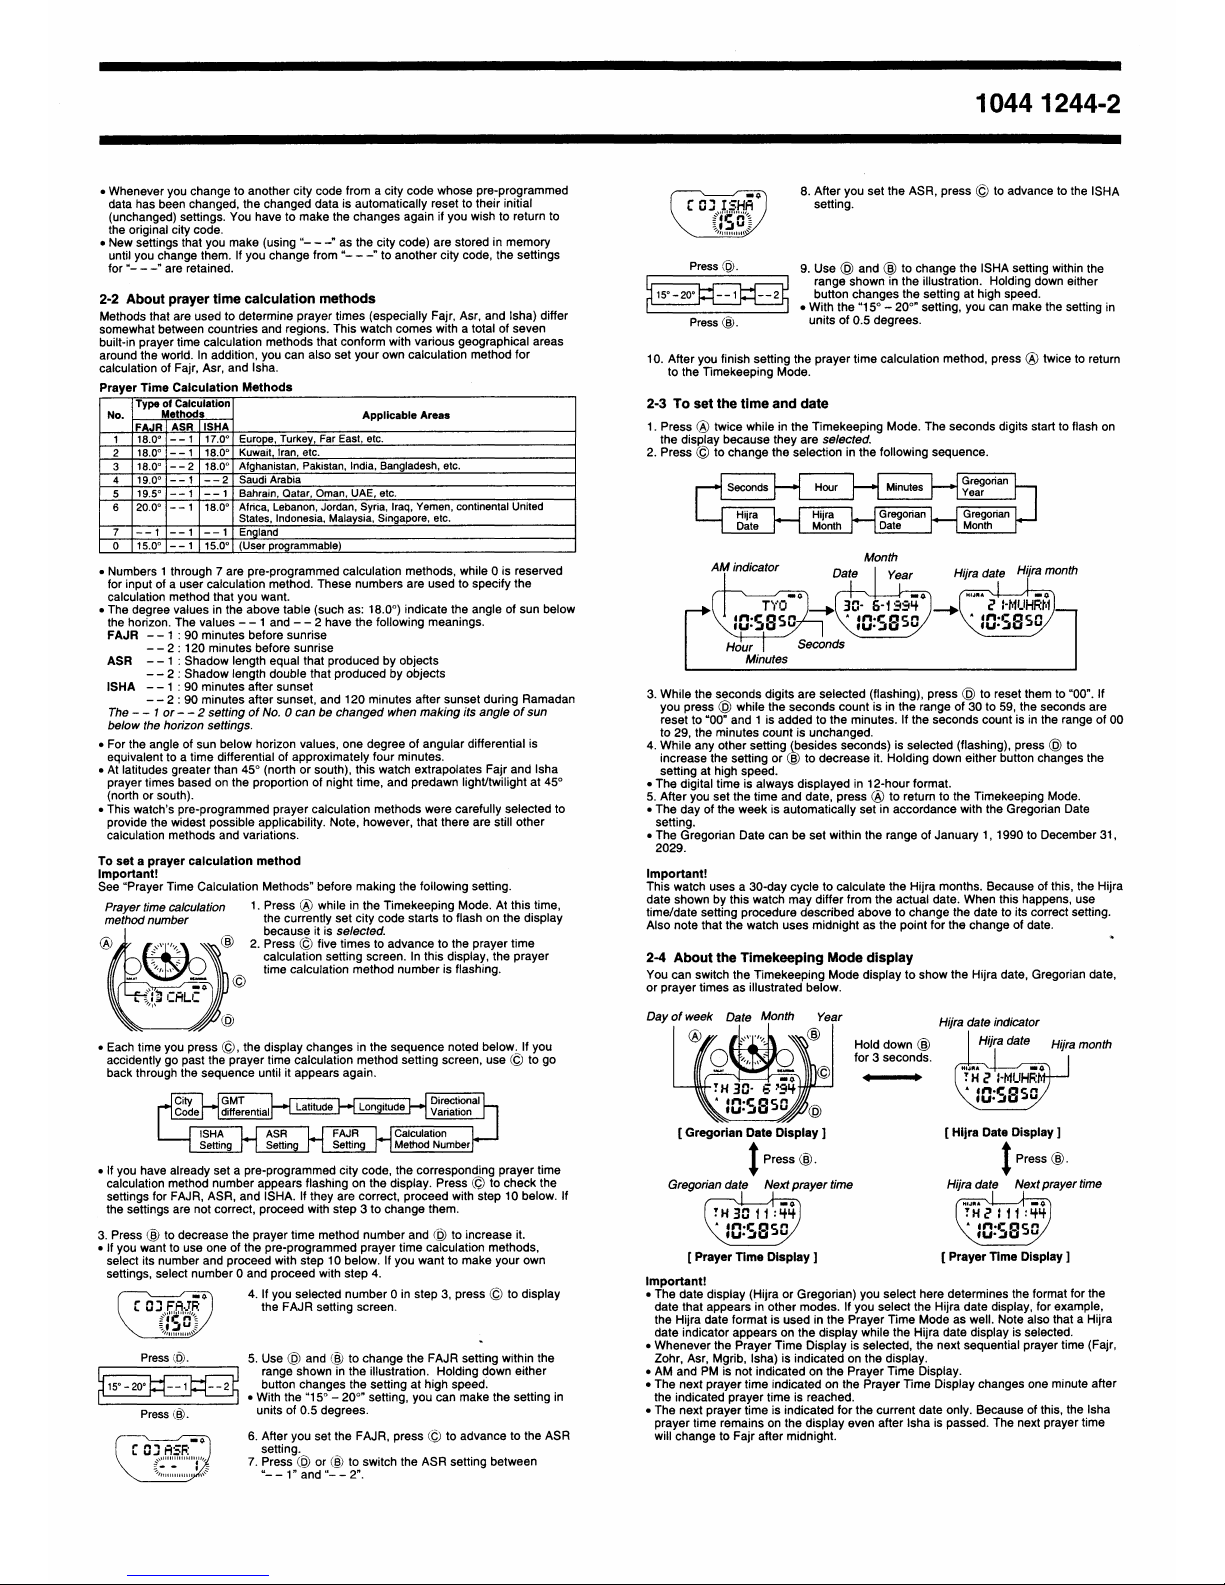
Casio 1044 User manual

Module No 10
4
1144 1 0 4 4 1 2 4 4 - 1
PART 1 GENERAL GUIDE
The operational procedures for Modules 1044 and 1244 are identical. All of the
illustrations in this manual show Module 1044.
[Module No. 1244]
Hold down
B for 3
seconds.
HIJRA
HI
1-MUHRM
10 58 5 0
[ Gregori n D te Displ y ] [ Hijr D te Displ y ]
To switch from the Timekeeping Mode to the Prayer Time Mode, hold down © for
about one second. For other modes, simply press © to change from mode to mode.
After you perform an operation in any mode, pressing © returns to the Timekeeping
Mode.
Pr yer Time Mode
SALAT Hijr D te Mode
HIJRA
TH 30 FAJR
2 3 9
HIJRA
30- 6
CMPSS
NORTH
Digit l Comp ss Mode
ALARM
12:00
1 2 0 0
Al rm Mode
PART 2 TIMEKEEPING MODE
This part of the manual tells you how to set the city data (to tell the watch where you
are), the prayer time calculation method,* and the current time and date. Note that the
settings you make in the Timekeeping Mode are used by the Digital Compass and
Prayer Time function. Make sure you make these settings correctly.
* There are number of different prayer time calculation methods in use, depending on
geographic region. This watch is pre-programmed to calculate prayer times in
accordance with the method you select. For details, see “2-2 About prayer time
calculation methods.”
• In the Timekeeping Mode, you can switch the date display between Hijra style and
Gregorian style. For details, see “2-4 About the Timekeeping Mode display.”
• In the Timekeeping Mode, hold down B to illuminate the display.
2-1 About city d t ...
With the city data, you tell the watch your current location so that it can calculate other data.
Be sure to change the city data setting whenever you move from one city to another.
City data consist of time differential from Greenwich Mean Time (GMT), latitude,
longitude, and directional variation (variation between true north and magnetic north)
for the city where you are currently located. You can use either of the two following
methods to set city data.
• Standard Data Input
With this method, you simply specify one of 30 pre-programmed city codes, and all
other data (based on data for 1990) is input automatically. With this method, however,
you must remember to change the time differential from GMT whenever you switch
between summer time and standard time. A complete list of the available city codes
can be found at the end of this manual.
• Original Data Input
With this method, you make each of the settings by yourself. There are two methods
you can use to preset original data editing pre-programmed city data or inputting new
data.
To edit pre-programmed city data, you select one of the pre-programmed city codes
and make changes in its data to suit your current location.
To input new data, you must make each setting one-by-one.
To set city d t using city codes
1. Press (A) while in the Timekeeping Mode. At this time,
the currently set city code starts to flash on the display
because it is selected.
Graphic display area
2. While the city code is selected (flashing), press (D) or
(B) to scroll through the 3-letter city codes until the one
you want is displayed.
• See the City Code List at the end of this manual for a full
list of available city codes.
3. After you select your city code, press © to advance to
the GMT differential setting.
City code • Pressing © causes the GMT differential to start flashing,
GMT differential 4. If you want to change the GMT differential setting (to
(+9 hours) adjust for the 1 -hour change for summer time), press
to increase the time differential or (B) to decrease it.
Prayer time calculation
method number
• If you do not want to change the GMT differential setting, skip this step and proceed
to step 5.
• Pressing (D) and (B) changes the time differential in 15-minute increments.
• The hours setting changes automatically whenever a change in the minutes settings
increases or decreases past 00.
• You can set the GMT differential within the range of -11 hours to +13 hours 45
minutes.
5. After you finish making your setting, press (A) twice to return to the Timekeeping
Mode.
• After you change the setting in the above procedure, the watch needs a bit of time to
calculate certain information. During this calculation, the pattern in the graphic
display moves. Wait until this display stops moving before you try to set any further
data.
• If you do not operate any button for a few minutes while a selection is flashing, the
flashing stops and the watch automatically goes back to the Timekeeping Mode.
• After you change the GMT differential for summer time, the city code (which is
displayed with the city data when setting the prayer time calculation method) is
marked with a to indicate that its data has been changed.
To set origin l city d t
When setting original city data, you can use the City Data List at the back of this
manual and the Directional Variation Map (included separately with this watch).
1. Press (A) while in the Timekeeping Mode. At this time,
the currently set city code starts to flash on the display
because it is selected.
2. While the city code is selected (flashing), press (B) or (D)
to scroll through the 3-letter city codes until the one you
want is displayed.
• If you are going to use pre-programmed city data, you
should select a city code for a location that is close to the
one whose data you want to set.
• If you are going to input new data, select “_ _ _” as the
city code.
GMT differential
(hours minutes)
Prayer time calculation method
number
to advance to
3. After you select the city code (3-letter city code or "_ _ _”), press
the GMT differential setting.
• Pressing © causes the GMT differential to start flashing.
4. Press (D) to increase the time differential or (B) to decrease it.
• Pressing (D) and (B) changes the time differential in 15-minute increments.
• The hours setting changes automatically whenever a change in the minutes settings
increases or decreases past 00.
• Holding down (D) or (B) changes the time differential at high speed.
• You can set the GMT differential within the range of -11 hours (-11 00) to +13 hours
45 minutes (13 45).
60° S Press (D).
0°N
Press (B).
(B) 5. After you set the GMT differential, press
to the latitude setting. to advance
Latitude
60° N 6. Use (D) and (B) to change the latitude within the range
shown in the illustration. Holding down either button
changes the setting at high speed.
7. After you set the latitude, press
longitude setting. to advance to the
Longitude
Press (D).
179°W = 0°E 180°E =
8. Use (D) and (B) to change the longitude within the range
shown in the illustration. Holding down either button
changes the setting at high speed.
Press (B).
Qibla value 9. After you set the longitude, press © to advance to the
directional variation setting.
• The sample display illustrated here shows a directional
variation of 7 degrees west.
• For details on the Qibla value, see “3-2 About Qibla
values...”.
Directional variation
60°W Press (D).
0°E
Press (B). 60° E
Notes
8 : 0 0
U 'U U
10. Use (D) and (B) to change the directional variation
setting the range shown in the illustration. Holding
down either button changes the setting at high speed.
11. After finish setting your city data, press (A) twice to
return to the Timekeeping Mode.
• Anytime you change pre-programmed city data, the city
code (which is displayed with the city data when setting
the prayer time calculation method) is marked with a “ # ”
to indicate that its data has been changed.
Note here that the prayer time calculation method (see “2-2 About prayer time
calculation methods") is also considered to be part of the pre-programmed data.
Because of this, ” is shown with the city code if the prayer time calculation method
has been changed, also.

1044 1244-2
• Whenever you change to another city code from a city code whose pre-programmed
data has been changed, the changed data is automatically reset to their initial
(unchanged) settings. You have to make the changes again if you wish to return to
the original city code.
• New settings that you make (using “_ _ _” as the city code) are stored in memory
until you change them. If you change from “_ _ _" to another city code, the settings
for “_ _ _" are retained.
2-2 About pr yer time c lcul tion methods
Methods that are used to determine prayer times (especially Fajr, Asr, and Isha) differ
somewhat between countries and regions. This watch comes with a total of seven
built-in prayer time calculation methods that conform with various geographical areas
around the world. In addition, you can also set your own calculation method for
calculation of Fajr, Asr, and Isha.
Pr yer Time C lcul tion Methods
No. Type of C lcul tion
Methods Applic ble Are s
FAJR ASR ISHA
118.0° - - 1 17.0° Europe, Turkey, Far East, etc.
218.0° - - 1 18.0° Kuwait, Iran, etc.
318.0° - - 2 18.0° Afghanistan, Pakistan, India, Bangladesh, etc.
419.0° - - 1 — 2 Saudi Arabia
519.5° - - 1 — 1 Bahrain, Qatar, Oman, UAE, etc.
620.0° - - 1 18.0° Africa, Lebanon, Jordan, Syria, Iraq, Yemen, continental United
States, Indonesia, Malaysia, Singapore, etc.
7- - 1 - - 1 - - 1 England
015.0° - - 1 15.0° (User programmable)
• Numbers 1 through 7 are pre-programmed calculation methods, while 0 is reserved
for input of a user calculation method. These numbers are used to specify the
calculation method that you want.
• The degree values in the above table (such as 18.0°) indicate the angle of sun below
the horizon. The values — 1 and — 2 have the following meanings.
FAJR - - 1 90 minutes before sunrise
— 2 120 minutes before sunrise
ASR — 1 Shadow length equal that produced by objects
- - 2 Shadow length double that produced by objects
ISHA - - 1 90 minutes after sunset
— 2 90 minutes after sunset, and 120 minutes after sunset during Ramadan
The — 1 or — 2 setting of No. 0 can be changed when making its angle of sun
below the horizon settings.
• For the angle of sun below horizon values, one degree of angular differential is
equivalent to a time differential of approximately four minutes.
• At latitudes greater than 45° (north or south), this watch extrapolates Fajr and Isha
prayer times based on the proportion of night time, and predawn light/twilight at 45°
(north or south).
• This watch’s pre-programmed prayer calculation methods were carefully selected to
provide the widest possible applicability. Note, however, that there are still other
calculation methods and variations.
To set pr yer c lcul tion method
Import nt!
See “Prayer Time Calculation Methods” before making the following setting.
1. Press (A) while in the Timekeeping Mode. At this time,
the currently set city code starts to flash on the display
because it is selected.
2. Press © five times to advance to the prayer time
calculation setting screen. In this display, the prayer
time calculation method number is flashing.
©
Prayer time calculation
method number
Each time you press © , the display changes in the sequence noted below. If you
accidently go past the prayer time calculation method setting screen, use © to go
back through the sequence until it appears again.
GMT
differential Directional
Variation
ISHA ASR FAJR Calculation
Setting Setting Setting Method Number
• If you have already set a pre-programmed city code, the corresponding prayer time
calculation method number appears flashing on the display. Press © to check the
settings for FAJR, ASR, and ISHA. If they are correct, proceed with step 10 below. If
the settings are not correct, proceed with step 3 to change them.
3. Press (B) to decrease the prayer time method number and (D) to increase it.
• If you want to use one of the pre-programmed prayer time calculation methods,
select its number and proceed with step 10 below. If you want to make your own
settings, select number 0 and proceed with step 4.
4. If you selected number 0 in step 3, press © to display
the FAJR setting screen.[ 0 ] FAJR
Press (D).
Press (B).
[ 0 ] ASR
5. Use (D) and (B) to change the FAJR setting within the
range shown in the illustration. Holding down either
button changes the setting at high speed.
• With the “15° - 20°” setting, you can make the setting in
units of 0.5 degrees.
6. After you set the FAJR, press © to advance to the ASR
setting.
7. Press (D) or (B) to switch the ASR setting between
“- - 1” and “- - 2”.
V
[ 0 ] ISHA 8. After you set the ASR, press
setting. to advance to the ISHA
Press (D)
15° - 20°— 1- - 2
Press (B)
9. Use (D) and (B) to change the ISHA setting within the
range shown in the illustration. Holding down either
button changes the setting at high speed.
• With the “15° - 20°” setting, you can make the setting in
units of 0.5 degrees.
10.After you finish setting the prayer time calculation method, press (A) twice to return
to the Timekeeping Mode.
2-3 To set the time nd d te
1.
2.
Press (A) twice while in the Timekeeping Mode. The seconds digits start to flash on
the display because they are selected.
Press © to change the selection in the following sequence.
Seconds Hour
Hijra Hijra
Date Month
Minutes Gregorian
Year
Gregorian
Date <— Gregorian
Month
AM indicator Month
Date
TYO 30- 6-1994
Hour
Minutes
Year Hijra date Hiyra month
HIJRA 21-MUHRM
Seconds
3. While the seconds digits are selected (flashing), press (D) to reset them to “00”. If
you press (D) while the seconds count is in the range of 30 to 59, the seconds are
reset to “00” and 1 is added to the minutes. If the seconds count is in the range of 00
to 29, the minutes count is unchanged.
4. While any other setting (besides seconds) is selected (flashing), press (D) to
increase the setting or (B) to decrease it. Holding down either button changes the
setting at high speed.
• The digital time is always displayed in 12-hour format.
5. After you set the time and date, press (A) to return to the Timekeeping Mode.
• The day of the week is automatically set in accordance with the Gregorian Date
setting.
• The Gregorian Date can be set within the range of January 1, 1990 to December 31,
2029.
Import nt!
This watch uses a 30-day cycle to calculate the Hijra months. Because of this, the Hijra
date shown by this watch may differ from the actual date. When this happens, use
time/date setting procedure described above to change the date to its correct setting.
Also note that the watch uses midnight as the point for the change of date.
2-4 About the Timekeeping Mode displ y
You can switch the Timekeeping Mode display to show the Hijra date, Gregorian date,
or prayer times as illustrated below.
Day of week Date Month Year Hijra date indicator
Hold down (B)
for 3 seconds. Hijra date Hijra month
30- 6 '94
[ Gregori n D te Displ y ]
Press (B).
Gregorian date Next prayer time
HIJRA
TH 21-MUHRM
[ Hijr D te Displ y ]
Press (8
Hijra date
TH 30 11 :44
[ Pr yer Time Displ y ]
HIJRA
Next prayer time
TH 21 11 : 44
[ Pr yer Time Displ y ]
Import nt!
• The date display (Hijra or Gregorian) you select here determines the format for the
date that appears in other modes. If you select the Hijra date display, for example,
the Hijra date format is used in the Prayer Time Mode as well. Note also that a Hijra
date indicator appears on the display while the Hijra date display is selected.
• Whenever the Prayer Time Display is selected, the next sequential prayer time (Fajr,
Zohr, Asr, Mgrib, Isha) is indicated on the display.
• AM and PM is not indicated on the Prayer Time Display.
• The next prayer time indicated on the Prayer Time Display changes one minute after
the indicated prayer time is reached.
• The next prayer time is indicated for the current date only. Because of this, the Isha
prayer time remains on the display even after Isha is passed. The next prayer time
will change to Fajr after midnight.

1044 1244-3
PART 3 DETERMINING THE DIRECTION TO QIBLA
This part of the manual tells you how to determine Qibla. It also contains information
about the Qibla value.
Import nt!
Be sure to keep this watch away from any sources of strong magnetism whenever
using the digital compass to determining directions or Qibla. Also note that proper
digital compass operation is impossible while inside a motor vehicle. For details, see
“7-2 Digital Compass Precautions” of this manual.
3-1 Determining Qibl
1. Set your city data.
2. Place the watch on a flat surface or (if
you wearing the watch), make sure
that your wrist horizontal (in relation
to the horizon).
Digital compass operation while the watch is not horizontal can produce erroneous
results.
Arrow 3. While in the Timekeeping Mode, press © to start the
Qibla operation.
• If the watch is not in the Timekeeping Mode, press © to
enter the Timekeeping Mode before starting the Qibla
operation.
• “QIBLA” appears on the display, and soon an arrow
pointing in the direction of QIBLA appears in the graphic
display area.
• The arrow remains on the display for about two minutes
after you perform the above operation.
3-2 About Qibl v lues...
The Qibla value represents the clockwise angle formed between a line starting from
your current location extending to magnetic north, and a line starting from your current
location reaching Makkah. True north
Qibla value Magnetic
north
3 00 AR.W Makkah 7° (Directional
Variation)
300° (Qibla Value)
Directional variation
Your current location
Current Mode
Hijra date indicator
PART 4 PRAYER TIME MODE
The Prayer Time Mode lets you recall the prayer times
throughout the day. A Prayer Time Alarm (which can be
switched on and off) sounds for 10 seconds when each
prayer time arrives. Press any button to stop the alarm
after it starts to sound.
Prayer
indicator
Prayer time
4 - 1 About pr yer times....
Pr yer Indic tor| Pr yer Time
FAJR (Fajr) Fajr start time
RISE* Sunrise time
ZOHR (Zohr) Zohr start time
ASR (Asr) Asr start time
MGRB (Mgrib) Mgrib start time
ISHA (Isha) Isha start time
Prayer times are calculated automatically in
accordance with the time, date, city data, and prayer
time calculation method you set in the Timekeeping
Mode. This, of course, means that you should always
make sure that your Timekeeping Mode data is set
correctly.
* RISE (sunrise time) does not indicate a prayer time.
To view Pr yer Time Mode d t
While in the Prayer Time Mode, use (D) and (B) to scroll through the different prayer
times. Each prayer time is accompanied by a prayer indicator that tells you what prayer
time is displayed.
4-2 To switch the pr yer l rm on nd off
1. Enter the Prayer Time Mode and use (D) and (B) to display the prayer time whose
alarm you want to switch on or off.
2. While the prayer time you want is displayed, press (A) to switch its prayer alarm on
and off.
Prayer alarm
indicator shown
on display Al rm on No prayer
alarm indicator Al rm off
• You can individually switch the alarms on and off.
• If any prayer time indicator is on, the prayer alarm indicator is shown on the display
when you change to another mode.
4-3 Pr yer Time Prec utions
• Compared to astronomical calculations, the accuracy of the prayer time values
produced by this watch is within ±5 minutes.
• When you move from one region to another, be sure that you correctly set the
Timekeeping Mode data (city data, prayer time calculation method, and current time)
for the region you are moving into.
• In Europe, the United States, and other areas that use daylight saving time (summer
time), be sure to make the proper adjustment in the current time and the GMT
differential to allow for standard time or daylight saving time (standard time +1 hour).
Ex mple:
Paris GMT +1 (standard time) or GMT +2 (daylight saving time)
New York GMT -5 (standard time) or GMT -4 (daylight saving time)
Remember that if you fail to make the above settings correctly, the prayer times cannot
be calculated and displayed properly.
PART 5 HIJRA DATE MODE
In the Hijra Date Mode, you can scroll through dates to display both the Hijra date and
the Gregorian date.
To displ y specific d te
While in the Hijra Date Mode, use © to advance the date (Timekeeping Mode date)
and (B) to move back. Holding down either button changes the date at high speed.
Day of week Hijra date
HIJRA
TH 25-MUHRM
2 9 - 6
Next year indicator
Mode indicator
Hijra month
[ Current D te ] Month
When you enter the Hijra Date Mode from another mode, the display automatically
changes to the current Hijra and Gregorian dates, in accordance with the
Timekeeping Mode setting.
This watch uses a 30-day cycle to calculate the Hijra months. Because of this, the
Hijra date shown by this watch may differ from the actual date.
With the above operation, you can advance the date up to one year. If the current
Timekeeping Mode Gregorian date is June 30, 1994 for example, you can advance
up to June 29, 1995.
Note that the message “NEXT YEAR” appears on the display when you advance the
date into the next year.
Alarm on
indicator
Hourly time signal
on indicator
ALARM
AM
indicator Hour
PART 6 ALARM MODE
When the Daily Alarm is switched on, the alarm sounds
for 20 seconds at the preset time each day. Press any
button to stop the alarm after it starts to sound.
When the Hourly Time Signal is switched on, the watch
beeps every hour on the hour.
To set the l rm time
1. Press (A) while in the Alarm Mode. The hour digits
flash on the display because they are selected.
• At this time the Daily Alarm is switched on automatically.
2. Press © to change the selection in the following
sequence.
Minutes Mode
indicator
3. Press © to increase the selected digits and (B) to decrease them. Holding down
either button changes the selection at high speed.
• The digital time is always displayed in 12-hour format. Take care to set the alarm
time correctly as morning (A) or afternoon (P).
4. After you set the alarm time, press (A) to return to the Alarm Mode.
To switch the D ily Al rm nd Hourly Time Sign l on nd off
Press (B) while in the Alarm Mode to change the status of the Daily Alarm and Hourly
Time Signal in the following sequence.
[ Al rm ON Indic tor/Hourly Time Sign l ON indic tor ]
•III -
Both
ON Both
OFF Daily Hourly Time
Alarm only Signal only

1044 1244-4
To test the l rm
Hold down © while in the Alarm Mode to sound the alarm.
About the l rm sounds
This watch has three types of alarms Prayer Time Alarm, Daily Alarm, and Hourly
Time Signal. Each alarm has a different type of sound so you can tell them apart. Note
that the alarms have the following priority sequence whenever they are set to sound at
the same time.
1. Prayer Time Alarm
2. Daily Alarm
3. Hourly Time Signal
• This means that if the Daily Alarm and Prayer Time Alarm are set to sound at the
same time, only the Prayer Time Alarm sounds.
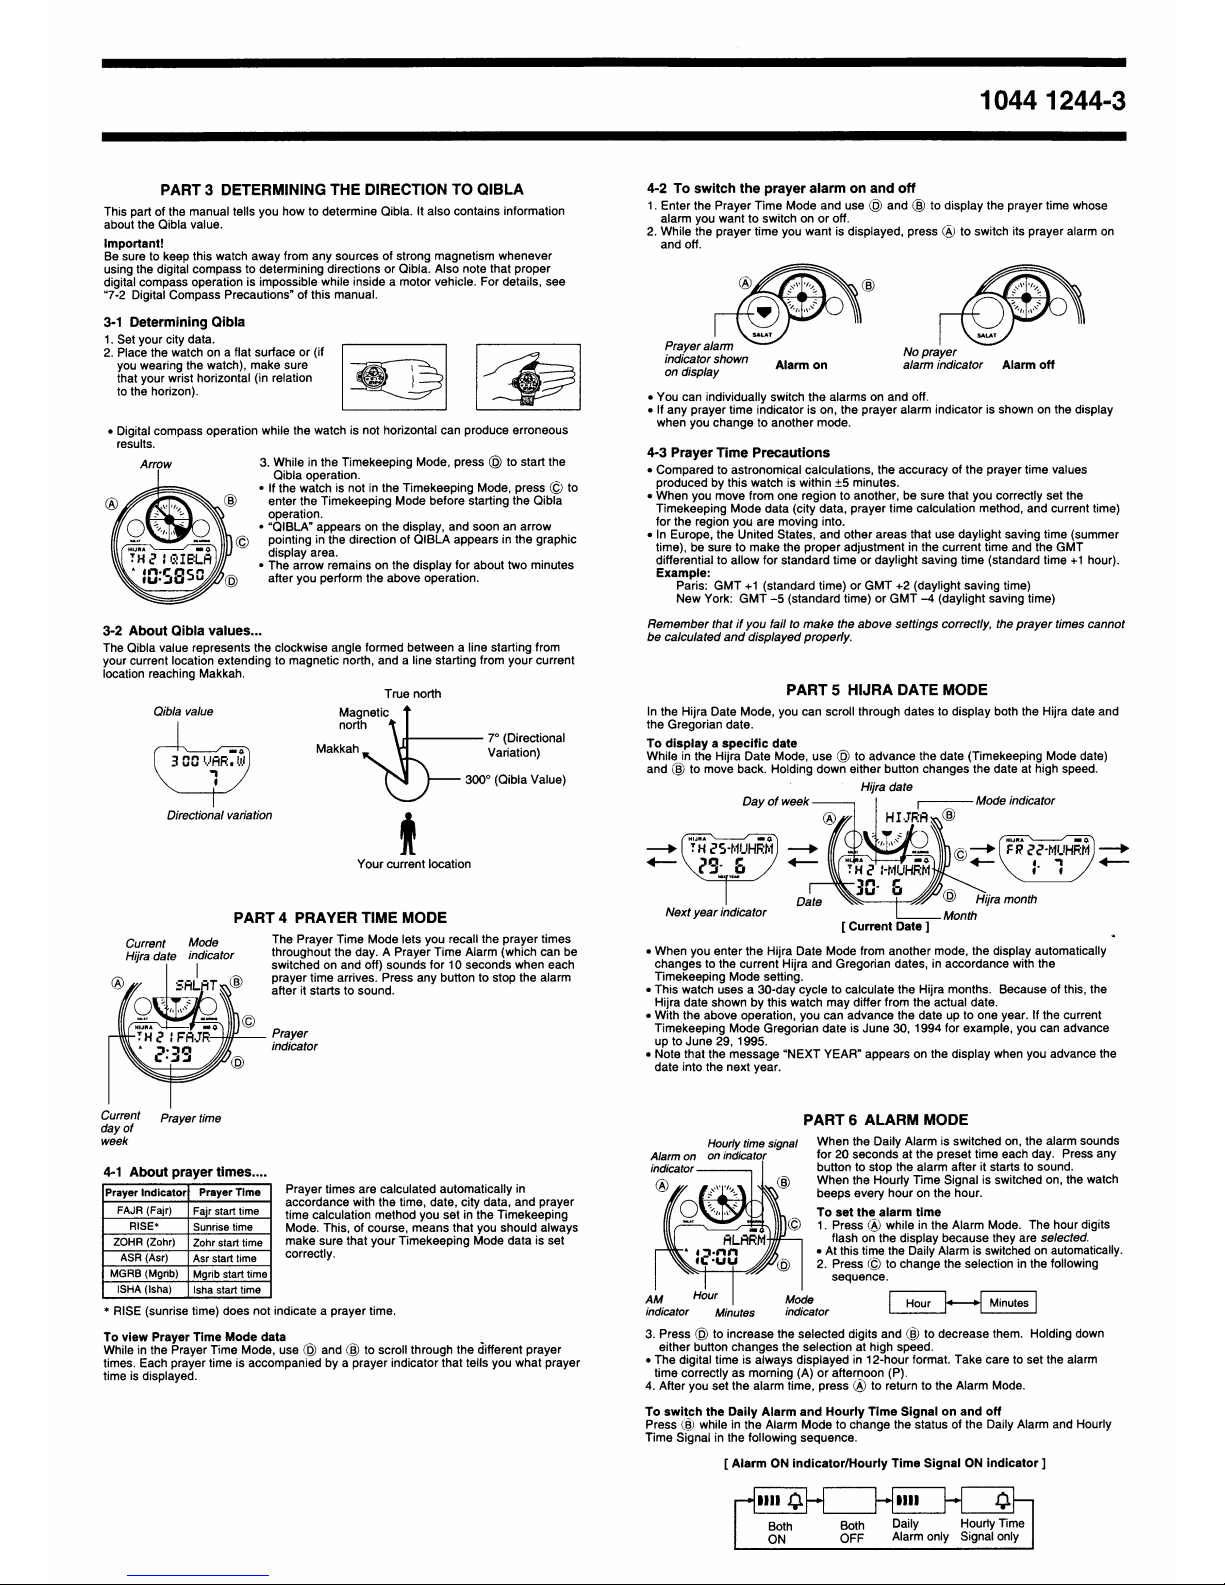
PART 7 DIGITAL COMPASS MODE
Mode
Current Hijra indicator In the Digital Compass Mode, the watch points to one
of 16 directions selected by you.
7-1 To use the digit l comp ss
1. While in the Digital Compass Mode, use (B) to
display the indicator that specifies the direction you
want to point to.
Direction indicator
Current time
Indic tor Direction Indic tor Direction Indic tor Direction Indic tor Direction
NORTH North NNE North-
northeast NE Northeast ENE East-
northeast
EAST East ESE East-
southeast SE Southeast SSE South-
southeast
SOUTH South SSW South-
southwest SW Southwest WSW West-
southwest
WEST West WNW West-
northwest NW Northwest NNW North-
northwest
2. Place the watch on a flat surface or (if you wearing the watch), make sure that your
wrist horizontal (in relation to the horizon).
• Note that taking a measurement while the watch is not horizontal (in relation to the
horizon) can result in large measurement error.
Arrow 3. Press (D) to start the compass operation.
• After a few seconds the arrow on the display points in
the direction you selected in step 1. This arrow
remains on the display for about two minutes
• You can repeat steps 1 through 3 as many times as
you like.
Direction indicator
(Northeast)
7-2 Digit l Comp ss Prec utions
The following describes precautions you should observe when performing a digital
compass operation. Note that the term digital compass operation in this manual refers
to Digital Compass Mode operations and to the Qibla operation.
This watch features a built-in magnetic bearing sensor that detects terrestrial
magnetism. This means that the northern direction indicated by this watch is magnetic
north, which is somewhat different from true polar north. The magnetic north pole is
located in northern Canada, while the magnetic south pole is in southern Australia. The
difference between true north and magnetic north is expressed in degrees, and it is
called the directional variance. The map that is included separately with this watch
shows the directional variance for points around the globe.
Note that the directional variance as measured with magnetic compasses tends to be
greater as one gets closer to either of the magnetic poles. You should also remember
that some maps indicate true north (instead of magnetic north), and so you should
make allowance when using such maps with this watch.
Loc tion • Using a digital compass operation when you are near a source of
strong magnetism can cause large errors in readings. Because of
this you should avoid using a digital compass operation while in the
vicinity of the following types of objects permanent magnets
(magnetic necklaces, etc.), concentrations of metal (metal doors,
lockers, etc.), high tension wires, aerial wires, household appliances
(TVs, personal computers, washing machines, freezers, etc.).
• Accurate direction measurements are impossible while in a train, boat, air plane, etc.
• Accurate measurements are also impossible indoors, especially inside ferroconcrete
structures. This is because the metal framework of such structures picks up
magnetism from appliances, etc.
Stor ge
• The precision of the digital compass may deteriorate if the watch becomes
magnetized. Because of this, you should be sure to store the watch away from
magnets or any other sources of strong magnetism, including permanent magnets
(magnetic necklaces, etc.) and household appliances (TVs, personal computers,
washing machines, freezers, etc.)
• Whenever you suspect that the watch may have become magnetized, perform either
one of two calibration procedures bidirectional calibration or northerly calibration
(see “7-4 Calibrating the magnetic sensor”).
7-3 W rning Indic tors
Warning indicators (message) appear whenever any of the conditions described below
occurs.
Abnorm l M gnetic Field Indic tor
This indicator appears on the display whenever the digital
compass has a problem obtaining a correct reading. This
condition could indicate that the watch is within a very high
magnetic field, and so you should try moving to another
location. Also see “7-2 Digital Compass Precautions” for
further information on conditions that cause errors.
HIJRA
V
Low B ttery Indic tor
HIJRA
V
TH 21 BATT
This message indicates battery power is too low to perform a
digital compass operation. It appears whenever battery
power drops below a certain level, or when you try to perform
a digital compass operation under cold conditions.
Calibration direction
indicator
If the BATT message appears because of use under cold conditions, it should clear
(and normal operation should return) after the watch is brought back to normal
temperature.
If battery power is low (indicated when BATT appears under normal temperatures), you
should have the battery replaced as soon as possible.
7-4 C libr ting the m gnetic sensor
Whenever you suspect that the readings produced by a digital compass operation are
wrong, you should calibrate it. You can use either one of two calibration
procedures bidirectional calibration or northerly calibration.
You should use bidirectional calibration when you want to calibrate the digital compass
to operate within an area exposed to magnetic force. This type of calibration should be
employed if the watch becomes magnetized for any reason.
With northerly calibration, you “teach” the watch which way is magnetic north (which
you have to determine with another compass or some other means).
Import nt!
• If you want to perform both bidirectional and northerly calibration, be sure to perform
bidirectional calibration first, and then perform northerly calibration. This is
necessary because bidirectional calibration cancels any previously set northerly
calibration setting.
• If you do not perform any button operation for two or three minutes while either
calibration procedure is in progress (while the calibration direction indicator is
flashing at the 12 or 6 o’clock position), the watch automatically returns to the Digital
Compass Mode.
• The more correctly you perform bidirectional calibration, the better the accuracy of
your digital compass readouts. You should perform bidirectional calibration whenever
you change environments where you perform digital compass operations and
whenever you feel that digital compass operations are producing incorrect readings.
To perform bidirection l c libr tion
1. While in the Digital Compass Mode, press (A) to start the
bidirectional calibration procedure.
• At this time, the display changes to show 1 and the
calibration direction indicator flashes at the 12 o’clock
position to indicate that the watch is ready to calibrate the
first direction.
2. Place the watch on a level surface, and press © to
calibrate the first direction.
• When the calibration procedure is complete, the message
“OK” appears in the display. This shortly changes to
2 and the calibration direction indicator flashes at the
6 o’clock position to indicate that the watch is ready for
the second direction.
3. Rotate the watch 180 degrees.
4. Press © again to calibrate the second direction.
• When the calibration procedure is complete, the message “OK” appears in the display.
After a short while, the watch automatically returns to the Digital Compass Mode.
Prec utions bout bidirection l c libr tion
• You can use any two opposing directions for bidirectional calibration. You must,
however, make sure that they are 180 degrees opposite each other. Remember that if
you perform the procedure incorrectly, you will get wrong readings from digital
compass operations.
• Do not move the watch during one to two seconds (from the point you press (D), up to
the point that “OK” appears on the display) that the calibration of each direction is in
progress. If you do, the Abnormal Magnetic Field Indicator “ERROR” appears on the
display. When this happens, restart the bidirectional calibration procedure from the
beginning.
• The appearance of “ERROR” during bidirectional calibration can also be caused by
local interference. Move to another location and try the bidirectional calibration
procedure again.
• You should perform bidirectional calibration in an environment that is the same as that
where you plan to be performing digital compass operations, if you plan to use it in an
open field, for example, calibrate in an open field.
To perform northerly c libr tion
1. While in the Digital Compass Mode, press (A) to start the bidirectional calibration
procedure.
2. Press © to start the northerly calibration procedure.
• At this time, the indicator “NORTH” appears on the display.
3. Place the watch on a level surface, and position it so that
its 12 o’clock position points magnetic north (as
measured with another compass).
4. Press (D) to start the calibration operation.
• When the calibration procedure is complete, the message
“OK” appears on the display. After a short while, the
watch automatically returns to the Digital Compass Mode.
OK

1044 1244-5
City D t 'List
*1 City Code List
*2 City Code
*3 City
*4 Based on data for December, 1993
*5 Based on data for 1990
*6 Origin l City D t List
City Code List *1
City Code *2
NYC
LON
CAS
City *3
New York
London
Casablanca
TZONE *4
-5
0
0
0
LAT.
40.8N
ON
51.5N
33.7N
LON.
73.9W
0E
0. 2W
7.6W
VAR *5
13W
OE
5W
5W
CALC
6
1
7
6
ALG Algiers 136.8N 3.0E 2W
TUN Tunis 136.8N 10.2E 0E
1ST Istanbul 41 .ON 29.0E 3E 1
CAI Cairo 30.1N 31.3E 2E
KRT Khartoum 15.6N 32.5E 1E
BEY Beirut 33.9N 35.5E 3E
AMM Amman 32.0N 35.9E 3E
DAM Damascus 33.5N 36.3E 3E
JED Jeddah 21.5N 39.2E 2E
RUH Riyadh 24.7N 46.8E 3E
BGW Baghdad
SAH Sanaa 33.3N 44.4E
15.4N 44.2 E 3E
1E
KWI Kuwait 29.3N 48.0E 3E
BAH Bahrain (Al Manamah) 26.2N 50.6E 2E
DOH Doha 25.3N 51.6E
THR Tehran 3.5 35.7N 51.4E 2E
4E
DXB Dubai 25.2N 55.3E 1E
MCT Muscat 23.6N 58.6E 1E
KBL Kabul 4.5 34.5N 69.2E
KHI Karachi 24.9N 67.0E 2E
OE
DEL Delhi 5.5 28.7N 77.2E 0E
DAC Dhaka 23.7N 90.4E
JKT Jakarta 6.1S 106.8E 1W
0E
KUL Kuala Lumpur 83.1N 101.7E 0E
SIN Singapore 81.3N 103.8E 0E
HKG Hong Kong 822.3N 114.2E 2W 1
TYO Tokyo 35.7N 139.8E 7W 1
Origin l City D t List *6
ABADAN
ABHA 18N 43E 2E HODEIDA 13N 43E 1E
ABU DHABI
ADANA 25N 54E 1E HOMS 35N 37E
37N 35E 4E IRBID 33N 36E 3E
3E
ADEN 13N 45 E 1E ISTANBUL 41N 29E 3E
AL JAWF
AL KHALUF 30N 40 E 3E IZMIR 38N 27E
21N 58E 1E JEDDAH 22N 39E 3E
2E
AL MANAMAH 26N 51E 2E JERUSALEM 32N 35E 3E
AL MUKALLA 13N 49E 1E JIZAN 17N 43E 2E
ALEPPO 36N 37E 4E KABUL 4.5 35N 69 E 2E
AMMAN
AN NAJAF 32N 36E 3E KANDAHAR 4.5 32N 66E
32N 44E 3E KUWAIT 29N 48E 2E
3E
ANKARA 40N 33E 4E LATAKIA 36N 36E 3E
AQABA
ARAR
BAGHDAD
30N 35E 3E MASHHAD 3.5 36N 60E
31N 41E 3E MEDINA 25N 40E
33N 44E 3E MOSUL 36N 43E
3E
2E
4E
BAGHLAN
BASRA
BEIRUT
4.5 36N 69E 3E MUSCAT 24N 59E
3
231N
34N 48 E
36E 3E
3E NICOSIA
RAS AL KHAIMAH 2
435N
26N 33E
56E
1E
3E
2E
BURAYDAH 26N 44E 2E RIYADH 25N 47E 3E
DAMASCUS
DAMMAM 34N 36E 3E SALALAH 17N 54E
26N 50E 2E SANAA 15N 44E 1E
1E
DOHA
DUBAI 25N 52E 2E SHIRAZ 3.5 30N 53E
25N 55E 1E TABRIZ 3.5 38N 46E 2E
4E
ESFAHAN
FUJAIRAH 3.5 33N
25N 52E 3E TABUK 28N 37E
56E 1E TEHRAN 3.5 36N 51E 3E
4E
HAIFA
HAMA 33N 35E 3E TELABIB 32N
35N 37E 3E TRIPOLI 34N 35E
36E 3E
3E
I City TZONE LAT. LON. VAR. | City TZONE LAT. LON. VAR.
| Afric HAMBURG 1 54N 10E 1W
ABIDJAN 05N 4W 8W HELSINKI 260N 25E 6E
ACCRA 0 6N 0E 6W KIEV 250N 31E 5E
ADDIS ABABA 39N 39E 1E LISBON 1 39N 9W 6W
ALEXANDRIA 2 31N 30 E 3E LONDON 052N 0E ! 5W
ALGIERS 1 37N 3E 2W MADRID 140N 4W 4W
ANTANANARIVO 319S 48E 14W MILANO 145N 9E 1W
BAMAKO 013N 8W 7W MINSK 254N 28E 5E
BISSAU 012N 16W 11W MOSCOW 3 56N 38E 9E
CAIRO 230N 31E 2E MUNCHEN 1 48N 12E 0E
CAPE TOWN 234S 18E 23W NICE 144N 7E 1W
CASABLANCA 034N 8W 5W PARIS 149N 2E 3W
DAKAR 015N 17W 11W PRAHA 1 50N 14E 1E
DAR ES SALAAM 37S 39E 2W ROME 142N 13E 0E
DJIBOUTI 312N 43E IE SANKT-
PETERSBURG 360N 30 E 8E
FREETOWN 0 9N 13W 11W
JOHANNESBURG 226S 28E 16W SOFIYA 243N 23E 3E
KAMPALA 3ON 33E 0E STOCKHOLM 1 59N 18E 2E
KHARTOUM 2 16N 33E 1E TASHKENT 5 41N 69E 5E
KINSHASA 1 4S 15E 5W TIRANA 141N 20 E 2E
LAGOS 16N 3E 5W VIENNA 1 48N 16E 1E
LAS PALMAS 0 28N 15W 8W WARSZAWA 1 52N 21E 3E
MOGADISHU 3 2N 45E 0E ZURICH 1 47N 9E 1W
NAIROBI 31S 37E 0E Asi nd P cific
NIAMEY 114N 2E 4W ADELAIDE 9.5 35S 139E 8E
NOUAKCHOTT 018N 16W 10W AHMADBAD 5.5 23N 73E 1W
PRAIA -1 15N 23W 13W BANDAR SERI
BEGAWAN 85N 115E OE
RABAT 034N 7W 5W BANGALORE 5.5 13N 78E 2W
TRIPOLI 233N 13E 0E BANGKOK 7 14N 101E 2W
TUNIS 137N 10E 0E BEIJING
BOMBAY 8
5.5 40N
19N 116E
73E 6W
1W
YAOUNDE 14N 12E 4W
North Americ
BOGOTA nd Cent
-5 r l nd S
5N South An
74W meric
3W CALCUTTA 5.5 23N 88E 1W
CHITTAGONG 6 22N 92E 1W
BOSTON -5 42N 71W 16W
BRASILIA -3 16S 48W 19W CHONGQING 8 30N 107E 2W
BUENOS AIRES -3 35S 59W 4W CHRAIST CHURCH 12 44S 173E 24E
COLOMBO 5.5 7N 80E 3W
CARACAS -4 11N 67W 9W DELHI 5.5 29N 77E OE
CHICAGO -6 42N 88W 1W DHAKA 6 24N 90 E 1W
DALLAS -6 33N 97W 6E GUAM 10 13N 145E 2E
DENVER -7 40N 105W 11E GUANGZHOU 823N 113E 2W
DETROIT -5 42N 83W 6W HANOI 7 21N 106E 1W
EDMONTON -7 54N 113W 21E HONG KONG 822N 114E 2W
EL PASO -7 32N 107W 11E HYDERABAD
(P kist n) 525N 68E OE
HONOLULU -10 21N 158W 11E
HOUSTON -6 30N 95W 5E \
9
HYDERABAD
(Indi ) 5.5 17N 78E
1
2W
LAPAZ —4 17S 68W 3W
LIMA -5 12W 77W 2E ISLAMABAD 5 34N 73E 2E
LOS ANGELES -8 34N 118W 14E JAKARTA 76S 107E OE
MEXICO CITY -6 19N 99W 7E KANPUR 5.5 26N 80 E OE
MIAMI -5 26N 80W 4W KARACHI 5 25N 67E OE
MONTEVIDEO -3 35S 56W 7W KATMANDU 5.75 28N 85E . OE
MONTREAL -5 46N 74W 16W KUALA LUMPUR 8 3N 102E OE
NEW ORLEANS 30 N 90W 2E LAHORE 532N 74E 1E
NEW YORK -5 41N 74W 13W LANZHOU 836N 104E 2W
PAGO PAGO -11 14S 171W 12E MADRAS 5.5 13N 80 E 2W
PANAMA CITY -5 9N 80W 0E MANILA 815N 121E 1W
PORT OF SPAIN —4 11N 61W 13W MEDAN 74N 99E 1W
RIO DE JANEIRO -3 23S 43W 20W MELBOURNE 10 38S 145E 12E
SAN FRANCISCO --8 38N 122W 16E MULTAN 530N 72E 1E
SANTIAGO -4 34S 71W 6E NAURU 12 1S 166E 10E
SAO PAULO -3 24S 47W 18W NOUMEA 11 22S 166E 13E
SEATTLE -8 48N 122W 20E PAPEETE -10 18S 150W 13E
VANCOUVER -8 49N 123W 21E PERTH 832S 116E 3W
WASHINGTON -5 39N 77W 10W PHNOM PENH 712N 105E OE
WINNIPEG -6 SON 97W 6E PORT VILA 11 18S 168E 12E
Eureope PYONG YANG 939N 126E 8W
ALMA-ATA 643N 77E 5E RAWALPINDI 5 34N 73E 2E
AMSTERDAM 1 52N 5E 3W SANANA 9 2S 126E 2E
ASHKHABAD 538N 58E 4E SEOUL 938N 127E 8W
ATHENS 238N 24E 2E SHANGHAI 8 31N 121E 5W
AZORES -1 39N 28W 14W SINGAPORE 8 1N 104E OE
BAKU 4 40N 50E 5E SRINAGAR 5.5 34N 75E 2E
BEOGRAD 245N 21E 3E SURABAYA 7 7S 113E 1E
BERLIN 1 53N 13E 1E SUVA 12 18S 178E : 13E
BISHKEK 543N 75E 5E SYDNEY 10 34S 151E 13E
BONN 1 51N 7E 2W TAIPEI 825N 122E 3W
BRUXELLES 1 51N 4E 3W TOKYO 936N 140E 7W
BUCURESTI 244N 26E 3E UJUNG
PANDANG 85S 119E 2E
BUDAPEST 1 48N 19E 2E
CANNES 1 44N 7E 1W ULAN BATOR 848N 107E 4W
COPENHAGEN 1 56N 13E OE VIENTIANE 718N 103E 1W
DUBLIN 053N 6W 8W WELLINGTON 12 41S 175E 22E
DUSHANBE 5 39N 69E 4E XI'AN 834N 109E 3W
FRANKFURT 1 50N 9E 1W YANGON 6.5 17N 96E 1W
GENEVE 1 46N 6E 2W YINCHUAN 8 39N 106E 3W
TZONE: B sed on d t for December, 1993
VAR.: B sed on d t for 1990
VAR. (Direction l V ri tions) Source: World D t Center C2 for Geom gnetism, Kyoto

1044 1244-6
Direction l V ri tions
The map on the other side of this paper shows you directional variations
for various points around the world. The directional variation for Tokyo,
which falls between the lines marked 10W and 5W would be 7W.
import nt!
The information contained in the map is current as of 1990. Note that
directional variations are subject to change in accordance with move-
ments of the earth’s axis.
LON.
LA T . I80W
80 N
60 N
40 N
20 N
0
20 S
40 S
60S
80 S
Tokyo
150W 120 W 90 W 60 W 30 W 030 E 60 E 90 E 120 E 150 E I80E
Source :World Data enter 2 for Geomagnetism.Kyoto
This manual suits for next models
1
Table of contents
Other Casio Watch manuals

Casio
Casio Analog (MAB) User manual

Casio
Casio WTP-150 User manual

Casio
Casio Oceanus OCW-G2000S-1A User manual

Casio
Casio 5096 User manual

Casio
Casio 1889 User manual

Casio
Casio MO0701-EB User manual

Casio
Casio 2611 User manual

Casio
Casio 4770 User manual

Casio
Casio 3270/3293 User manual

Casio
Casio 5565 User manual