Operation Guide 4392
2
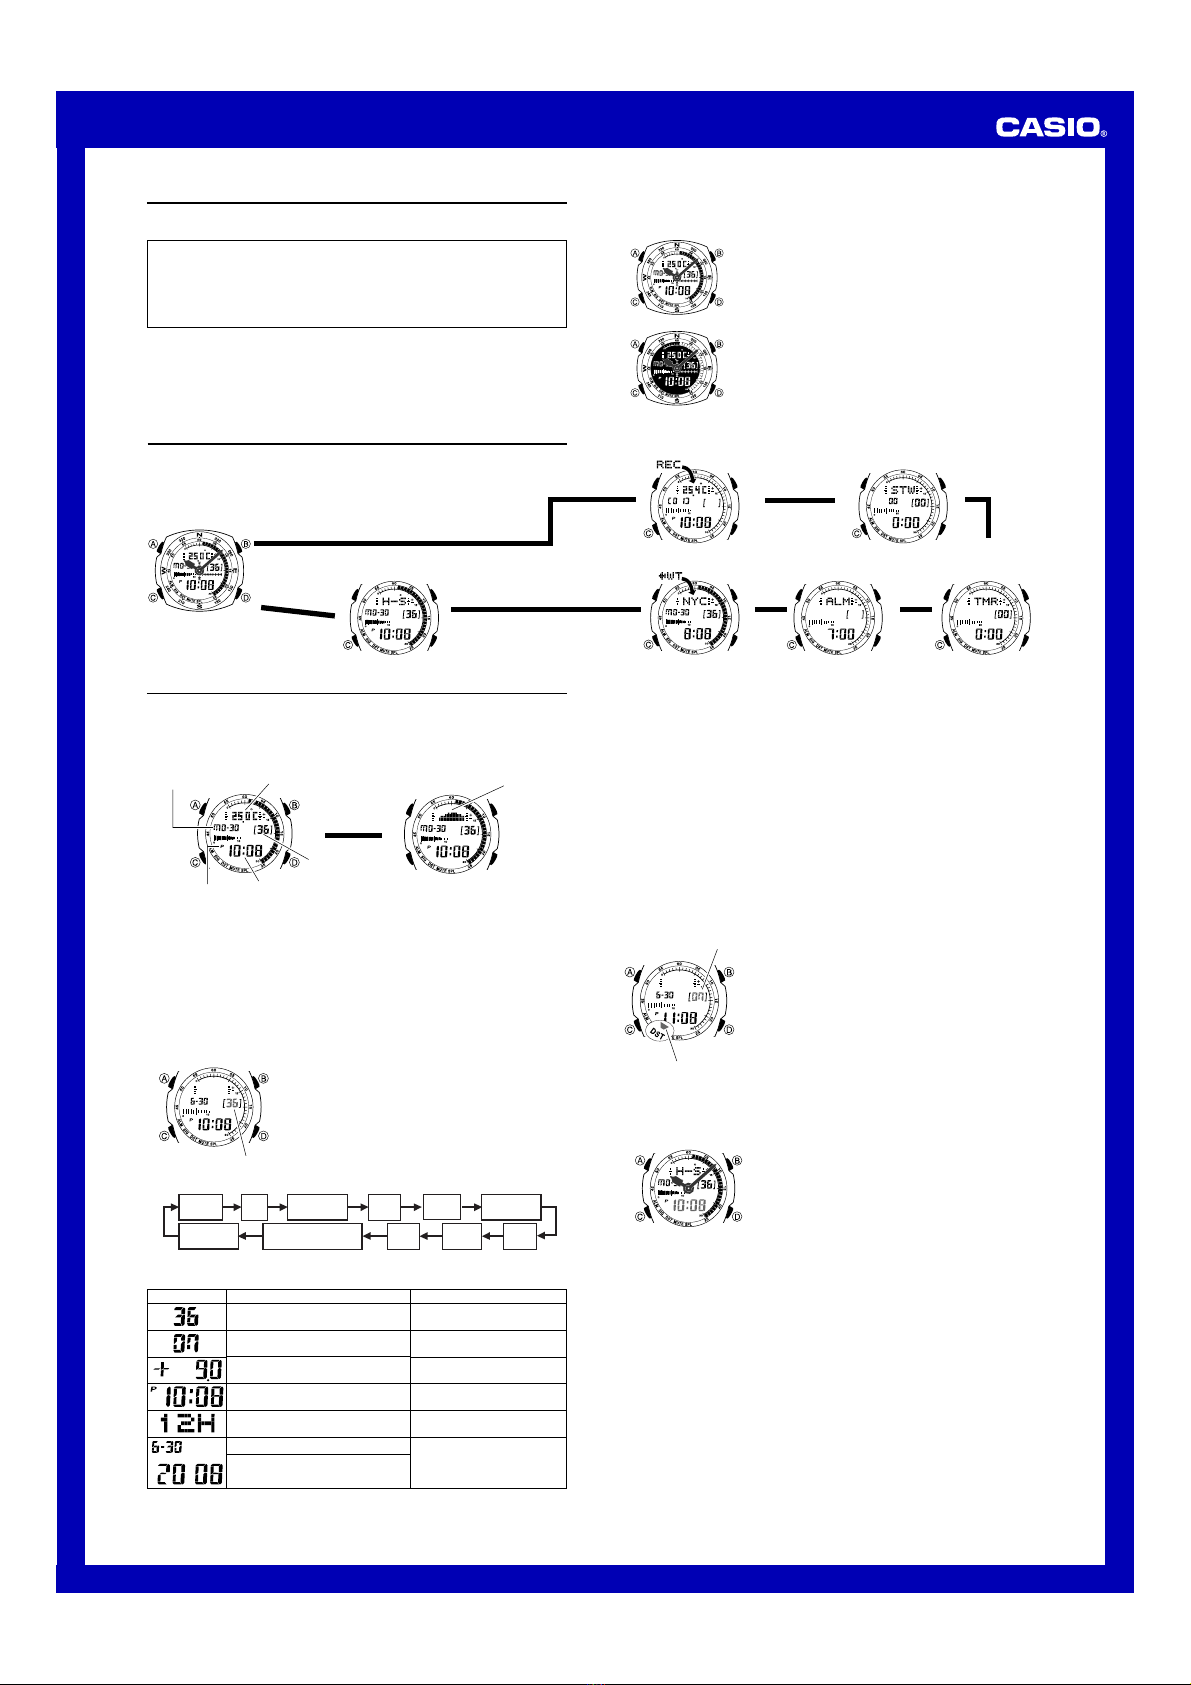
Thermometer
This watch uses a temperature sensor to measure temperature. A reading is taken
during each even-numbered minute, and the result of the last reading is displayed on
the thermometer screen.
The watch also takes separate readings and stores them in memory for display in the
temperature tendency graph, which can be viewed in the Timekeeping Mode.
Measured temperature values are stored in memory for later recall when you need
them.
Press A.
▲
▲
Thermometer Screen
Thermometer
Temperature
Tendency Screen
Temperature
tendency
graph
•You can select either Celsius (°C) or Fahrenheit (°F) units for the thermometer
screen. See “To specify the temperature display unit” for more information.
•The thermometer screen displays temperature values in 0.1°C units (or 0.2°F units).
•The display range of the thermometer screen is –10.0°C to 60.0°C (or 14.0°F to
140.0°F).
•You can calibrate the temperature sensor if you feel that the displayed temperature
values are not correct. See “Temperature Sensor Calibration” for more information.
Important!
•Temperature measurements are affected by your body temperature (while you are
wearing the watch), direct sunlight, and moisture. To achieve a more accurate
temperature measurement, remove the watch from your wrist, place it in a well
ventilated location out of direct sunlight, and wipe all moisture from the case. It takes
approximately 20 to 30 minutes for the case of the watch to reach the actual
surrounding temperature.
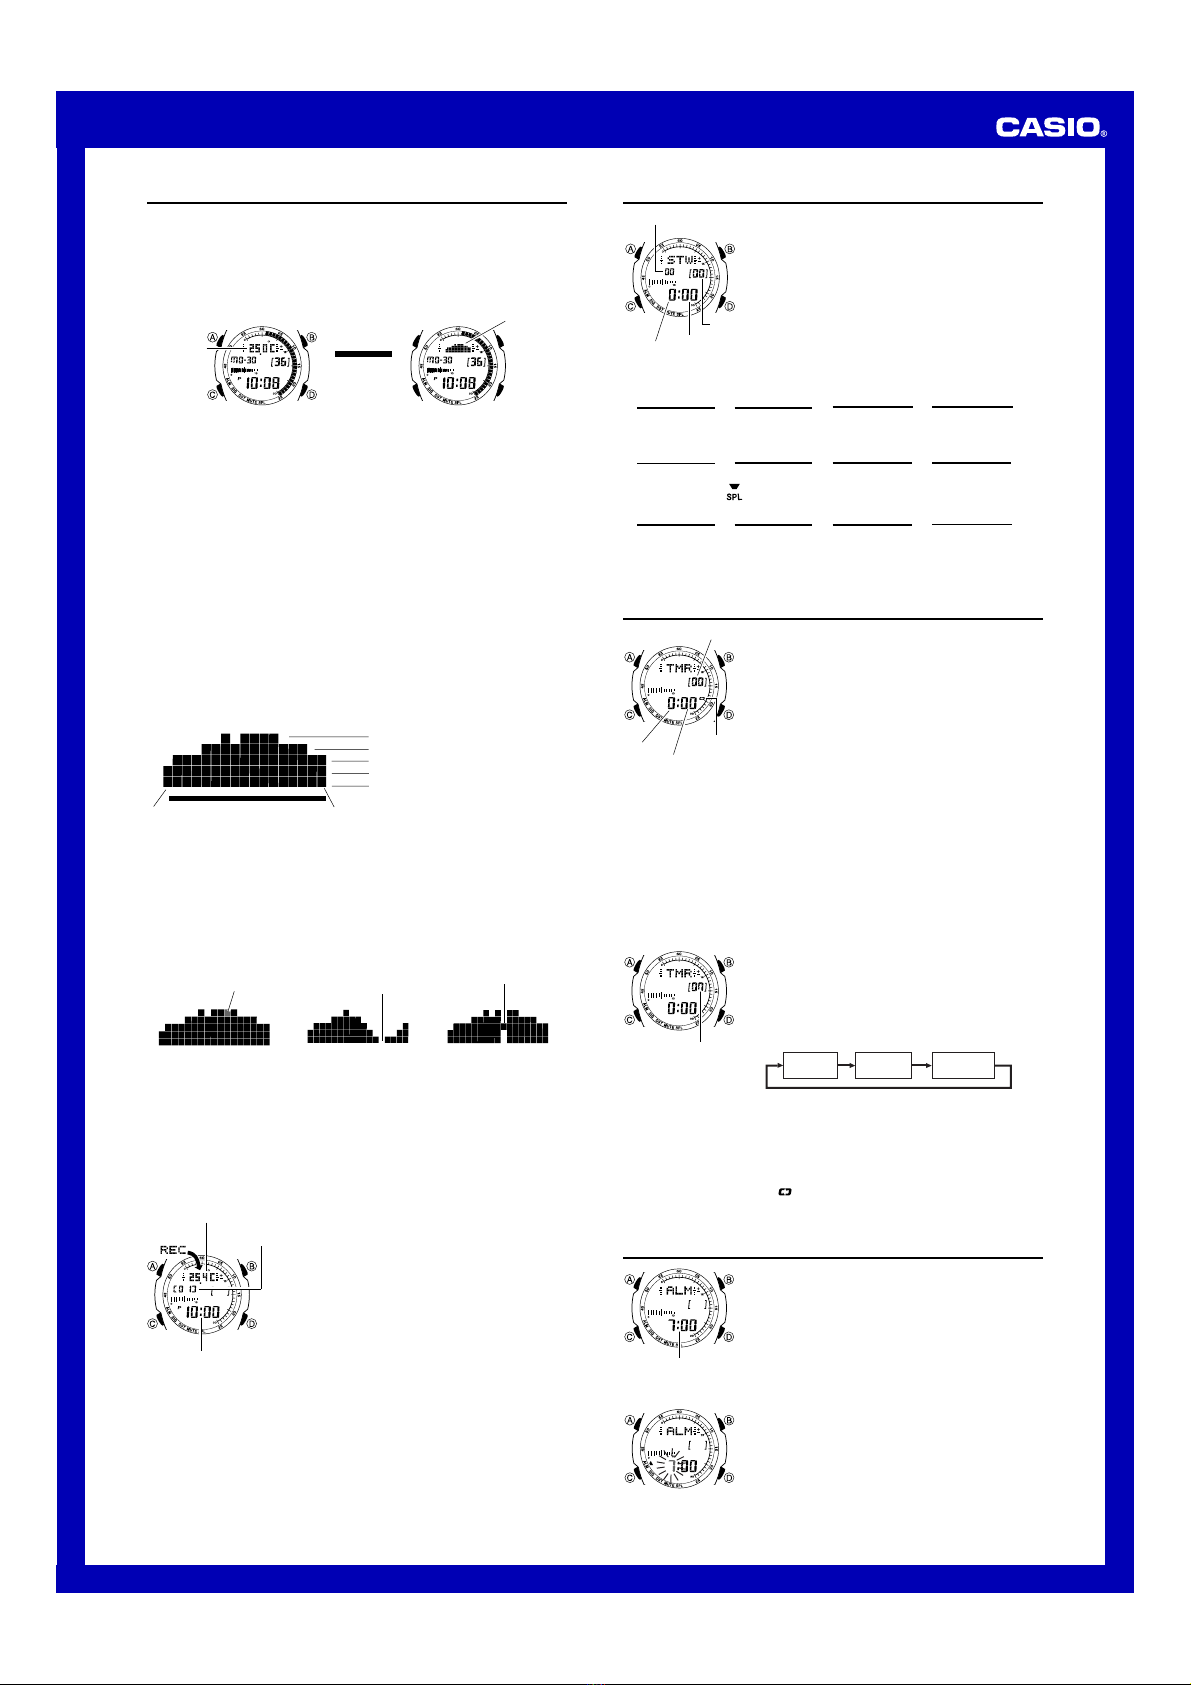
Temperature Tendency Graph
The watch also takes temperature readings at the top and the bottom of each hour
and stores the results in memory for display on the temperature tendency graph.
Depending on the current Timekeeping Mode time, the temperature tendency graph
shows either the top of the hour measurements or the bottom of the hour
measurements for the past 17 hours.
From the top of each hour to the 29th minute, past top of the hour readings are shown
in the graph. From the bottom of each hour to the 59th minute, past bottom of the hour
readings are shown in the graph.
Temperature tendency graph contents are updated every 30 minutes.
Past 17 hours of
measurement values Latest measurement value
+6.0 to +9.9°C (+10.8 to +17.9°F)
+2.0 to +5.9°C (+3.6 to +10.7°F)
–1.9 to +1.9°C (–3.5 to +3.5°F)
–5.9 to –2.0°C (–10.7 to –3.6°F)
–9.9 to –6.0°C (–17.9 to –10.8°F)
▲
l
l
l
l
l
l
l
l
l
Temperature change greater
than +10.0
°
C (+18.0
°
F)
Temperature change greater
than –10.0
°
C (–18.0
°
F) Error
The horizontal axis of the graph represents time. The rightmost column is the newest
temperature value in memory, while the leftmost column is the temperature value
stored approximately 17 hours ago (1 dot = 1 hour). The vertical axis of the graph
represents the relative change from one hour to the next.
•When the relative change from one hour to the next exceeds +10.0°C (+18.0°F), the
dot at the highest point for the applicable hour flashes.
•When the relative change from one hour to the next exceeds –10.0°C (–18.0°F),
there is no dot in the applicable hour’s column.
•If a measurement error occurs for some reason, only a single dot in the center
column will be displayed.
Recalling Temperature Data
The measurements the watch takes at the top and the bottom of each hour are stored
in memory automatically. Memory can hold up to 50 measurement records.You can
use the Temperature Data Recall Mode to recall memory data when you need it.
•Temperature data records are assigned numbers automatically starting from 01.
•When there are already 50 records in memory, storage of a new temperature
reading causes the oldest record (record number 50) to be deleted automatically to
make room for the new data. The new data is assigned record number 1, and all of
the numbers of all the other records (01 to 49) are incremented by 1 (becoming 02
through 50).
To recall temperature records
1. In the Timekeeping Mode, press Cto enter the
Temperature Data Recall Mode.
•This displays the newest record currently in memory.
2. Use D(+) to scroll through the records.
•Pressing Dwhile the oldest record is displayed will
scroll to the newest record.
•If a temperature measurement operation is performed
while a record is displayed, the displayed record’s
number will be incremented by 1.
•If an error occurs during temperature measurement,
--.-will be shown for the temperature value in the
corresponding record.
Temperature
Record
number
Data storage time
Stopwatch
The stopwatch lets you measure elapsed time, split times,
and two finishes.
•The display range of the stopwatch is 99 hours, 59
minutes, 59.99 seconds.
•The stopwatch continues to run, restarting from zero
after it reaches its limit, until you stop it.
•All of the operations in this section are performed in the
Stopwatch Mode, which you enter by pressing C.
1/100 second
Minutes
Seconds
Hours
To measure times with the stopwatch
D
Start Stop
Elapsed Time
➤
Re-start Clear
D➤
Stop
D➤D➤A
Split Time
D
Start Split
➤
Split release Clear
A➤
Stop
A➤D➤A
Two Finishes
D
Start Split
➤
Stop Clear
A➤
Split release
D➤A➤A
First runner
finishes.
Display time of
first runner.
Second runner
finishes.
Display time of
second runner.
( displayed)
Countdown Timer
You can set the countdown timer within a range of one
minute to 100 hours. An alarm sounds when the
countdown reaches zero.
•You can also select auto-repeat, which automatically
restarts the countdown from the original value you set
whenever zero is reached.
•All of the operations in this section are performed in the
Countdown Timer Mode, which you enter by pressing
C.
Seconds
Hours
Minutes
Auto-repeat
on indicator
To use the countdown timer
Press Dwhile in the Countdown Timer Mode to start the countdown timer.
•When the end of the countdown is reached and auto-repeat is turned off, the alarm
sounds for 10 seconds or until you stop it by pressing any button. The countdown
time is automatically reset to its starting value after the alarm stops.
•When auto-repeat is turned on, the countdown will restart automatically without
pausing when it reaches zero. The alarm sounds to signal when the countdown
reaches zero.
•The countdown timer measurement operation continues even if you exit the
Countdown Timer Mode.
•To stop a countdown operation completely, first pause it (by pressing D), and then
press A. This returns the countdown time to its starting value.
To configure countdown start time and auto-repeat settings
1. While the countdown start time is on the display in the
Countdown Timer Mode, hold down Auntil the hour
setting of the countdown start time starts to flash, which
indicates the setting screen.
•If the countdown start time is not displayed, use the
procedure under “To use the countdown timer” to
display it.
2. Press Cto move the flashing in the sequence shown
below, and select the setting you want to change.
Start Time
(Minutes)
Auto-Repeat
On/Off
Start Time
(Hours)
3. Perform the following operations, depending on which setting is currently selected
on the display.
•While the start time setting is flashing, use D(+) and B(–) to change it.
On/Off status
•Set 0:00 to specify 100 hours.
•While the auto-repeat on/off setting (0N or 0F) is flashing on the display, press
Dto toggle auto-repeat on (0N) and off (0F).
4. Press Ato exit the setting screen.
•The auto-repeat on indicator ( ) is displayed on the Countdown Timer Mode
screen while this function is turned on.
•Frequent use of auto-repeat and the alarm can run down battery power.
Alarm
When the alarm is turned on, the watch beeps when the
alarm time is reached. You can also turn on an Hourly
Time Signal, which will cause the watch to beep twice
every hour on the hour.
•All of the operations in this section are performed in the
Alarm Mode, which you enter by pressing C.
Alarm time
(Hour : Minutes)
To set the alarm time
1. In the Alarm Mode, hold down Auntil the hour setting
of the alarm time starts to flash, which indicates the
setting screen.
•This operation turns on the alarm automatically.
2. Press Cto move the flashing between the hour and
minute settings.
3. While a setting is flashing, use D(+) and B(–) to
change it.
•When setting the alarm time using the 12-hour format, take care to set the time
correctly as a.m. or p.m. (Pindicator).
4. Press Ato exit the setting screen.