Cata GT-Plus Safety guide

EN
Manual for the installation, use and maintenance of decorative hoods
HU
Üzembehelyezési, használati és karbantartási útmutató konyhai szagelszívókhoz

2
22 2 2 2
4

3

7
D
E
CO
R
A
T
IVE E
X
TRAC
T
OR H
O
O
D
Dear Customer,
Thank you for buying our hood. Please read these instructions carefully for its
optimum installation, use and maintenance.
Notes: The gures mentioned in this manual are in the rst pages.
Hood installation on walls (look for the symbol in the gures)
Warning: consult local regulations regarding fumes outlets. Do not
connect the hood to a fume, ventilation or hot air duct. Conrm that
room ventilation is appropriate with the local authorities. Make sure
the maximum air extraction ow rate for the appliances in the room does
not exceed 4 Pa (0.04 mbar).The room must have adequate ventilation if an
extractor hood is used simultaneously with appliances that run on gas or other
fuels. The evacuated air must be extracted through ducts that are used for
evacuating fumes from appliances that run on gas or other fuels. Regulations
regarding air extraction must be complied with.
INSTALLATION
The hood may be installed to work in two different ways: If there is a possibility
of installing the hood with an evacuation pipe to the outside, it will be used in
aspirating version. If this possibility does not exist, the hood will be used in the
ltering version, recirculating the air using active carbon lters.
Aspiration: If the hood is used in the ASPIRATING version, connect the plastic
conic outlet piece supplied with the hood (125 mm diameter) to an evacuation
pipe connected directly to the outside We recommend the use of a 125 mm.
diameter pipe for better hood performance and lower noise levels.
Filter: This hood can be transformed into an air lter if there is no possibility of
connecting it to the outside. In this case, the air circulates through opening
which you must drill into the furniture. In order to operate as an air lter, you must
use two active carbon lters which are supplied as separate accessories. The
active carbon lters must be replaced periodically in order to work properly,
at least every three months (depending on how frequency the lter is used)
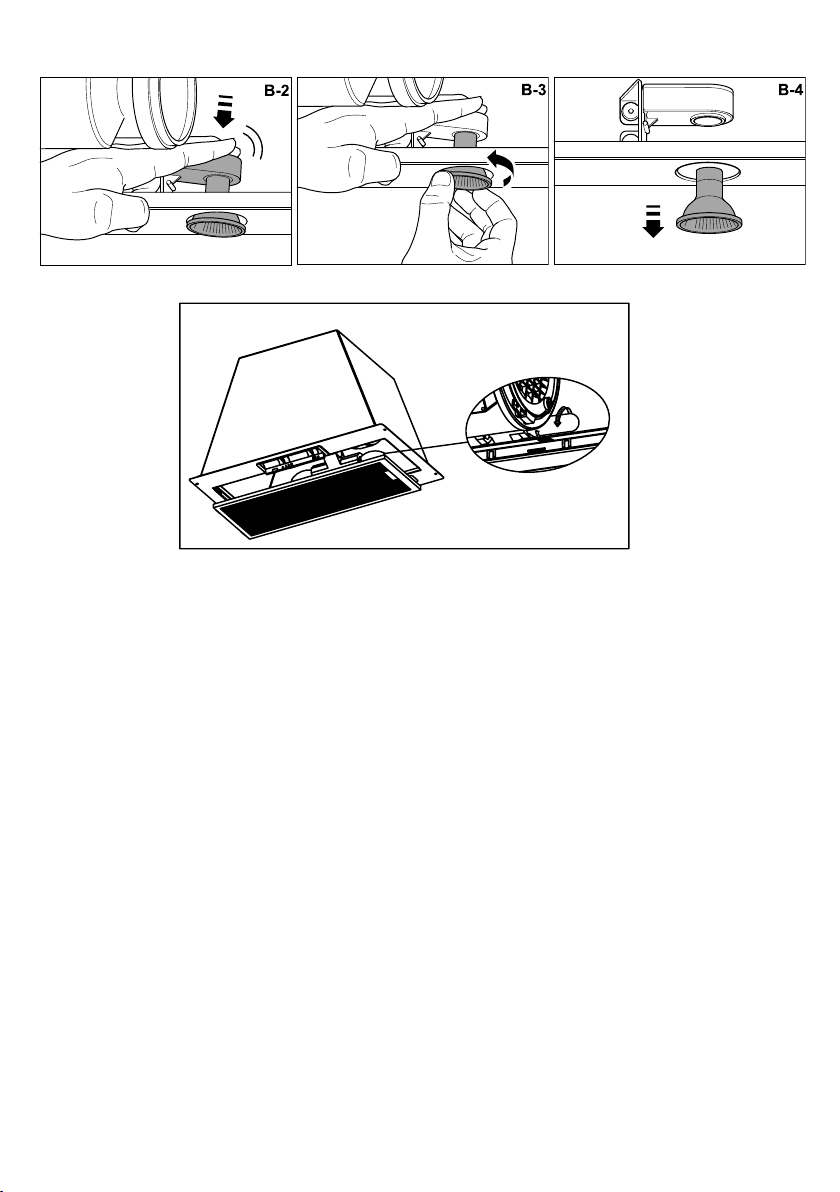
Mounting and fastening to the furniture
– The accessories needed to install the hood are located inside the hood.
– The hood must be installed at least 66 cm. from the stovetop.
– The screws needed to fasten the hood are contained in the bag of
accessories which comes with the hood. (Fig. 2).
Connecting the hood to the grid
Warning: before connecting the hood: switch off the electricity supply
and check that the supplied voltage and frequency coincide with that
indicated on the appliance nameplate.
If the extractor hood has a plug, connect it to a power socket in line with
applicable regulations, located in an accessible area.
If the hood does not have a plug, connect it directly to the electrical grid,
protected by a separator device accessible for disconnection, in line with local
regulations.
Use of the hood – Safety
Warning: the hood may stop working during an electrostatic discharge
(e. g. lightning). This involves no risk of damage. Switch off the electricity
supply to the hood and reconnect after one minute.
Do not allow the hood to be used by children or persons with reduced
(physical, sensory or mental) capabilities or lack of experience and knowledge,
unless they have been given instruction concerning use of the appliance by a
person responsible for their safety.
Children should be supervised so that they do not play with the appliance.
To avoid the risk of re, clean the metal lter regularly, permanently control
pans containing hot oil and do not ambé food underneath the hood.
Do not use the hood if it shows signs of damage or imperfection. Contact an
ofcial distributor or authorised dealer.
Accessible parts may heat up when using cooking appliances.
Use of the hood - Control panel (look for the symbol in the gures)
The different control panels are described below. Check the panel model
installed on your hood and see the gure indicated in each case.
Panel with sliding switch (Fig. P1)
1- Extractor fan speed - positions: OFF, speed 1, 2 and 3
2- Extractor fan operating control pilot light.
3- Lighting on and off switch.
Five-button panel (Fig. P4)
1- Extractor fan operating control pilot light.
2- Lighting on and off.
3- Extractor fan off.
4- Extractor fan speed - button: speed 1, 2 and 3
Touch panel (Fig. P5)
1- Filter clean warning display/button. Warning of the need to replace the
lter – press to deactivate once the lter has been cleaned or replaced.
2- Enable and disable extractor fan timer.
3- Lighting on and off. Keep pressed down to adjust the lighting
intensity.
4- Extractor fan on and off.
5- Extractor fan speed - button: speed 1, 2 and 3/4
Timer: the extractor fan works for 5 min. at the current speed and another 5
min. at each of the lower speeds until it stops.
Hood maintenance
Warning: always switch off the electricity supply before carrying out
maintenance work on the hood. In the event of a fault, contact an
ofcial distributor or authorised dealer.
Exterior cleaning: use non-corrosive, liquid detergent and avoid the use of
abrasive cleaning products.
Grease lters: to avoid res, clean thoroughly once a month or whenever the
display pilot light indicates as such. To do so, remove the lters and wash with
hot water and detergent. If using a dishwasher, position the lters vertically to
prevent solid remains from depositing on them.
Activated charcoal lters: replace the every 3 months.
Important: increase the lter cleaning/replacement frequency if the hood
is used for more than 2 hours a day. Always use genuine lters from the
manufacturer.
Bulb replacement (look for the symbol in the gures)
Warning: do not handle the bulbs until the electricity supply has been
switched off and they have cooled.
Important: use new bulbs according to that indicated on the hood
nameplate.
Use bulbs with an aluminium reector to replace halogen bulbs. Do not use
dichroic bulbs - risk of overheating.
Legal information
The manufacturer:
- Declares that this product meets all basic requirements regarding low-voltage
electrical equipment established in Directive 2006/95/EC of 12 December 2006
and electro-magnetic compatibility established in Directive 2004/108/EC of 15
December 2004.
- Is not responsible for any failure to observe the instructions given in this manual
and current safety regulations for the correct use of the equipment.
- R eserves the right to make any modications to the equipment or this manual
without prior notice.
Contact our ofcial distributor should you require technical assistance or
additional information on our products.
EN

18
DEKORATÍV KONYHAI ELSZÍVÓ
Tisztelt Vásárló!
Köszönjük, hogy az elszívónkat választotta. Kérjük, hogy optimális felszerelése,
használata és karbantartása érdekében alaposan olvassa el az alábbi utasításokat.
Megjegyzés: A kézikönyben említett ábrák az első oldalakon találhatók.
Elszívó falra történő felszerelése (keresse az ábrákon a szimbólumot)
Figyelem! Tartsa be a páraelszívókra vonatkozó helyi előírásokat.
Ne kösse az elszívót füstelvezető-, szellőző-, illetve meleglevegő-
csövekre. Győződjön meg arról, hogy a helyiség szellőzése
megfelel a helyi hatóságok előírásainak. Gondoskodjon arról, hogy a
helyiség berendezéseinek maximális levegőelszívása ne legyen nagyobb,
mint 4 Pa (0,04 mbar). A helyiségnek megfelelő szellőzéssel kell rendelkeznie, ha
az elszívót gázüzemű vagy más tüzelőanyaggal működő készülékkel használja egy
helyen. Az elszívott levegőt gázüzemű vagy más tüzelőanyaggal működő készülékek
füstgázelvezetésére szolgáló csöveken keresztül kell a szabadba vezetni. A
légelszívásra vonatkozó jogszabályokat be kell tartan.
Az elszívó hálózatba történő bekötése
Figyelem! Az elszívó bekötése előtt kapcsolja le az elektromos áramellátást, és
ellenőrizze, hogy a szolgáltatott feszültség és frekvencia megfelel-e a készülék
adattábláján feltüntetett értékeknek.
Ha az elszívó rendelkezik csatlakozódugóval, dugja be egy hozzáférhető helyen lévő,
a vonatkozó jogszabályi előírásoknak megfelelő hálózati aljzatba.
Ha az elszívó nem rendelkezik csatlakozódugóval, kösse be közvetlenül az elektromos
hálózatba egy, a helyi jogszabályi előírásoknak megfelelő, leválasztást lehetővé tevő,
könnyen hozzáférhető megszakítón keresztül.
Az elszívó használata – Biztonság
Figyelem! Az elszívó elektrosztatikus kisülés (pl. villámlás) esetén leállhat. Ez
nem járhat a készülék sérülésével. Kapcsolja le az elszívó elektromos ellátását,
majd egy perc eltelte után kapcsolja vissza.
Ne engedje, hogy az elszívót gyerekek vagy működtetésre alkalmatlan személyek
használják, kivéve, amennyiben ezeket a személyeket egy, a biztonságukért felelős
személy felügyeli, illetve a készülék használatát nekik elmagyarázza.
A gyermekekre vigyázni kell, nehogy játsszanak a készülékkel.
A tűzveszély elkerülése érdekében rendszeresen tisztítsa meg a fémszűrőt, és ne
hagyja felügyelet nélkül a forró olajat tartalmazó serpenyőket, illetve ne ambírozzon
ételeket az elszívó alatt.
Amennyiben sérülés vagy nem megfelelő működés jeleit tapasztalja, ne használja
az elszívót. Forduljon egy hivatalos forgalmazóhoz vagy engedéllyel rendelkező
viszonteladóhoz.
A hozzáférhető részek sütés-főzéskor felforrósodhatnak.
Az elszívó használata – Kezelőpanel (keresse az ábrákon a szimbólumot)
A különböző kezelőpanelek leírását lásd alább. Minden esetben ellenőrizze az Ön
elszívójába beszerelt panel típusát és tekintse meg a feltüntetett ábrát.
Csúszókapcsolós panel (P1. ábra)
1- Elszívóventilátor sebessége – helyzetek: KI, 1., 2. és 3. sebesség
2- Elszívóventilátor működésjelző lámpája.
3- Világítás be-/kikapcsoló.
Ötgombos panel (P4. ábra)
1- Elszívóventilátor működésjelző lámpája.
2- Világítás be-/kikapcsoló.
3- Elszívóventilátor kikapcsoló.
4- Elszívóventilátor sebessége – gomb: 1., 2. és 3. sebesség
Érintőpanel (P5. ábra)
1- Szűrőtisztításra gyelmeztető kijelző/gomb. Figyelmeztetés a szűrőcsere
szükségességére – a kikapcsolásához nyomja meg, ha megtisztította vagy
kicserélte a szűrőt.
2- Elszívóventilátor időzítésének be-/kikapcsolása.
3- Világítás be-/kikapcsoló. A fényerő beállításához tartsa lenyomva a gombot.
4- Elszívóventilátor be-/kikapcsoló.
5- Elszívóventilátor sebessége – gomb: 1., 2. és 3/4. sebesség
Időzítés: Az elszívóventilátor 5 percig az aktuális sebességfokozaton működik,
majd további 5 percig az alacsonyabb sebességfokozatok mindegyikén, egészen a
kikapcsolásig.
Az elszívó karbantartása
Figyelem! Az elszívó karbantartási munkálatai előtt mindig kapcsolja le az
elektromos áramellátást. Hiba esetén forduljon egy hivatalos forgalmazóhoz
vagy engedéllyel rendelkező viszonteladóhoz.
A külső burkolat tisztítása: Használjon nem maró, folyékony tisztítószert, és kerülje a
dörzshatású tisztítószereket.
Zsírszűrők: A tűzveszély elkerülése érdekében havonta egyszer vagy amikor a kijelző
jelzőlámpája jelzi annak szükségességét, alaposan tisztítsa meg. Ehhez vegye ki
a szűrőket, és mossa le tisztítószeres meleg vízzel. Amennyiben mosogatógépet
használ, a szűrőket függőlegesen helyezze be, hogy a szilárd maradékok nehogy
lerakódjanak rajtuk.
Aktívszén-szűrők: 3 havonta cserélje le a őket..
Fontos: Amennyiben naponta több mint két órát használja az elszívót, a
szűrőket gyakrabban kell tisztítani, illetve cserélni. Mindig használjon a gyártótól
származó eredeti szűrőket.
Izzó kicserélése (keresse az ábrákon a szimbólumot)
Figyelem! Mielőtt az izzókhoz nyúlna, kapcsolja le az elektromos áramellátást,
és várja meg, hogy az izzók lehűljenek.
Fontos: Csak az elszívó adattábláján feltüntetett új izzókat használjon.
A halogén izzók helyett alumínium tükörrel ellátott izzókat használjon. Ne használjon
dikroikus izzókat – túlmelegedés veszélye.
Jogi információk
A gyártó:
- Kijelenti, hogy e termék megfelel a 2006. december 12-i 2006/95/EK irányelv
kisfeszültségű elektromos berendezésekre és a 2004. december 15-i 2004/108/
EK irányelv elektromágneses összeférhetőségre vonatkozó valamennyi
alapkövetelményének.
- Nem vállal felelősséget a kézikönyv utasításainak és a berendezés helyes
használatára vonatkozó hatályos biztonsági előírásoknak a be nem tartásából eredő
hibákért.
- Fenntartja a jogot, hogy minden előzetes értesítés nélkül módosítsa a berendezést
vagy e kézikönyvet.
Amennyiben a termékeinkkel kapcsolatosan technikai segítségre vagy további
információkra van szüksége, forduljon hivatalos forgalmazónkhoz.
HU

CATA ELECTRODOMÉSTICOS, S.L.
C. del Ter, 2 - 08570 TORELLÓ (Barcelona) SPAIN
Tel. +34 938 594 100 - Fax +34 938 594 101
60802405.07.01.2013
Importőr:
MULTIKOMPLEX BUDAPEST KFT.
a páraelszívók szakértője... 1995 óta
H - 1211 Budapest, Mansfeld Péter u. 27
(volt Bajáki Ferenc utca)
tel.: +(36-1) 427 0325, +(36-1) 427-0326;
fax: +(36-1)427 0327
www.multikomplex.hu
Other manuals for GT-Plus
1
This manual suits for next models
2
Table of contents
Languages:
Other Cata Ventilation Hood manuals

Cata
Cata VH60SSW User manual

Cata
Cata TF6600 User guide

Cata
Cata 700XGBK Quick guide

Cata
Cata ASOMA 600 User manual

Cata
Cata Isla Gamma Reference manual

Cata
Cata V-6000 XA Quick start guide

Cata
Cata TFH 6430 X User guide

Cata
Cata TFH6630 Quick start guide

Cata
Cata F2060W User guide

Cata
Cata ART283108 User manual

Cata
Cata PROFESSIONAL 750 User manual

Cata
Cata Cata P-3260 User manual

Cata
Cata TH 600 Duralum Quick start guide

Cata
Cata CERES Reference manual

Cata
Cata F-2060 User manual

Cata
Cata CHK60 User manual

Cata
Cata TF 5250 GBK User guide

Cata
Cata ISCG90SS User manual

Cata
Cata IAS 770 User manual

Cata
Cata omega Reference manual