manuals.online logo
Brands
  1. Home
  2. •
  3. Brands
  4. •
  5. Cateye
  6. •
  7. Bicycle Accessories
  8. •
  9. Cateye TL-LD135-R User manual

Cateye TL-LD135-R User manual

For UK Consumers
When used in constant flashing mode this
light complies with the Road Vehicles
Lighting Regulations 2005 No.2559. If used
in constant mode, this light should be used
in conjunction with a British Standard
6102/3 cycle light.
Pad
Garniture
Handlebar
Guidon
ø22 - 32mm
Please be sure to securely attach the light to your
bicycle. If it becomes loose it may be dangerous.
S’assurer de bien attacher la lumière au vélo. Il
est dangereux de rouler avec une lumière qui
n’est pas fixée solidement.
Loosen the screw to
adjust the angle of the
light. Tighten the
screw to set in place.
Desserrer la vis pour
régler l’angle de la
lumière. Serrer ensuite
la vis pour fixer la
lumière et empêcher
les cliquetis.
When cutting off the
protruding part of the
bracket band, round the
edges to prevent injury.
Lorsque vous découpez
les parties saillantes du
ruban du support,
arrondissez les angles
pour éviter les blessures.
Flash
Constant
Long press: Turn off
Longue pression:Éteint
Press:
Une pression :
Remove top body by pushing down while sliding it
backward.
•Carefully install batteries, ensuring proper
polarity.
•For best performance, do not mix new and old
batteries.
•Do not shine this light directly into eyes.
Enlevez la partie supérieure du boîtier en appuyant
dessus tout en faisant glisser vers l'arrière.
•Respectez la polarité des piles.
•Evitez de mélanger nouvelles et anciennes piles.
•Ne regardez pas ou ne projetez pas cette lampe
directement dans les yeux.
HL-EL135
060719
TL-LD135-R
TL-LD155-R
Copyright© 2017 CATEYE Co., Ltd. LD135R/155R-170207 2
ENG
90˚
Slot
Slot
-
+
-
+
12
3
Dial
Lens
Rubber gasket
Coin
Strap
HOW TO INSTALL BATTERY
HOW TO MOUNT TO A BICYCLE
Lever
Clip
Belt
Rubber gasket
2
1
3
AAA (LR3) x 2
1
3
WHEN USING THE CLIP
4
HOW TO USE
2
Standard operating time TL-LD135-R TL-LD155-R
Rapid Approx. 200 h Approx. 120 h
Flash Approx. 150 h Approx. 90 h
Constant Approx. 100 h Approx. 60 h
Switch operation
Switch operation
Long press : ON / OFF
Short press :
Lighting mode switch
Rapid Flash Constant
2-8-25, Kuwazu, Higashi Sumiyoshi-ku, Osaka
546-0041 Japan
Attn: CATEYE Customer Service Section
Phone : (06)6719-6863
Fax : (06)6719-6033
E-mail : [email protected]
URL : http://www.cateye.com
[For US Customers]
CATEYE AMERICA, INC.
2825 Wilderness Place Suite 1200, Boulder
CO80301-5494 USA
Phone : 303.443.4595
Toll Free: 800.5CATEYE
Fax : 303.473.0006
E-mail : [email protected]
Before using the product, please thoroughly read this manual and keep it for future
reference.
3
4
5
2
1
3
ø12 - 32 mm
Seatpost, Seatstay
Light unit Clip (C-1N)
FlexTight™ bracket (SP-11) AAA dry-cell battery x 2
LIMITED WARRANTY
2-year Warranty: Light unit only
CatEye products are warranted to be free of defects from materials and workmanship for a period
of 2 years from original purchase. If the product fails to work during normal use, CatEye will repair
or replace the defect at no charge. Service must be performed by CatEye or an authorized retailer.
To return the product, pack it carefully and enclose the warranty certificate (proof of purchase) with
instruction for repair. Please write or type your name and address clearly on the warranty certificate.
Insurance, handling and transportation charges to CatEye shall be borne by person desiring service.
For UK and REPUBLIC OF IRELAND consumers, please return to the place of purchase. This does not
affect your statutory rights.
Please register your CatEye product on the website.
http://www.cateye.com/en/support/regist/
CO., LTD.
SPARE PARTS
5342410
FlexTight™ bracket
(SP-12-R)
5445620
Rear rack bracket
5446510
RM-1 bracket
5342280
FlexTight™ bracket
(SP-11)
5440900N
Clip (C-1N)
OPTION PARTS
CAUTION!
• Before your trip, please make sure the light is firmly mounted to the bracket, it
lights up, and the light is not blocked by baggage, etc.
•
Stop your bicycle to operate the switch.
• This unit is not totally waterproof.
Please wipe and dry it completely after using in rain. Otherwise, it may cause failure.
• If the light unit or parts become dirty with mud, etc., clean with a soft cloth which
is moistened with mild soap.
Never apply paint thinner, benzine or alcohol; damage will result.
1. Mount the clip to the belt as shown. (1)
2. Insert the light to the clip until it clicks. (2)
3. To remove, press down the clip from the top while holding the light. (3)
CAUTION!
Do not mount the clip to the saddlebag. It may come off by vibration of the bicycle.
SPECIFICATIONS
Battery AAA dry-cell battery x 2
Operating time (When using alkaline batteries)
TL-LD135-R Rapid : Approx. 200 hours, Flash : Approx. 150 hours, Constant : Approx. 100 hours
TL-LD155-R Rapid : Approx. 120 hours, Flash : Approx. 90 hours, Constant : Approx. 60 hours
Temperature range 14˚F – 104˚F (-10˚C – 40˚C)
Dimensions/weight
TL-LD135-R
1-27/64” x 2-61/64” x 55/64” (36 x 75 x 21.9 mm) / 1.47 oz (41.6 g) (Including batteries)
TL-LD155-R
1-27/64” x 2-61/64” x 55/64” (36 x 75 x 21.9 mm) / 1.47 oz (41.8 g) (Including batteries)
* The specifications and design are subject to change without notice.
1. Mount the bracket to the seatpost or the seatstay as shown. (1- 3)
2. Slide the light onto the bracket until it “clicks” into place. (4)
3. To remove the light, press the lever (5) and slide it off.
CAUTION!
• Be sure to tighten the dial by hand. When you tighten it too hard with a tool, the
screw thread may be stripped.
• Check the bracket frequently to be sure it is properly tightened at all times.
• Round off the cut edge of the bracket strap to prevent injury.
Use the switch to turn the power ON or OFF and to change the lighting mode.
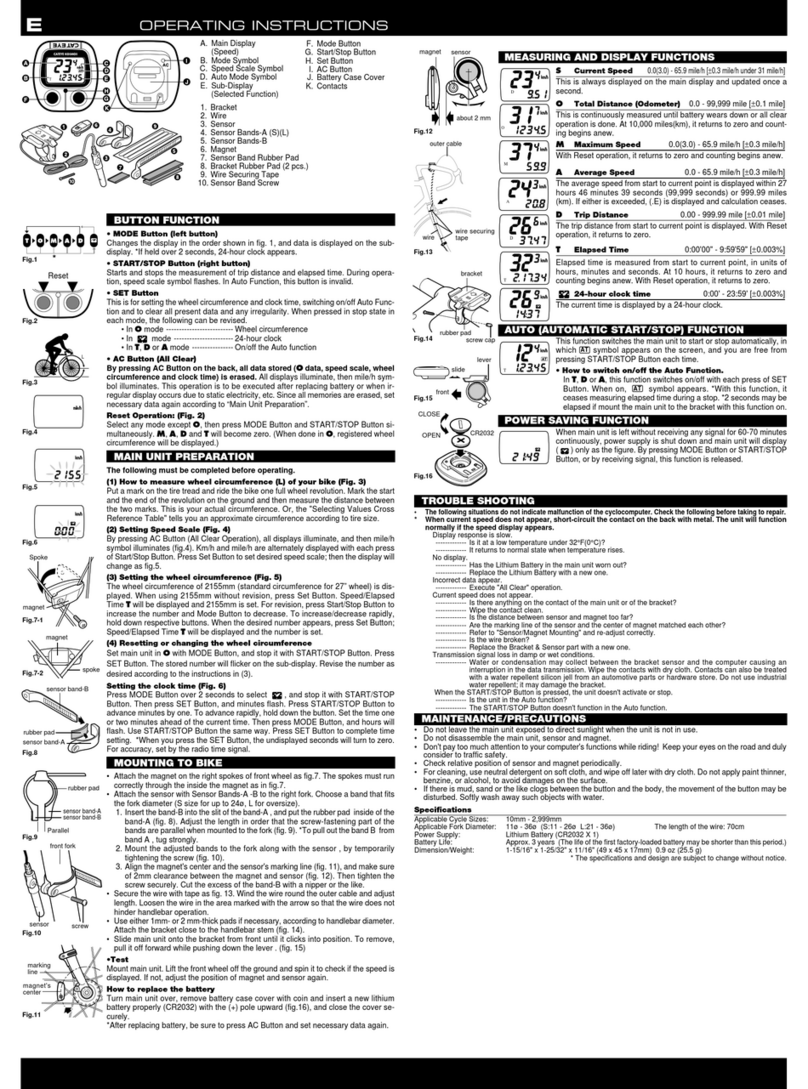
* The light will turn on in the lighting mode previously selected.
(Mode memory function)
1. Using a coin to remove the lens from the light as shown in the drawing. (1- 2)
2. Insert the battery according to the mark stamped on the body, and then fit the lens
firmly to the body. (3)
CAUTION!
• Be sure to install batteries in the correct direction.
• Install the rubber gasket correctly to maintain waterproof features.
• Remove and store batteries when you will not use the light for a long period of
time. Otherwise, batteries may leak liquid, which may result in failure.
3
2
This manual suits for next models

1

Other Cateye Bicycle Accessories manuals

Cateye Enduro8 CC-ED300 Setup guide

Cateye

Cateye Enduro8 CC-ED300 Setup guide

Cateye COMMUTER CC-COM10W Instruction manual

Cateye

Cateye COMMUTER CC-COM10W Instruction manual

Cateye CC-RD400DW User manual

Cateye

Cateye CC-RD400DW User manual

Cateye CC-VL510 User manual

Cateye

Cateye CC-VL510 User manual

Cateye CC-VL100 Use and maintenance manual

Cateye

Cateye CC-VL100 Use and maintenance manual

Cateye Rapid micro TL-LD620-R User manual

Cateye

Cateye Rapid micro TL-LD620-R User manual

Cateye COMPACT OPTICUBE HL-EL400 User manual

Cateye

Cateye COMPACT OPTICUBE HL-EL400 User manual

Cateye Vectra CC-VT100W User manual

Cateye

Cateye Vectra CC-VT100W User manual

Cateye RAPID X2 User manual

Cateye

Cateye RAPID X2 User manual

Cateye TL-LD800B User manual

Cateye

Cateye TL-LD800B User manual

Cateye MSC-2DX N Operation and maintenance manual

Cateye

Cateye MSC-2DX N Operation and maintenance manual

Cateye ASTRALE User manual

Cateye

Cateye ASTRALE User manual

Cateye Velo5 CC-VL510 User manual

Cateye

Cateye Velo5 CC-VL510 User manual

Cateye CC-RD430DW User manual

Cateye

Cateye CC-RD430DW User manual

Cateye HL-EL130 User manual

Cateye

Cateye HL-EL130 User manual

Cateye Wearable X SL-WA100 User manual

Cateye

Cateye Wearable X SL-WA100 User manual

Cateye TWIN HL-NC250 User manual

Cateye

Cateye TWIN HL-NC250 User manual

Cateye Tomo CC ST-200 User manual

Cateye

Cateye Tomo CC ST-200 User manual

Cateye STRADA User manual

Cateye

Cateye STRADA User manual

Cateye CC-TR200DW (V2c) User manual

Cateye

Cateye CC-TR200DW (V2c) User manual

Cateye CC-CD300DW User manual

Cateye

Cateye CC-CD300DW User manual

Cateye TL-LD150-R User manual

Cateye

Cateye TL-LD150-R User manual

Cateye CR123A User manual

Cateye

Cateye CR123A User manual

Cateye URBAN WIRELESS+ CC-VT245W User manual

Cateye

Cateye URBAN WIRELESS+ CC-VT245W User manual

Popular Bicycle Accessories manuals by other brands

Ge-Tectronic Sonic Bike Fastmute user manual

Ge-Tectronic

Ge-Tectronic Sonic Bike Fastmute user manual

Tune SPEEDNEEDLE manual

Tune

Tune SPEEDNEEDLE manual

Bosch 0 275 007 042 Original instructions

Bosch

Bosch 0 275 007 042 Original instructions

DVO DIAMOND Seal Service & Casing Cleaning

DVO

DVO DIAMOND Seal Service & Casing Cleaning

Key-Disp KD21C user guide

Key-Disp

Key-Disp KD21C user guide

AddBike AddBike+ instruction manual

AddBike

AddBike AddBike+ instruction manual

SW-Motech NSW.00.770.10000 Mounting instructions

SW-Motech

SW-Motech NSW.00.770.10000 Mounting instructions

Giant NeosTrac Faq

Giant

Giant NeosTrac Faq

Leggero Enso user manual

Leggero

Leggero Enso user manual

THM Carbones Steven Nimbus Instruction book

THM Carbones

THM Carbones Steven Nimbus Instruction book

Extralite CyberRear SL 2 owner's manual

Extralite

Extralite CyberRear SL 2 owner's manual

FastTt Carbon Aero Bar installation guide

FastTt

FastTt Carbon Aero Bar installation guide

Manitou SIX owner's manual

Manitou

Manitou SIX owner's manual

SR Suntour NRX Series owner's manual

SR Suntour

SR Suntour NRX Series owner's manual

HOMCOM 440-001 Assembly & instruction manual

HOMCOM

HOMCOM 440-001 Assembly & instruction manual

Rose electronics 2287898 owner's manual

Rose electronics

Rose electronics 2287898 owner's manual

EUFAB 11446 manual

EUFAB

EUFAB 11446 manual

NiteRider PRO 2200 RACE user guide

NiteRider

NiteRider PRO 2200 RACE user guide

manuals.online logo
manuals.online logoBrands
  • About & Mission
  • Contact us
  • Privacy Policy
  • Terms and Conditions

Copyright 2025 Manuals.Online. All Rights Reserved.