CCi PiMPro Tower 700 User manual

8/7/2018 Rev. 1.0
Tower Series PIM Analyzer Remote
Operation User Guide

8/7/2018 Rev. 1.0 ii
Tower Series PIM Analyzer Remote
Operation User Guide
Table of Contents
Page
1 Introduction.............................................................................................................................................................................................5
1.1 Analyzer Frequencies Available....................................................................................................................................................5
2 Safety .....................................................................................................................................................................................................6
2.1 Safety Instructions........................................................................................................................................................................6
2.2 Warnings......................................................................................................................................................................................6
2.3 Electrical Hazards.........................................................................................................................................................................7
2.4 ESD..............................................................................................................................................................................................8
2.5 Working at Heights.......................................................................................................................................................................8
2.6 Radio Frequency Radiation..........................................................................................................................................................8
2.7 Specific Safety for the Tower Series PIM Analyzer.......................................................................................................................8
2.8 RF, Interference & Grounding Protection......................................................................................................................................8
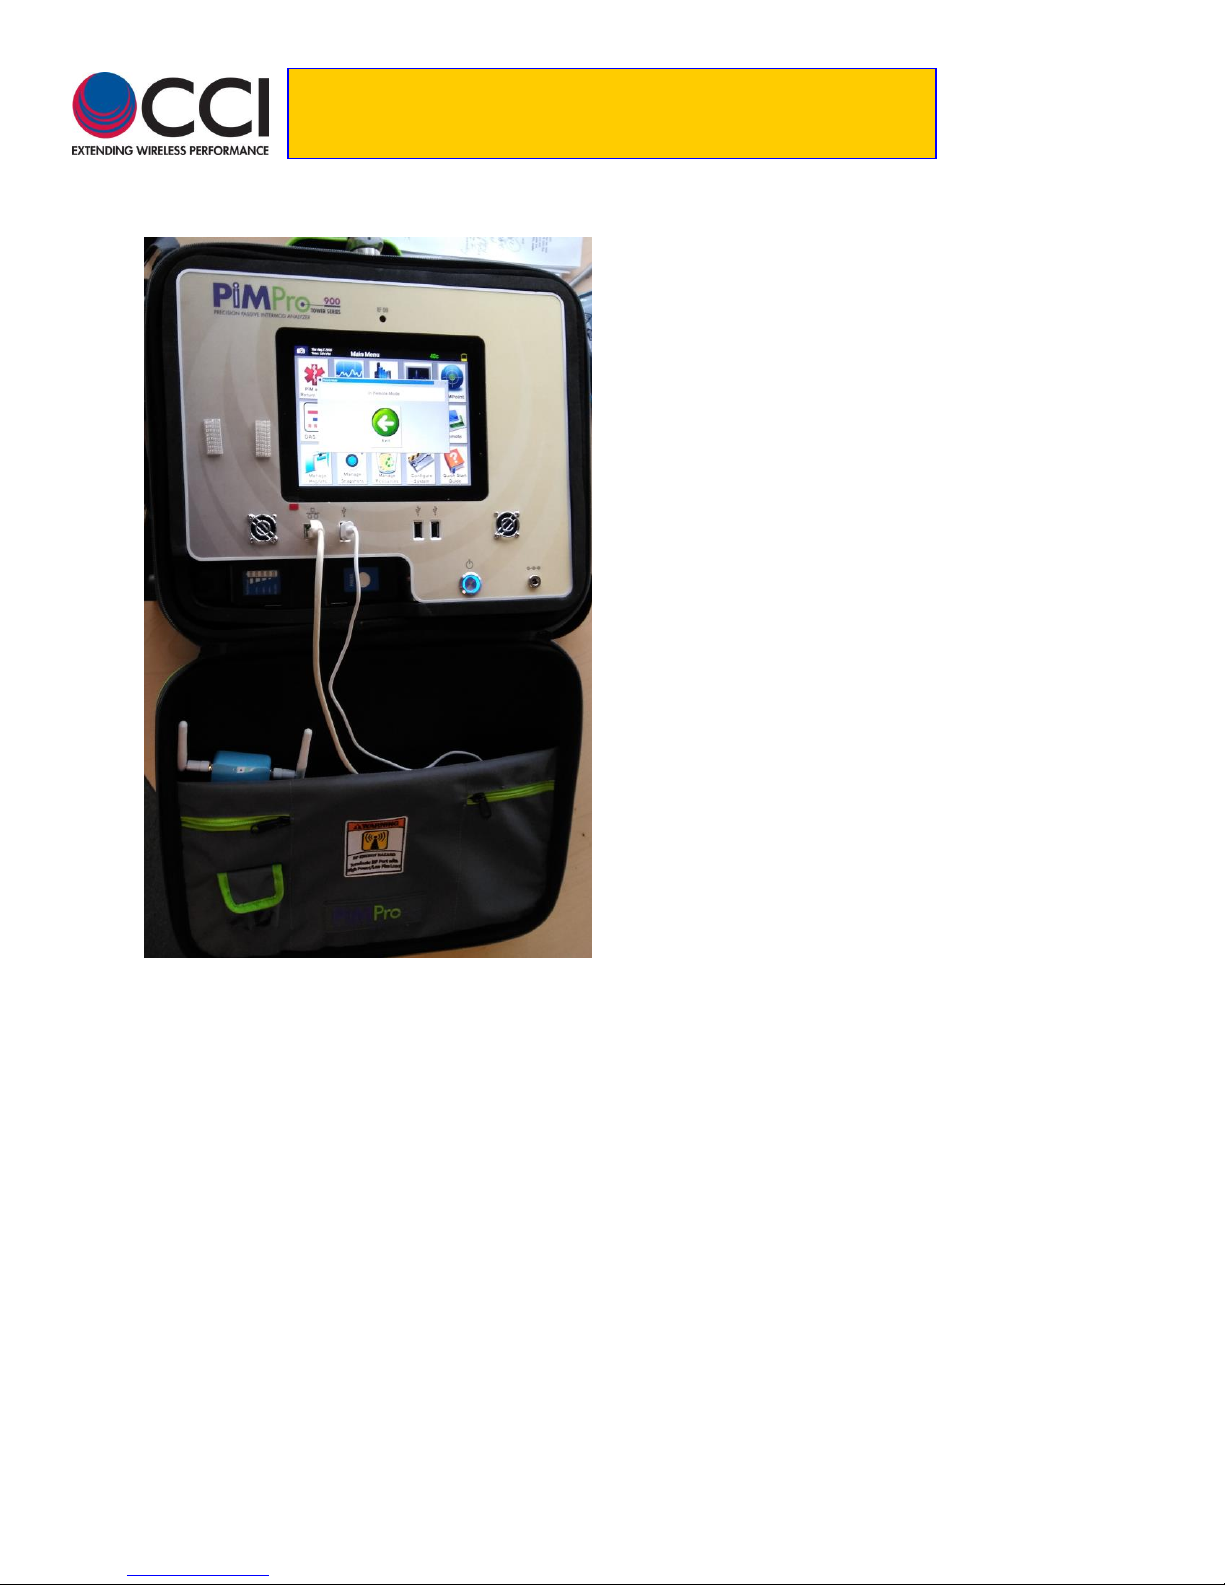
3 Tower Series Remote Operation.............................................................................................................................................................9
3.1 Optional “Remote” Operation of the Tower Series PiMPro............................................................................................................9
3.1.1 Verify “Remote” Operation is Available ................................................................................................11
3.1.2 Connect Wireless Router.....................................................................................................................11
3.1.3 Turn “ON” Tablet(s) .............................................................................................................................11
3.1.4 Start Remote Operation.......................................................................................................................11
3.1.5 Check for Wi-Fi from Tower Series PiMPro..........................................................................................13
3.1.6 Open Tower Series PiMPro on Tablet..................................................................................................13
3.1.7 Verify Tower Series Wi-Fi Connection .................................................................................................14
3.1.7.1 Computer Icons Show Green....................................................................................................................................14
3.1.7.2 Computer Icons Show Red .......................................................................................................................................14
3.1.8 Tablet Main Screen .............................................................................................................................14
3.1.9 Start PIM & RL Test.............................................................................................................................15
3.1.9.1 Change PIM & R.Loss and PIM vs. Time Settings.....................................................................................................15
3.1.9.1.1 Change Frequencies.........................................................................................................................................16
3.1.9.1.2 Change Power ..................................................................................................................................................17
3.1.9.1.3 Change Test Duration.......................................................................................................................................18
3.1.9.1.4 PIM Units and Acceptance/Failure Limits ..........................................................................................................18
3.1.9.1.5 IM Frequency Change.......................................................................................................................................20
3.1.9.1.6 dBm/dBc Unit Change.......................................................................................................................................21
3.1.9.1.7 Battery Life Selection........................................................................................................................................21
3.1.9.1.8 Turn-On and Turn-Off of Transmitter (TX).........................................................................................................22
3.1.9.1.9 Record Reading................................................................................................................................................22
3.1.9.1.10 Report Menu ..................................................................................................................................................24
3.1.10 PIMPoint..............................................................................................................................................25
3.1.10.1 PIMPoint Calibration................................................................................................................................................25
3.1.10.2 PIMPoint Test..........................................................................................................................................................25
3.1.11 Quick Start Guide................................................................................................................................26
3.1.12 Multiple Tablets ...................................................................................................................................26
3.1.12.1 Notes About Operation with Two Tablets Connected...............................................................................................26
C Appendix C –Declarations of Conformity...............................................................................................................................................27
C.1 CE Declaration of Conformity .....................................................................................................................................................27
C.2 KC Declaration of Conformity.....................................................................................................................................................28
These products are in conformity with the following NRAA published standards at the date of this declaration...........................................28
C.3 Sample Label Showing CE “Mark” and KC “Mark” and MSIP Registration Number.....................................................................28
List of Tables
Page
Table 1 - Tower Series PIM Analyzer Specifications..........................................................................................................................................4

8/7/2018 Rev. 1.0 iii
Tower Series PIM Analyzer Remote
Operation User Guide
List of Figures
Page
Figure 1 –Wireless Router Mounted on PiMPro................................................................................................................................................9
Figure 2 –Wireless Router Mounted in PiMPro Carrying Case........................................................................................................................10
Figure 3 –Wireless Router for Tower Series PiMPro.......................................................................................................................................11
Figure 4 –Tower PiMPro Main Menu Including “Remote”................................................................................................................................12
Figure 5 –“In Remote Mode” Pop-up window..................................................................................................................................................12
Figure 6 –Wi-Fi Connections Available...........................................................................................................................................................13
Figure 7 –Tablet Main Screen with PiMPro Icon Highlighted...........................................................................................................................13
Figure 8 –PiMPro Operating Modes on Tablet................................................................................................................................................14
Figure 9 –PIM & R.Loss Screen Prior to Test .................................................................................................................................................15
Figure 10 –TX-1 Frequency Setting Pop-up Window......................................................................................................................................16
Figure 11 –“Frequency out Of Range” Pop-up Window...................................................................................................................................16
Figure 12 –Location of F1 & F2 Power Level Icons.........................................................................................................................................17
Figure 13 –TX Power Level Setting Pop-up Window.......................................................................................................................................17
Figure 14 –Location of PIM vs. Time “Slider” ..................................................................................................................................................18
Figure 15 –Time Duration Setting Pop-up Window .........................................................................................................................................18
Figure 16 –PIM Level Pop-up Window............................................................................................................................................................19
Figure 17 –PIM Pass Limit Pop-up Window....................................................................................................................................................19
Figure 18 –PIM Fail Limit Pop-up Window......................................................................................................................................................19
Figure 19 –PIM & R.Loss Screen for Location of IM Product ..........................................................................................................................20
Figure 20 –IM Selection Window ....................................................................................................................................................................20
Figure 21 –dBm/dBc Unit Change Selection...................................................................................................................................................21
Figure 22 –Battery Life Selection Screen........................................................................................................................................................21
Figure 23 –Icon to Turn TX (RF) ON...............................................................................................................................................................22
Figure 24 –Site Info Pop-up Window after Depressing Record Reading .........................................................................................................22
Figure 25 –Sector Info Pop-up Window ..........................................................................................................................................................23
Figure 26 –Label and Comment Pop-up Window............................................................................................................................................23
Figure 27 –Record Reading Pop-up Window..................................................................................................................................................24
Figure 28 –PIM vs. Time “Graphical” Window.................................................................................................................................................24
Figure 29 –Initial DTP Screen Prior to Reading...............................................................................................................................................25
Figure 30 –PIMPoint Not Available Screen Due to No Calibration Performed.................................................................................................25
Figure 31 –DTP and “Record Reading”...........................................................................................................................................................26
Figure 32 –Quick Start Guide as Viewed on a Tablet......................................................................................................................................26

8/7/2018 Rev. 1.0 4
Tower Series PIM Analyzer Remote
Operation User Guide
Table 1 - Tower Series PIM Analyzer Specifications
Description
Typical Specifications
Electrical Specifications
Frequency Bands
Receive Range (MHz)
Transmit Range (MHz)
LTE 700 (Tower Series Dual Band 700)
698 - 722 (RX1), 780 - 798 (RX2)
745.6 - 769.4 (TX1), 732.6 - 734.4 (TX2)
APT 700 (Tower Series Dual Band 700A)
703 - 748 (RX1), 825 - 845 (RX2)
758 - 776 (TX1), 788 - 807 (TX2)
LTE 800 (Tower Series 800)
832 - 862
811 - 821 (TX1), 791 - 795 (TX2)
Cellular 850 (Tower Series 850)
824 - 849
864 - 871 (TX1), 881.6 - 894 (TX2)
GSM 900 (Tower Series 900)
890 - 915
925 - 937.5 (TX1), 951.5 - 980 (TX2)
DCS 1800 / UMTS 2100 (Tower Series Dual Band 1821)
1710 - 1785 (RX1), 1920 - 1980 (RX2)
1805 - 1833 (TX1), 1855 - 1880 (TX2)
PCS/AWS (Tower Series Dual Band 1921)
1710 - 1755 (RX1), 1850 - 1910 (RX2)
1965 - 1995 (TX1), 1930 - 1945 (TX2)
2110 - 2155 (TX1)
LTE 2600 (Tower Series 2600)
2500 –2570 (RX1)
2620 - 2644 (TX1) 2690 Fixed (TX2)
Transmitter
Frequency Accuracy: ±1 ppm @ +23°C; Stability ±1 ppm (-10°C to +55°C)
Frequency Aging: ±1 ppm/yr
Output Accuracy: ± 0.3 dB
Frequency Step Resolution: ± 200 KHz
Output Power Resolution: ± 0.1 dB
Adjustable Power Range: 20 to 46 dBm x 2 (100 mW –40 W x 2)
Receiver
Residual Intermod Level : < -120 dBm (< -163 dBc at 20 W); -125 dBm (-168 dBc) Typical
Measurement Range: -60 to -140 dBm
Noise Floor: -136 dBm
Reverse Power Protection: 13 dBm (20 mW) continuous
Measurement Modes
Measurement Method: One Port, Reverse PIM
Real Time PIM: 3rd and 5th order IMD
Return Loss: Measured in dB
Frequency Sweep: Frequency Response
PIM vs. Time: 3rd and 5th order IMD
RX Interference: Receive Only Mode –Noise Floor Measurements
Noise Floor Measurement: Up-Link noise level with TX off
PIM Location (PiMPoint): Distance to PIM Location in Feet or Meters with VP Settings
Distance to Fault/Cable Loss: One Port Open-Short Calibration
DAS Feature: Path Loss Characteristics (at Low Power over time)
Measurement Range
Return Loss: Directivity >25 dB; Resolution: >0.1 dB
VSWR:Measurement Range 17:1 to 1.12:1; Resolution: >0.01 dB
Cable Loss: Measurement Range 0 to 30 dB; Resolution: >0.01 dB
Distance to Fault: VSWR Range 17:1 to 1.02:1; RL Range: 0 to 40 dB
System
Battery: >3 hours (Full Charge)
Power: AC (90 - 256 VAC, 50 - 60 Hz)
Alarms: Audio & Visual Display
Display Size & Type: 8.” (203.2 mm) Capacitive TFT, Industrial Grade Screen
Data Ports: 3 –USB 2.0, 1 x Ethernet LAN Port
Remote Control: WiFi Enabled (802.11n)
Control: GUI Control Via Touch Screen Display
Battery Power: 28 VDC
Battery Capacity: 3.5 AH (99.4 WH)
Battery Type: Li-Polymer Removable Battery Pack
Electrical
Max Power Consumption: <340 W
Mechanical
Weight: < 18 to 27 lbs. (8.5 to 12.5 kg) (Model Dependent)
RF Output Connector: 1 x 7/16 DIN Female
Dimensions (W × H × D): 14” × 9” × 4.5” (350 × 230 × 114 mm)
Operating Temperature: -10C to +45C (14F to 113F), 95% RH
Storage Temperature: -30C to +60C (-22F to 140F), 85% RH

8/7/2018 Rev. 1.0 5
Tower Series PIM Analyzer Remote
Operation User Guide
1 Introduction
This user guide only covers Remote Operation of the Tower Series PiMPro PIM Analyzers.
1.1 Analyzer Frequencies Available
CCI’s Tower Series Analyzer is presently available for the following frequency bands:
Model
Frequency
Band
TX1 (MHz)
TX2 (MHz)
RX1 (MHz)
RX2 (MHz)
Tower 700
(Dual Band)
LTE 700
745.6 - 769.4
732.6 - 734.4
698 - 722
780 - 798
Tower 700A
(Dual Band)
APT 700
758 - 776
788 - 807
703 - 748
825 - 845
Tower 800
LTE 800
811 - 821
791 - 795
832 - 862
Tower 850
Cellular 850
864 - 871
881.6 - 894
824 - 849
Tower 900
GSM 900
925 - 935.4
951.6 - 980
880 - 915
Tower 1821
(Dual Band)
DCS &
UMTS 1800
1805 - 1833
1855 - 1880
1710 - 1785
1920 - 1980
Tower 1921
(Dual Band)
PCS & AWS
1965 - 1995
1930 - 1945
1710 - 1755
1850 - 1910
2110 - 2155
Tower 2600
LTE 2600
2620 - 2644
2690 Fixed
2500 - 2570

8/7/2018 Rev. 1.0 6
Tower Series PIM Analyzer Remote
Operation User Guide
2 Safety
2.1 Safety Instructions
This section illustrates the systems used for presenting safety information.
Note: Reduce the risk of accidents by studying all of the instructions carefully before starting work. If questions
arise regarding the safety instructions, contact your supervisor or CCI Technical Support (information below).
Where local regulations exist, these are to be followed first. The safety information in this manual is a supplement
to local regulations.
It is your responsibility to make certain that local regulations are known and followed.
This manual including safety information and specific instructions supplied by CCI personnel must be followed in
any work performed on these products. A sufficient knowledge of English or any other languages in which the
manuals or instructions are printed is required.
The safety information in this manual presupposes that any person performing work on CCI products or systems
has the necessary education, training, and competence required to perform that work correctly. For certain work,
additional training may be required.
2.2 Warnings
Warnings are used to indicate hazardous activities. The warnings are preceded by the common hazard symbol.
Hazard Symbol
Danger
Danger means that an accident may occur if the safety precautions are
neglected. This type of accident is likely to be fatal.
Warning
Warning means that an accident may occur if the safety precautions are
neglected. This type of accident may be fatal or cause serious injury.
Product damage can occur.
Caution
Caution means that an accident may occur if the safety precautions are
neglected. This type of accident may cause serious injury. Product
damage can occur.

8/7/2018 Rev. 1.0 7
Tower Series PIM Analyzer Remote
Operation User Guide
The following special symbols are used to indicate the risk of radio frequency radiation, electrical hazards, and
ESD:
Warnings are used throughout this manual to alert the reader to special instructions concerning a particular task
or operation that may be hazardous if performed incorrectly or carelessly. Therefore, read the instructions
carefully.
Strict compliance with the special instructions while performing a task is the best way to prevent accidents.
2.3 Electrical Hazards
High Voltage
The A.C. Installation must be carried out according to local regulations. These regulations may require the work
to be carried out by a qualified and authorized electrician.
Remove metal objects from your person that may come in contact with the equipment.
Switch off power if the equipment becomes wet or damp.
Prevent damp or water from entering the equipment in bad weather.
Danger
High Voltage is used in the operation of this equipment. Either direct
contact with the mains power or indirect contact via dampness or
collected moisture can be harmful and/or fatal

8/7/2018 Rev. 1.0 8
Tower Series PIM Analyzer Remote
Operation User Guide
Electrical
Cable marking –Verify cable markings correspond before connecting cables
2.4 ESD
2.5 Working at Heights
Caution must be taken when working at heights installing racks. Please ensure that you are trained and have the
appropriate equipment for this type of installation.
2.6 Radio Frequency Radiation
2.7 Specific Safety for the Tower Series PIM Analyzer
The CCI Tower Series PIM Analyzer shall always be terminated with a “High Power Low PIM Load” connected
either to its RF Output connector or at the end of a Device Under Test (DUT) which is connected between the CCI
Tower Series PIM Analyzer and the Low PIM Load. If the Tower Series is not properly terminated, dangerous RF
Radiation will be present when the unit is turned on. Additionally, the Tower Series can malfunction due to the
possibility that the High Power RF can be reflected back into the Tower Series itself.
2.8 RF, Interference & Grounding Protection
If the equipment is used in a manner not specified by the manufacturer, the protection provided by the equipment may
be impaired.
Danger
Improper electrical installation may cause fire or electrical shock.
Approved circuit breakers for the AC mains and the cable’s cross
sectional areas must always be selected in accordance with local
laws and regulations. Only a qualified and authorized electrician is
permitted to install or modify the electrical installation.
Caution
Sensitive Components such as Integrated Circuits (ICs) can be damaged
by discharges of static electricity
Danger
Radio Frequency Radiation (RF) from antenna systems can endanger
your health

8/7/2018 Rev. 1.0 9
Tower Series PIM Analyzer Remote
Operation User Guide
3 Tower Series Remote Operation
This user guide only covers Remote Operation of the Tower Series PiMPro PIM Analyzers, and it assumes that the
user is familiar with the operation of the Tower Series PiMPro units.
3.1 Optional “Remote” Operation of the Tower Series PiMPro
Optional Remote operation is available when purchased for the Tower Series PiMPro units. Remote operation
can be purchased either at the same time as the Tower Series PiMPro is procured, or it can be purchased at a
later date. When the Remote Operation option is purchased the following will be supplied by CCI:
1) Wireless Router
2) Tablet (quantity to be specified at time of purchase)
3) Tower Series License
4) Ethernet Cable(s) –Long & short cables
5) USB Cable(s) –Long & short cables
6) Remote Operation Guide
The icon for Remote Operation can be seen in figure 4 below. This function allows one or more tablets to control
the operation of the Tower Series PiMPro. Presently remote control is available for PIM & R.Loss, PIMPoint and
the Quick Start Guide functions on the Tower Series PiMPro. Note that the short USB & Ethernet cables are to
be used when the wireless router is placed on the PiMPro unit itself (see figure 1), while the long USB & Ethernet
cables can be used when placing the wireless router in the pocket of the Tower Series PiMPro (see figure 2).
Figure 1 –Wireless Router Mounted on PiMPro

8/7/2018 Rev. 1.0 10
Tower Series PIM Analyzer Remote
Operation User Guide
3.1 Optional “Remote” Operation of the Tower Series PiMPro (Cont.)
Figure 2 –Wireless Router Mounted in PiMPro Carrying Case

8/7/2018 Rev. 1.0 11
Tower Series PIM Analyzer Remote
Operation User Guide
3.1.1 Verify “Remote” Operation is Available
“Remote” operation is available when the “Remote” icon is visible on the Main Menu Screen on the
Tower Series PiMPro.
3.1.2 Connect Wireless Router
To prepare for remote operation choose the correct set of Ethernet and USB cables for the position the
wireless router is to be placed in. Connect the LAN port of the supplied “Wireless Router” shown in figure 3 to
the Ethernet Port of the Tower PiMPro “for communication.”Connect the Power port of the supplied Wireless
Router to one of the USB ports on the Tower Series PiMPro “to power”the wireless router. Note that there
are LED’s on the wireless router. A Green LED indicates that the wireless router is “ON,” and a RED Blinking
LED indicates that the wireless router is communicating with the tablet(s).
Figure 3 –Wireless Router for Tower Series PiMPro
3.1.3 Turn “ON” Tablet(s)
Turn on the tablet(s) to be used to control the Tower Series PiMPro.
3.1.4 Start Remote Operation
To start Remote Operation press the “Remote”Icon (see figure 4) on the Main Menu Screen of the Tower
Series PiMPro. The “In Remote Mode” pop-up window will appear as shown in figure 5 below.
LAN
Port
PWR
Port

8/7/2018 Rev. 1.0 12
Tower Series PIM Analyzer Remote
Operation User Guide
Figure 4 –Tower PiMPro Main Menu Including “Remote”
Figure 5 –“In Remote Mode” Pop-up window

8/7/2018 Rev. 1.0 13
Tower Series PIM Analyzer Remote
Operation User Guide
3.1.5 Check for Wi-Fi from Tower Series PiMPro
Check to see that the Wi-Fi operation is available from the Tower Series PiMPro, by opening the available Wi-
Fi connections on the tablet. See figure 6 for an example of the Wi-Fi connections available, where the
PiMPro is highlighted. Note: The SSID and Password for the wireless router are located on the wireless
router, in case they are required to make the connection with the PiMPro.
Figure 6 –Wi-Fi Connections Available
3.1.6 Open Tower Series PiMPro on Tablet
Open the Tower Series PiMPro operation on the tablet by clicking on the PiMPro icon on the Tablet’s
Main Menu as shown in figure 7 below. This will open up the screen shown in figure 8 below and the screen
shows the functions presently available for “Remote Operation” on the Tower Series PiMPro. The functions
include PIM & R.Loss (includes PIM vs. Time), PIMPoint and the Quick Start Guide.
Figure 7 –Tablet Main Screen with PiMPro Icon Highlighted

8/7/2018 Rev. 1.0 14
Tower Series PIM Analyzer Remote
Operation User Guide
3.1.6 Open Tower Series PiMPro on Tablet (Cont.)
Figure 8 –PiMPro Operating Modes on Tablet
3.1.7 Verify Tower Series Wi-Fi Connection
When connected the following screen will appear on the remote tablet. Note that the unit’s RF is off initially.
Check for the green computer to computer connection icon in the upper right hand corner of the tablet screen
as shown in figure 8 above.
3.1.7.1 Computer Icons Show Green
If the computer to computer icons at the top right corner of the tablet screen are “green,” then the
wireless connection is established.
3.1.7.2 Computer Icons Show Red
If the computer to computer icons at the top right corner of the tablet screen are “red,” then the wireless
connection is halted. In order to reset the communications, you should “Exit” the “Remote Mode” and
then start up the Remote Mode once again. Or you can go to the Wi-Fi connections on the tablet in
question, and try to disconnect and restart the Wi-Fi communications on the tablet.
3.1.8 Tablet Main Screen
When ready and communicating the Tablet screen will appear as shown in figure 8 above. PIM & R.Loss,
PIMPoint and the Quickstart Guide are initially available to access when using the tablet to Remote Operate
the Tower Series PiMPro.

8/7/2018 Rev. 1.0 15
Tower Series PIM Analyzer Remote
Operation User Guide
3.1.9 Start PIM & RL Test
When the remote tablet is connected, press the PIM & R.Loss icon and the screen shown in figure 9 below
will appear. If the user needs to set the Tower Series PiMPro for values other than the default values (or
wants to confirm the “default” values are correct), than the user should go through the steps listed in 3.1.9.1
and it’s subparagraphs below to set up the Tower Series PiMPro for PIM and RLtesting as desired. Note that
if the user has two tablets connected, the user can measure the PIM in dBm on one tablet, while the other
tablet is performing readings in dBc. The hi-lighted “Flashing Blue Square” in the “PIM reading” portion of the
screen indicates that the PiMPro is taking readings (even when “TX” is off).
Figure 9 –PIM & R.Loss Screen Prior to Test
3.1.9.1 Change PIM & R.Loss and PIM vs. Time Settings
Note that PIM & R.Loss settings can be changed from the tablet(s) when in remote operation. Settings
available for change include:
1) F1 and F2 Frequencies
2) Power Levels of F1 and F2
3) Test Duration
4) PIM Acceptance/Failure Limits
5) Turn-On and Turn-Off of the TX
6) IM Frequency
7) dBm/dBc Unit Change
8) Battery Life Selection
9) Record Reading
10) PIM vs. Time (Graph)

8/7/2018 Rev. 1.0 16
Tower Series PIM Analyzer Remote
Operation User Guide
3.1.9.1.1 Change Frequencies
The F1 and F2 frequencies can be changed as on the Tower Series PiMPro itself. Pressing the
associated frequency for F1 and F2 (see the highlighted area in figure 7) will open up the pop-up
window to enter the new F1 or F2 frequency. See figure 10 below for the TX-1 (or TX-2) pop-up
window. If the user attempts to set a frequency outside the allowable range, a “Frequency out of
Range” pop-up window appears (as seen in figure 11) and also indicates “Please Try Again.”
Figure 10 –TX-1 Frequency Setting Pop-up Window
Figure 11 –“Frequency out Of Range” Pop-up Window

8/7/2018 Rev. 1.0 17
Tower Series PIM Analyzer Remote
Operation User Guide
3.1.9.1.2 Change Power
The Power Level of the F1 and F2 frequencies can also be changed as on the Tower Series
PiMPro. Pressing the Power Level shown will open up the pop-up window to enter the new
power level for F1 or F2. See figure 12 below for the location to press the F1 and F2 Power
Level. This will open up the Power Setting pop-up window as shown in figure 13. Note: if the
user selects a power value which is outside of the available range, a pop-up window will appear
similar to the one shown for the frequency range being out of range. However, it will indicate
“Power Out of Range” and “Please Try Again.”
Figure 12 –Location of F1 & F2 Power Level Icons
Figure 13 –TX Power Level Setting Pop-up Window

8/7/2018 Rev. 1.0 18
Tower Series PIM Analyzer Remote
Operation User Guide
3.1.9.1.3 Change Test Duration
The duration of the PIM & R.Loss test can also be changed as on the Tower Series PiMPro.
Pressing the “Test Time Icon” (as shown in figure 14) on the Screen will open up the pop-up (see
figure 15 below) to change the Test Duration, which has a duration of 10 to 240 seconds.
Please note that there is an icon to the “right” of the Test Time which appears as if it is a slider.
Clicking the icon (which changes the icon by showing the bar next to the letters Test Time as
having shifted to the “right” and turning “red”) as shown in figure 14, tells the Tower Series
PiMPro to only test for the “specified” amount of time. In the screen shown below, this would be
10 seconds. If the Icon is off (the icon will appear gray and what appears as if it is a slider is to
the “left”) then the PIM and R.Loss test will stay on for the maximum allowable period of 4
minutes (240 seconds).
Figure 14 –Location of PIM vs. Time “Slider”
Figure 15 –Time Duration Setting Pop-up Window
3.1.9.1.4 PIM Units and Acceptance/Failure Limits
The PIM Acceptance/Failure Limits can be accessed by pressing the left side bar (icon) of the
tablet screen. Clicking on the Acceptance/Failure Limit Icon on the left side of the screen will
open up the pop-up window to allow for control of the Passing and Failing IM Criteria. Pressing
on the -140 dBc portion of the icon opens up the PIM Pass Limit pop-up window, while pressing
on the -120 dBc portion of the icon opens up the PIM Fail Limit pop-up window. The allowable
Pass and Fail limits are -103 dBc to -183 dBc (-80 dBm to -140 dBm). See figures 16 - 18 below
for an example.

8/7/2018 Rev. 1.0 19
Tower Series PIM Analyzer Remote
Operation User Guide
3.3.9.1.4 PIM Units and Acceptance/Failure Limits (Cont.)
Figure 16 –PIM Level Pop-up Window
Figure 17 –PIM Pass Limit Pop-up Window
Figure 18 –PIM Fail Limit Pop-up Window

8/7/2018 Rev. 1.0 20
Tower Series PIM Analyzer Remote
Operation User Guide
3.1.9.1.5 IM Frequency Change
The IM Frequency can be accessed by pressing the “IMx” (where “x” can be 3, 5, 7 or 9) portion
of the screen as highlighted in figure 19 below. This will open up the window shown in figure 20.
Select the appropriate IM Frequency (“allowed values” are shown in “Green” text), and press the
“OK” button. Note that the IM frequencies listed in “red” text are out of valid range for that band,
hence, not “selectable.” If the IM frequencies showing are not acceptable, then change the F1
and F2 frequencies as needed to achieve the desired acceptable IM order and IM frequency.
Note: pressing a value which is shown in red and clicking the “OK” button will give the user a
popup window indicating “IM Not Valid” “Please Try Again.
Figure 19 –PIM & R.Loss Screen for Location of IM Product
Figure 20 –IM Selection Window
This manual suits for next models
7
Table of contents
Other CCi Measuring Instrument manuals