CDA CD 9302/3 SS Operation instructions

Twin oven
gas cooker
CD 9302/3 SS
Before operating this cooker,
please read these instructions carefully
Users Operating Instructions
GB

2
Dear Customer
Thank you for choosing one of our appliances, carefully designed and built by our
specialist staff and thoroughly tested to satisfy your cooking requirements.
We suggest that you read this Instruction Booklet so that you will understand fully how
to operate your appliance.
Please keep the booklet handy. You may wish to refer to it at a later date.
CDA
Important:
This appliance is designed and manufactured solely for the cooking of domestic
(household) food and is not suitable for any non domestic application and therefore
should not be used in a commercial environment.
The appliance guarantee will be void if the appliance is used within a non domestic
environment i.e. a semi commercial, commercial or communal environment.
IMPORTANT INFORMATION FOR CORRECT DISPOSAL OF THE
PRODUCT IN ACCORDANCE WITH EC DIRECTIVE 2002/96/EC.
At the end of its working life, the product must not be disposed of as
urban waste. It must be taken to a special local authority differentiated
waste collection centre or to a dealer providing this service.
Disposing of a household appliance separately avoids possible negative
consequences for the environment and health deriving from inappropriate
disposal and enables the constituent materials to be recovered to obtain
significant savings in energy and resources. As a reminder of the need to
dispose of household appliances separately, the product is marked with a
crossed-out wheeled dustbin.

3
Contents
Model CD 9302/3 SS
Page Number
Introduction . . . . . . . . . . . . . . . . . . . . . . . . . . . . . . . . . . . . . . . . . . . . . . . . . . . . . 4
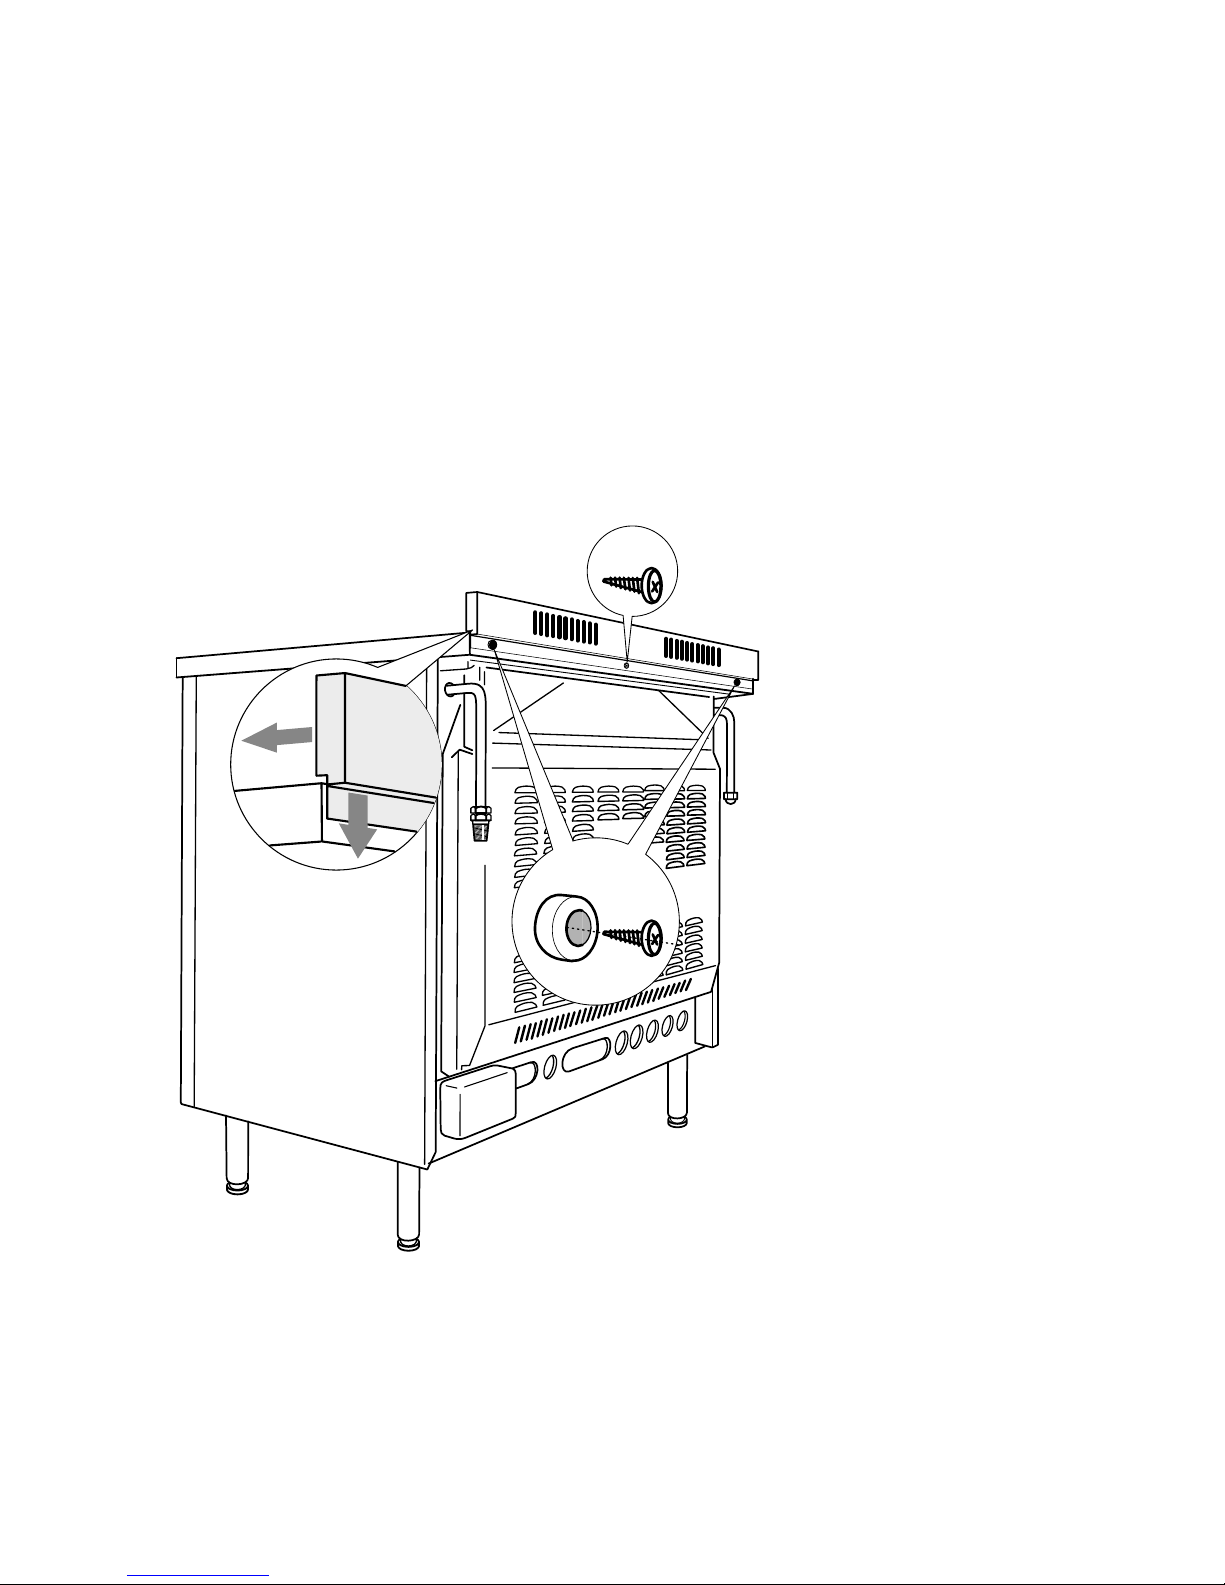
Assembling the backguard . . . . . . . . . . . . . . . . . . . . . . . . . . . . . . . . . . . . . . . . . 4
Features and technical data . . . . . . . . . . . . . . . . . . . . . . . . . . . . . . . . . . . . . . . . . 5
Control panel . . . . . . . . . . . . . . . . . . . . . . . . . . . . . . . . . . . . . . . . . . . . . . . . . . . . 6
Minute counter . . . . . . . . . . . . . . . . . . . . . . . . . . . . . . . . . . . . . . . . . . . . . . . . . . . 6
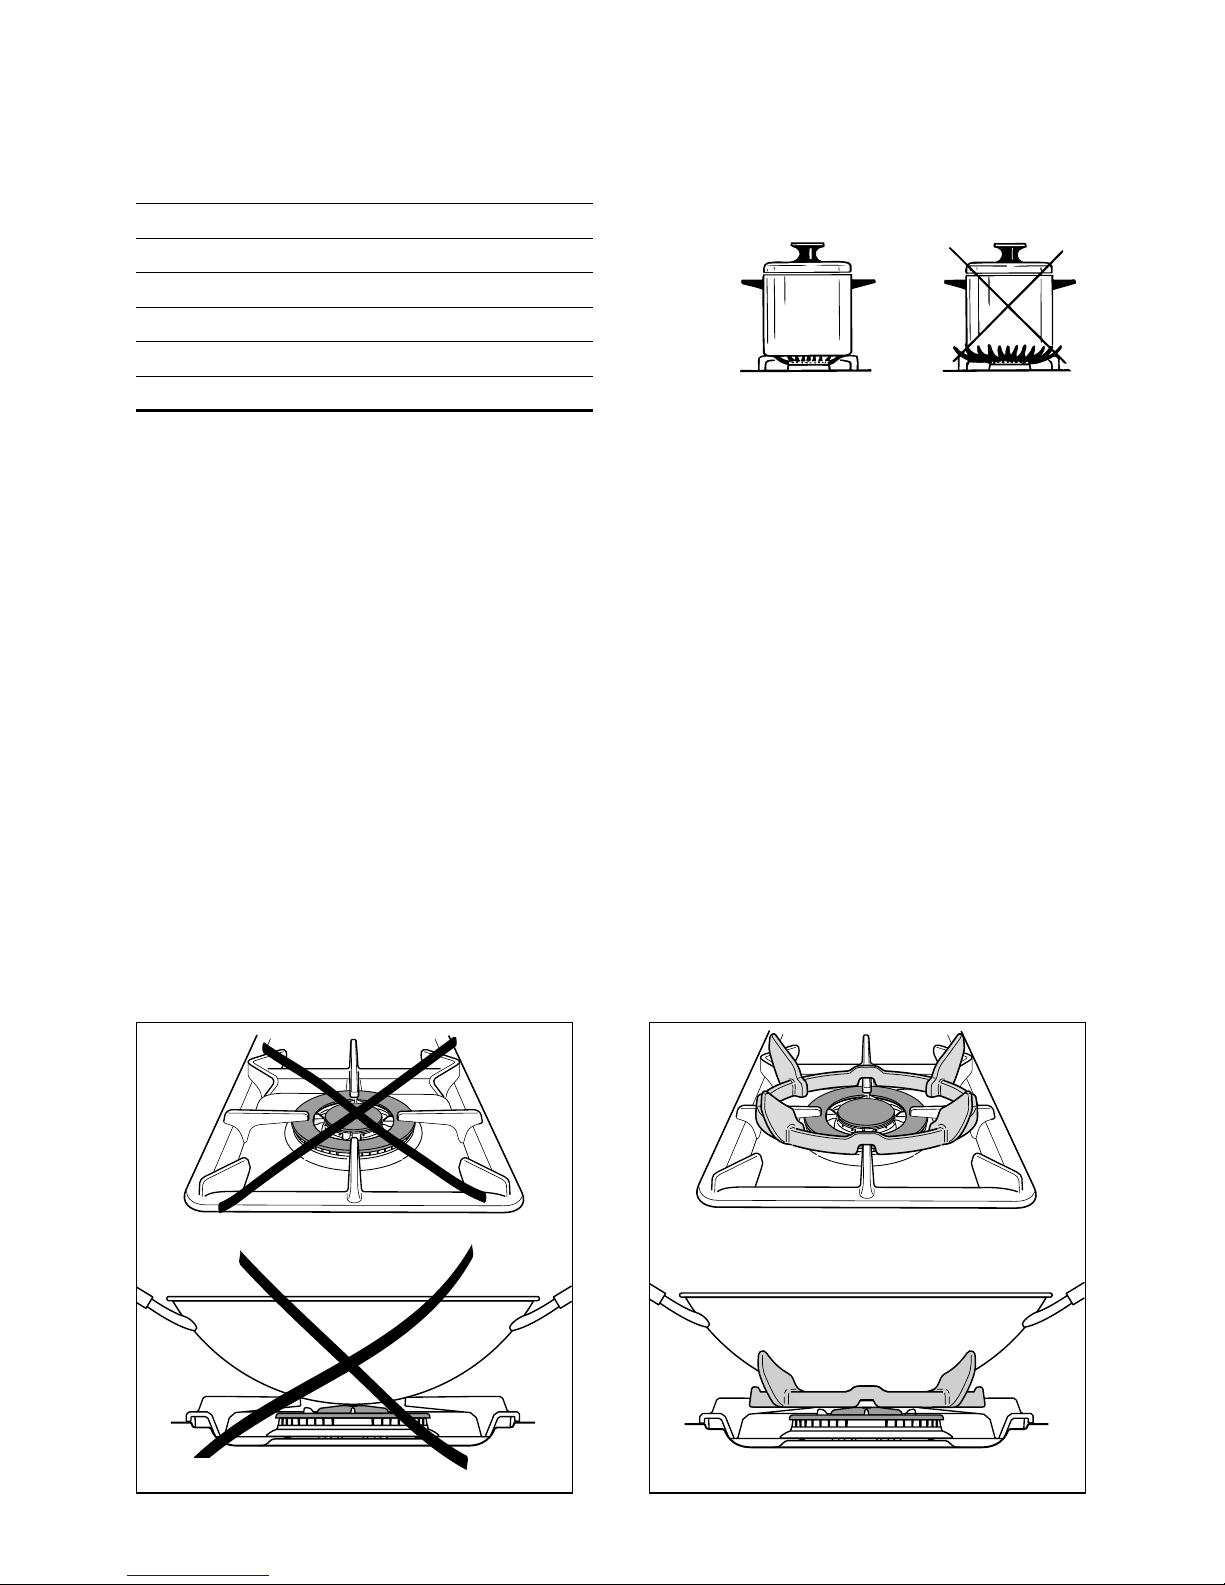
How to use the hob burners . . . . . . . . . . . . . . . . . . . . . . . . . . . . . . . . . . . . . . . . 7
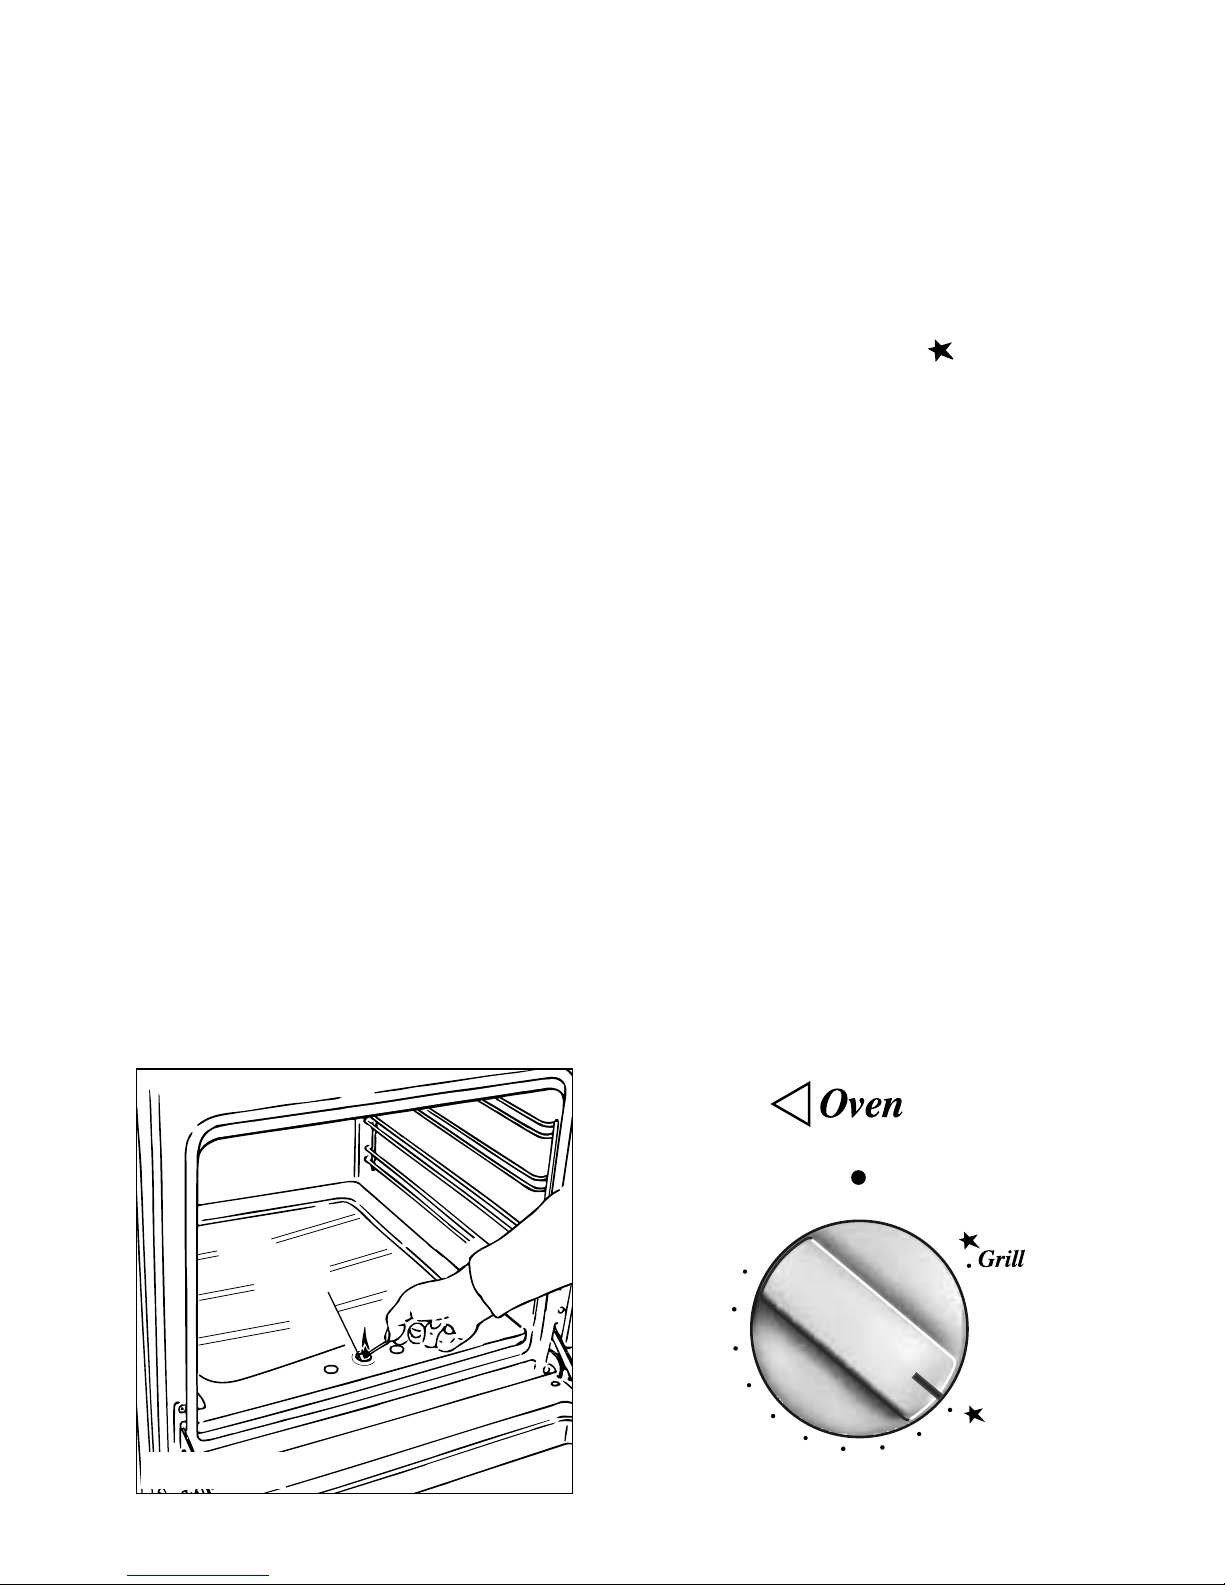
How to use the gas oven (left oven) . . . . . . . . . . . . . . . . . . . . . . . . . . . . . . . . . . 9
How to use the gas grill (left oven) . . . . . . . . . . . . . . . . . . . . . . . . . . . . . . . . . . . 11
How to use the gas oven (right oven) . . . . . . . . . . . . . . . . . . . . . . . . . . . . . . . . . 13
How to use the gas grill (right oven) . . . . . . . . . . . . . . . . . . . . . . . . . . . . . . . . . . 15
Rotisserie (right oven) . . . . . . . . . . . . . . . . . . . . . . . . . . . . . . . . . . . . . . . . . . . . . 17
Oven cooking temperatures . . . . . . . . . . . . . . . . . . . . . . . . . . . . . . . . . . . . . . . . 18
Do’s and do not’s . . . . . . . . . . . . . . . . . . . . . . . . . . . . . . . . . . . . . . . . . . . . . . . . 19
Important notes . . . . . . . . . . . . . . . . . . . . . . . . . . . . . . . . . . . . . . . . . . . . . . . . . . 20
Care and maintenance . . . . . . . . . . . . . . . . . . . . . . . . . . . . . . . . . . . . . . . . . . . . . 21
For the installer
Location . . . . . . . . . . . . . . . . . . . . . . . . . . . . . . . . . . . . . . . . . . . . . . . . . . . . . . . . 26
Fitting the adjustable feet . . . . . . . . . . . . . . . . . . . . . . . . . . . . . . . . . . . . . . . . . . 27
Moving the cooker . . . . . . . . . . . . . . . . . . . . . . . . . . . . . . . . . . . . . . . . . . . . . . . 28
Stability bracket . . . . . . . . . . . . . . . . . . . . . . . . . . . . . . . . . . . . . . . . . . . . . . . . . . 29
Provision for ventilation . . . . . . . . . . . . . . . . . . . . . . . . . . . . . . . . . . . . . . . . . . . . 30
Gas installation . . . . . . . . . . . . . . . . . . . . . . . . . . . . . . . . . . . . . . . . . . . . . . . . . . . 31
Conversion to LPG . . . . . . . . . . . . . . . . . . . . . . . . . . . . . . . . . . . . . . . . . . . . . . . . 33
Lubrication of the gas taps . . . . . . . . . . . . . . . . . . . . . . . . . . . . . . . . . . . . . . . . . 39
Electrical installation . . . . . . . . . . . . . . . . . . . . . . . . . . . . . . . . . . . . . . . . . . . . . . 40
Appliance servicing . . . . . . . . . . . . . . . . . . . . . . . . . . . . . . . . . . . . . . . . . . . . . . 42
Guarantee . . . . . . . . . . . . . . . . . . . . . . . . . . . . . . . . . . . . . . . . . . . . . . . . . . . . . . 43

4
Introduction
Congratulations on your purchase of this CDA cooker which has been carefully designed
and produced to give you many years of satisfactory use.
Before using this appliance it is essential that the following instructions are carefully read and
fully understood.
We would emphasise that the installation section must be fully complied with for your safety
to ensure that you obtain the maximum benefits from your appliance.
Fig. 1
Assembling the
backguard
■Remove the two spacers
“A” and the screw “B” from
the rear of the cooktop.
■Assemble the backguard
as shown in figure 1 and fix
it by screwing the central
screw “B” and the spacers
“A”.
This cooker has been designed, constructed and marketed in compliance with:
- safety requirements of EEC Directive “Gas” 90/396;
- safety requirements of EEC Directive “Low voltage” 73/23;
- protection requirements of EEC Directive “EMC” 89/336;
- requirements of EEC Directive 93/68.
A
B

5
Features and technical data
Fig. 2
2
43
1
1
2
Gas burners
1. Auxiliary burner (A) 1,00 kW
2. Semi-rapid burner (SR) 1,75kW
3. Rapid burner (R) 3,00 kW
4. Triple-ring burner (TR) 3,50 kW
Left
Gas oven
Right
Gas oven

6
Control panel
Fig. 3
CONTROL PANEL - Controls description
1. Left gas oven/gas grill control knob
2. Left oven light control knob
3. Minute counter
4. Right oven rotisserie / light control knob
5. Front left burner control knob
6. Rear left burner control knob
7. Front central burner control knob
8. Rear central burner control knob
9. Rear right burner control knob
10. Front right burner control knob
11. Right gas oven/gas grill control knob
Minute counter
Minute counter
The minute counter is a timed acoustic
warning device which can be set for a
maximum of 60 minutes.
The knob (Fig. 4) must be rotated
clockwise as far as the 60 minute position
and then set to the required time by
rotating it anticlockwise.
Fig. 4
130
155
180 205 230
130
155
180 205 230
1 4 56 78 910 11
32

7
How to use the hob burners
Lighting of the hob burners
To ignite the burner, the following instructions are to be followed:
1) Lightly press and turn the knob anti-clockwise, and position the knob indicator to the
symbol printed on the control panel (fig. 5).
2) Press the knob to operate the electric ignition; or, in the case of a mains failure light the
burner with a match or lighted taper.
3) Adjust the burner according to the setting required.
Fig. 5
Electric ignition
The sparks generated by the electrodes close to the burners will ignite the choosen
burner. Whenever the lighting of the burners is difficult due to peculiar conditions of
the gas features or supply, it is advised to repeat the ignition with the knob on
“minimum” position.
Hob burners
Each hob burner is controlled by a
separate gas tap operated by a control
knob (fig. 5) which has 3 positions marked
on the control panel, these are:
– Symbol ●: tap closed (burner off)
– Symbol : High (maximum)
– Symbol : Low (minimum)
Push in and turn the knob anti-clockwise
to the selected position.
Low High
To turn the burner off, fully rotate the knob clockwise to the off position: ●.
The maximum setting of the control tap is for boiling, the minimum setting is for slow
cooking and simmering.
All working positions must be choosen between the maximum and minimum setting, never
between the maximum setting and the “OFF” position.

8
Fig. 6
Choice of burner
The burner must be chosen according to the diameter of the pans and energy required.
Saucepans with handles that are excessively heavy in relation to the weight of the pan are
less safe as they are more likely to tip. Pans which are positioned centrally on burners are
more stable than those which are offset. It is far safer to position the pan handles in such a
way that they cannot be accidentally knocked.
When deep fat frying fill the pan only one third full of oil.
DO NOT cover the pan with a lid and DO NOT leave the pan unattended.
In the unfortunate event of a fire, leave the pan where it is and turn off all controls.
Place a damp cloth or correct fitting lid over the pan to smother the flames.
DO NOT use water on the fire.
Leave the pan to cool for at least 30 minutes.
Burners Pan diameter
Auxiliary 12 ÷ 14 cm
Semi-rapid 16 ÷ 24 cm
Rapid 24 ÷ 26 cm
Triple-ring 26 ÷ 28 cm
Wok max 36 cm
do not use pans with concave or convex bases
Correct use of triple-ring burner
The flat-bottomed pans are to be placed directly onto the pan-support.
To use the WOK you need to place the proper stand in order to avoid any faulty
operation of the triple-ring burner (Fig. 7 - 8).
IMPORTANT: The special grille for wok pans (fig. 8) MUST BE PLACED ONLY over the pan-
rest for the triple-ring burner.
Fig. 7
WRONG
Fig. 8
CORRECT

9
How to use the gas oven (left oven)
130
155
180 205 230
Fig. 9
General features
The oven is furnished completely clean; it is advisable, however, upon first use, to turn the
oven on to the maximum temperature (position ) to eliminate possible traces of grease
from the oven burner.
The same operation should be followed for grill burner.
The gas oven is provided with two burners:
a) Oven burner, mounted on the lower part of the oven (wattage: 3,70 kW)
b) Grill burner, mounted on the upper part of the oven (wattage: 2,50 kW).
Oven burner
It carries out normal “oven cooking”.
The gas flow to the burner is regulated by a thermostat which allow to maintain the oven
temperature constant.
The control of the temperature is assured by a thermostatic probe positioned inside the
oven.
The probe must be always kept in its housing, in a clean condition, as an incorrect position
or encrustment may cause an alteration in the control of the temperature.
Oven thermostat
The oven thermostat (fig. 9) is marked with
numbers, these correspond to the oven
temperature, in addition the “OFF” position
is shown by the symbol ●.
To choose the required oven temperature,
turn the control knob until its line mark is
level with the temperature required on the
control panel (facia).
Attention: the oven door becomes very hot during operation.
Keep children away.

10
Lighting the oven gas burner
The thermostat allows the automatic control of the temperature.
The gas delivery to the oven burner is controlled by a two way thermostatic tap (oven
and grill burners) with flame-failure device.
To light the oven burner operate as follow:
1) Open the oven door
WARNING: Risk of explosion!
The oven door must be open during this operation.
2) Lightly press and turn the thermostat knob anti-clockwise to max position “ ” (fig. 11).
3) Press the knob right down to prime the electric ignition.
In case of power cut, press the knob and immediately approach a lighted match to the
opening “A” (fig. 10). Never continue this operation for more than 15 seconds. If the
burner has still not ignited, wait for about 1 minute prior to repeating the ignition.
4) Wait about 10/15 seconds after the burner lighting before releasing the knob (time of priming
of the valve).
5) Close the oven door slowly and adjust the burner according to the power required.
Should the flame of the burner estinguish for any reason, the safety valve will cut
off automatically the gas flow to the tap.
To re-start operation, take the knob to “off” position, wait for at least 1 minute
and repeat operations as above explained.
Fig. 10
A
130
155
180 205 230
Fig. 11
Oven cooking
For efficient oven preheating, we recommend that grill trays and racks are removed
from the oven and replaced after about 15 minutes.
Before introducing the food, preheat the oven to the desired temperature.
For a correct preheating operation, it is advisable to remove the tray from the oven and intro-
duce it together with the food, when the oven has reached the desired temperature.
Check the cooking time and turn off the oven 5 minutes before the theoretical time to recu-
perate the stored heat.

11
How to use the gas grill (left oven)
Lighting the grill gas burner
The grill burner generates the infra-red rays for grilling.
To light the grill burner operate as follow:
1) Open the oven door.
WARNING: Risk of explosion!
The oven door must be open during this operation.
2)
Lightly press and turn
the thermostat knob clockwise to the position (fig. 12).
3) Press the knob right down to prime the electric ignition.
In case of power cut, press the knob and put a lighted match to the right and left side of
the burner (fig. 13).
Never continue this operation for more than 15 seconds. If the burner has still not
ignited, wait for about 1 minute prior to repeating the ignition.
4) Wait about 10/15 seconds after the burner lighting before releasing the knob (time of priming
of the valve).
5) Half-close the oven door slowly.
Should the flame of the burner estinguish for any reason, the safety valve will cut
off automatically the gas flow to the tap. To re-start operation, take the knob to
“off” position, wait for at least 1 minute and repeat operations as above
explained.
Do not grill with oven door closed.
Always fit the heat shield supplied with the cooker under the front panel
before commencing operations (Fig. 14).
WARNING. The heat shield and the oven door reaches a very high temperature
whilst in use. Keep children away and allow to cool before removing.
130
155
180 205 230
Fig. 11Fig. 12 Fig. 13

12
Use of the grill
Very important: the grill must always be
used with the oven door slightly open
and with shield "A” mounted (Fig. 14).
Mount shield “A” which serves to protect the
control panel from the heat.
Turn on the grill, as explained in the preced-
ing paragraphs and let the oven preheat for
about 5 minutes with the door ajar.
Introduce the food to be cooked, position-
ing the rack as close to the grill as possible.
The dripping pan should be placed under
the rack to catch the cooking juices and fats.
Note: It is recommended that you do not
grill for longer than 30 minutes at any
one time.
Attention: the oven door becomes very
hot during operation.
Keep children away.
HOTZONE
Fig. 14
A
Oven light
The cooker is equipped with a light that illu-
minates the oven to enable visually control-
ling the food that is cooking.
This light is controlled by a switch knob (Fig.
15 - position).
Notes:
– The grill burner has only one setting, that
is full-on
– It is important that the heat shield is fit-
ted the correct way up, as shown in the
figure 14.
IMPORTANT WARNING
For best results when using the grill, place the shelf on the second level and when using the
grill pan handle avoid contact with the heat shield which will be
HOT during use
Fig. 15

13
How to use the gas oven (right oven)
Attention: the oven door becomes very hot during operation.
Keep children away.
General features
The oven is furnished completely clean; it is advisable, however, upon first use, to turn the
oven on to the maximum temperature (position ) to eliminate possible traces of grease
from the oven burner.
The same operation should be followed for grill burner.
The gas oven is provided with two burners:
a) Oven burner, mounted on the lower part of the oven (wattage: 2,20 kW)
b) Grill burner, mounted on the upper part of the oven (wattage: 2,00 kW).
Oven burner
It carries out normal “oven cooking”.
The gas flow to the burner is regulated by a thermostat which allow to maintain the oven
temperature constant.
The control of the temperature is assured by a thermostatic probe positioned inside the
oven.
The probe must be always kept in its housing, in a clean condition, as an incorrect position
or encrustment may cause an alteration in the control of the temperature.
130
155
180 205 230
Fig. 16
Oven thermostat
The oven thermostat (fig. 16) is marked with
numbers, these correspond to the oven
temperature, in addition the “OFF” position
is shown by the symbol ●.
To choose the required oven temperature,
turn the control knob until its line mark is
level with the temperature required on the
control panel (facia).

14
Oven cooking
For efficient oven preheating, we recommend that grill trays and racks are removed
from the oven and replaced after about 15 minutes.
Before introducing the food, preheat the oven to the desired temperature.
For a correct preheating operation, it is advisable to remove the tray from the oven and intro-
duce it together with the food, when the oven has reached the desired temperature.
Check the cooking time and turn off the oven 5 minutes before the theoretical time to recu-
perate the stored heat.
Lighting the oven gas burner
1) Open the oven door to the full extent.
WARNING: Risk of explosion!
The oven door must be open during this operation.
2) Lightly press and turn the thermostat knob anti-clockwise to max position ( fig. 18).
3) Press the knob firmly until the burner lights.
Never continue this operation for more than 15 seconds. If the burner has still not
ignited, wait for about 1 minute prior to repeating the ignition.
In case of mains failure, press the knob firmly and immediately approach a lighted match or
taper to the opening “A” (fig. 17).
4) Wait about 10/15 seconds after the burner lighting before releasing the knob (time of
priming of the valve).
5) Close the oven door slowly and adjust the burner according to the power required.
If the flame extinguishes for any reason, the safety valve will automatically shut off the gas
supply to the burner.
To re-light the burner, first turn the oven control knob to position ●, wait for at least 1
minute and then repeat the lighting procedure.
Fig. 17
A
130
155
180 205 230
Fig. 18

15
How to use the gas grill (right oven)
Lighting the grill gas burner
The grill burner generates the infra-red rays for grilling.
To light the grill burner operate as follow:
1) Open the oven door.
WARNING: Risk of explosion!
The oven door must be open during this operation.
2)
Lightly press and turn
the thermostat knob clockwise to the position (fig. 19).
3) Press the knob right down to prime the electric ignition.
In case of power cut, press the knob and put a lighted match to the right and left side of
the burner (fig. 20).
Never continue this operation for more than 15 seconds. If the burner has still not
ignited, wait for about 1 minute prior to repeating the ignition.
4) Wait about 10/15 seconds after the burner lighting before releasing the knob (time of priming
of the valve).
5) Half-close the oven door slowly.
If the flame extinguishes for any reason, the safety valve will automatically shut off the gas
supply to the burner.
To re-light the burner, first turn the oven control knob to position ●, wait for at least 1
minute and then repeat the lighting procedure.
Do not grill with oven door closed.
Always fit the heat shield supplied with the cooker under the front panel
before commencing operations (Fig. 21).
WARNING. The heat shield and the oven door reaches a very high temperature
whilst in use. Keep children away and allow to cool before removing.
130
155
180 205 230
Fig. 11Fig. 19 Fig. 20

16
Use of the grill
Very important: the grill must always be
used with the oven door slightly open
and with shield "A” mounted (Fig. 21).
Mount shield “A” which serves to protect the
control panel from the heat.
Turn on the grill, as explained in the preced-
ing paragraphs and let the oven preheat for
about 5 minutes with the door ajar.
Introduce the food to be cooked, position-
ing the rack as close to the grill as possible.
The dripping pan should be placed under
the rack to catch the cooking juices and fats.
Oven light
The cooker is equipped with a light that illu-
minates the oven to enable visually control-
ling the food that is cooking.
This light is controlled by a switch knob
(Fig. 22 - position).
Notes:
– The grill burner has only one setting, that is full-on
– It is important that the heat shield is fitted the correct way up, as shown in the figure 21.
IMPORTANT WARNING
For best results when using the grill, place the shelf on the second level and when using the
grill pan handle avoid contact with the heat shield which will be HOT during use
Fig. 22
HOT ZONE
Fig. 21
A
Note: It is recommended that you do not grill for longer than 30 minutes at any one time.
Attention: the oven door becomes very hot during operation.
Keep children away.

17
This is used for spit roasting under the grill
and comprises:
– an electric motor fitted to the rear of the
oven
– a stainless steel skewer provided with
slide-out heatless handgrip and two sets
of adjustable forks
– a skewer support to be fitted in the mid-
dle runner.
The rotisserie motor is operated by a
switch knob (Fig. 23).
Use of the rotisserie
Very important: the rotisserie must always be used with the oven door ajar and with
shield “A” mounted (Fig. 21).
– Insert the tray into the lowest rack holders of the oven and insert the rod support into the
intermediate rack holders.
– Put the meat to be cooked onto the rod, being careful to secure it in the center with the
special forks.
– Insert the rod into the motor opening and rest it onto the support of the spit collar; then
remove the grip by turning it to the left.
Attention: the oven door becomes very hot during operation.
Keep children away.
It is recommended that you do not grill for longer than 30 minutes at any one time.
Fig. 23
Rotisserie (right oven)
Fig. 24

18
Oven cooking temperatures
MARK APPROX. HEAT OF TYPE OF DISH TO COOK
TEMP. OVEN
130 130°C Very cool Meringue cakes,
oven slow cooking items
• 140°C Cool or Milk puddings, very rich fruit
slow oven cakes, i.e., Christmas
155 155°C Cool or Stews, casseroles, braising,
slow oven rich fruit cakes, i.e., Dundee
• 165°C Warm oven Biscuits, rich plain cakes
i.e., Madeira. Low temp. roasting
180 180°C Moderate Plain cakes, Victoria
oven sandwich, raised meat pies
• 190°C Fairly hot Small cakes, savoury flans,
oven fish
205 205°C Hot oven Plain cakes and buns, swiss rolls,
fruit pies. High temp. roasting
• 215°C Moderately Bread and bread rolls etc., scones,
hot oven flaky and rough puff pastry,
yorkshire pudding
230 230 Very hot Sausage rolls, mince pies, puff
• 240 oven pastry, pizza
Browning ready cooked dishes

19
Do’s and do not’s
Do’s and do not’s
• Do not grill with oven door closed. Always fit the heat shield supplied with the cooker
under the front panel before commencing operations.
• Do read the user instructions carefully before using the cooker for first time.
• Do allow the oven to heat for one and a half hours, before using for the first time, in order
to expel any smell from the new oven insulation, without the introduction of food.
• Do clean your oven regularly.
• Do remove spills as soon as they occur.
• Do always use oven gloves when removing food shelves and trays from the oven.
• Do not allow children near the cooker when in use.
• Do not allow fat or oils to build up in the oven trays, or oven base.
• Do not place cooking utensils or plates directly onto the oven base.
• Do not grill food containing fat without using the grid.
• Do not cover the grilling grid with aluminium-foil.
• Do not use the oven tray for roasting.
• Do not place hot enamel parts in water. Leave them to cool first.
• Do not allow vinegar, coffee, milk, saltwater, lemon or tomato juice to remain in contact
with enamel parts (inside the oven and on the oven tray).
• Do not use abrasive cleaners or powders that will scratch the surface of the stainless steel
and the enamel.
• Do not attempt to repair the internal workings of your cooker.
• Do remove the protective film before the first use.
• Fire risk! Do not store flammable material in the oven and in the storage compartment.
For your safety
The product should only be used for its intended purpose which is for the cooking of
domestic foodstuffs.
Under no circumstances should any external covers be removed for servicing or
maintenance except by suitably qualified personnel.

20
Important notes
Installation, and any demonstration, information or adjustments are not included in the
warranty.
The cooker must be installed by a qualified person in accordance with the Gas Safety
(Installation and Use) (Amendment) Regulations 1990 and the relevant building/l.E.E
Regulations.
Failure to install the appliance correctly could invalidate any manufacturers warranty and
lead to prosecution under the above quoted regulation.
In the UK C.O.R.G.I registered installers are authorised to undertake the installation and
service work in compliance with the above regulations.
Attention
The appliance gets very hot, mainly around the cooking areas. It is very important
that children are not left alone in the kitchen when you are cooking.
Table of contents
Other CDA Kitchen Appliance manuals

CDA
CDA FWC151 for Reference manual

CDA
CDA CFWC153 User guide

CDA
CDA DUAL FUEL COOKERS RC 9021 User manual

CDA
CDA FWV601 Installation and operating instructions

CDA
CDA FWC861 Quick start guide

CDA
CDA FWC881 Quick start guide

CDA
CDA SVW101 Reference manual

CDA
CDA RC9020 Product guide

CDA
CDA FWC153 Quick start guide

CDA
CDA GB RV 701 SS Instructions for use