CDA CFWC153 User guide

WCCF0152
WCCF0302
WCCF0602
WCCF0622
CFWC153
CFWC304
CFWC604
CFWC624
Wine coolers
Use and maintenance
IO-RFW-0065
(03-2023)

2 | Instruction Manual Instruction Manual | 3
Contents
3 Important information
6 Before first use
8 Use and controls
12 Care and cleaning
13 Troubleshooting
15 Installing the wine cooler
17 Reversing the door
20 Adjusting the plinth
23 Electrical information
24 How to connect an alternative plug
25 Bottle Storage
27 Climate class
Important
The CDA Group Ltd cannot be held responsible for injuries or
losses caused by incorrect use or installation of this product.
Please note that The CDA Group reserve the right to invalidate the
guarantee supplied with this product following incorrect installation
or misuse of the appliance or use in a commercial environment.
This appliance is not designed to be used by people (including
children) with reduced physical, sensorial or mental capacity, or
who lack experience or knowledge about it, unless they have
had supervision or instructions on how to use the appliance by
someone who is responsible for their safety.
Under no circumstances should any external covers be
removed for servicing or maintenance except by suitably
qualified personnel.
Do not use the appliance if the plug, the mains cord or the
appliance itself is damaged. If the mains cord is damaged, you
must have it replaced by the manufacturer, or an authorised
service centre or similarly qualified persons in order to avoid a
hazard.
Children should be supervised to ensure that they do not play
with the appliance. Keep the mains cord out of the reach of
children. Do not let the mains cord hang over the edge of the
table or worktop on which the appliance stands.
This refrigeration appliance is intended for use as a built-in
appliance.

4 | Instruction Manual Instruction Manual | 5
Appliance information:
Please enter the details on the appliance rating plate below for
reference, to assist Customer Care in the event of a fault with your
appliance and to register your appliance for guarantee purposes.
Appliance model
Serial number
Declarations of Conformity:
This appliance has been manufactured to comply with all EU & UK
statutory requirements and complies with all applicable legislation
and the following European Directives:
IMPORTANT INFORMATION FOR CORRECT DISPOSAL OF THE
PRODUCT IN ACCORDANCE WITH EC DIRECTIVE 2012/19/EU.
Please render the appliance unusable before disposal. This
includes removing the plug and breaking the door fixings to
prevent children being trapped inside the appliance during play, or
any other risk of injury.
At the end of its working life, the product must not be disposed of
as urban waste. It must be taken to a special local authority
differentiated waste collection centre or to a dealer providing this
service.
Disposing of a household appliance separately avoids possible
negative consequences for the environment and health deriving
from inappropriate disposal and enables the constituent materials
to be recovered to obtain significant savings in energy and
resources.
As a reminder of the need to dispose of household appliances
separately, the product is marked with a crossed-out wheeled
dustbin.
•Repairs carried out by unqualified persons may seriously
endanger the appliance user
•Pursuant to Commission Regulation (EU) 2019/2019, The
minimum availability period for spare parts necessary to repair
the appliance is 7 or 10 years depending on the type and
purpose of the spare part
•The list of spare parts and the ordering procedure are available
on the websites of the manufacturer, importer or an authorised
representative
•The minimum warranty period for the appliance offered by the
manufacturer, importer or authorized representative is given in
the warranty card
•The warranty shall be void if you make any independent
adaptations or alterations, tamper with seals or other appliance
safety devices or its parts or interfere with the appliance
contrary to operating instructions
For more information about the product, please refer to the EU
EPREL Product Database at https://eprel.ec.europea.eu.
Alternatively you can use your mobile device to scan the QR code
on the energy label or enter the product model listed on the
energy label in the EPREL search engine.
•The Low Voltage Directive 2014/35/EU
•Electromagnetic Compatibility Directive 2014/30/EU
•ErP Directive 2009/125/EC
•Directive RoHS 2011/65/EC
This product has been marked with the and symbol.

6 | Instruction Manual Instruction Manual | 7
Before first use
You must allow the appliance to settle for at least twenty four
hours prior to switching the power on.
It is recommended that you remove all internal and external
packaging and clean the interior of the appliance prior to first use.
We recommend that you use a solution of bicarbonate of soda and
warm water and then thoroughly dry the interior.
The appliance may have an odour to it at first use. This will
disappear as the appliance cools.
Please note:
• The appliance will work continuously until it gets to the correct
temperature. Continuous noise from the compressor and
refrigeration system is normal
• If the appliance is switched off, you should allow five minutes
before switching it on again to prevent the risk of unnecessary
damage to the compressor
• The LED display may not show the selected temperature whilst
the appliance first gets to the correct temperature. This is
normal, and the display will be corrected automatically once the
appliance has run for a few hours
•If the appliance does not have a freezer compartment ( )
it is not suitable for freezing foodstuffs.
Use
•Only store wine in sealed containers
•Do not overload the cabinet
•Only open the door when necessary
• Do not cover the shelves with aluminium foil or anything else that
will prevent air from circulating around the cabinet
• To prevent damage to the door seal, ensure the door is fully
open before removing the shelves
• This is a self-defrosting appliance. The compressor will not run
during the thirty minute defrost cycle
• Do not pull the shelves beyond the anti-stop position
(approximately one third out) when fully loaded
• This appliance is intended to be used exclusively for the storage
of wine
• In the event of a power failure, leave the door closed as much
as possible to maintain the internal working temperature. Should
the power failure continue for a prolonged period, you should
take steps to protect the contents of the wine cooler against a
rise in temperature. The wine cooler will remember the selected
temperature settings and revert to these settings once the power
is restored
This appliance is suitable for use in an extended temperature
climate (ST) and has a normal operating ambient temperature of
16-38°C. Use of the appliance below 16°C may cause performance
issues that are not indicative of a fault. Normal operation will
resume once the appliance is within the specified range.

8 | Instruction Manual Instruction Manual | 9
Key:
1. Power button
2. Light button
3. "+" button
4. "-" button
1 2 3 4
WCCF0302 / CFWC304
1 2 3 4
Key:
1. Power button
2. Light button
3. “+” button
4. “-” button
Use and controls
WCCF0152 / CFWC153
WCCF0602 / CFWC604
1 2 3 4 5 6 Key:
1. Power button
2. Light button
3. Temperature
display button
4. “+” button
5. “-” button
6. Zone selection
To lock/unlock the control panel - all models
• Press and hold the power button and the light button for
approximately 4 seconds.
• The control panel locks automatically after approximately 15
seconds of inactivity.
To switch the power on/off - all models
• Press and hold the power button for approximately 4 seconds to
switch the wine cooler on.
• Press and hold the power button for approximately 4 seconds to
switch the wine cooler off.
To change the temperature - all models
• Unlock the control panel, if necessary.
• Press the or buttons until the required temperature is shown
on the display.
• The display flashes when temperature adjustment is active or a
different temperature is being set.
• What the wine cooler display does next is dependent upon what
temperature display you have active (see pages 10).
To change the zone control - WCCF0602 / CFWC604
• Unlock the control panel, if necessary.
• Press the button. The ‘active’ display will flash.
• The temperature ranges are 5-12°C for the upper zone (left display)
and 12-20°C for the lower zone (right display).
To change the temperature reading - WCCF0302 & WCCF0152
& WCCF0622 / CFWC304 / CFWC153 / CFWC624
You can change the temperature display reading from Fahrenheit to
Celsius, or Celsius to Fahrenheit. To do so:
• Ensure the control panel is locked.
• Press and hold the or buttons for approximately 4 seconds.
WCCF0622 / CFWC624
1 2 3 4 Key:
1. Power button
2. Light button
3. “+” button
4. “-” buttoN

10 | Instruction Manual Instruction Manual | 11
Optimal temperature selection
Below is a table showing the recommended storage temperatures for
different types of wine. These are also the ideal drinking temperatures
for most types.
To use the internal light
• Unlock the control panel, as per page 8, if necessary.
• Press the light button to switch the light on or off.
Temperature display
This appliance has two options for the temperature display. One option
shows the set or target temperature in the wine cooler. The other option
shows the real temperature within the wine cooler, and can be useful for
actively monitoring the wine cooler’s behaviour. Descriptions and
further information on these display options are shown below.
• The temperature display will show the set temperature (the
temperature that the cooler is working to achieve).
• A decimal point ‘.’ next to the temperature signifies that the wine
cooler is working to achieve the set temperature. When the
decimal point disappears, or if it is not present, the cooler’s sensor
has detected that the set temperature has been reached. The
decimal point may reappear periodically when the cooling system
kicks in to maintain the temperature.
•The display flashes when temperature adjustment is active or a
different temperature is being set.
Real temperature display
• The temperature display will show the real or actual temperature
within the wine cooler.
•A decimal point ‘.’ next to the temperature signifies that the wine
cooler is working to achieve the set temperature. When the
decimal point disappears, or if it is not present, the cooler’s sensor
has detected that the set temperature has been reached. The
decimal point may reappear periodically when the cooling system
kicks in to maintain the temperature.
• The display flashes when temperature adjustment is active or a
different temperature is being set.
To change the temperature display
and the button for
• Ensure the control panel is locked.
•Touch and hold the light button
approximately 2 seconds.
• The display will show ‘02’ or ‘01’, depending upon which
display setting has been active.
Wine Type Recommended Temp.
Red Wine 15 - 18ºC (59ºF-64ºF)
Dry/White Wine 9 - 14ºC (48ºF-57ºF)
Rose Wine 10 - 11ºC (50ºF-52ºF)
Sparkling Wine 5 - 8ºC (41ºF-46ºF)
Set temperature display
To change the temperature reading - WCCF0602 / CFWC624
You can change the temperature display reading from Fahrenheit to
Celsius, or Celsius to Fahrenheit. To do so:
• Ensure the control panel is unlocked.
• Press the button.

12 | Instruction Manual Instruction Manual | 13
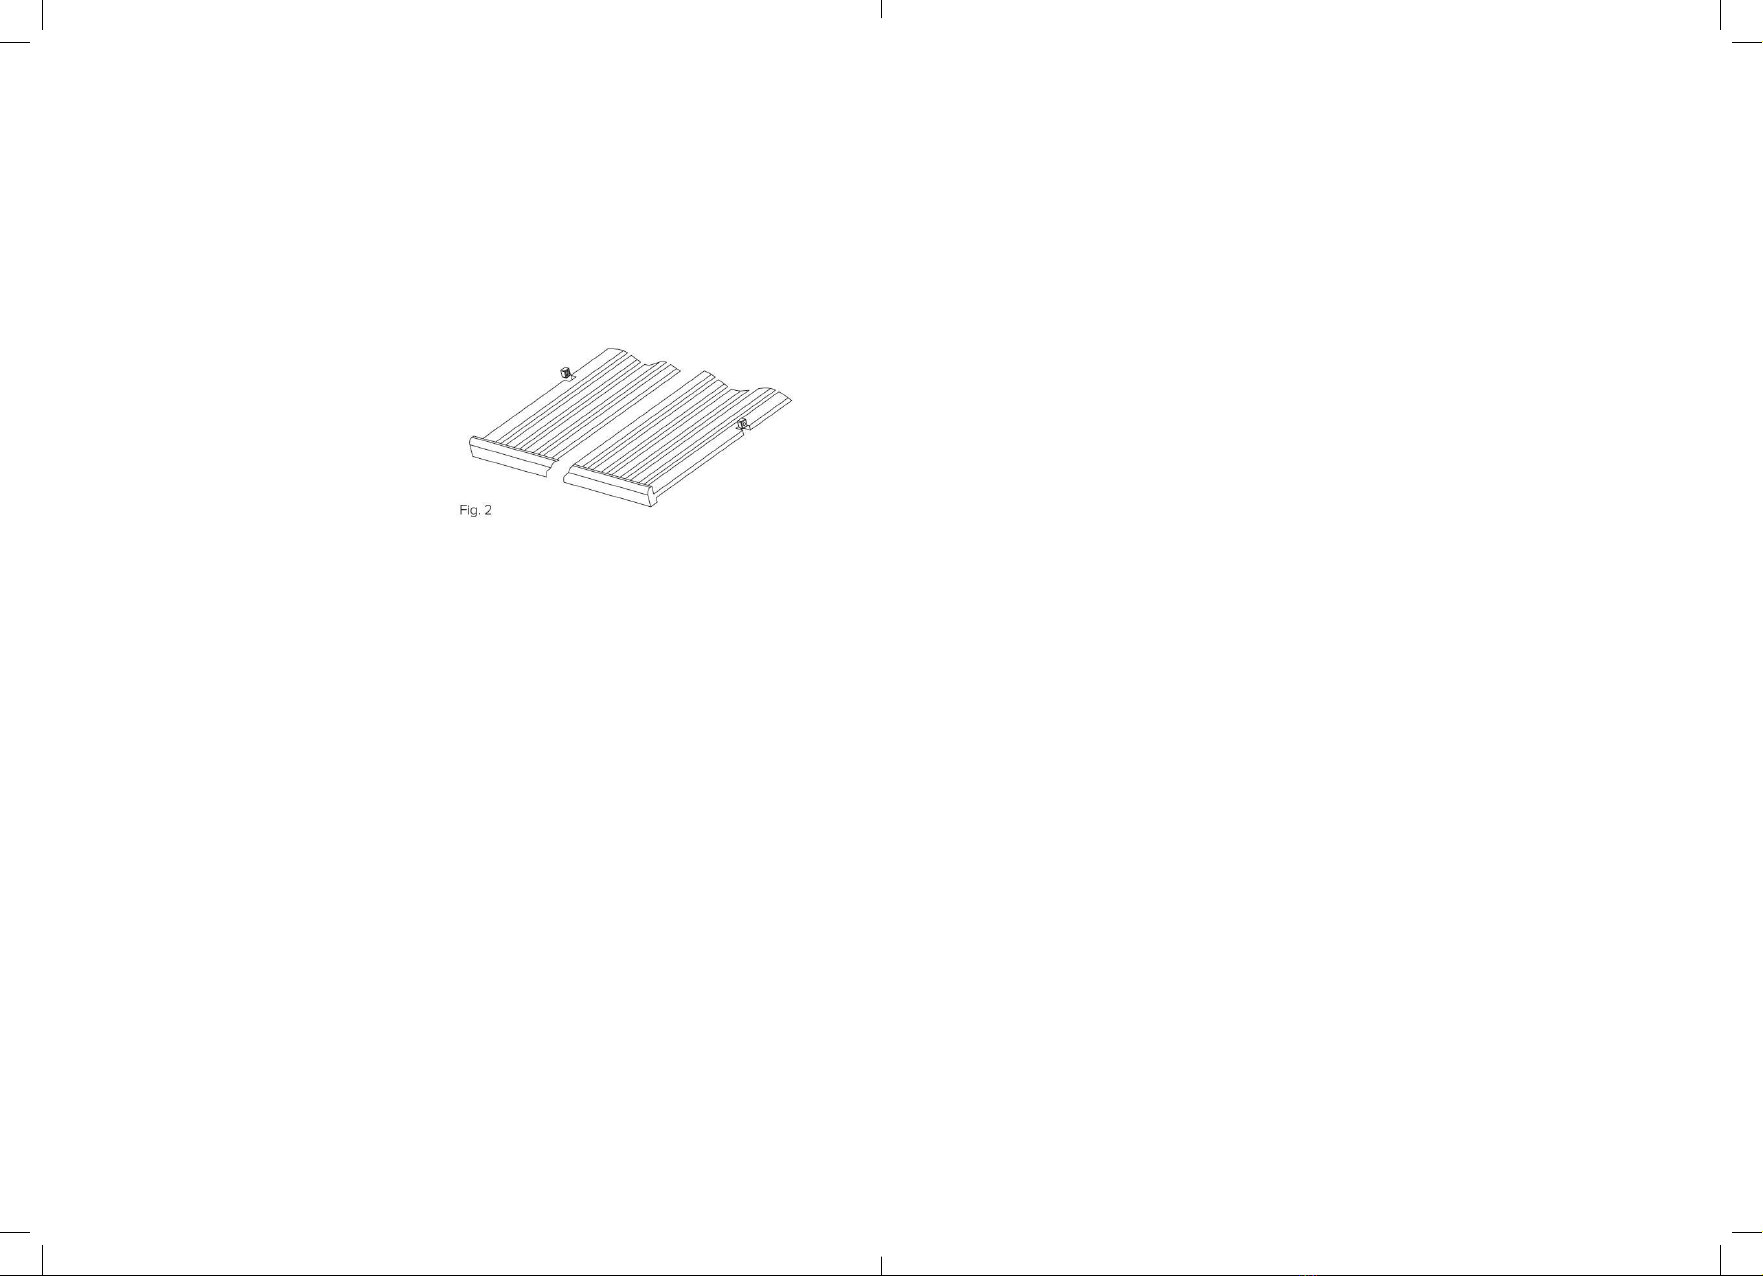
Removing the shelves (WCCF0302, WCCF0602, WCCF0622,
CFWC304, CFWC604, CFWC624)
•To remove a shelf from the WCCF0302, WCCF0602,
WCC0622, CFWC304, CFWC604, CFWC624 first remove all
bottles from the shelf, then pull the shelf forwards until the
groove on either side of the shelf is level with the plastic peg
on either side of the cabinet (as shown in Fig 2). Then lift
• the shelf up and pull forwards.
•To replace the shelves, follow
the steps above in reverse order.
Cleaning
IMPORTANT: Always disconnect the appliance from the mains electri-
cal cupply before any cleaning or maintenance
•Do not use abrasive products or detergents. After washing, rinse
and dry thoroughly.
•The exterior of the appliance and the door seal should be cleaned
using mild soapy water and dried thoroughly.
•The interior cabinet should be cleaned regularly using a
solution of bicarbonate of soda and lukewarm water.
•Clean the shelves separately by hand using soap and water. Do not
put them in the dishwasher.
•Ensure that the cloth is only moist when cleaning the
control panel and electrical parts, and that all water is
thoroughly dried off before reconnecting the power.
•Once cleaning is complete, reconnect the mains electrical
supply.
•If the appliance is not to be used for prolonged periods of time, un-
plug and clean the appliance thoroughly. and ensure dry. The door
should be left slightly ajar to prevent the formation of odours, mould
or condensation.
Temperature alarm
If the temperature rises or falls outside the set temperature range,
an alarm will sound and the display may show a fault.
This may be because:
• The wine cooler has not yet reached the set temperature (when
first switched on) or is taking a long time to reach it.
• There has been a power failure.
• The wine cooler has been overloaded or damaged.
• The door is not closed properly.
• The temperature sensor has failed (see page 15).
Please note: If the wine cooler has overheated and the alarm is
sounding because of this, the system will shut down automatically
after 6 hours of the alarm tripping. The warnings will continue
however.
Troubleshooting
If you have any problems with your appliance, you should check
the troubleshooting guide prior to calling CDA Customer Care.
If the appliance is not working, check:
• There is power to the appliance
• The house fuses or circuit breakers are intact and the fuse in
the plug has not blown.
• The plug socket is functioning correctly. To check this, plug
another electrical appliance in to see if the socket is working.
• The ambient temperature is between 16°C to 38°C.

The appliance is working, but not very well, check
•The appliance is not overloaded.
•The thermostat is set to an appropriate temperature.
•The door is closing properly.
•The door gasket is sealing properly
•There is enough ventilation at the side and rear walls.
•The ambient temperature is between 16°C to 38°C.
The appliance is noisy, check
•The appliance is level and stable.
• The cooling gas will make some noise, even when the compressor
is not running.
• During operation, it is normal for the fan to run, even when the
compressor is not running.
The appliance is turning cooling on and o frequently
•The internal temperature is fluctuating, causing the system to cool.
The light does not work, check
•There is power to the appliance.
• The house fuses or circuit breakers are intact and the fuse in the
plug has not blown.
• The light button is not set to off (unlock the panel first as per page
7).
The door will not close properly, check
•The appliance is level and stable.
• If the door has been removed, it may not have been correctly
refitted.
•Whether the door seal is dirty.
•The shelves are positioned correctly.
The display shows “LL” or “HH”
•The temperature sensor has failed. Please contact CDA Customer
Care.
Installing the wine cooler
This appliance is intended to be installed in a space between two
units. If it is to be freestanding in an open space, ensure that it can
not cause harm nor damage.
The minimum space required is:
Please note: When the product is installed, the measurements
above will ensure a minimum 5mm ventilation gap around the
product.
Fig.3
WCCF0152 / CFWC153 158mm (W) x 525mm (D) x 830/885mm (H)
WCCF0302 / CFWC304 305mm (W) x 570mm (D) x 830/885mm (H)
WCCF0602 / CFWC604 605mm (W) x 570mm (D) x 830/885mm (H)
WCCFO622 / CFWC624 605mm (W) x 570mm (D) x 830/885mm (H)
Instruction Manual | 15
Please note:
The LED lighting cannot be replaced without a service call. If the light
fails, contact CDA customer care.
Instruction Manual | 14

These products should not be installed:
1. In direct sunlight.
2. Adjacent to a heat source (oven or radiator).
3. Below a hob unit.
4. In a damp or wet environment
Where a continuous plinth is to be used, it is necessary to cut a section
out so that the ventilation slots at the front of the appliance are not
obstructed in any way as per Fig 3.
This appliance is designed to fit under worktops between 830 –
885mm in height, using the adjustable plinth plate to ensure that the
feet are concealed from view.
IMPORTANT: Failure to follow the instructions regarding installation
and ventilation may invalidate the warranty supplied with your
appliance.
To install the handle
IMPORTANT: DO NOT REMOVE
THE SCREWS FROM THEIR
POSITION IN THE DOOR (Fig. 4)
PRIOR TO FITTING THE
HANDLE AS FIXINGS MAY
DROP INTO THE DOOR. The
door seal holds the screws in
place during transit. Do not
overtighten the screws, and do
not use power tools to install
the handle.
Fig. 4
Door glass
Screw hole + screw
60oM
in.
Screw
Pivot plate
1. Peel back the door seal from the glass side to expose the screw
holes, as per Fig. 4. Place a screwdriver against the screw and
hold it in position.
2. Carefully locate the handle over the fixing screw.
3. Using a screwdriver, tighten the securing screw to fix the handle.
Repeat with the remaining handle fixing screw.
IMPORTANT: Take care, when installing the handle, not to damage
the door. Any damage caused may not be covered by the warranty
supplied with your appliance.
Reversing the door
The following instructions are based
on a wine cooler with the door hinged
on the right hand side. We strongly
recommend seeking the help of at least
one other individual during this process.
Before starting the reversal process,
ensure that you have the left hand
upper and lower hinges. These are
supplied with your product.
Do not tilt the appliance backwards
further than an angle of 60° (Fig.5).
Fig. 5
Fig. 6
Instruction Manual | 17
Instruction Manual | 16

18 | Instruction Manual Instruction Manual | 19
1. With the help of another, open the
door and support it. Loosen and
remove the two screws from the
pivot plate of the lower right hinge,
as per Fig. 6.
2. Move the door away from the wine
cooler slightly and remove the
pivot plate from the bottom of the
door as per Fig. 7. Lower the door
from the upper hinge and place
it somewhere safe where it will
neither cause nor receive damage.
3. Remove the three screws from
both the upper hinge and the
lower hinge, taking care not to let
them fall, as per Fig. 8. Remove the
hinges and place them somewhere
safe in case they are needed in the
future.
4. Remove the plastic caps from the
left hand hinge positions and fit
them into the now empty right hand
hinge holes, as per Fig. 9.
5. Fit the supplied upper left hinge and
lower left hinge to the appliance as per Fig. 10. These are mirror
opposites of their right-handed counterparts.
6. Turn the door around by 180° (upside down) so that the
handle is now on the right (Fig. 11). Insert the pivot plate into the
now-bottom of the door as per Fig. 12.
7. Guide the door onto the upper
hinge pivot and manoeuvre the
lower part of the door and pivot
plate onto the lower hinge. Align
the pivot plate holes with the hinge
plate holes.
8. Reinsert the two screws that you
removed in step 1 and tighten them.
Check that the door sits level with the appliance. If not, the pivot
plate offers some adjustment - loosen the screws you have just
tightened and adjust the door as necessary.
This manual suits for next models
15
Table of contents
Other CDA Kitchen Appliance manuals

CDA
CDA FWV450 Reference manual

CDA
CDA FWC304 Specification sheet

CDA
CDA FWC153 Quick start guide

CDA
CDA GB RV 701 SS Instructions for use

CDA
CDA SVW101 Reference manual

CDA
CDA FWC152 Quick start guide

CDA
CDA RC 9620 Guide

CDA
CDA FWC150 Instruction Manual

CDA
CDA RC9020 Product guide

CDA
CDA FWV600 Quick start guide
Popular Kitchen Appliance manuals by other brands

Tayama
Tayama TYG-35AF instruction manual

AEG
AEG 43172V-MN user manual

REBER
REBER Professional 40 Use and maintenance

North American
North American BB12482G / TR-F-04-B-NCT-1 Assembly and operating instructions

Presto
Presto fountain popper instruction manual

Westmark
Westmark 1035 2260 operating instructions


