Cellularline U-COM 8R User manual

User manual

2
SUMMARY
1. ABOUT 3
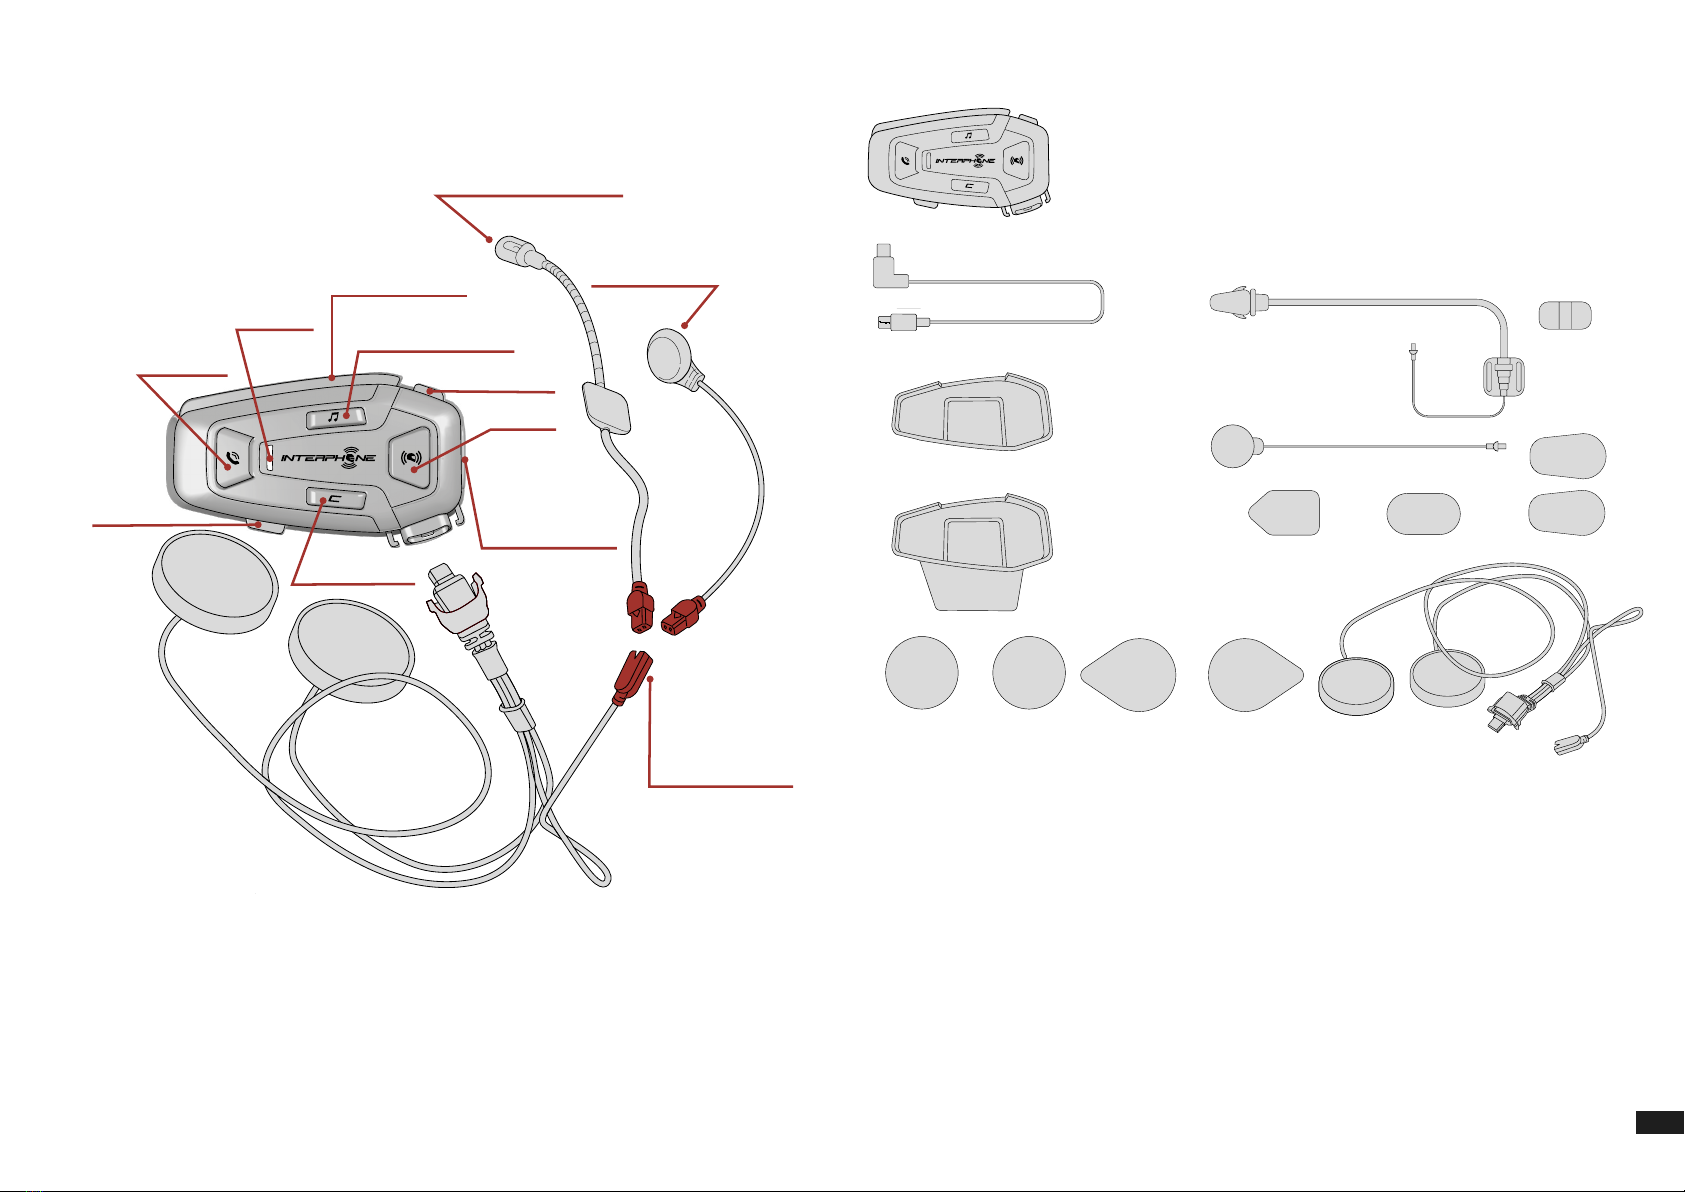
1.1 Product details................................................................................. 3
1.2 Package contents ............................................................................ 3
2. HOW TO INSTALL 4
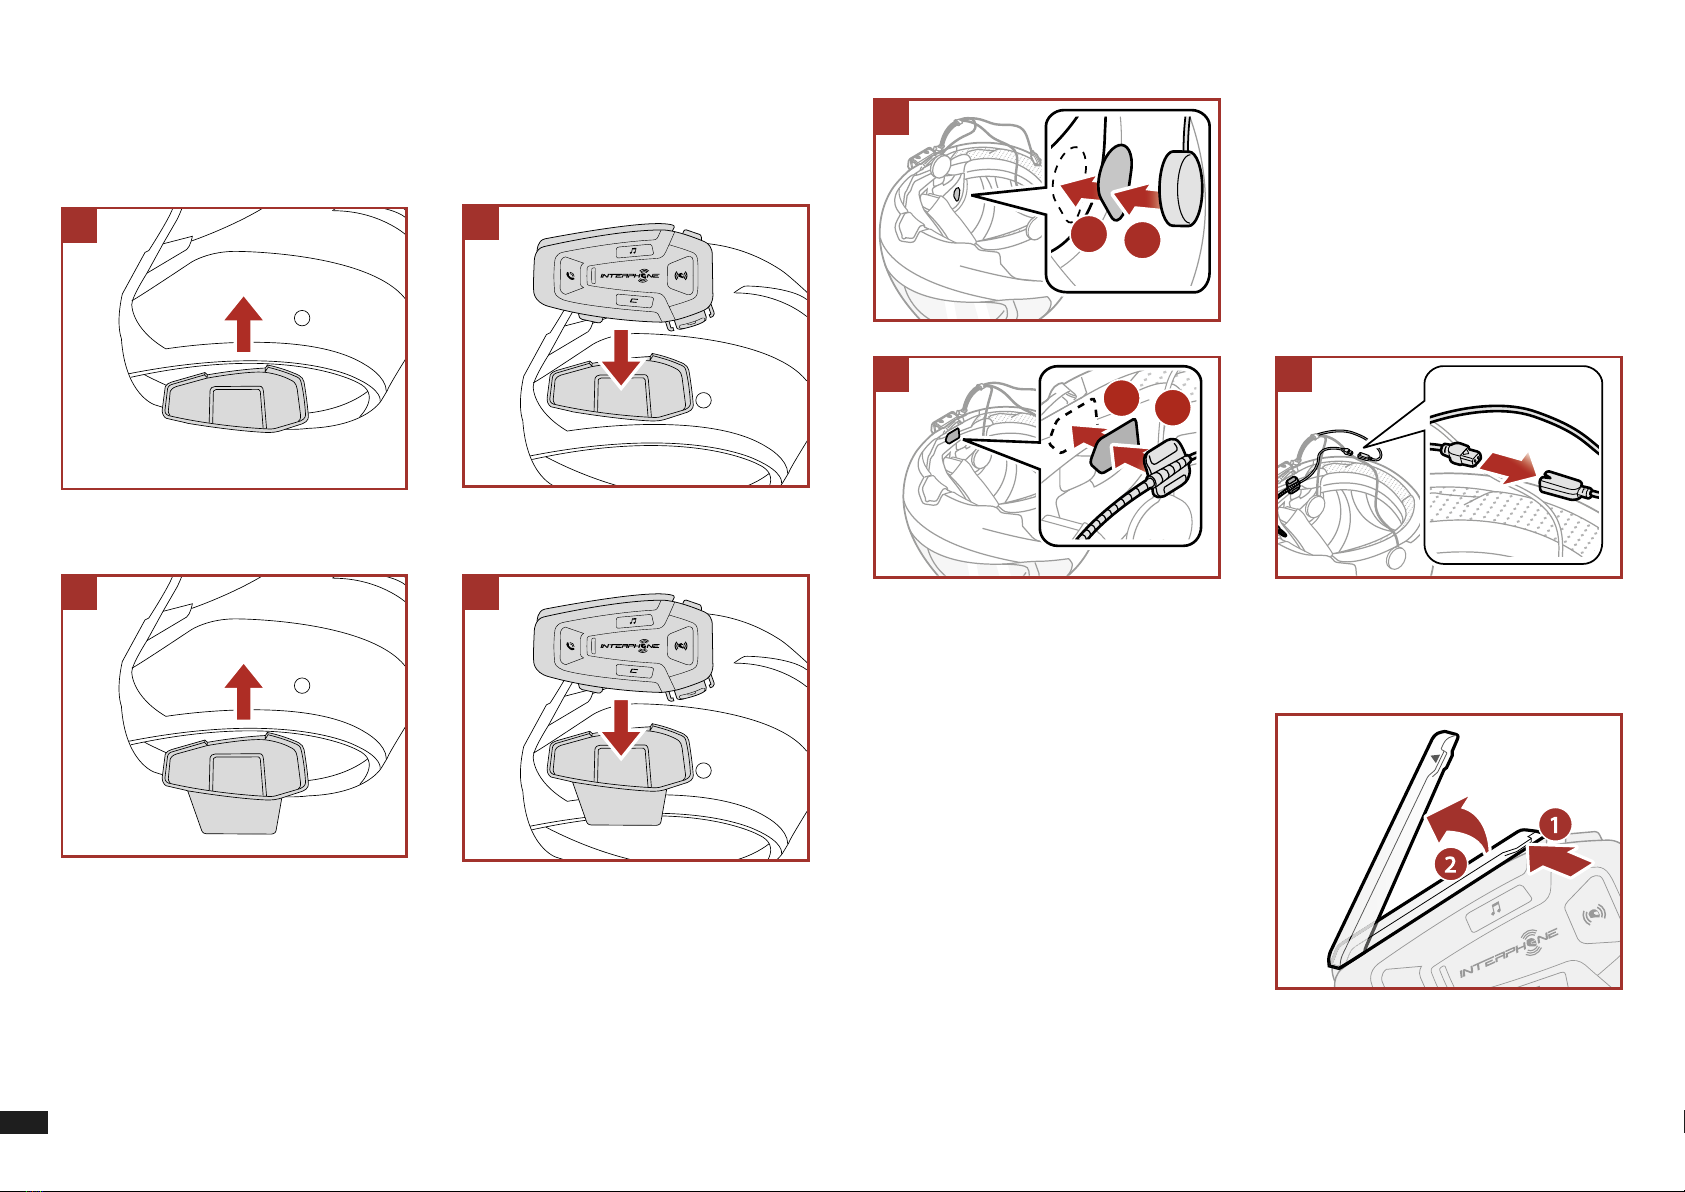
2.1 Install main unit ...............................................................................4
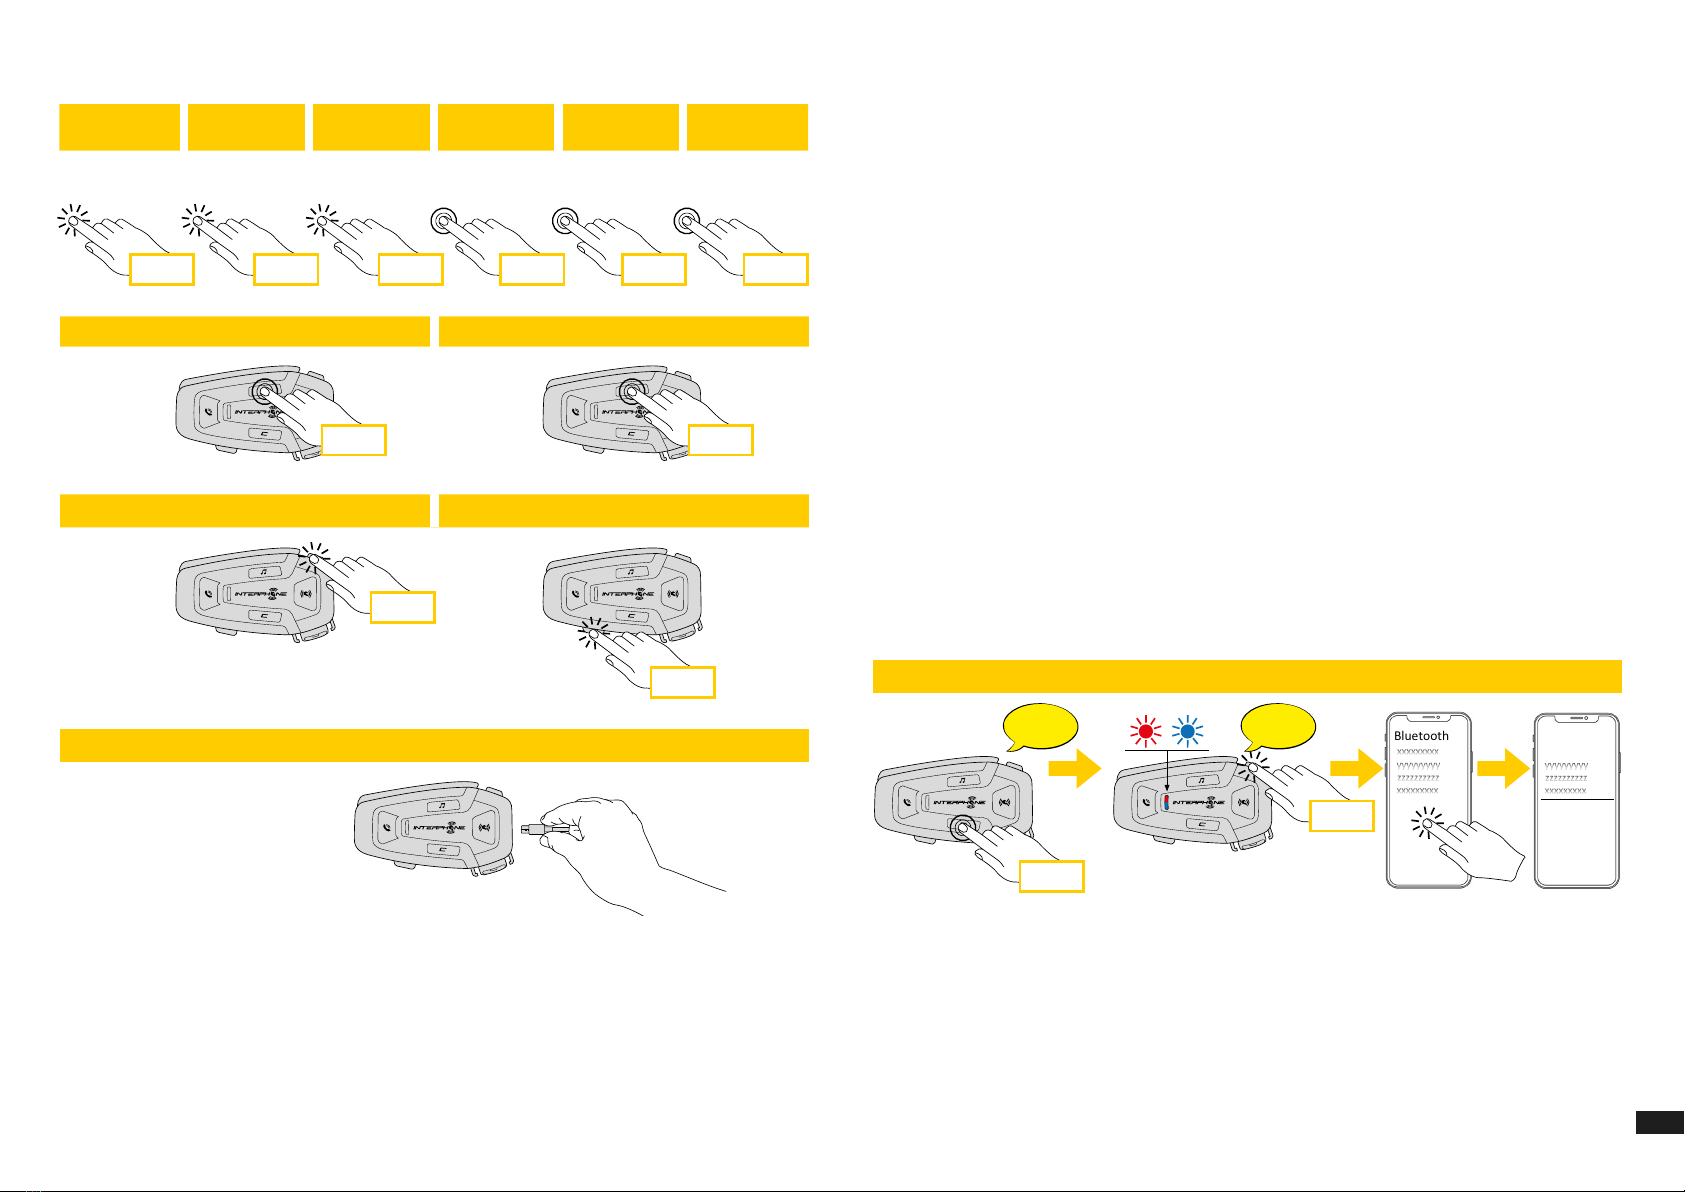
3. GETTING STARTED 5
4. PAIRING WITH OTHER BLUETOOTH®DEVICES 5
4.1 Pairing with Mobile phone / TFT systems ......................................... 5
4.2 Second mobile phone pairing .........................................................6
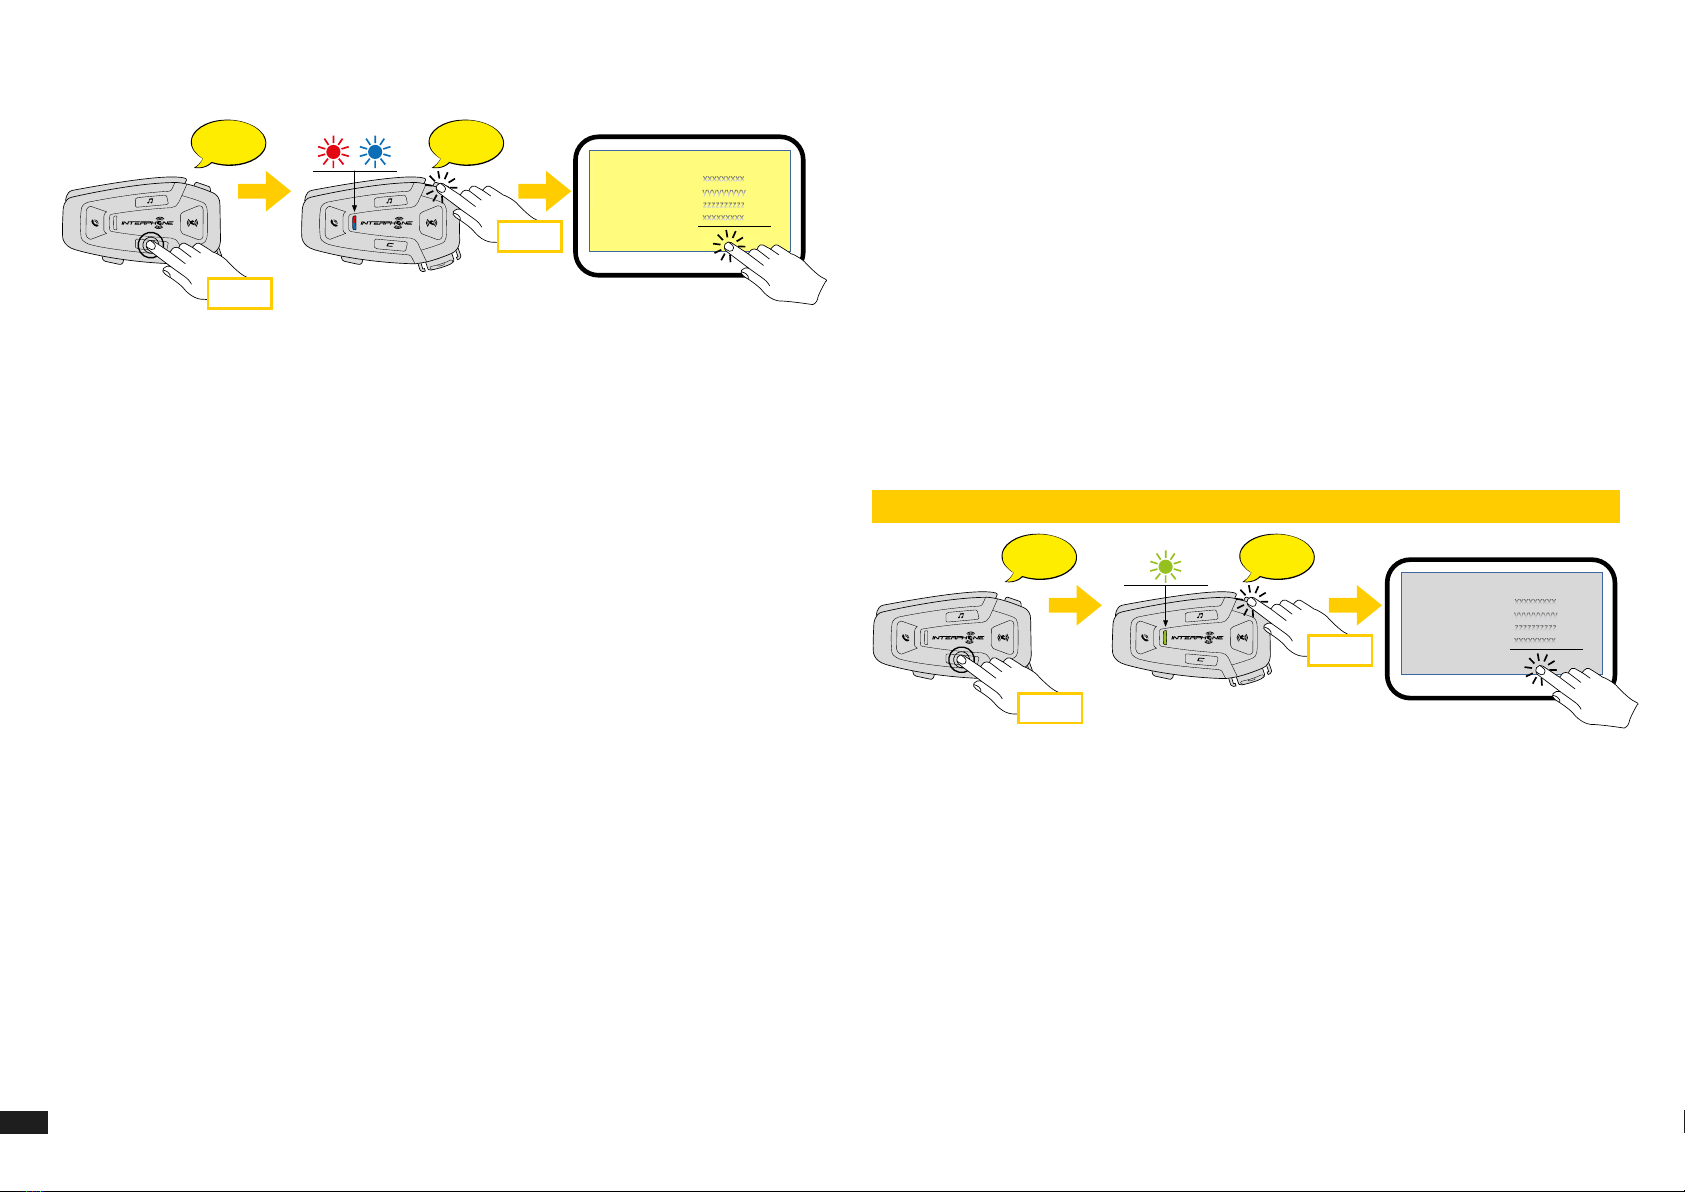
4.3 GPS Pairing ....................................................................................6
5. MOBILE PHONE USAGE 7
5.1 Making and Answering Calls ............................................................ 7
5.2 Siri and Google Assistant................................................................. 7
5.3 Speed Dialing ................................................................................. 7
5.3.1 Using preset speed dial numbers ....................................................... 7
6. MUSIC 8
6.1 Playing Music with Bluetooth®Devices ............................................. 8
7. MESH INTERCOM 9
7.1 What is Mesh Intercom? ...................................................................9
7.2 OPEN MESH mode ..........................................................................9
7.3 Start Mesh intercom in OPEN MESH mode ..................................... 10
7.3.1 OPEN MESH channel selection ........................................................ 10
7.4 Group Mesh (only available if “Advanced Features”
is activated on the APP) ................................................................ 10
7.4.1 Creating a group “Group Mesh” ....................................................... 10
7.5 Reset Mesh (only available if “Advanced Features”
is activated on the APP) ................................................................. 11
7.6 Toggle Open Mesh / Group Mesh modes ......................................... 11
7.7 Enable / disable microphone ........................................................... 11
8. FUNCTION PRIORITY AND FIRMWARE UPGRADES 12
8.1 Function Priority.............................................................................12
8.2 Firmware Upgrades........................................................................12
9. CONFIGURATION SETTING 12
9.1 Headset Conguration Setting ........................................................12
9.1.1 Delete all pairings ...............................................................................12
9.2 Device settings ..............................................................................12
9.2.1 Speed dial...........................................................................................13
9.2.2 Channel Setting (Default: channel 1) ................................................13
9.2.3 Unit Language....................................................................................13
9.2.4 Audio Equalizer (Default: O)...........................................................13
9.2.5 VOX Phone (Default: Enable) ............................................................13
9.2.6 VOX Sensitivity (Default: 3) ..............................................................13
9.2.7 Intercom-Audio Overlay Sensitivity (Default: 3) ..............................13
9.2.8 Audio Overlay Volume Management (Default: Disable) .................13
9.2.9 HD Voice (Default: Enable) ...............................................................13
9.2.10 Smart Volume Control (Default: Disable) .......................................13
9.2.11 Sidetone (Default: Disable)...............................................................13
9.2.12 Advanced Noise Control™ (Default: Enable)..................................13
10. TROUBLESHOOTING 14
10.1 Fault reset.....................................................................................14
10.2 Factory reset................................................................................14

3
A
E
F
G H
I
O
L
MN
B
C
D
1. ABOUT
1.1 Product details
Product details
Mesh antenna
Conrmation
Wired microphone
for fullface helmet
Boom microphone for
ip-up & jet helmet
Microphone
2 way connector
Music
Volume +
Volume –
DC Power
Charging &
Firmware Upgrade
Port
Phone
Status led
Mesh
CHECK FOR SOFTWARE UPDATES
ON WEBSITE
www.interphone.com
1.2 Package contents
A) Main unit
B) Data/charge cable usb type C
C) Adhesive bracket
D) Clip-on bracket
E) Boom microphone
F) Wired microphone
G) Boom microphone Velcro
H) Wired microphone Velcro
I) Boom microphone foam cover
L) Speakers
M) Spacers for speakers
N) Speakers Velcro
O) Boom microphone holder

4
2. HOW TO INSTALL
2.1 Install main unit
1 2
2
1
Installation
Use/application with the clamp for main unit
Use/application with double-sided adhesive in the bracket
Installazione degli auricolari
12
Installazione del microfono con asticella con filo
1
12
2
3
1
2
1
2 3
Installazione degli auricolari
12
Installazione del microfono con asticella con filo
1
12
2
3
1
2
Installazione degli auricolari
12
Installazione del microfono con asticella con filo
1
12
2
3
1
2
Installing the speakers and the microphone
Mesh Intercom Antenna
Pull the mesh intercom antenna
inwards slightly to unfold it.

5
3. GETTING STARTED
x 1
x 1
x 1 x 2 x 3 1 sec
1 sec
3 sec
3 sec
5 sec
Legenda and basic functions
Power on Power o
Volume increase Volume decrease
Charging
Press once Press twice Press three
times
Press and hold
for 1sec
Press and hold
for 3sec
Press and hold
for 5sec
x 1
x 1
x 1 x 2 x 3 1 sec
1 sec
3 sec
3 sec
5 sec
Legenda and basic functions
Power on Power o
Volume increase Volume decrease
Charging
Press once Press twice Press three
times
Press and hold
for 1sec
Press and hold
for 3sec
Press and hold
for 5sec
x 1
x 1
x 1 x 2 x 3 1 sec
1 sec
3 sec
3 sec
5 sec
Legenda and basic functions
Power on Power o
Volume increase Volume decrease
Charging
Press once Press twice Press three
times
Press and hold
for 1sec
Press and hold
for 3sec
Press and hold
for 5sec
x 1
x 1
x 1 x 2 x 3 1 sec
1 sec
3 sec
3 sec
5 sec
Legenda and basic functions
Power on Power o
Volume increase Volume decrease
Charging
Press once Press twice Press three
times
Press and hold
for 1sec
Press and hold
for 3sec
Press and hold
for 5sec
Note:
• U-COM 8R use a fast charging technology, via USB-C connector. Charging
for 30 minutes will give 3,5h in Mesh mode.
• Any USB charger with FCC, CE, IC or any local approval can be used.
• U-COM 8R is compatible only with USB device with 5V DC input.
4. PAIRING WITH OTHER BLUETOOTH®DEVICES
When using the headset with other Bluetooth®devices for the rst time, they
will need to be “paired.” This enables them to recognize and communicate
with one another whenever they are within range.
U-COM 8R can be paired to Bluetooth®devices such as mobile phones, GPS
Satnav and TFT motorcycle multimedia systems.
4.1 Pairing with Mobile phone / TFT systems
1. Switch on Bluetooth®service on your phone (check device manual for
more details).
2. With U-COM 8R on, press and hold central button for 10 seconds, to
enter settings menu. Don’t release the button until the led light is blue.
3. Press once VOLUME + button to start phone pairing mode.
4. On your phone search for new Bluetooth®devices.
5. In few moments the phone will list “U-COM 8R vx.x” among available
devices to pair. Select this item.
6. If prompted for a PIN or code, enter 0000 (four times zero ).
7. U-COM Voice guide will conrm the successful pairing.
8. If your smartphone asks for additional authorization please conrm.
UCOM16
UCOM8R
Bluetooth
UCOM16
UCOM8R
UCOM16
UCOM8R
Bluetooth
UCOM16
UCOM8R
GPS
UCOM16
Bluetooth
UCOM8R
5 sec
5 sec
5 sec
5 sec
x 1
x 1
x 2
x 3
TFT
UCOM16
Cascopilota
COLLEGAMENTI
UCOM8R
Bluetooth®devices pairing
Conguration
menu
Conguration
menu
Conguration
menu
Conguration
menu
Phone
pairing
Phone
pairing
Second
mobile phone
pairing
GPS pairing
Main phone pairing (to be done with unit on)
Second phone pairing (to be done with unit on)
Gps SATNAV & TFT pairing (to be done with unit on)
TFT
UCOM16
Rider’shelmet
CONNECTIONS

6
Multimedia TFT system of motorcycle must be paired with “PHONE
PAIRING”:
UCOM16
UCOM8R
Bluetooth
UCOM16
UCOM8R
UCOM16
UCOM8R
Bluetooth
UCOM16
UCOM8R
GPS
UCOM16
Bluetooth
UCOM8R
5 sec
5 sec
5 sec
5 sec
x 1
x 1
x 2
x 3
TFT
UCOM16
Cascopilota
COLLEGAMENTI
UCOM8R
Bluetooth®devices pairing
Conguration
menu
Conguration
menu
Conguration
menu
Conguration
menu
Phone
pairing
Phone
pairing
Second
mobile phone
pairing
GPS pairing
Main phone pairing (to be done with unit on)
Second phone pairing (to be done with unit on)
Gps SATNAV & TFT pairing (to be done with unit on)
TFT
UCOM16
Rider’shelmet
CONNECTIONS
Note: There is an alternative way, to pair only the rst phone (main
telephone). With the control unit o, press and hold at the same time the
MUSIC button together with the CONFIRMATION button, until the red /
blue LED ashes.
The primary phone will have priority over the second phone, in case of
simultaneous call reception on both phones.
4.2 Second mobile phone pairing
1. Switch on Bluetooth®service on your phone (check device manual for
more details).
2. With U-COM 8R on, press and hold CONFIRMATION button for 5
seconds, to enter settings menu. Don’t release the button until the led
light is blue.
3. Press the VOLUME + button twice to activate Second mobile phone
pairing mode.
4. Start the search for new Bluetooth®devices on the mobile phone.
5. In few moments the phone will list “U-COM 8R vx.x” among available
devices to pair. Select this item.
6. If prompted for a PIN or code, enter 0000 (four times zero ).
7. UCOM Voice guide will conrm the successful pairing.
8. If your smartphone asks for additional authorization please conrm.
4.3 GPS Pairing
1. Switch on Bluetooth®service on your GPS (check device manual for more
details).
2. With U-COM 8R on, press and hold CONFIRMATION button for 5
seconds, to enter settings menu. Don’t release the button until the led
light is blue.
3. Press the VOLUME + button 3 times to activate GPS pairing mode.
4. Start the search for new Bluetooth®devices on the GPS.
5. In few moments the device will list “U-COM 8R vx.x” among available
devices to pair. Select this item.
6. If prompted for a PIN or code, enter 0000 (four times zero).
7. UCOM Voice guide will conrm the successful pairing.
8. If your device asks for additional authorization please conrm.
UCOM16
UCOM8R
Bluetooth
UCOM16
UCOM8R
UCOM16
UCOM8R
Bluetooth
UCOM16
UCOM8R
GPS
UCOM16
Bluetooth
UCOM8R
5 sec
5 sec
5 sec
5 sec
x 1
x 1
x 2
x 3
TFT
UCOM16
Cascopilota
COLLEGAMENTI
UCOM8R
Bluetooth®devices pairing
Conguration
menu
Conguration
menu
Conguration
menu
Conguration
menu
Phone
pairing
Phone
pairing
Second
mobile phone
pairing
GPS pairing
Main phone pairing (to be done with unit on)
Second phone pairing (to be done with unit on)
Gps SATNAV & TFT pairing (to be done with unit on)
TFT
UCOM16
Rider’shelmet
CONNECTIONS

7
5. MOBILE PHONE USAGE
5.1 Making and Answering Calls
2 sec 2 sec
3 sec
x 1
x 1
x 1 x 1
1 sec
1 sec
Phone
Beep
Beep
Incoming call answer End call Reject incoming call
Phone assistant trigger Speed dial
Music
Music play Music pause
Next track Previous track
Note: If you have a GPS device connected, you will not hear its voice
navigations during a phone call.
5.2 Siri and Google Assistant
U-COM 8R supports the Siri and Google Assistant access directly or press
the PHONE button once. You can activate the Siri or Google Assistant using
the voice through the headset’s microphone, a wake word will be used. This
is a word or groups of words such as “Hey Siri“ or “Hey Google”.
5.3 Speed Dialing
It is possible to store up to 3 telephone numbers (if "advanced mode" is
active) to be used as speed dials. You can set the speed dial numbers via
UNITE APP or INTERPHONE Device Manager.
5.3.1 Using preset speed dial numbers
How to activate speed dial (with ADVANCED FEATURES o)
2 sec 2 sec
3 sec
x 1
x 1
x 1 x 1
1 sec
1 sec
Phone
Beep
Beep
Incoming call answer End call Reject incoming call
Phone assistant trigger
Speed dial
Music
Music play Music pause
Next track Previous track
How to activate speed dial (with ADVANCED FEATURES on)
1. Enter into the Speed Dial menu.
2 sec 2 sec
3 sec
x 1
x 1
x 1 x 1
1 sec
1 sec
Phone
Beep
Beep
Incoming call answer End call Reject incoming call
Phone assistant trigger
Speed dial
Music
Music play Music pause
Next track Previous track

8
2. Navigate between the Speed Dial Preset with VOLUME + or VOLUME –
buttons, as indicated in picture here below. Select the wanted feature
with CONFIRMATION button.
Select one function Conrm selected funcion
Last number redial
Speed dial #1
Speed dial #2
...
Last number redial
Speed dial #1
Speed dial #2
Speed dial #3
Cancel (exit from menu)
x 1
6. MUSIC
6.1 Playing Music with Bluetooth®Devices
Interphone U-COM 8R can play music from Bluetooth®devices (smartphones,
MP3 players, Motorcycle TFTs etc ...) equipped with the A2DP prole. To play
music you need to pair these devices to INTERPHONE U-COM 8R.
2 sec 2 sec
3 sec
x 1
x 1
x 1 x 1
1 sec
1 sec
Phone
Beep
Beep
Incoming call answer End call Reject incoming call
Phone assistant trigger Speed dial
Music
Music play Music pause
Next track Previous track

9
7. MESH INTERCOM
7.1 What is Mesh Intercom?
U-COM 8R is equipped with MESH 2.0 technology.
MESH 2.0 is the latest evolution of MESH intercom communication, which
allows you to speak freely without having to do any pairing and without any
position constraints within the group.
Within the same Open Mesh ™ channel or the same private group in
Group Mesh ™, users can talk and enjoy at the same time a conversation of
excellent quality.
7.2 OPEN MESH mode
The OPEN MESH mode allows free communication, in public mode, up
to a maximum of 24 connected users. To talk, devices can only be within
range, with the MESH mode active. OPEN MESH mode is active as a factory
default mode.
You can choose the MESH channel (from 1 to 9) to be used for
communication.
ch2
ch1
ch1
ch1
ch1
ch2
ch3
ch3
X
X

10
7.3 Start Mesh intercom in OPEN MESH mode
With U-COM 8R on, press the MESH button on each control unit, to activate
the communication mode. Each control unit automatically will connect to
other units simply by speaking into the microphone. Adjust the volume of
Mesh communication according to your needs.
x 1
x 1
x 1, 2, 3...
ch2
ch1
ch1
ch1
ch1
ch2
ch3
ch3
X
X
X
X
Bluetooth
Gruppo Mesh Ripristina Mesh
Modalità attuale
On / O
Canale 1
Mesh
Open Mesh
x 2
Mesh Intercom - OPEN MESH
Mesh Intercom - GROUP MESH
OPEN MESH mode (default)
Start/stop intercom
OPEN MESH Intercom connection OPEN MESH
Change intercom channel OPEN MESH 1 > 2 > 3 > 4 > 5 > 6 > 7 > 8 > 9 > Exit > 1 > 2 >...)
GROUP MESH mode
Channel
setting One-Two-
Three-… Channel
is set
Private
group
! Read the full
user manual and
check the APP
7.3.1 OPEN MESH channel selection
By activating OPEN MESH, the default factory setting is Channel1.
Only the control units working on the same channel will be able to connect
together.
You can choose a dierent channel to manage dierent conversation groups.
To change channel, press the MESH button twice, change the channel by
pressing the VOLUME + button (each press advances one channel), conrm
the channel selected by pressing the CONFIRMATION button.
x 1
x 1
x 1, 2, 3...
ch2
ch1
ch1
ch1
ch1
ch2
ch3
ch3
X
X
X
X
Bluetooth
Gruppo Mesh Ripristina Mesh
Modalità attuale
On / O
Canale 1
Mesh
Open Mesh
x 2
Mesh Intercom - OPEN MESH
Mesh Intercom - GROUP MESH
OPEN MESH mode (default) Start/stop intercom
OPEN MESH Intercom connection OPEN MESH
Change intercom channel OPEN MESH 1 > 2 > 3 > 4 > 5 > 6 > 7 > 8 > 9 > Exit > 1 > 2 >...)
GROUP MESH mode
Channel
setting One-Two-
Three-… Channel
is set
Private
group
! Read the full
user manual and
check the APP
7.4 Group Mesh (only available if “Advanced Features” is
activated on the APP)
Group Mesh is an intercom function, which allows users to join a closed /
private group conversation (as opposed to OPEN MESH which is open /
public), limited to members of that group only.
Users belonging to the group can freely communicate with each other when
they are in the same Group Mesh private group, taking advantage of all
benets of MESH 2.0 technology.
For a private intercom conversation using Group Mesh, rst step is to create
the group by users. When users create a private group in Group Mesh, the
intercom switches automatically from Open Mesh a Group Mesh mode.
A
A
A
A
C
B
B
B
B
D
C
5 sec
Private
group
Private
group
Private
group
Private
group
7.4.1 Creating a group “Group Mesh”
Creating a Group Mesh requires two or more “Open Mesh” users.
1. Activate the GROUP MESH function on the control units by pressing the
MESH button on both control units for 5 seconds.
A
B
A
A
A
A
C
B
B
B
B
D
C
5 sec
Private
Gruppe
Private
Gruppe
Private
Gruppe
Private
Gruppe
5 sec
5 sec
Units will complete the group creation and switch automatically from Open
Mesh to Group Mesh mode.

11
2. One of the members of an existing Group Mesh, by pressing 5 seconds
the MESH button, can allow new members to join to the existing Group
Mesh.
C
A
A
A
A
C
B
B
B
B
D
C
5 sec
Private
group
Private
group
Private
group
Private
group
A
A
A
A
C
B
B
B
B
D
C
5 sec
Private
group
Private
group
Private
group
Private
group
5 sec
Units will complete the new group, adding the new member. The new
member switches automatically from Open Mesh to Group Mesh and a
voice prompt will conrm it.
3. Repeat the operation of point 2. for each control unit to be added to
private group.
7.5 Reset Mesh (only available if “Advanced Features” is
activated on the APP)
If a Mesh reset command is activated on a device, it returns automatically to
Open Mesh mode (default channel 1). To start MESH reset, press the MESH
button for 8 seconds.
8 sec
7.6 Toggle Open Mesh / Group Mesh modes
Users can toggle between Open Mesh and Group Mesh and vice versa
without reset the Mesh. This allows users to retain their private Group Mesh
connection information while they are in Open Mesh.
To switch from Open Mesh to Group Mesh and vice versa, press the MESH
button for 3 seconds.
3 sec
Note: If you have never joined Group Mesh before, you cannot switch
between Open Mesh to Group Mesh and vice versa. The voice prompt is
output “No groups available”.
7.7 Enable / disable microphone
Users can mute the microphone during a Mesh intercom conversation.
The same command is used to reactivate the microphone.
Press the MESH button for 1 second.
1 sec

12
8. FUNCTION PRIORITY AND FIRMWARE
UPGRADES
8.1 Function Priority
The headset prioritizes connected devices in the following order:
1. (Highest) Mobile phone
2. Mesh Intercom
3. (Lower) Bluetooth®stereo music
A lower-priority function gets interrupted by a higher-priority function.
For example, stereo music will be interrupted by an Mesh Intercom
Conversation; an Mesh Intercom Conversation will be interrupted by an
incoming mobile phone call.
8.2 Firmware Upgrades
The headset supports rmware upgrades. Using the Device Manager utility
(available for PC and MAC on www.interphone.com) you can upgrade
rmware.
The USB Power & Data Cable (USB-C) must be connected to your computer,
then start Device Manager on computer and follow instructions step by step.
Interphone Unite APP can check the rmware version present on the
headset and inform you in case of a newer available rmware, but APP can't
ash the new rmware to headset.
9. CONFIGURATION SETTING
9.1 Headset Conguration Setting
With U-COM 8R on, press and hold CONFIRMATION button for 5 seconds,
to enter settings menu. Don't release the button until the led light is blue.
UCOM16
UCOM8R
Bluetooth
UCOM16
UCOM8R
UCOM16
UCOM8R
Bluetooth
UCOM16
UCOM8R
GPS
UCOM16
Bluetooth
UCOM8R
5 sec
5 sec
5 sec
5 sec
x 1
x 1
x 2
x 3
TFT
UCOM16
Cascopilota
COLLEGAMENTI
UCOM8R
Bluetooth®devices pairing
Conguration
menu
Conguration
menu
Conguration
menu
Conguration
menu
Phone
pairing
Phone
pairing
Second
mobile phone
pairing
GPS pairing
Main phone pairing (to be done with unit on)
Second phone pairing (to be done with unit on)
Gps SATNAV & TFT pairing (to be done with unit on)
TFT
UCOM16
Rider’shelmet
CONNECTIONS
To navigate through the settings, press once the VOLUME + button or the
VOLUME – button.
1. Phone pairing
2. Second Mobile Phone Pairing
3. GPS pairing
To conrm the following conguration menu options, press
CONFIRMATION button once.
4. Delete all pairings
5. Factory reset
6. Exit
9.1.1 Delete all pairings
Delete all Bluetooth®pairings stored in the device.
9.2 Device settings
You can change the device settings from the Device Manager utility
(available for PC and MAC on www.interphone.com) or from the Interphone
UNITE app.
Attention: the setting "Advanced Features" will enable the following
headeset features:
• The private MESH mode called “GROUP MESH”
• Reset Mesh
• Phone multiple speed dial

13
9.2.1 Speed dial
Assign phone numbers for speed dialing to make a phone call quickly.
9.2.2 Channel Setting (Default: channel 1)
If the Open Mesh communication experiences interference because other
groups are also using the channel 1 (default), change the channel. You can
select one of 1 to 9 channels.
9.2.3 Unit Language
You can select the device language. The selected language is maintained
even when the headset is rebooted
9.2.4 Audio Equalizer (Default: O)
You can use the Audio Equalizer to increase/decrease the decibel level of
dierent frequency ranges of audio.
• Balance will adjust all of the frequency ranges to be the same volume
level (0 dB).
• Bass Boost will increase the bass range of audio (20 Hz - 250 Hz).
• Mid Boost will increase the mid range of audio (250 Hz - 4 kHz).
• Treble Boost will increase the high range of audio (4 kHz - 20 kHz).
9.2.5 VOX Phone (Default: Enable)
If this feature is enabled, you can answer incoming calls by voice. When you
hear a ringtone for an incoming call, you can answer the phone by saying a
word such as “Hello” loudly or by blowing air into the microphone. VOX phone
is temporarily disabled if you are connected to intercom. If this feature is
disabled, you have to tap the PHONE button to answer an incoming call.
9.2.6 VOX Sensitivity (Default: 3)
VOX sensitivity can be adjusted depending on your riding environment.
Level 5 is the highest sensitivity setting and level 1 is the lowest.
9.2.7 Intercom-Audio Overlay Sensitivity (Default: 3)
The music and GPS volume will be lowered to play in the background if
you talk over the intercom Mesh while the overlaid audio is playing. You
can adjust the intercom Mesh sensitivity to activate this background
audio mode. Level 1 has the lowest sensitivity and level 5 has the highest
sensitivity.
Note: If your voice is not louder than the sensitivity of the selected level, the
overlaid audio will not be lowered.
9.2.8 Audio Overlay Volume Management (Default: Disable)
The music and GPS overlaid audio reduces in volume whenever there is an
ongoing intercom Mesh conversation. If Audio Overlay Volume Management
is enabled, the volume level of the overlaid audio will not be reduced during
an intercom Mesh conversation.
9.2.9 HD Voice (Default: Enable)
HD Voice allows you to communicate in high-denition during phone calls.
This feature increases the quality so that the audio will be crisp and clear
during phone call conversations.
Note:
• Refer to the manufacturer of your Bluetooth®device that will be connected
to the headset to see if it supports HD Voice.
9.2.10 Smart Volume Control (Default: Disable)
Enabling Smart Volume Control automatically changes the level of the
speakers volume based on the level of the environment noise. You can
enable it by setting the sensitivity to low, medium or high.
9.2.11 Sidetone (Default: Disable)
Sidetone is audible feedback of your own voice. It helps you to naturally
speak at the correct level according to varying helmet noise conditions. If
this feature is enabled, you can hear what you are speaking during a phone
call.
9.2.12 Advanced Noise Control™ (Default: Enable)
When Advanced Noise Control is enabled, the background noise is reduced
during an intercom conversation. When it is disabled, the background noise
is mixed with your voice during intercom.

14
10. TROUBLESHOOTING
Please visit www.interphone.com for video tutorials and answers to
frequently asked questions.
10.1 Fault reset
When the intercom does not work properly, it is possible to reset the unit
easily, simply by disconnecting the battery for few seconds.
Note: Reset after error will not restore the intercom to factory settings.
10.2 Factory reset
To erase all of your settings and start fresh, the headset can be restored to
factory default settings using the Factory Reset feature.
UCOM16
UCOM8R
Bluetooth
UCOM16
UCOM8R
UCOM16
UCOM8R
Bluetooth
UCOM16
UCOM8R
GPS
UCOM16
Bluetooth
UCOM8R
5 sec
5 sec
5 sec
5 sec
x 1
x 1
x 2
x 3
TFT
UCOM16
Cascopilota
COLLEGAMENTI
UCOM8R
Bluetooth®devices pairing
Conguration
menu
Conguration
menu
Conguration
menu
Conguration
menu
Phone
pairing
Phone
pairing
Second
mobile phone
pairing
GPS pairing
Main phone pairing (to be done with unit on)
Second phone pairing (to be done with unit on)
Gps SATNAV & TFT pairing (to be done with unit on)
TFT
UCOM16
Rider’shelmet
CONNECTIONS
With U-COM 8R on, enter the conguration menu by pressing
CONFIRMATION button for 5 seconds. Be careful not to release the button
before the LED turns blue, you will hear the message conrming activation
of the conguration menu.
Press the VOLUME + button twice until you hear the message “Factory
reset”, press once the CONFIRMATION button to conrm. A voice
announcement will be issued to conrm: "Reset headphones, goodbye".
Table of contents
Other Cellularline Motorcycle Accessories manuals

Cellularline
Cellularline iCase Holder User manual

Cellularline
Cellularline Interphone CU0047 User manual

Cellularline
Cellularline U-COM 2 User manual

Cellularline
Cellularline INTERPHONE U-COM 4 User manual

Cellularline
Cellularline U-COM 2 User manual

Cellularline
Cellularline U-COM 6R User manual

Cellularline
Cellularline Interphone Connect User manual