Central Boiler Fire Star II User manual

Press to
Prime
If Enabled
Press to
Reset
II
OPERATION MANUAL
Save This Manual
For Future Reference
24-JUL-2015 • (p/n 9000317 - REV. A)
For parts and accessories, service or repairs, call your authorized Central Boiler dealer or heating
contractor. Record the information below for future reference.
Serial Number Installation Date
Dealership Name Phone Number
Owner Name
SOFTWARE VERSION 2.5
™
II

by Central Boiler, Inc.
20502 160th Street • Greenbush, MN 56726
CentralBoiler.com • MaximHeat.com
NOTE: Any person(s) operating a hydronic heater must comply with all applicable laws,
including but not limited to local ordinances.
™
II

1
FIRESTAR CONTROLLER (version 2.5)
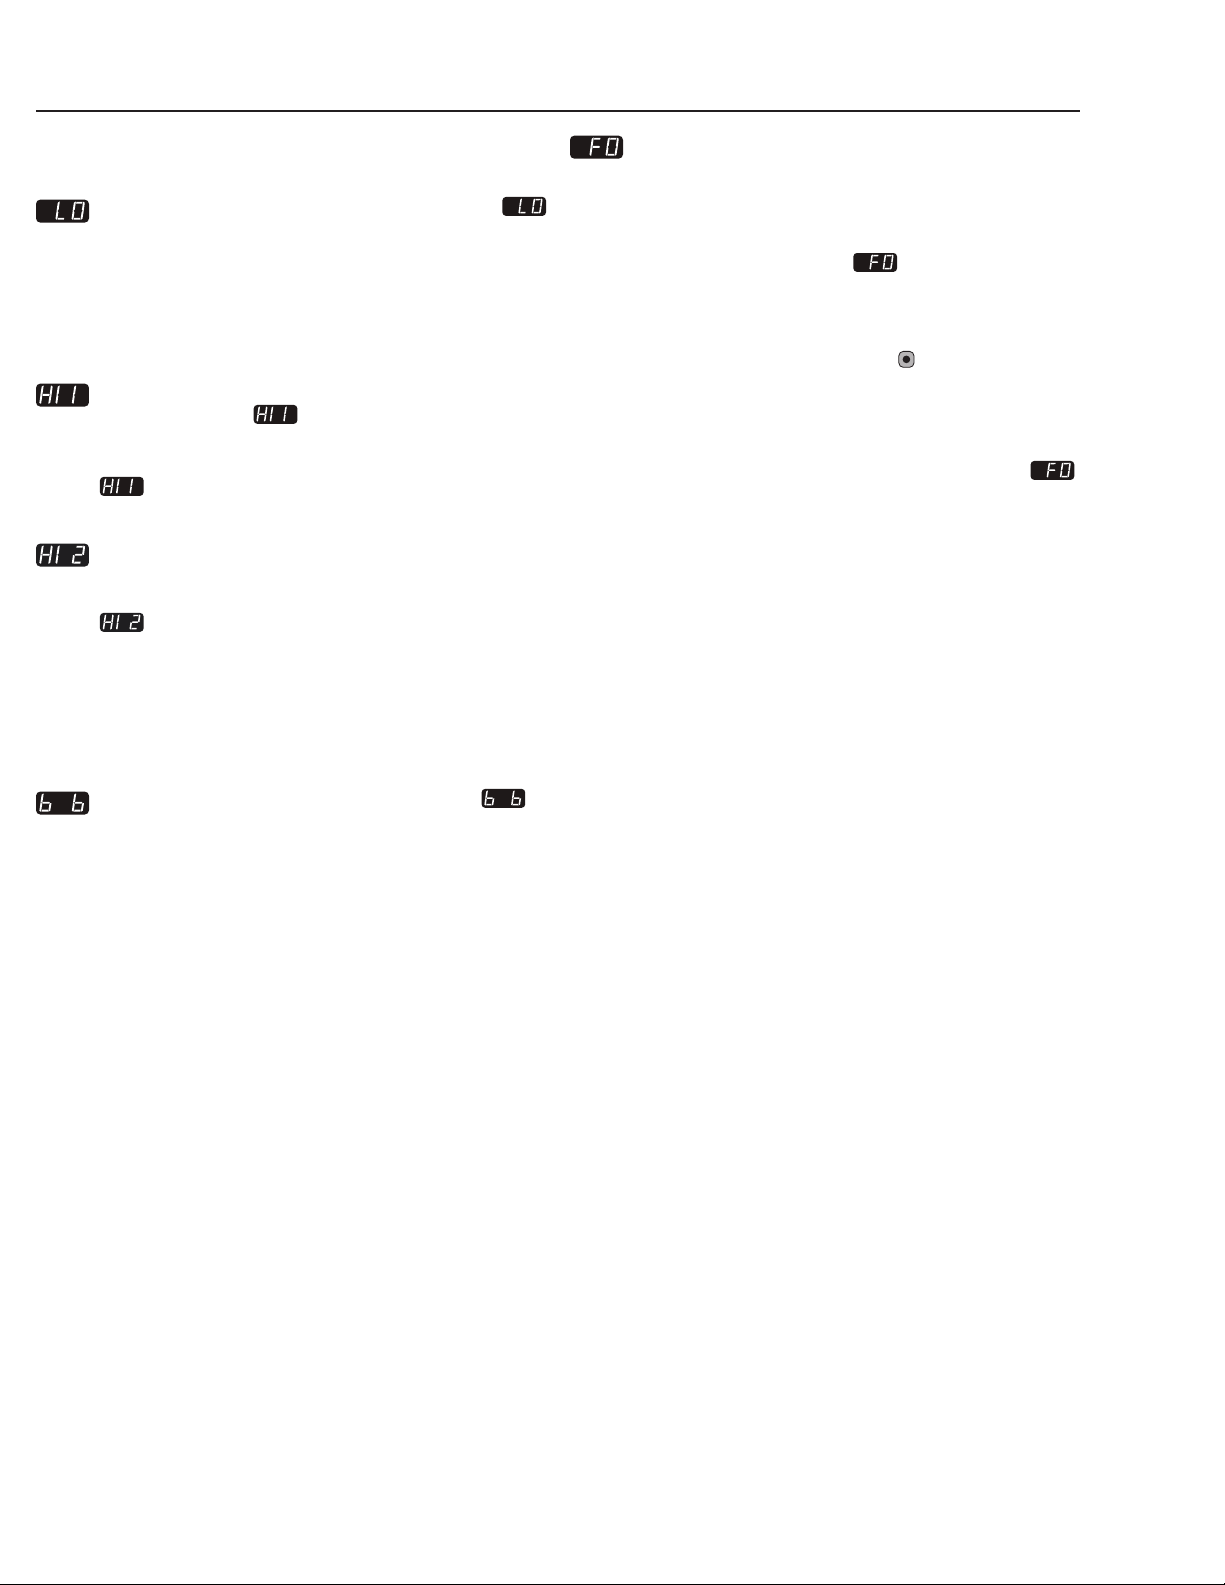
Press to
Prime
p/n 7000375
If Enabled
Press to
Reset
II
2
4
65
1
3
The FireStar controller is designed to cycle between
three operating modes to control the amount of fuel fed to
the burn chamber and the amount of air for combustion,
thereby regulating the amount of heat transferred into
the water in the furnace.
Before operating the FireStar Controller, become
familiar with the information the control panel provides
and with the procedures for making changes to settings.
The controller has been programmed with default
settings (factory settings) that may be adjusted to match
your heating requirements.
1. The Power button is used to turn the FireStar
controller on and off. To turn the controller on or
off, press and hold the Power button for at least
one second. The Power button does not disable
all electrical power to the furnace.
2. During normal operation, the LED display indicates
the actual temperature of the system water. Other
information will also be displayed on the LED
display depending on settings, modes, etc. The
Water Temp button may be used to display the
water temperature setting or, used in conjunction
with the and buttons, to change the water
temperature setting.
3. The heat output (fuel feed rate) settings in each of
the three modes (HIGH / MEDIUM / LOW) may
be changed here using the and buttons. During
operation, the light bar will indicate the heat output
setting for the mode the controller is currently in. The
and buttons may also be used in conjunction
with the Air Adjust button to change the air
setting for each mode. By default, the LOW mode is
disabled.
4. The AirAdjust button may be used in conjunction
with the HIGH, MEDIUM and LOW and
buttons to change the combustion air ow setting
for each mode. For HIGH and MEDIUM modes,
decreasing the setting (fewer lights on the light
bar) lowers the fan speed and increasing the setting
(more lights on the light bar) increases the fan speed.
For LOW mode, increasing or decreasing the setting
will increase or decrease the length of time the fan
operates each time the auger turns.
5. When pressed once, the Auger button will cause
the augers to operate for 30 seconds while the LED
display counts down the time. When pressed twice
within once second, Clean Out Mode is enabled. The
Auger light is on any time the burner auger is running.
6. The Ignition button starts the Ignitor. This button
can also be used to reset the ignition mode (for
example, if there is an alarm, you can press
this button to restart the ignition sequence).
Adjusting Water Temperature Setpoint
Normally the furnace water temperature will be
displayed. To display the water temperature setpoint,
press the Water Temp button. The default setting is
175˚C (79˚C). To raise or lower the water temperature
setpoint, press and hold the Water Temp button;
then press the and button. The water temperature
setpoint can be set between 150˚F (65˚C) and 190˚F
(88˚C).
NOTE: To reduce condensation in the rebox, it
is not recommended to set the water temperature
setpoint below 165˚F (74˚C).
Burner Temperature
To display the temperature of the burner, press the
Water Temp button. The LED display will indicate
the actual temperature of the burner up to 999 degrees
or, if higher, as a decimal representation (e.g., 1500˚F
will display as 1.50).

2
Initial Start-up
NOTE: Before starting the outdoor furnace, make
sure that (1) the proper amount of Corrosion
Inhibitor Plus™ has been added and the water
level is full; (2) there is adequate clean, dry fuel in
the hopper or supply bin; (3) the main electrical
power supply to the outdoor furnace is on; and (4)
the ground rod has been installed and connected
to the outdoor furnace.
CAUTION
Do not burn garbage, gasoline, naphtha, drain oil
or other inappropriate materials.
1. Press the Power button. Upon start-up, the
controller will display the software version number
followed by a brief indicator light test. The LED
display will indicate the furnace water temperature.
2. Fuel must be present in the burn chamber for the
system to burn properly. To deliver fuel to the burn
chamber, start the prime cycle by pressing the
Auger button. The prime cycle timer will count
down and stop the augers. When starting from an
empty auger, it may take two prime cycles.
3. To manually start the ignitor, press and hold the
Ignition button until the LED display indicates
and the ignition light illuminates.
NOTE: Upon initial start-up, it is not uncommon
for a substantial amount of condensation to be
present in the rebox as the furnace is coming up
to operating temperature. This is normal and the
moisture will evaporate when the outdoor furnace
reaches operating temperature. Condensation
can also occur if the furnace is allowed to operate
below 140˚F (60˚C) on a normal basis.
CAUTION
Regularly exposing the furnace rebox to
excessive condensation can signicantly reduce
the life of the rebox.
Normal Operation*
FireStar Controller - Maxim M255 PE
Burner Modes
*NOTE: This graph is based on factory default settings when the water temperature setpoint is 175˚F.
175˚F
-10°F
-10°F
+7°F
+13°F
165˚F
Water Temperature
155˚F
STANDBY
10 Minute Minimum
If burner temperature is not high enough the controller will not switch from MEDIUM to HIGH mode.
5 Minute Minimum
STANDBYMEDIUM MEDIUMHIGH
162˚F

3
Setting the FireStar Controller for Heat Load and Efciency
The controller’s factory default settings allow the
furnace to operate properly in most installations without
adjustment. These settings can be adjusted, however, for
installations that require matching the furnace output to
the heat demands of the system.
NOTE: Be sure to thoroughly read and
understand this manual before making changes
to factory default settings. Changing settings
can signicantly change the way the furnace
operates. Consult your dealer if you have any
questions.
Heat Output Settings
For best results, determine the lowest water temperature
setpoint the outdoor furnace can be set to that will supply
enough heat to the heat emitters. For most installations,
a water temperature setpoint of 175˚F (79˚C) should be
adequate.
If, as an example, the water temperature setpoint is
175˚F, when a heat load is applied, there will be a delay
before the water temperature starts to fall. When it
falls 10˚F, the controller will shift to MEDIUM mode.
If operating in MEDIUM mode is unable to maintain
the water temperature with the heat load applied, once
the water temperature drops another 10˚F (this variable
is called the MEDIUM to HIGH differential), the
controller will shift to HIGH mode.
NOTE: The controller will operate in MEDIUM
mode for a minimum of 5 minutes before shifting
into HIGH mode, regardless of temperature loss.
If the heat demand is less than 50% of the Maxim’s
output capacity, it is not necessary for the FireStar
controller to shift into HIGH mode.
The MEDIUM to HIGH differential can be changed
match the installation (see Setup Mode section).
Monitor the outdoor furnace operation to determine if
additional changes are needed, keeping in mind that
it may take several cycles of the heat load before this
becomes apparent.

4
Understanding Operating Modes
IGNITION Mode
Upon entering ignition mode, the augers will start for
several seconds to add enough fuel to the burner. The
fan will then speed up to the ignition fan speed and the
ignitor will heat up. If the ignition sequence exceeds
ten minutes, the augers will start a second time to add
more fuel to the burner. The controller will attempt this
ignition sequence three times.
LOW Mode (If Enabled)
NOTE: LOW mode should only be enabled if there
is a problem with the electric ignitor. Contact
your dealer to enable LOW mode.
LOW mode is used to maintain the re when the heat
demand is low or not present.
NOTE: For most applications, the LOW heat
output and air settings should be set to the
lowest setting when using wood pellets. The
LOW heat output and air settings may require
additional adjustment if the re does not relight
when shifting from LOW to MEDIUM, or if the
outdoor furnace overheats when changing to a
lower mode.
• The LOW heat output setting should be set as low
as possible while still enabling the re to relight
when shifting into MEDIUM mode.
• If there is no fuel left in the burn chamber and the
re has gone out, the heat output is set too low.
Increase the LOW heat output setting.
• If the water temperature increases above 195˚F
(90˚C) when the furnace is in LOW, the heat
output is set too high. Decrease the LOW heat
output setting.
Monitor the outdoor furnace operation to determine if
additional changes are needed, keeping in mind that
it may take several cycles of the heat load before this
becomes apparent.
MEDIUM Mode
In general, the MEDIUM heat output setting should
be set high enough to minimize the amount of time the
controller is in HIGH mode.
The outdoor furnace is most efcient when it is operating
in MEDIUM mode and not shifting often into HIGH or
LOW mode. The controller changes to MEDIUM mode
when the water temperature drops 10˚ below the water
temperature setpoint. MEDIUM mode represents 20%-
60% of the outdoor furnace’s heat output capacity.
NOTE: For most applications, the default MEDIUM
heat output setting is adequate to allow the
outdoor furnace to operate efciently. For some
heat load requirements or when burning a fuel
other than wood pellets, it may be necessary to
change this setting.
• If the outdoor furnace operates in HIGH mode
much of the time, increase the MEDIUM heat
output setting one step. If the outdoor furnace
changes from MEDIUM to LOW mode when
there is a heat demand, lower the MEDIUM heat
output setting one step.
• In a higher heat load installation such as radiant
oor heat, an abrupt heat load change (i.e., when
there is no longer a call for heat) will cause the
controller to shift from HIGH to MEDIUM to
LOW mode. A fuel such as wood pellets that burns
easily will continue to provide heat in LOW mode
and can cause the water temperature to increase
above 195˚F (90˚C). In this instance, decrease
the MEDIUM heat output setting so there is less
remaining fuel when the controller changes from
HIGH to LOW mode.
• Upon entering medium mode, the controller will
turn the fan on in its highest setting for a few
seconds to clear the burner. It will then slow down
to its medium speed. If the burner temperature is
high enough, the controller will stay in medium
and cycle the augers at the medium feed rate.
• If the burner temperature is too low, the ignition
sequence will start.

5
HIGH Mode
The reason the FireStar Controller has a MEDIUM
and HIGH heat output setting is for efciency. The
most efcient setting for the HIGH mode is when the
heat output setting is set as low as possible while still
providing enough heat.
HIGH mode is used for peak or spike heat loads. The
controller changes to HIGH mode when the water
temperature drops 20˚F below the water temperature
setpoint. HIGH mode represents 65%-100% of the
outdoor furnace’s heat output capacity.
NOTE: The controller will operate in MEDIUM
mode for a minimum of 5 minutes before shifting
into HIGH mode, regardless of temperature loss.
• The most efcient setting for the HIGH heat output
mode is the lowest setting possible that keeps the
water temperature from dropping to 150˚F (66˚C).
If the water temperature drops to 150˚F (66˚C),
increase the HIGH heat output setting or reduce
the heat load. Remember that a thermostatic valve
must be installed in each set of hot supply and
return lines to keep the water temperature from
dropping below 150˚F (66˚C).
• If the fuel cannot burn fast enough (i.e., unburned
fuel gets pushed into the ash pan), either lower the
HIGH heat output setting, use a different type of
fuel that will burn better, or mix in premium wood
pellets with the fuel.
To View All Heat Output Settings:
1. Press any of the or buttons for the HIGH,
MEDIUM or LOW modes. The light bars will
display the current heat output settings.
To Change Heat Output Settings:
1. In each mode (HIGH, MEDIUM or LOW), press the
button to increase the heat output or press the
button to decrease the heat output. The new heat
output setting will be displayed on the light bar.
2. The light bars will turn off and the new heat output
setting(s) will take effect 15 seconds after no buttons
are pressed.

6
Air Settings
Air Settings When LOW Mode is Enabled
The air setting for LOW mode increases or decreases
the length of time the fan runs each time the auger turns.
NOTE: The LOW heat output and air settings
should only require adjustment if the re does
not relight when shifting from LOW to MEDIUM.
• If there is fuel left in the burn chamber, the water
temperature has not increased above 195˚F (90˚C)
and the re has gone out, the fan setting for LOW
mode is too low. Increase the fan setting for LOW
mode.
Air Setting for MEDIUM and HIGH Modes
The air settings for the MEDIUM and HIGH modes can
be adjusted to provide the correct amount of combustion
air to the re. The proper setting for these two modes is
the lowest setting that will still provide enough air for
complete combustion (i.e., no smoke and no unburned
fuel in the ash pan). If the air settings are too high, the
extra air will take heat with it as it goes out the chimney.
If the air settings are too low, complete combustion may
not occur.
As a general rule, the air settings for the MEDIUM and
HIGH modes should be within one bar of each other.
To optimally set the fan speeds for the MEDIUM and
HIGH modes, it is best to use a CO2combustion meter
and adjust for a reading of 11-13%. If a CO2combustion
meter is not available, set the fan setting for each mode
to the lowest setting that does not cause smoke to
appear in the exhaust after the mode has operated for
15 minutes.
NOTE: In cold weather, steam in the exhaust will
condense and appear as smoke, similar to the
steam in the exhaust from an automobile.
To View the Current Air Settings:
1. Press and hold the Air Adjust button. The light
bars will display the current air setting for each
mode.
To Change the Air Settings:
1. Press and hold the Air Adjust button; then
press the or button for the respective mode
to decrease or increase the air setting. For HIGH
and MEDIUM modes, decreasing the setting (fewer
lights on the light bar) lowers the fan speed and
increasing the setting (more lights on the light bar)
increases the fan speed.
2. Release the Air Adjust button.
NOTE: Allow the re in the burn chamber to
stabilize for a few minutes after changing an air
setting to assess what effect the change had
before making another adjustment.

7
Auto Relight / Clean Out Mode
Auto Relight
The controller continuously monitors the burner
temperature. If at any time the burner temperature is
less than the burner temperature setting (which is set at
the factory), the controller will automatically start the
ignition sequence in an attempt to relight and raise the
burner temperature.
If after three ignition cycles, the burner temperature does
not rise above the burner temperature setting, all outputs
will be disabled and the LED display will indicate
to show that the ignition attempt has failed.
The controller will maintain the system in a disabled
condition until one of the following occurs:
1. Press and hold the Ignition button for 15 seconds.
2. Press the Power button to turn off the controller;
then press again to turn on the controller.
3. The main power to the furnace is turned off and then
on again.
NOTE: Examples of situations that would cause
the controller to go into auto relight mode: 1)
Drop in burner temperature caused by wet or
contaminated fuel or improper air setting; 2)
Extended operation in LOW mode due to a low
heat load; 3) Feed rate or air setting in LOW mode
is not set high enough to sustain the re; 4) Auger
is plugged with swollen or expanded pellets; 5)
Hopper is out of fuel; 6) Power outage.
NOTE: Before resetting the controller from
nd the cause of the burner not being operational
(e.g., wet or contaminated fuel, mechanical
problem, etc.).
Clean Out Mode
Situations may arise when it becomes necessary to
empty all of the fuel from the burner auger (e.g., for
service, at the end of season, etc.). In the Clean Out
Mode, the transfer auger is disabled.
To start Clean Out Mode:
1. Press the Auger button two times within one
second. The Clean Out Mode light will turn on, the
transfer auger will be disabled, and the controller
will be forced into MEDIUM mode. The controller
will stay in MEDIUM mode until the burner is
cleared.
To cancel Clean Out Mode:
Press the Auger button two times within one second.
The Clean Out Mode light will turn off and the burner
and transfer augers will run as normal.
NOTE: If not cancelled, Clean Out Mode will
run for 30 minutes. After 30 minutes the Clean
Out Mode light will turn off and the burner and
transfer augers will run as normal.

8
LED Display Alarm Denitions
If any of the following alarms occur, system operations
will be halted until the cause of the alarm is corrected.
Low Water: the LED display will ash
until the water level is above the sensor. Check
that the water level indicator rod is above the
vent cap and, if necessary, add water according
to the Water Quality and Maintenance section.
If adding water does not correct the problem,
contact your Central Boiler dealer.
High Water Temperature: the LED display will
alternately ash and the water temperature
if the water temperature reaches 200˚F (93˚C).
The LED will continue to alternate between
and the water temperature until the water
temperature drops to 195˚F (90˚C).
There is an external limit switch that can also
lock the controller in the high water temperature
alarm. The LED display will alternately ash
and the water temperature if the external
limit switch trips. This limit switch will trip at
approximately 200˚F (93˚C) and automatically
reset at 185˚F (85˚C).
If this alarm occurs often, you will need to lower
the water temperature setpoint.
Back Burn: The LED display will ash if
the controller detects a high temperature in the
burner auger area, even if the control panel is
turned off. Everything but the burner auger will
be disabled. The burner auger will run for two
minutes, pause for 10 minutes, and continue as
required. The Back Burn alarm will not stop until
the controller detects that the temperature in the
burner auger area has dropped.
Fire Out: while in MEDIUM or HIGH mode, if
the burner temperature drops below the burner
temperature setpoint and, if enabled, the ignitor
has tried to relight the re three times, the
controller will go into Fire Out mode and the
LED display will ash . This will continue
until the cause of the Fire Out alarm is corrected
and the controller is reset. To clear the Fire Out
alarm, turn the controller off and on again or
press and hold the Ignition button. This will
reset the controller and allow normal operation.
NOTE: while in LOW mode, if the burner
temperature drops below the burner temperature
setpoint, the LED display will not ash .
the LOW light bar will ash and augers will be
disabled until the water temperature drops low
enough for the controller to change to MEDIUM
mode. No action is required.

9
Setup Mode
To Enter Setup Mode
Press and hold the Menu button for at least 7
seconds until the LED display changes from the water
temperature to .
Changing Control Variables
While in Setup Mode, select the control variable you
want to change (see Selecting Control Variables). To
make a change, press the Water Temp button. The
current value is displayed. Press the or the button
to modify the setting. Press the Water Temp button
to accept the value and return to the selection menu.
Selecting Control Variables
Variables 1-7 and 18-21 can be changed within Setup
Mode. Variables 8-17 are reserved settings that are used
in conjunction with the optional FireStar XP.
To select a variable while in Setup Mode, press the Water
Temp or button until the number representing
the variable appears in the display. The following list
indicates each variable’s number, name, the default
factory setting and a brief description of the function.
1. Water Temperature Setpoint: 175˚F (80˚C)
The water temperature the controller will operate to
maintain. Range: 150-190
2. IDLE to MEDIUM Differential: 10˚F (6˚C)
When the water temperature is less than the Water
Temperature Setpoint minus this setting, the
controller will change from IDLE mode to MEDIUM
mode. For example, with the default factory settings,
the controller will change from IDLE mode to
MEDIUM mode when the water temperature is less
than 175˚F – 10˚F (or 165˚F). Range: 1-20
3. MEDIUM to HIGH Differential: 10˚F (6˚C)
When the water temperature is less than the Water
Temperature Setpoint minus the LOW to MEDIUM
Differential minus this setting, the controller will
change from MEDIUM mode to HIGH mode.
For example, with the default factory settings, the
controller will change from MEDIUM mode to
HIGH mode when the water temperature is less than
175˚F – 10˚F – 10˚F (or 155˚F). Range: 1-30
NOTE: Changing this variable will automatically
change the HIGH to MEDIUM differential. The HIGH
to MEDIUM Differential is a ratio of the MEDIUM to
HIGH Differential and is a numeric value from 1 to
10. When the water temperature is this far above
the temperature at which the controller changed
into HIGH mode, the controller will change to
MEDIUM mode.
4. Low Burner Temperature: 300˚F (149˚C)
The controller will operate in Ignition Mode until
the burner temperature reaches this value plus the
Ignition Differential (variable 5).
If the burner temperature drops below this value
during MEDIUM mode, the controller will switch
to Ignition mode. Range: 100-470
5. Ignition Differential: 100˚F (38˚C)
The controller will continue in Ignition Mode until
the burner temperature is higher than the Low
Burner Temperature plus this value (300˚F + 100˚F
= 400˚F). If a third attempt is required, this value
is added to the target temperature again (300˚F +
100˚F + 100˚F = 500˚F). Range: 1-199
6. Ignition Duration: 10 min. (wood pellets)
20 min. (corn)
The amount of time in minutes Ignition mode will
run. The controller will make up to three attempts at
ignition, each for this amount of time, before a Fire
Out mode. Range: 1-100
7. Pellet Mode Enabled: 1
Be default, this variable is set to 1 and the controller
is congured to operate with premium quality
wood pellets as a fuel source. The controller also
has a modied program to help ignite lesser quality
wood pellets and/or corn. To enable, change this
setting to 0. If set to 0, several other variables will
automatically change to the corn default values.
Range: 0-1
18. Electric Ignition Selected: 1 (wood pellets)
0 (corn)
Changing this setting to 0 will disable electric
ignition assist. Range: 0-1
19. Electric Assist Duration: 0 (wood pellets)
61 (corn)
Time in minutes that the electric ignitor(s) will
remain on after Ignition Required Temperature
(variable 4) has been met. Setting this variable to
61 will keep the electric ignitor(s) on constantly.
Range: 0-61
20. Ignition Prime Duration: 15 (wood pellets)
2 (corn)
The augers will run for this amount of time in
seconds during the rst ignition attempt. Range:
0-255
21. 2nd Ignition Prime Duration: 30 (wood pellets)
1 (corn)
The augers will run for this amount of time in
seconds during the second ignition attempt. Range:
0-255
To Exit Setup Mode
Wait 15 seconds (while not pressing any buttons) and
the controller will automatically exit Setup Mode.

Central Boiler, Inc.
20502 160th Street
Greenbush, MN 56726
CentralBoiler.com
Printed in U.S.A. ©2015 Central Boiler
(p/n 9000317 - REV. A) • 24-JUL-2015
To Lock/Unlock Controller
The controller can be locked to prevent unauthorized
access to the controller settings. To lock the controller:
Press the Water Temp button four times within three
seconds. The LED display will indicate (locked)
for several seconds. To unlock the controller: Press the
Water Temp button four times within three seconds.
The LED display will indicate (unlocked) for
several seconds.
Power Outage
In the event of a power outage, the controller is
programmed to return to its previous state. If the system
was powered on, it will automatically restart.
Troubleshooting/System Restarting
If there appears to be a controller error, attempt to restart
the controller using the Power button. If a standard
restart fails to correct an apparent error, shut off the main
power at the source for one minute and then try again. If
that does correct an apparent error, contact your Central
Boiler dealer.
To restore to factory default settings:
Press the Power button to turn off the controller; then,
while pressing and holding the Water Temp button,
press the Power button to turn on the controller.
The LED display will indicate if the controller is
restored to factory default settings.
Other manuals for Fire Star II
1
Table of contents
Other Central Boiler Controllers manuals