Central Pneumatic 97014 Installation manual

ENGINE CLEANING GUN
WITH 4’ SIPHON HOSE
Model
97014
SET UP AND OPERATING INSTRUCTIONS
NOTE: 4’ Flexible Clear Vinyl Siphon Hose not shown.
Diagrams within this manual may not be drawn proportionally.
Due to continuing improvements, actual product may differ slightly from the product described herein.
Distributed exclusively by Harbor Freight Tools®.
3491 Mission Oaks Blvd., Camarillo, CA 93011
Visit our website at: http://www.harborfreight.com
Read this material before using this product.
Failure to do so can result in serious injury.
SAVE THIS MANUAL.
Copyright©2007 by Harbor Freight Tools®. All rights reserved. No portion of
this manual or any artwork contained herein may be reproduced in any shape
or form without the express written consent of Harbor Freight Tools.
For technical questions or replacement parts, please call 1-800-444-3353.

Page 2SKU 97014 For technical questions, please call 1-800-444-3353.
SAVE THIS MANUAL
Keep this manual for the safety warnings and precautions, assembly, operating,
inspection, maintenance and cleaning procedures. Write the product’s serial number in
the back of the manual near the assembly diagram (or month and year of purchase if
product has no number). Keep this manual and the receipt in a safe and dry place for
future reference.
IMPORTANT SAFETY INFORMATION
In this manual, on the labeling, and all other
information provided with this product:
This is the safety alert symbol. It is used to alert you to potential
personal injury hazards. Obey all safety messages that follow this
symbol to avoid possible injury or death.
DANGER indicates a hazardous situation
which, if not avoided, will result in death or
serious injury.
WARNING indicates a hazardous situation
which, if not avoided, could result in death
or serious injury.
CAUTION, used with the safety alert
symbol, indicates a hazardous situation
which, if not avoided, could result in minor
or moderate injury.
NOTICE is used to address practices not
related to personal injury.
CAUTION, without the safety alert symbol,
is used to address practices not related to
personal injury.
DANGERDANGER
WARNINGWARNING
CAUTIONCAUTION
NOTICENOTICE
CAUTIONCAUTION

Page 3SKU 97014 For technical questions, please call 1-800-444-3353.
GENERAL SAFETY RULES
WARNING! Read all instructions
Failure to follow all instructions listed below may result in serious injury.
SAVE THESE INSTRUCTIONS
Work area safety
Keep work area clean and well lit. Cluttered or dark areas invite accidents.
Keep children and bystanders away while operating this high pressure
Engine Cleaning Gun. Distractions can cause you to lose control.
Personal safety
Stay alert, watch what you are doing and use common sense when
operating. Do not use while you are tired or under the inuence of drugs,
alcohol or medication. A moment of inattention while operating may result in
serious personal injury.
Use safety equipment. Always wear ANSI-approved safety goggles.
Safety equipment such as full face shield, work gloves and non-skid
safety shoes, used for appropriate conditions will reduce personal
injuries.
Do not overreach. Keep proper footing and balance at all times. This
enables better control in unexpected situations.
Power tool use and care
Use the correct tool for your application. The correct tool will do the job
better and safer at the rate for which it was designed.
Do not use the Engine Cleaning Gun if the Knurled Knob Trigger will not start
and completely stop the action of this tool. Any tool that cannot be controlled
with the Trigger/Switch is dangerous and must be repaired.
Disconnect the air supply before making any adjustments or storing
the Engine Cleaning Gun. Such preventive safety measures reduce the
risk of activating the tool accidentally.
Store this tool out of the reach of children and do not allow persons
unfamiliar with the Engine Cleaning Gun or these instructions to
operate this tool. Tools are dangerous in the hands of untrained users.
Before use, check for Siphon Hose leaks and any other condition that may
affect the tool’s operation. If damaged, have the tool repaired before use.
Many accidents are caused by poorly maintained tools.
Use this Engine Cleaning Gun in accordance with these instructions and
in the manner intended for the particular type of tool, taking into account
the working conditions and the work to be performed. Use of the Engine
Cleaning Gun for operations different from those intended could result in a
hazardous situation.
1.
a.
b.
3.
a.
b.
c.
4.
a.
b.
c.
d.
e.
f.

Page 4SKU 97014 For technical questions, please call 1-800-444-3353.
Service
Have your Engine Cleaning Gun serviced by a qualied repair person using
only identical replacement parts. This will ensure that the safety of the tool is
maintained.
SPECIFIC SAFETY RULES
WARNING! To prevent serious injury and/or property damage:
Use with approved engine cleaning uids only.
Wear ANSI-approved safety glasses under full face shield, along with a dust
mask during use. Wear work gloves to protect your hands.
Do not use near ignition sources.
Use for intended purposes only, and use in well ventilated areas.
Do not exceed maximum air pressure of 90 PSI.
Do not point the Engine Cleaning Gun at people, animals or yourself at anytime.
Inspect before use; do not use if parts are loose, or damaged.
Read and follow all manufacturers instructions, safety warnings and procedures
for the air compressor you use with this Engine Cleaning Gun
Do not clean or touch hot engine. Always let engine cool before using this tool.
Maintain labels and nameplates on the tool. These carry important safety
information. If unreadable or missing, contact Harbor Freight Tools for a
replacement.
Prepare to begin work before attaching the air supply and/or turning on the tool.
When using a handheld power tool, maintain a rm grip on the tool with both
hands at startup.
Do not leave the tool unattended when it is attached to an air supply. Turn off
the tool, and disconnect the air supply before leaving.
WARNING: The brass components of this product contain lead, a chemical
known to the State of California to cause birth defects (or other reproductive
harm). (California Health & Safety code § 25249.5, et seq.)
This product is not a toy. Keep it out of reach of children.
The warnings, precautions, and instructions discussed in this instruction manual
cannot cover all possible conditions and situations that may occur. It must be
understood by the operator that common sense and caution are factors which
cannot be built into this product, but must be supplied by the operator.
5.
a.
1.
2.
3.
4.
5.
6.
7.
8.
9.
10.
11.
12.
13.
14.
15.
16.

Page 5SKU 97014 For technical questions, please call 1-800-444-3353.
SPECIFICATIONS
Construction Materials
Nozzle: Brass
Nozzle Tip, Coupler Fittings and Knurled Knob Trigger: Zinc
Housing: Aluminum
O-Ring: Rubber
Operating Air Pressure 60 PSI
Maximum Air Pressure 90 PSI
Air Consumption 3.0 CFM @ 60 PSI
Air Inlet Size 1/4-18 NPT
Activation Method Push Spring Loaded Knurled Knob Trigger
UNPACKING
When unpacking, check to make sure that the item is intact and undamaged. If
any parts are missing or broken, please call Harbor Freight Tools at the number shown
on the cover of this manual as soon as possible.
SET UP INSTRUCTIONS
Read the ENTIRE IMPORTANT SAFETY INFORMATION section at the
beginning of this manual including all text under subheadings therein
before set up or use of this product.
Disconnect this Engine Cleaning Gun from its air supply
before making any adjustments to the tool.
Note: For additional information regarding the parts listed in the following pages, refer
to the Assembly Diagram near the end of this manual.
Assembly
There is no assembly required.
OPERATING INSTRUCTIONS
Read the ENTIRE IMPORTANT SAFETY INFORMATION section at the
beginning of this manual including all text under subheadings therein
before set up or use of this product.
WARNINGWARNING

Page 6SKU 97014 For technical questions, please call 1-800-444-3353.
Tool set up
Hose, hose connections, air valve, oiler, lter, regulator, hose reel are not
included with this tool but are available at Harbor Freight Tools.
General operating instructions
Before using, disconnect the positive battery cable of the engine you will be
cleaning.
Attach the air supply to the Air Inlet (3) of the Engine Cleaning Gun.
Turn on your air supply.
Set the compressor air regulator to 60 PSI. Do not exceed maximum air
pressure of 90 PSI.
Be sure to wear a full face shield with ANSI-approved safety goggles and a dust
mask to prevent back spray from contacting your eyes, nose or mouth while
using this tool.
Knurled Knob Trigger (5)
Figure 1
Siphon Control
Knob (6)
Point the Engine Cleaning Gun in a safe direction and press the Knurled Knob
Trigger (5) quickly and release. The Gun should start and stop completely. If it
does not, do not use until it can be adjusted or repaired. See Figure 1.
Place end of Siphon Hose (2) into a container of engine cleaning solution.
1.
2.
3.
4.
5.
6.
7.

Page 7SKU 97014 For technical questions, please call 1-800-444-3353.
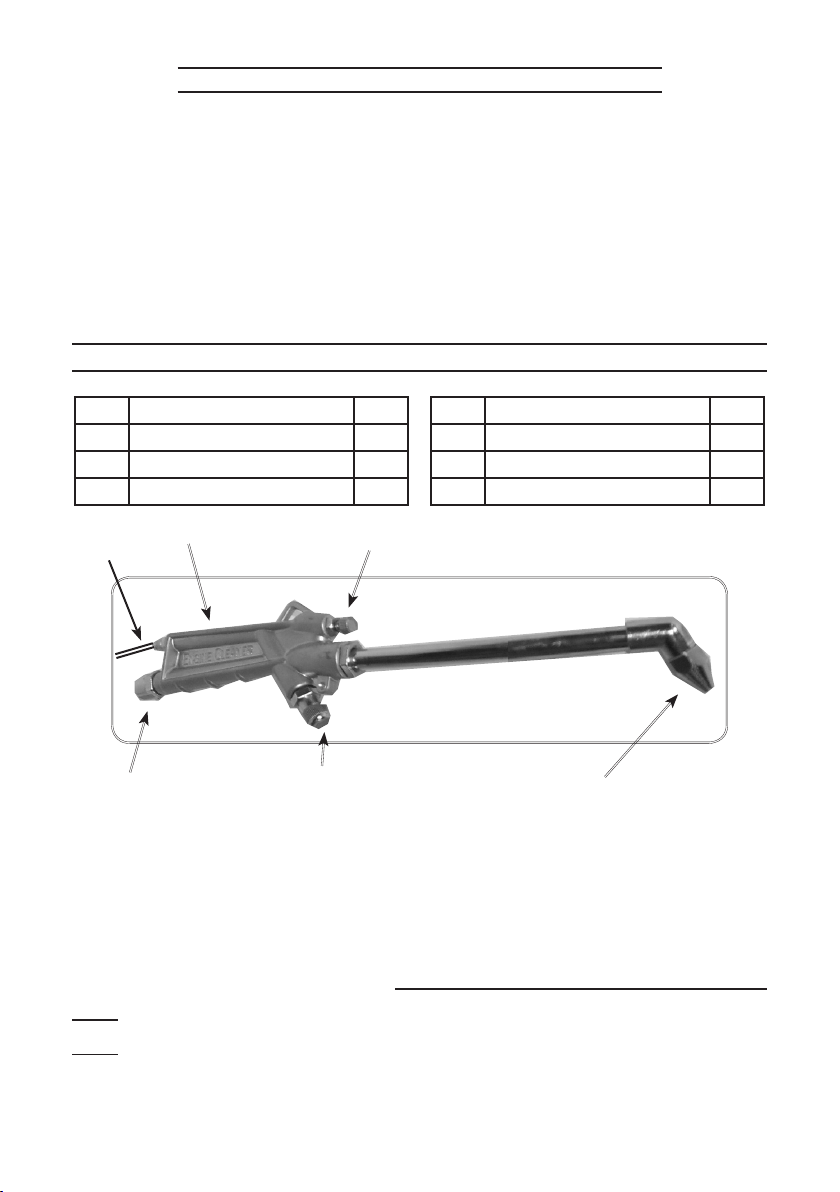
You can adjust the amount of engine cleaning solution being used by turning the
Siphon Control Knob (6) counterclockwise for more solution and clockwise for
less. See Figure 1 on page 6.
Hold the end of the Spray Nozzle (4) approximately 6 to 10 inches from the
engine and squeeze the Knurled Knob Trigger (5).
It is best to keep the Gun in motion with a back and forth action.
When the job is completed, ush the Siphon Hose (2) by placing it into a
container lled with clean, clear water and spraying it in a safe direction until
only clean water comes from the Spray Nozzle (4).
To prevent accidents, disconnect the air supply after use and store the tool
indoors out of children’s reach.
8.
9.
10.
11.
12.
MAINTENANCE AND SERVICING
Before performing any inspection, maintenance, or
cleaning procedures, disconnect the air supply.
Damaged equipment can fail, causing serious personal
injury. Do not use damaged equipment. If anything
abnormal occurs, have the problem corrected before
further use.
Cleaning, maintenance, and lubrication
BEFORE EACH USE, inspect the general condition of the tool. Check for
loose hose connections, cracked hoses, inoperative trigger and siphon control,
cracked or broken parts, and any other condition that may affect its safe
operation.
AFTER USE, clean external surfaces of the tool with clean, moist cloth.
Troubleshooting
Problem Possible Causes Probable Solutions
Tool has low air
output
Broken hoses, loose connections
Air regulator not set at proper PSI
Siphon Control Knob in a closed
position
1.
2.
3.
Check all hoses for leaks
and connections. Replace if
necessary.
Check, make sure Air Regulator is
set at 60 PSI
Open the Siphon Valve
1.
2.
3.
1.
2.
WARNINGWARNING

Page 8SKU 97014 For technical questions, please call 1-800-444-3353.
PLEASE READ THE FOLLOWING CAREFULLY
THE MANUFACTURER AND/OR DISTRIBUTOR HAS PROVIDED THE PARTS LIST AND
ASSEMBLY DIAGRAM IN THIS MANUAL AS A REFERENCE TOOL ONLY. NEITHER THE
MANUFACTURER OR DISTRIBUTOR MAKES ANY REPRESENTATION OR WARRANTY OF
ANY KIND TO THE BUYER THAT HE OR SHE IS QUALIFIED TO MAKE ANY REPAIRS TO
THE PRODUCT, OR THAT HE OR SHE IS QUALIFIED TO REPLACE ANY PARTS OF THE
PRODUCT. IN FACT, THE MANUFACTURER AND/OR DISTRIBUTOR EXPRESSLY STATES
THAT ALL REPAIRS AND PARTS REPLACEMENTS SHOULD BE UNDERTAKEN BY CERTIFIED
AND LICENSED TECHNICIANS, AND NOT BY THE BUYER. THE BUYER ASSUMES ALL RISK
AND LIABILITY ARISING OUT OF HIS OR HER REPAIRS TO THE ORIGINAL PRODUCT OR
REPLACEMENT PARTS THERETO, OR ARISING OUT OF HIS OR HER INSTALLATION OF
REPLACEMENT PARTS THERETO.
PARTS LIST AND PHOTO
Part Description Q’ty
1 Engine Cleaning Gun Body 1
2 4’ Siphon Hose 1
3 Air Inlet 1
Part Description Q’ty
4 Spray Nozzle 1
5 Knurled Knob Trigger 1
6 Siphon Control Knob 1
35
6
4
1
Record Product’s Serial Number Here:
Note: If product has no serial number, record month and year of purchase instead.
Note: Some parts are listed and shown for illustration purposes only, and are not
available individually as replacement parts.
2

Page 9SKU 97014 For technical questions, please call 1-800-444-3353.
LIMITED 90 DAY WARRANTY
Harbor Freight Tools Co. makes every effort to assure that its products meet high
quality and durability standards, and warrants to the original purchaser that this product
is free from defects in materials and workmanship for the period of 90 days from the date
of purchase. This warranty does not apply to damage due directly or indirectly, to misuse,
abuse, negligence or accidents, repairs or alterations outside our facilities, criminal activity,
improper installation, normal wear and tear, or to lack of maintenance. We shall in no event
be liable for death, injuries to persons or property, or for incidental, contingent, special
or consequential damages arising from the use of our product. Some states do not allow
the exclusion or limitation of incidental or consequential damages, so the above limitation
of exclusion may not apply to you. THIS WARRANTY IS EXPRESSLY IN LIEU OF ALL
OTHER WARRANTIES, EXPRESS OR IMPLIED, INCLUDING THE WARRANTIES OF
MERCHANTABILITY AND FITNESS.
To take advantage of this warranty, the product or part must be returned to us
with transportation charges prepaid. Proof of purchase date and an explanation of the
complaint must accompany the merchandise. If our inspection veries the defect, we
will either repair or replace the product at our election or we may elect to refund the
purchase price if we cannot readily and quickly provide you with a replacement. We will
return repaired products at our expense, but if we determine there is no defect, or that
the defect resulted from causes not within the scope of our warranty, then you must bear
the cost of returning the product.
This warranty gives you specic legal rights and you may also have other rights
which vary from state to state.
3491 Mission Oaks Blvd. • PO Box 6009 • Camarillo, CA 93011 • (800) 444-3353
Table of contents
Other Central Pneumatic Tools manuals

Central Pneumatic
Central Pneumatic 42332 User manual

Central Pneumatic
Central Pneumatic 95793 User manual

Central Pneumatic
Central Pneumatic 97456 Installation manual

Central Pneumatic
Central Pneumatic 46061 Owner's manual

Central Pneumatic
Central Pneumatic 98672 Installation manual

Central Pneumatic
Central Pneumatic 92857 User manual

Central Pneumatic
Central Pneumatic 32940 Parts list manual

Central Pneumatic
Central Pneumatic 95211 Original instruction manual

Central Pneumatic
Central Pneumatic 95801 Parts list manual

Central Pneumatic
Central Pneumatic 95826 Parts list manual