manuals.online logo
Brands
  1. Home
  2. •
  3. Brands
  4. •
  5. Certikin
  6. •
  7. Underwater Lighting
  8. •
  9. Certikin PU9CLS User manual

Certikin PU9CLS User manual

Other Certikin Underwater Lighting manuals

Certikin PU9CS User manual

Certikin

Certikin PU9CS User manual

Certikin CKSS358 User manual

Certikin

Certikin CKSS358 User manual

Certikin PU9LS User manual

Certikin

Certikin PU9LS User manual

Popular Underwater Lighting manuals by other brands

S.R.Smith Mod-Lite PowerPass Wireless Faq

S.R.Smith

S.R.Smith Mod-Lite PowerPass Wireless Faq

Keldan VIDEO 18X 25000lm CRI82 operating instructions

Keldan

Keldan VIDEO 18X 25000lm CRI82 operating instructions

Oase ProfiLux Garden LED RGB operating instructions

Oase

Oase ProfiLux Garden LED RGB operating instructions

Oceanled DISCOVER D3 Installation & operation manual

Oceanled

Oceanled DISCOVER D3 Installation & operation manual

NORBIT AQUA FCL600 quick guide

NORBIT

NORBIT AQUA FCL600 quick guide

LIGMAN NEMO 2 installation manual

LIGMAN

LIGMAN NEMO 2 installation manual

Luxor LED-SUWL30-XX user manual

Luxor

Luxor LED-SUWL30-XX user manual

RGBlue System 01/02:re instruction manual

RGBlue

RGBlue System 01/02:re instruction manual

LIGMAN OR-60895 installation manual

LIGMAN

LIGMAN OR-60895 installation manual

hentech HT023C instruction manual

hentech

hentech HT023C instruction manual

hentech HT001BL-T1 instruction manual

hentech

hentech HT001BL-T1 instruction manual

OMD 5000w Tungsten Instructions for use

OMD

OMD 5000w Tungsten Instructions for use

EVA EVA Q2 MONO Mounting instructions

EVA

EVA EVA Q2 MONO Mounting instructions

EasyPro EPL20 Instructions for operation

EasyPro

EasyPro EPL20 Instructions for operation

PXM PxAqua 3 SF 12V user manual

PXM

PXM PxAqua 3 SF 12V user manual

LIGMAN ANNET 1 installation manual

LIGMAN

LIGMAN ANNET 1 installation manual

ccei Mini Brio M12 Technical manual

ccei

ccei Mini Brio M12 Technical manual

Oceanled Sport Colours DMX 012117CD Product guide

Oceanled

Oceanled Sport Colours DMX 012117CD Product guide

manuals.online logo
manuals.online logoBrands
  • About & Mission
  • Contact us
  • Privacy Policy
  • Terms and Conditions

Copyright 2025 Manuals.Online. All Rights Reserved.

Instalaciín típica de iluminación
acuática en piscinas con
recubrimento de hormigón / postigo
Beton / Verschaulungs becken
Piscina in calcestruzzo con
dispositivi di chiusura
Installation standard pour projecteur
de piscine a cloison / en beton
Instalação de luz subaquática em
piscinas de betão / com cofragem
Concrete / Shutter Pool
Underwater Light Installation
ES
D
IT
FR
PT
05.02.02
1
Installation of all Certikin underwater lighting equipment must comply with IEE 16th edition, with
particular reference to section 206 concerning swimming pool installations.
IMPORTANT - Never switch light on when pool is empty. If this light is being used in a commercial
installation it is advisable to use an impact resistant lens cover (Certikin code PU16).
GB Part No PU9CLS For Concrete / Shutter Installation
La instalación de todos los equipos de iluminación acuática de Certikin debe cumplir la 16 edición de la
norma IEE, con referencia especial a la sección 206 concerniente a las instalaciones de piscinas.
IMPORTANTE - Nunca encender la luz cuando la piscina se encuentre vacía. Si la iluminación es utilizada
en una instalación comercial se recomienda la utilización de un protector de cristal contra los golpes.
(referencia Certin PU16).
ES Referencia : PU9CLS Instalaciín típica de iluminación acuática en
piscinas con recubrimento de hormigón / postigo
Die Installation aller Ausrüstungen für Unterwasserbeleuchtungen von Certikin muß der 16. Ausgabe der
IEE - Richtlinien entsprechen, insbesondere bezüglich des Abschnitts 206 über die Installation von
Schwimmbecken.
WICHTIG - Niemals das Licht einschalten, während das Becken leer ist. Wenn die Beleuchtung in einer
kommerziellen Installation eingesetzt wird, sollte eine schlagfeste Abdecklinse (Certikin Nr. PU16)
verwendet werden.
DTeil No PU9CLS Beton / Verschalungs becken
L’installazione di tutti i proiettori subacquei Certikin deve essere conforme alla 16a edizione IEE con particolare
riferimento alla sezione 206 sulle installazioni per piscina.
IMPORTANTE - Non accendere mai il proiettore a piscina vuota. Se questo proiettore viene usato in un’instal-
lazione commerciale, si consiglia l’uso di calotta di protezione lente resistente all’urto (codice Certin PU16).
IT Parte No PU9CLS Piscina in calcestruzzo con dispositivi di chiusura
2
L’installation de tout equipment d’eclairage immergé doit être en conformite avec la reglementation IEE 16 me
édition, avec référence particuli re à la section 206 concernant les installations de piscine.
IMPORTANT - Ne jamais faire fonctionner l’éclairage lorsque la piscine est vide. Si cet éclairage est en
fonctionnement dans les installations commerciales il est conseillé d’utiliser une lentille protectrice résistante
au choc (code Certikin PU16).
FR Piece No PU9CLS Installation standard pour projecteur de piscine a
cloison / en beton
A instalação de todo o equipamento de iluminação subaquática Certikin deve obedecer à norma IEE, 16ª edição,
com referência especial à secção 206 relativa a instalações em piscinas.
IMPORTANTE – Nunca ligue a luz quando a piscina estiver vazia. Se esta luz vai ser usada numa instalação
comercial, é aconselhável utilizar uma tampa na lente resistente a impacto (código Certikin PU16).
PT Nº de Peça PU9CLS – Para instalação em betão / com cofragem
Concrete / Shutter Pool Installation
SPC459
Figure 1
SPC465S
A
B
3
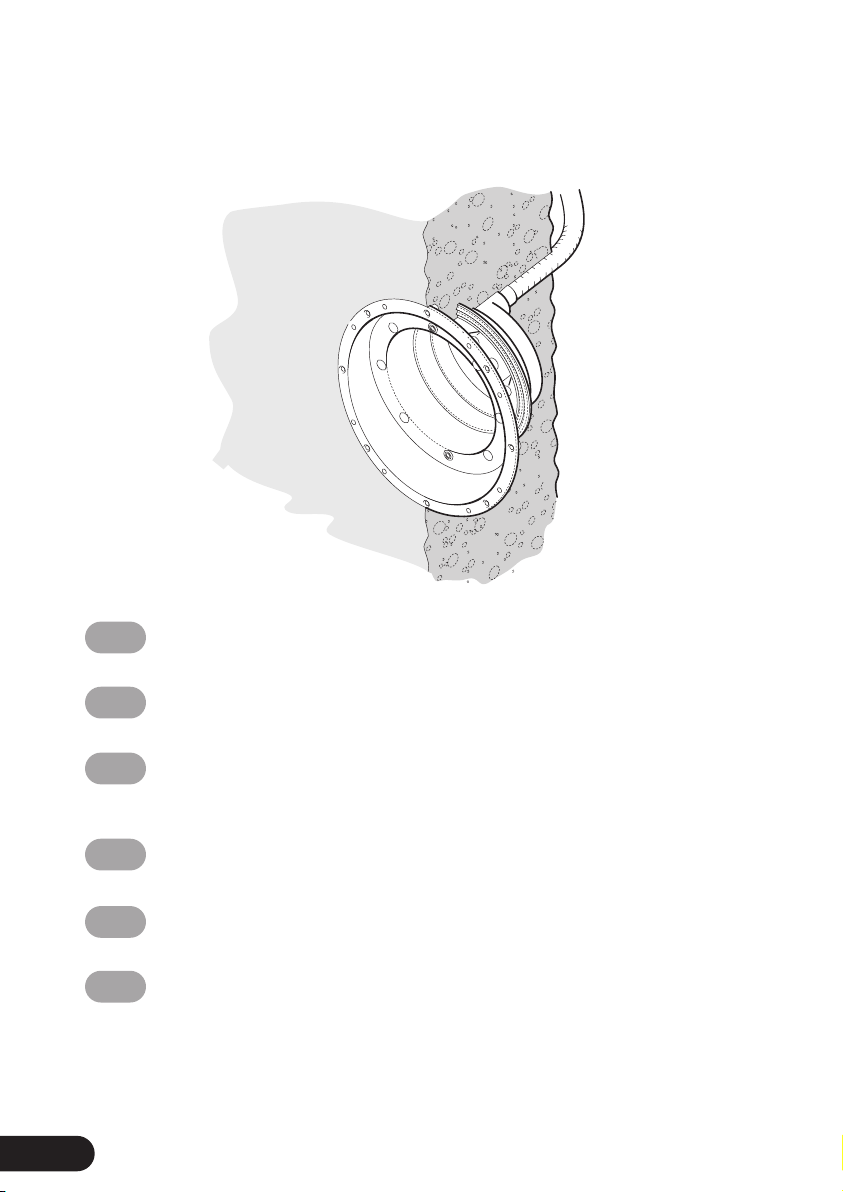
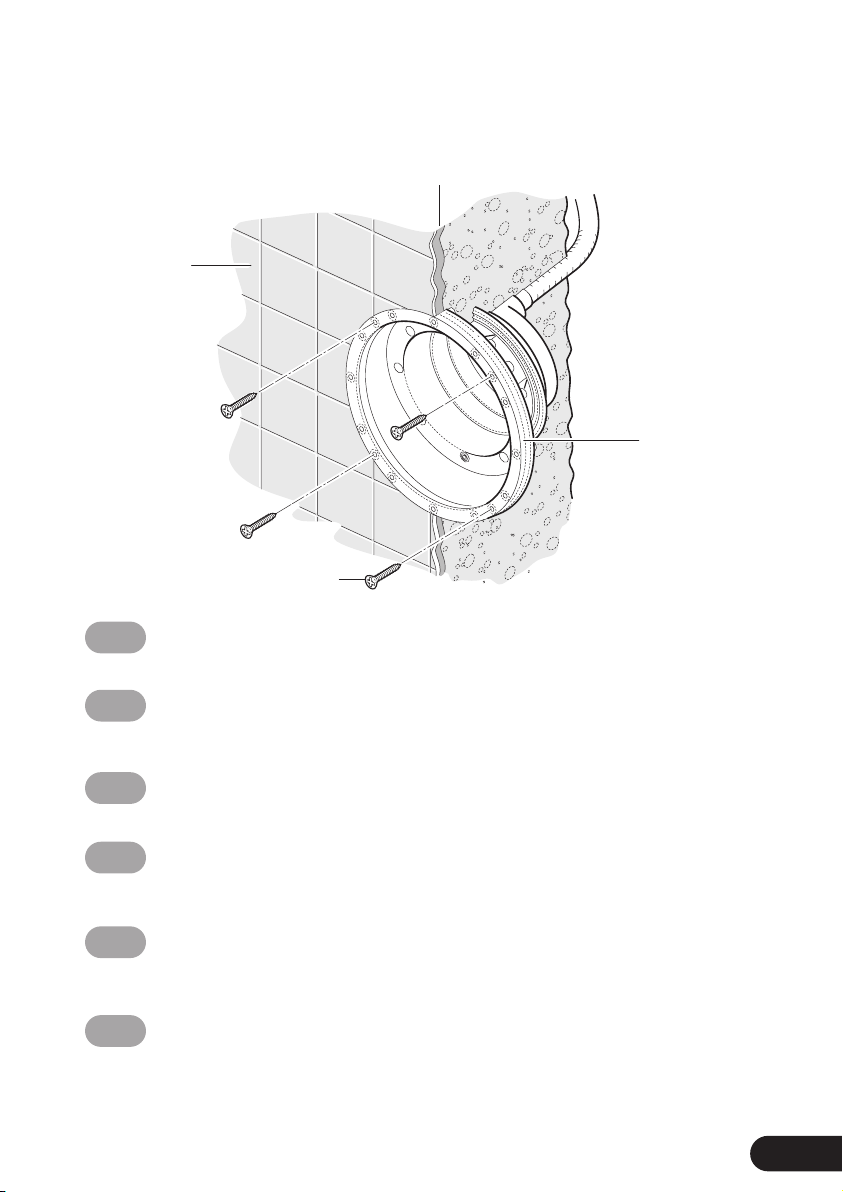
GB Use front of niche as a template to drill holes for 4 no. screws to hold niche to shutter. (Use holes
indicated y (*)). Position niche etween shutters A & B and fix using 1 1/4” or 11/2” screws depending
on the thickness of the shutter. Thread the flexi le conduit (SPC465S) into the opening in the ack of the
niche (using silicone or mastic to seal the thread), prior to ack filling. NB The approximate distance
etween the centre of the lamp and the final water level should e 750mm.
ES Utilizar el orde frontal del nicho como plantilla para taladrar los agujeros para los cuatro tornillos para
sujetar el nicho al hormigón (utilizar los agujeros indicados con (*)). Colocar el nicho entre las capas de
hormigón (A,B) y sujetarlo utilizando tornillos de 11/4o 11/2dependiendo del grosor de la capa de hormigón.
Enroscar el tu o flexi le (SPC465S) por la a ertura en la parte posterior del nicho (utilizando silicona o
masilla para sellar la rosca), antes de realizar el relleno. Nota : La distancia aproximada entre el centro de
la làmpara y el nivel final del agua de e ser 750 mm.
DVerwenden Sie die Gehäusevorderseite als Scha lone, wenn Sie die vier Löcher für die
Befestigungschrau en des Gehäuses ohren ( enutzen Sie die mit * gekennzeichneten Bohrungen).
Positionieren Sie das Gehäuse zwischen den Verschalungen und efestigen Sie es je nach der Dicke der
Verschalungen mit den 11/4” oder 11/2” Schrau en. Drehen Sie vor dem Auffüllen das flexi le Isolierrohr
(SPC465S) in die Öffnung auf der Gehäuserückseite. Verwenden Sie da ei Silikon oder Harz, um das
Gewinde a zudichten. Achten Sie darauf, daß der A stand zwischen Lampenmitte und der
Wassero erfläche etwa 750 mm eträgt.
IT Usare il davanti della nicchia come sagoma per trapanare i fori per 4 viti che fissino la nicchia al
dispositivo di chiusura (usare i fori indicati con asterisco (*)). Posizionare la nicchia tra i dispositivi di
chiusura (A,B) e fissarla usando viti da 11/4”o11/2” a seconda dello spessore del dispositivo di chiusura
stesso. Prima di effettuare il riempimento, infilare il tu o flessi ile (SPC465S) nell’apertura sul retro
della nicchia (usare del silicone o del mastice per sigillare la filettatura). N.B.: La distanza
approssimativa tra il centro della lampada ed il livello finale dell’acqua dovre e essere 750 mm.
FR Utilisez l’avant du logement comme ga arit pour percer des trous pour vis no4 afin de maintenir le
logement à la cloison - utilisez les trous indiqués par une (*). Positionnez le logement entre les cloisons
et fixez-le en utilisant des vis 11/4” ou 11/2” en fonction de l’épaisseur de la cloison. Enfilez le flexi le
(SPC465S) dans l’ouverture à l’arriére du logement (en utilisant du silicone ou mastic pour sceller le
filetage) avant de l’em oîter par derriére. NB : La distance approximative entre le centre de la lampe et
le niveau définitif de l’eau devrait être de 750 mm.
PT Use a frente do nicho como ga arito para a rir os orifícios destinados aos 4 parafusos que vão fixar o
nicho à comporta. (Use os orifícios indicados por (*)). Posicione o nicho entre os pontos A e B e fixe uti-
lizando parafusos de 1?” ou 1?”, consoante a espessura da comporta. Enrosque o tu o flexível
(SPC465S) na a ertura da parte de trás do nicho (usando silicone ou mástique para vedar a rosca), antes
de voltar a encher. N.B.: A distância aproximada entre o centro da lâmpada e o nível final da água deve
ser de 750 mm.
4
5
Concrete / Shutter Pool Installation
GB Backfill with concrete, taking care not to crush the conduit. When the concrete has set,
remove screws and shutters leaving niche set in concrete.
ES Rellenar con hormigón, teniendo cuidado para no romper el tu o. Cuando el cemento se haya
asentado, quitar los tornillos dejando el nicho sujeto por el cemento.
DFüllen Sie die Verschalung mit Beton, ohne da ei das Isolierrohr zu eschädigen. Wenn der
Beton fest geworden ist, entfernen Sie die Schrau en und Verschalungen, das Gehäuse
ver lei t im Beton.
IT Riempire di calcestruzzo, prestando attenzione a non schiacciare il tu o. Quando il calcestruzzo
si è asciugato togliere le viti e i dispositivi di chiusura lasciando la nicchia nel calcestruzzo.
FR Remplir avec du éton en prenant soin de ne pas écraser le conduit. Lorsque le éton s’est
solidifié, retirez les vis et les cloisons laissant le logement pris dans le éton.
PT Encha com etão, tomando cuidado para não esmagar o tu o. Quando o etão tiver secado,
tire os parafusos e comportas deixando o nicho engastado no etão.
Figure 2
6
Concrete / Shutter Pool Installation
Figure 3
D
SPC438
C
SPC459S
GB Add spacer rings to match thickness of screed (C) and tile finish. (D)
Fix using 1 1/4” or 1 1/2” screws depending on how many spacers are required.
ES Añadir las arandelas espaciadoras para ajustarse al grosor de la capa de mortero (C) y el
aca ado de azulejos (D). Sujetar utilizando los tornillos de 11/4o 11/2dependiendo del número
de arandelas espaciadoras que se necesiten.
DAr eiten Sie mit A standringen, um die Dicke von Estrich (C) und Kacheln (D) auszugleichen.
Verwenden Sie je nach der Anzahl der erforderlichen A standringe 11/4” oder 11/2” Schrau en.
IT Aggiungere il numero di distanziali necessari per eguagliare lo spessore della guida (C)
(dell’intonaco) e della finitura a mattonelle (D). Fissare usando viti da 11/4” oppure 11/2” a
seconda del numero di distanziali richiesti.
FR Ajoutez des anneaux d’espacement afin de rattraper l’épaisseur du guide (C) et de la finition
en carrelage (D). Fixez en utilisant des vis 11/4” ou 11/2” en fonction du nom re d’anneau
d’espacement nécessaire.
PT Adicione anéis espaçadores para igualar a espessura da argamassa (C) e do revestimento de azulejo
(D). Fixe utilizando parafusos de 1?” ou 1?”, consoante o número de espaçadores necessários.
7
Concrete / Shutter Pool Installation
Figure 4
SPC471
SPC476
SPC438
8
GB Fix front ring using 12 no. 11/4” self-tapping screws. Finish using clip-on cover
plate (finishing facia)
ES Sujetar la arandela frontal utilizando los 12 tirafondos de 11/4Aca ar colocando el
em ellecedor.
DBefestigen Sie den Vorderring mit 12 Trei schrau en 11/4” Bringen Sie zur Fertigstellung die
A schluß lende an.
IT Montare l’anello frontale usando 12 viti autofilettanti da 11/4”. Concludere usando la piastra di
copertura aggancia ile (fascia di finitura).
FR Fixez l’anneau avant en utilisant les vis auto taraudeuse no12 11/4”. Terminez en utilisant une
plaque de protection à clipser (pièce de protection).
PT Fixe o anel dianteiro utilizando 12 parafusos auto-roscantes de 1?”. Termine montando a placa
de co ertura de encaixar (cercadura de aca amento).
Concrete / Shutter Pool Installation
SPC976
Figure 5
SPC977
SPC465S
M20
M25
SPC980
SPC979
PU10N
9
GB Screw the “Micallef” gland ody (SPC976) up into the ase of the deck ox (PU10N) using silicone or mastic
to seal the thread. Thread the remaining end of the flexi le conduit (SPC465S) into the gland. Place the
lack ru er ush (SPC979) and the resin washer (SPC980) into the recess of the ase of the deck ox and
screw the “Micallef” gland nut (SPC977) onto this washer. Select which side opening is required for the
connection of the transformer ca le and seal the unwanted opening using one of the red threaded plugs
provided. The deck ox is now ready to e wired.