manuals.online logo
Brands
  1. Home
  2. •
  3. Brands
  4. •
  5. Certikin
  6. •
  7. Underwater Lighting
  8. •
  9. Certikin PU9LS User manual

Certikin PU9LS User manual

Other Certikin Underwater Lighting manuals

Certikin PU9CLS User manual

Certikin

Certikin PU9CLS User manual

Certikin PU9CS User manual

Certikin

Certikin PU9CS User manual

Certikin CKSS358 User manual

Certikin

Certikin CKSS358 User manual

Popular Underwater Lighting manuals by other brands

S.R.Smith Mod-Lite PowerPass Wireless Faq

S.R.Smith

S.R.Smith Mod-Lite PowerPass Wireless Faq

Keldan VIDEO 18X 25000lm CRI82 operating instructions

Keldan

Keldan VIDEO 18X 25000lm CRI82 operating instructions

Oase ProfiLux Garden LED RGB operating instructions

Oase

Oase ProfiLux Garden LED RGB operating instructions

Oceanled DISCOVER D3 Installation & operation manual

Oceanled

Oceanled DISCOVER D3 Installation & operation manual

NORBIT AQUA FCL600 quick guide

NORBIT

NORBIT AQUA FCL600 quick guide

LIGMAN NEMO 2 installation manual

LIGMAN

LIGMAN NEMO 2 installation manual

Luxor LED-SUWL30-XX user manual

Luxor

Luxor LED-SUWL30-XX user manual

RGBlue System 01/02:re instruction manual

RGBlue

RGBlue System 01/02:re instruction manual

LIGMAN OR-60895 installation manual

LIGMAN

LIGMAN OR-60895 installation manual

hentech HT023C instruction manual

hentech

hentech HT023C instruction manual

hentech HT001BL-T1 instruction manual

hentech

hentech HT001BL-T1 instruction manual

OMD 5000w Tungsten Instructions for use

OMD

OMD 5000w Tungsten Instructions for use

EVA EVA Q2 MONO Mounting instructions

EVA

EVA EVA Q2 MONO Mounting instructions

EasyPro EPL20 Instructions for operation

EasyPro

EasyPro EPL20 Instructions for operation

PXM PxAqua 3 SF 12V user manual

PXM

PXM PxAqua 3 SF 12V user manual

LIGMAN ANNET 1 installation manual

LIGMAN

LIGMAN ANNET 1 installation manual

ccei Mini Brio M12 Technical manual

ccei

ccei Mini Brio M12 Technical manual

Oceanled Sport Colours DMX 012117CD Product guide

Oceanled

Oceanled Sport Colours DMX 012117CD Product guide

manuals.online logo
manuals.online logoBrands
  • About & Mission
  • Contact us
  • Privacy Policy
  • Terms and Conditions

Copyright 2025 Manuals.Online. All Rights Reserved.

Instalación típica de iluminación
acuática en piscinas con
recubrimiento de paneles
Beckon mit wandauskleidung
Piscina con camicia rivestimento
di c iusura
Installation standard pour
piscine a pans de mur avec liner
Instalação de luz subaquática
em piscinas de painéis
Panel Pool
Underwater Lig t
Installation
ES
D
IT
FR
PT
05.02.02
Installation of all Certikin underwater lighting equipment must comply with IEE 16th edition, with
particular reference to section 206 concerning swimming pool installations.
IMPORTANT - Never switch light on when pool is empty. If this light is being used in a commercial
installation it is advisable to use an impact resistant lens cover (Certikin code PU16).
1
GB Part No PU9LS - Panel Liner Pool Installation
La instalación de todos los equipos de iluminación acuática de Certikin debe cumplir la 16 edición de la
norma IEE, con referencia especial a la sección 206 concerniente a las instalaciones de piscinas.
IMPORTANTE - Nunca encender la luz cuando la piscina se encuentre vacía. Si la iluminación es utilizada
en una instalación comercial se recomienda la utilización de un protector de cristal contra los golpes.
(referencia Certin PU16).
ES Referencia : PU9LS Instalación típica de iluminación acuática en
piscinas con recubrimiento de paneles
Die Installation aller Ausrüstungen für Unterwasserbeleuchtungen von Certikin muß der 16. Ausgabe der
IEE - Richtlinien entsprechen, insbesondere bezüglich des Abschnitts 206 über die Installation von
Schwimmbecken.
WICHTIG - Niemals das Licht einschalten, während das Becken leer ist. Wenn die Beleuchtung in einer
kommerziellen Installation eingesetzt wird, sollte eine schlagfeste Abdecklinse (Certikin Nr. PU16)
verwendet werden.
DTeil No PU9LS - Becken mit wandauskleidung
L’installazione di tutti i proiettori subacquei Certikin deve essere conforme alla 16a edizione IEE con parti-
colare riferimento alla sezione 206 sulle installazioni per piscina.
IMPORTANTE - Non accendere mai il proiettore a piscina vuota. Se questo proiettore viene usato in
un’installazione commerciale, si consiglia l’uso di calotta di protezione lente resistente all’urto (codice
Certin PU16).
IT Parte No PU9LS - Piscina con rivestimento liner in PVC
L’installation de tout equipment d’eclairage immergé doit être en conformite avec la reglementation IEE
16 me édition, avec référence particuli re à la section 206 concernant les installations de piscine.
IMPORTANT - Ne jamais faire fonctionner l’éclairage lorsque la piscine est vide. Si cet éclairage est en
fonctionnement dans les installations commerciales il est conseillé d’utiliser une lentille protectrice
résistante au choc (code Certikin PU16).
FR Piece No PU9LS - Installation standard pour piscine a pans
de mur avec linerPart No PU9LS - Panel Liner Pool Installation
A instalação de todo o equipamento de iluminação subaquática Certikin deve obedecer à norma IEE, 16ª
edição, com referência especial à secção 206 relativa a instalações em piscinas.
IMPORTANTE – Nunca ligue a luz quando a piscina estiver vazia. Se esta luz vai ser usada numa insta-
lação comercial, é aconselhável utilizar uma tampa na lente resistente a impacto (código Certikin PU16).
PT Nº de Peça PU9LS – Instalação em piscinas com revestimento de painéis
2
Panel Liner Pool Installation
Ø 5mm
Ø 312.5mm
*
*
*
Figure 1
3
*
4
GB Cut aperture in panel wall as per diagram (294mm Dia). The front lip of the niche can be used as a
template for the 16 no. 5mm holes (for holding screws) after the aperture has been cut out. NB the
approximate distance between the centre of the lamp and the final water level should be 750mm.
* = Securing holes for no.4 3/4” screws.
ES Cortar una abertura en el panel de la pared según el diagrama indicado (294 mm diámetro). El borde
frontal del nicho puede utilizarse como plantilla para los 16 agujeros de 5 mm (para tornillos de suje-
ción) una vez que se ha hecho la abertura. La distancia aproximada entre el centro de la lámpara y el
nivel de agua final debe ser de 750 mm. * = agujeros de sujeción para 4 tirafondos de 3/4pulgadas
DSchneiden Sie eine Öffnung mit einem Durchmesser von 294 mm in die Wandung (siehe Diagramm).
Danach kann der Ansatzring des Gehäuses als Schablone für die 16 Bohrungen (Ø 5 mm) für die
Befestigungsschrauben verwendet werden. Achten Sie darauf, daß der Abstand zwischen
Lampenmitte und der Wasseroberfläche etwa 750 mm beträgt. * = Sicherungsbohrungen für 4
Schrauben 3/4”
IT Tagliare un’apertura nel pannello come da schema (diam. 294 mm.). Dopo aver tagliato l’apertura, si
può usare il labbro frontale della nicchia come sagoma per i 16 fori da 5 mm. (per le viti di tenuta).
N.B.: La distanza approssimativa tra il centro della lampada ed il livello finale dell’acqua dovrebbe
essere 750 mm. * = Fori di fissaggio per 4 viti n. 3/4”
FR Pratiquez une ouverture dans le pan de mur tel que le schéma l’indique (diam. de 294 mm). Le rebord
du logement peut être utilisé comme gabarit pour les trous 5 mm no16 (pour les vis d’arrêt) une fois
que l’ouverture a été découpée. NB : La distance approximative entre le centre de la lampe et le
niveau définitif de l’eau devrait être de 750 mm. * = trous de renfort pour vis 3/4” no4.
PT Corte a abertura no painel da parede de acordo com o diagrama (294 mm de diâmetro). O rebordo
dianteiro do nicho pode ser usado como gabarito para os 16 orifícios de 5 mm (destinados aos para-
fusos de fixaç o) depois de cortada a abertura. N.B.: A distância aproximada entre o centro da lâm-
pada e o nível final da água deve ser de 750 mm. * = orifícios de fixaç o para 4 parafusos de ?”.
Panel Liner Pool Installation
SPC513
Figure 2
SPC456S
SPC 459
5
GB Pass niche (SPC456S) into panel wall aperture from pool side and line up 16 holes in niche ‘lip’ with the 16
holes in the panel wall. NB ensure niche is the correct way up - ‘top’ is indicated on the rear of the niche.
Pass back ring (SPC 459) over the rear of the niche and bring up to the back of the wall forming a
‘sandwich’, i.e. niche lip - panel wall - back ring. Secure all parts together using the 4 no. 3/4” self-tapping
screws provided (SPC513). NB ensure that these screws are fixed through the holes marked ‘*’
on drawing #1.
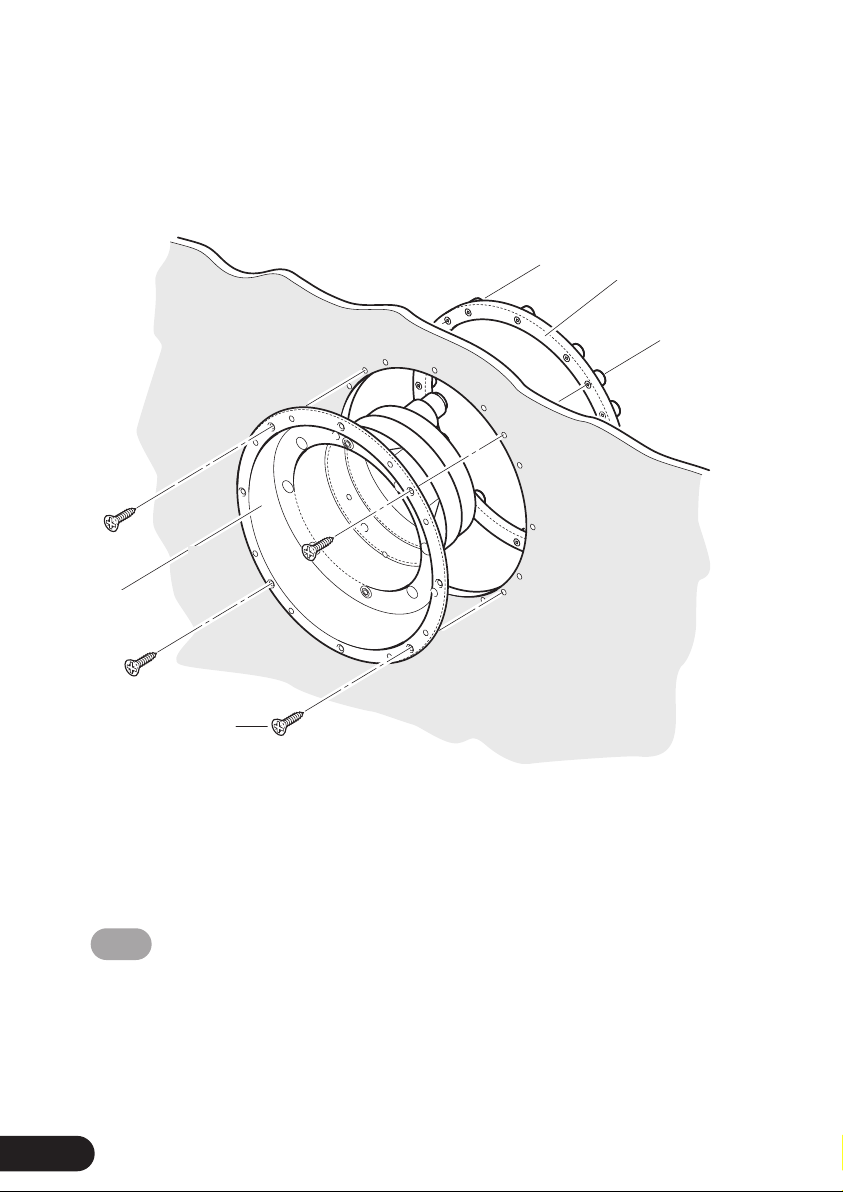
ES Pasar el nicho (SPC465S) por el panel desde el lado de la piscina y alinear los 16 agujeros en el “borde” del
nicho con los 16 agujeros en la pared del panel. Comprobar que el nicho se encuentra en la posición
correcta - la marca “TOP” se debe encontrar en la parte posterior del nicho. Pasar la arandela (SPC 459) por
la parte posterior del nicho y traerlo hasta la parte posterior de la pared formando un “sandwich”, ej : Borde
de nicho - pared - arandela posterior. Fijar todas las piezas utilizando los 4 tirafondos de 3/4pulgadas
suministrados (SPC513). Comprobar que estos tornillos se introducen por los agujeros marcados con ‘*’ en
la Figura #1.
DSetzen sie das Gehäuse (SPC456S) von der Beckeninnenseite aus so in die Öffnung der Beckenwand ein,
daß die 16 Löcher im Ansatzring und die 16 Bohrungen in der Beckenwandung übereinander liegen.
Achten Sie darauf, daß das Gehäuse richtig herum positioniert ist, auf der Rückseite finden Sie die
Angabe TOP für Oben. Setzen Sie von der Außenseite her den rückwärtigen Ring (SPC459) so über das
Gehäuse, daß eine Art Sandwich aus dem Ansatzring und dem rückwärtigen Ring mit der Beckenwandung
in der Mitte entsteht. Befestigen Sie alle Teile mit den beiliegenden vier 3/4” Treibschrauben (SPC513)
miteinander. Benutzen sie für diese Verschraubungen die in der Zeichnung 1 mit * bezeichneten Löcher.
IT Passare la nicchia (SPC456S) nell’apertura applicata nel pannello dal lato piscina ed allineare i 16 fori
applicati sul ‘labbro’ nicchia con i 16 fori praticati nel pannello. N.B.: Accertarsi che la nicchia sia orientata
nel verso giusto - sul retro è incisa la parola ‘top’ (alto). Passare l’anello posteriore (SPC459) sul retro della
nicchia e portarlo sul retro del pannello formando un ‘sandwich’, ossia: labbro nicchia - pannello - anello
posteriore. Fissare assieme tutte le parti usando le 4 viti autofilettanti da 3/4” fornite (SPC513). N.B.:
Accertarsi che le viti siano fissate attraverso i fori contrassegnati con un asterisco ‘*’ nel disegno #1.
FR Faites passer le logement (SPC456S) dans l’ouverture pratiquée dans le pan de mur et alignez les 16 trous
du rebord du logement avec les 16 trous percés dans le pan de mur. NB : assurez-vous que le logement se
trouve dans le bon sens - ‘haut’ est indiqué à l’arrière du logement. Faites passer le cercle arrière (SPC459)
par dessus l’arrière du logement et placez-le à l’arrière du mur en formant un sandwich ; à savoir : logement
- panneau - cercle arrière. Serrez toutes les pièces ensembles en utilisant les vis 3/4” no4 (SPC513) fournies.
NB : assurez-vous que ces écrous passent par les trous marqués par une * sur le dessin no1.
PT Introduza o nicho (SPC456S) na abertura do painel pelo lado da piscina e alinhe os 16 orifícios do rebor-
do do nicho com os 16 orifícios do painel da parede. N.B.: Certifique-se de que o nicho tem o lado cor-
recto para cima - a indicaç o “top” (topo) está marcada na parte de trás do nicho. Passe o anel traseiro
(SPC 459) sobre a parte de trás do nicho e coloque-o sobre a parte de trás da parede formando uma
“sanduíche”, ou seja, rebordo do nicho – painel – anel traseiro. Fixe todos os componentes em conjunto
usando os 4 parafusos auto-roscantes de ?” fornecidos (SPC513). N.B.: Certifique-se de que estes para-
fusos s o colocados nos orifícios marcados com “*” na figura 1.
6
7
Panel Liner Pool Installation
SPC465S
Figure 3
8
GB Thread the flexible conduit (SPC465S) into the opening in the back of the niche
(using silicone or mastic to seal the thread), prior to back filling.
NB 3/4” BSP threaded niches and rigid PVC conduits are available as an
alternative to flexible type.
ES Enroscar el conducto flexible (SPC465S) en la abertura en la parte posterior del nicho
(utilizando silicona o masilla para sellar la rosca) antes del relleno.
Hay disponibles nichos con roscas de 3/4” y con tubos rígidos de PVC como
alternativa al tipo flexible.
DBevor Sie die Rüfcckseite auffüllen, drehen sie das flexible Isolierrohr (SPC465S) in die
Öffnung auf der Gehäuserückseite. Verwenden Sie dabei Silikon oder Harz, um das
Gewinde abzudichten.
Als Alternative zur Verwendung eines flexiblen Isolierrohrs sind auch Gehäuse mit
Standardgewinde und festem Isolierrohr verfügbar.
IT Prima di effettuare il riempimento, infilare il tubo flessibile (SPC465S) nell’apertura sul
retro della nicchia (usare del silicone o del mastice per sigillare la filettatura).
N.B. Come alternativa al tubo flessibile sono disponibili nicchie filettate da 3/4” BSP e
tubi rigidi in cloruro di polivinile (PVC).
FR Enfilez le flexible (SPC465S) dans l’ouverture à l’arrière du logement (en utilisant du
silicone ou du mastic pour sceller le filetage) avant d’emboîter celui-ci par l’arrière
NB : les logements filetés BSP2et les conduits PVC rigides sont des alternatives
possibles aux flexibles.
PT Enrosque o tubo flexível (SPC465S) na abertura da parte de trás do nicho (usando
silicone ou mástique para vedar a rosca), antes de voltar a encher.
N.B.:Existem nichos com rosca de ?” BSP e tubos rígidos de PVC como
alternativa ao tipo flexível.