manuals.online logo
Brands
  1. Home
  2. •
  3. Brands
  4. •
  5. Chamberlain
  6. •
  7. Control Unit
  8. •
  9. Chamberlain ELITE SERIES K1A6426-2 User manual

Chamberlain ELITE SERIES K1A6426-2 User manual

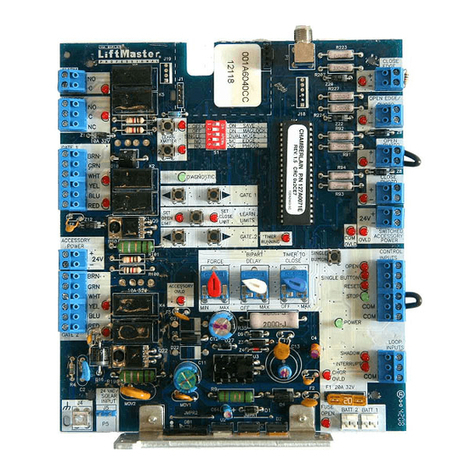
CONTROL BOARD REPLACEMENT KIT
K1A6426-2
Before installing the new control board, be sure to note the locations of all terminal block connections.
After installing the new control board, the limits, force adjustments and remote controls will have to be reprogrammed.
1
1
2
3
4
5
6
7
8
9
10
11
12
To reduce the risk of SEVERE INJURY or DEATH:
• Disconnect ALL electric and battery power BEFORE performing ANY service
or maintenance.
• Without a properly installed safety reversal system, persons (particularly small children)
could be SERIOUSLY INJURED or KILLED by a closing gate.
• Too much force on gate will interfere with proper operation of safety
reversal system.
• NEVER increase force beyond minimum amount required to close gate.
• NEVER use force adjustments to compensate for a binding or sticking gate.
• If one control (force or travel limits) is adjusted, the other control may also need
adjustment.
• After ANY adjustments are made, the safety reversal system MUST be tested. Gate MUST
reverse on contact with a rigid object.
• READ AND FOLLOW ALL INSTRUCTIONS.
• ANY maintenance to the operator or in the area near the operator MUST NOT be
performed until disconnecting the electrical power and locking-out the power via the
operator power switch. Upon completion of maintenance the area MUST be cleared and
secured, at that time the unit may be returned to service.
• Disconnect power at the fuse box BEFORE proceeding. Operator MUST be properly
grounded and connected in accordance with local electrical codes.
NOTE: The operator should be on a separate fused line of adequate capacity.
• NEVER let children operate or play with gate controls. Keep the remote control away
from children.
• ALWAYS keep people and objects away from the gate. NO ONE SHOULD CROSS THE
PATH OF THE MOVING GATE.
• Test the gate operator monthly. The gate MUST reverse on contact with a rigid object or
stop when an object activates the non-contact sensors. After adjusting the force or the
limit of travel, retest the gate operator. Failure to adjust and retest the gate operator
properly can increase the risk of INJURY or DEATH.
• Activate gate ONLY when it can be seen clearly, is properly adjusted and there
are no obstructions to gate travel.
INSTALLATION
CHGR
OVLD CTRL
AC PWR
/SOLAR
Cover
Dust Guard
Connector
Coaxial
Cable
Battery
Plug
Terminal
Blocks
Terminal
Blocks
Transformer or Solar Panel
Battery
Disconnect all electric power to the operator.
Remove the cover and dust guard from the operator.
Disconnect the battery.
Disconnect the coaxial cable and all terminal block connections
from the control board.
Remove the mounting screws from the control board.
Remove the control board.
Copy all settings from the existing control board to the new control board
(Force, Timer-To-Close, Bipart Delay, and Auto Open Jumper).
Install the new control board with the mounting screws.
Reconnect all terminal block connections and the coaxial cable.
Reconnect the battery.
Reconnect power to the operator.
Verify all other inputs and outputs as necessary (photoelectric sensors,
edges, loops, locks, alarm, reset, accessory power, open and single button).
ADJUSTMENT
Press and hold the GATE 1 left button to move the gate to the desired CLOSED position.
When the gate is in the desired position, release the button.
NOTE: The Gate 1 right and left buttons can be used to jog the gate back and forth
as needed.
When gate is in the desired CLOSED position, press the LEARN LIMITS button. The
control board will beep and the SET CLOSE LIMITS LED will stop blinking.
Close the gate.
Press and release the LEARN LIMITS button. The SET OPEN LIMIT LED will blink.
PROGRAM OPEN
Press and hold the GATE 1 right button to move the gate to the desired OPEN position.
When the gate is in the desired position, release the button.
NOTE: The Gate 1 right and left buttons can be used to jog the gate back and forth
as needed.
When the gate is in the desired OPEN position, press and release the LEARN LIMITS button.
The control board will beep and the SET CLOSE LIMITS LED will blink.
SINGLE GATE LEFT-HAND SIDE
1
2
3
4
5
6
PROGRAM CLOSE
Close the gate.
Press and release the LEARN LIMITS button. The SET OPEN LIMIT LED will blink.
PROGRAM OPEN
Press and hold the GATE 1 left button to move the gate to the desired OPEN position.
When the gate is in the desired position, release the button.
NOTE: The Gate 1 right and left buttons can be used to jog the gate back and forth
as needed.
When the gate is in the desired OPEN position, press and release and release the
LEARN LIMITS button. The control board will beep and the SET CLOSE LIMITS LED will blink.
1
2
3
4
LEARN LIMIT ASSEMBLY
The limits are internal settings that indicate when the gate is in the fully open position and the fully closed position. For proper functionality, the limits must be programmed during the
installation process. The gate has to travel a minimum of 6 feet in order to program the limits.
The programming uses a combination of buttons on the control board. The specific buttons used for programming depends on which side of the gate the primary operator is installed and how
many operators the installation includes.
BEFORE programming the limits ensure that the gate is closed and the chain is connected to the operator. To close the gate press the reset switch to RESET/DISCONNECT, then manually close the
gate. To resume normal operation press the reset switch back to NORMAL OPERATION.
SINGLE GATE RIGHT-HAND SIDE
DUAL GATES
Refer to the installation manual for dual gate programming.
Press and hold the GATE 1 right button to move the gate to the desired CLOSED
position. When the gate is in the desired position, release the button.
NOTE: The Gate 1 right and left buttons can be used to jog the gate back and forth
as needed.
When the gate is in the desired CLOSED position, press and release the
LEARN LIMITS button. The control board will beep and the SET CLOSE LIMITS LED will
stop blinking.
5
6
PROGRAM CLOSE
Programming is now complete. (If the SET OPEN LIMIT LED continues to blink, repeat
programming or refer to the following page.)
Test the limits by pressing the SINGLE BUTTON to open and close the gate.
Programming is now complete. (If the SET OPEN LIMIT LED continues to blink, repeat
programming or refer to the following page.)
Test the limits by pressing the SINGLE BUTTON to open and close the gate.
SET
CLOSE
DIAGNOSTIC
GATE 1
SET
CLOSE
DIAGNOSTIC
GATE 1
GATE 1 Left Button
GATE 1 Right Button
GATE 2
SET
CLOSE
LIMIT
LEARN
LIMITS
GATE 1
G
SET
CLOSE
LIMI
T
LEAR
N
LIMITS
GA
TE
A
SET
OPEN
LIMIT
"BEEP"
GATE 2
SET
CLOSE
LIMIT
LEARN
LIMITS
GATE 1
G
SET
CLOSE
LIMI
T
LEAR
N
LIMITS
GA
TE
A
SET
OPEN
LIMIT
"BEEP"
LEARN LIMITS Button
LEARN LIMITS Button
3
56
4
Outside
Property
Inside
Property
GATE 2
SET
CLOSE
LIMIT
GATE 1
G
SET
CLOSE
LIMI
T
GA
TE
A
SET
OPEN
LIMIT
N
N
LEARN
LIMITS
LEARN LIMITS Button
1
2
GATE 2
SET
CLOSE
LIMIT
LEARN
LIMITS
GATE 1
G
SET
CLOSE
LIMI
T
LEAR
N
LIMITS
GA
TE
A
SET
OPEN
LIMIT
"BEEP"
GATE 2
SET
CLOSE
LIMIT
LEARN
LIMITS
GATE 1
G
SET
CLOSE
LIMI
T
LEAR
N
LIMITS
GA
TE
A
SET
OPEN
LIMIT
"BEEP"
LEARN LIMITS Button
LEARN LIMITS Button
SET
CLOSE
DIAGNOSTIC
GATE 1
GATE 1 Right Button
5
SET
CLOSE
DIAGNOSTIC
GATE 1
GATE 1 Left Button
3
6
4
Outside
Property
Inside
Property
GATE 2
SET
CLOSE
LIMIT
GATE 1
G
SET
CLOSE
LIMI
T
GA
TE
A
SET
OPEN
LIMIT
N
N
LEARN
LIMITS
LEARN LIMITS Button
1
2
2
Outside
Property
Inside
Property
FORCE ADJUSTMENT
The operator is equipped with an obstruction sensing feature. If the gate encounters an
obstruction the operator will automatically reverse direction for a short time and stop. Based
on the length and weight of the gate it may be necessary to make force adjustments. The
force adjustment should be high enough that small objects such as branches or wind will not
cause nuisance interruptions but low enough to prevent serious injury to a person or a vehicle.
Use the SINGLE BUTTON to open and close the gate.
If the gate stops or reverses before reaching the fully open or closed position increase the
force by turning the force control clockwise.
If the gate hits a rigid object and does not stop or reverse, decrease the force by turning the
force control counterclockwise.
Run operator through a complete cycle and verify proper operation.
NOTE: Weather conditions can affect the gate movement, so seasonal adjustment may be
required. The force control is factory set to the mid-position.
1
2
3
4
3
Disconnect the operator by pressing the reset switch to RESET/DISCONNECT.
Manually close the gate.
Remove the learn limit cover and move the learn limit nut to the center position.
Press the reset switch to NORMAL OPERATION.
Program the limits again.
IF THE LIMITS WILL NOT PROGRAM
1
2
3
4
Outsid
e
Property
Inside
Property
TEST
After any adjustments are made, test the operator:
Use the SINGLE BUTTON to open and close the gate.
Test the limits by making sure the gate is stopping at the OPEN and CLOSE limits.
Test the force by making sure the gate will stop and reverse direction for a short time on
contact with an obstruction.
1
2
3
3
SINGLE BUTTON
1
2
RESET/
DISCONNECT
NORMAL
OPERATION
Learn Limit Nut
Learn Limit Switch
1
4
3
FORCE
OFF MAX
SINGLE BUTTON
2
1
LEARN
XMITTER
© 2009, The Chamberlain Group, Inc.
01-35675 All Rights Reserved
LEARN
XMITTER
Press and release the LEARN XMITTER button (LED will light).
Press the remote control button. The LED will flash and the alarm output will activate twice.
To program additional remote controls, repeat the steps until all the remote controls are
programmed.
TO ADD, REPROGRAM OR CHANGE A WIRELESS KEYLESS
ENTRY PIN (NOT PROVIDED)
Press and release the LEARN XMITTER button (LED will light).
Enter a 4-digit personal identification number (PIN) of your choice on the keypad.
Press the ENTER button on the keypad. The LED will flash and the alarm output will
activate twice.
TO ADD OR REPROGRAM A REMOTE CONTROL
(NOT PROVIDED)
1
2
1
2
3
LEARN
XMITTER
PIN Number
? ? ? ?
A combined total of 50 remote controls and keyless entry PINs can be programmed to
the operator.
ERASE ALL CODES
Press and hold the LEARN XMITTER button on the control board until the learn indicator light
goes out (approximately 6 seconds). All previous codes are now erased.
PROGRAMMING
NOTICE: To comply with FCC and or Industry Canada (IC) rules, adjustment or modifications of this
receiver and/or transmitter are prohibited, except for changing the code setting or replacing the
battery. THERE ARE NO OTHER USER SERVICEABLE PARTS.
Tested to Comply with FCC Standards FOR HOME OR OFFICE USE. Operation is subject to the
following two conditions: (1) this device may not cause harmful interference, and (2) this device
must accept any interference received, including interference that may cause undesired operation.
1
1
1
2
2

Other Chamberlain Control Unit manuals
Chamberlain 041-0200-000 User manual

Chamberlain

Chamberlain 041-0200-000 User manual

Chamberlain liftmaster CB2 User manual

Chamberlain

Chamberlain liftmaster CB2 User manual

Chamberlain 41A7114-7 User manual

Chamberlain

Chamberlain 41A7114-7 User manual

Chamberlain LiftMaster GOC1A User manual

Chamberlain

Chamberlain LiftMaster GOC1A User manual

Chamberlain CLLA1 User manual

Chamberlain

Chamberlain CLLA1 User manual

Chamberlain LiftMaster CB202EV User manual

Chamberlain

Chamberlain LiftMaster CB202EV User manual

Chamberlain GCU User manual

Chamberlain

Chamberlain GCU User manual
Chamberlain 041A8071-4 User manual

Chamberlain

Chamberlain 041A8071-4 User manual

Chamberlain 041D8071-4 User manual

Chamberlain

Chamberlain 041D8071-4 User manual

Chamberlain K1A6424-2 User manual

Chamberlain

Chamberlain K1A6424-2 User manual

Chamberlain LiftMaster Professional Security+ 395LM User manual

Chamberlain

Chamberlain LiftMaster Professional Security+ 395LM User manual

Chamberlain CAPXLCAM Instruction Manual

Chamberlain

Chamberlain CAPXLCAM Instruction Manual

Chamberlain LiftMaster CB1 User manual

Chamberlain

Chamberlain LiftMaster CB1 User manual

Chamberlain 41A7928-3 User manual

Chamberlain

Chamberlain 41A7928-3 User manual

Chamberlain 41D7742-7 User manual

Chamberlain

Chamberlain 41D7742-7 User manual

Chamberlain LiftMaster Professional CB124 User manual

Chamberlain

Chamberlain LiftMaster Professional CB124 User manual

Chamberlain CB24 User manual

Chamberlain

Chamberlain CB24 User manual

Chamberlain MyQ 888LM User manual

Chamberlain

Chamberlain MyQ 888LM User manual
Chamberlain 79LM User manual

Chamberlain

Chamberlain 79LM User manual

Chamberlain 945CB User manual

Chamberlain

Chamberlain 945CB User manual

Chamberlain MyQ 825LM User manual

Chamberlain

Chamberlain MyQ 825LM User manual
Popular Control Unit manuals by other brands

Altec Lansing 1783 SIGNAL PROCESSING Specifications

Altec Lansing

Altec Lansing 1783 SIGNAL PROCESSING Specifications

Van Air Systems Sentinel MDV400I Installation, operation & maintenance instructions

Van Air Systems

Van Air Systems Sentinel MDV400I Installation, operation & maintenance instructions

ATI Technologies PROFINET DL12 manual

ATI Technologies

ATI Technologies PROFINET DL12 manual

Honeywell AlarmNet GSMBR Installation and setup guide

Honeywell

Honeywell AlarmNet GSMBR Installation and setup guide

PSG Wilden XSD HS Series Engineering, operation & maintenance

PSG

PSG Wilden XSD HS Series Engineering, operation & maintenance

Velleman VM106 manual

Velleman

Velleman VM106 manual

Texas Instruments CC1101EMK quick start guide

Texas Instruments

Texas Instruments CC1101EMK quick start guide

Whelen Engineering Company 295HFSA6 installation guide

Whelen Engineering Company

Whelen Engineering Company 295HFSA6 installation guide

Rtelligent R Series user manual

Rtelligent

Rtelligent R Series user manual

Siemens AE-30U Operation and installation instructions

Siemens

Siemens AE-30U Operation and installation instructions

Belimo BKS24-1B Wiring diagram

Belimo

Belimo BKS24-1B Wiring diagram

Evco EV3 300 Series manual

Evco

Evco EV3 300 Series manual

Wolfspeed PRD-06983 user guide

Wolfspeed

Wolfspeed PRD-06983 user guide

Honeywell Home VC6800 Series manual

Honeywell Home

Honeywell Home VC6800 Series manual

Uhlenbrock Elektronik IntelliSound manual

Uhlenbrock Elektronik

Uhlenbrock Elektronik IntelliSound manual

ELPRO WP100 manual

ELPRO

ELPRO WP100 manual

CSA XLC 325 manual

CSA

CSA XLC 325 manual

Jabra 14201-20 - How to connect

Jabra

Jabra 14201-20 - How to connect

manuals.online logo
manuals.online logoBrands
  • About & Mission
  • Contact us
  • Privacy Policy
  • Terms and Conditions

Copyright 2025 Manuals.Online. All Rights Reserved.