Checkpoint Quantum LightSpeed Appliance QLS250 User manual

[Classification: Protected]
24 August 2022
INSTALLING AND
REMOVING AC POWER
SUPPLY UNITS IN CHECK
POINT APPLIANCES

Check Point Copyright Notice
© 2013-2022 Check Point Software Technologies Ltd.
All rights reserved. This product and related documentation are protected by copyright and distributed under
licensing restricting their use, copying, distribution, and decompilation. No part of this product or related
documentation may be reproduced in any form or by any means without prior written authorization of Check
Point. While every precaution has been taken in the preparation of this book, Check Point assumes no
responsibility for errors or omissions. This publication and features described herein are subject to change
without notice.
RESTRICTED RIGHTS LEGEND:
Use, duplication, or disclosure by the government is subject to restrictions as set forth in subparagraph (c)
(1)(ii) of the Rights in Technical Data and Computer Software clause at DFARS 252.227-7013 and FAR
52.227-19.
TRADEMARKS:
Refer to the Copyright page for a list of our trademarks.
Refer to the Third Party copyright notices for a list of relevant copyrights and third-party licenses.
Important Information
Installing and Removing AC Power Supply Units in Check Point Appliances|3
Important Information
Latest Software
We recommend that you install the most recent software release to stay up-to-date with the
latest functional improvements, stability fixes, security enhancements and protection against
new and evolving attacks.
Certifications
For third party independent certification of Check Point products, see the Check Point
Certifications page.
Latest Version of this Document in English
Open the latest version of this document in a Web browser.
Download the latest version of this document in PDF format.
Feedback
Check Point is engaged in a continuous effort to improve its documentation.
Please help us by sending your comments.
Revision History
Date Description
24 August 2022 Updated for TE250XN appliances
01 June 2022 Updated for Quantum LightSpeed Appliances
21 February 2022 Rebranding - New Check Point logo
18 January 2022 First release of this document

Table of Contents
Installing and Removing AC Power Supply Units in Check Point Appliances|4
Table of Contents
Introduction
5
QLS250, QLS450, QLS650, and QLS800
6
Removing a Power Supply Unit
8
Installing a Power Supply Unit
9
Installing the Power Supply Cable Restraint
10
PSU Configuration and Monitoring
12
TE250XN
13
Removing a Power Supply Unit
14
Installing a Power Supply Unit
15
Using the Power Cable Restraint Clip
16

Introduction
Installing and Removing AC Power Supply Units in Check Point Appliances|5
Introduction
This guide applies to these Check Point Appliances:
Appliance U In This Document
Quantum LightSpeed Appliance QLS250 2U QLS250
Quantum LightSpeed Appliance QLS450 3U QLS450
Quantum LightSpeed Appliance QLS650 3U QLS650
Quantum LightSpeed Appliance QLS800 3U QLS800
SandBlast Threat Emulation TE250XN 1U TE250XN

QLS250, QLS450, QLS650, and QLS800
Installing and Removing AC Power Supply Units in Check Point Appliances|6
QLS250, QLS450, QLS650, and
QLS800
The appliances have a redundant Power Supply Unit (PSU). They support AC PSUs.
If necessary, you can replace a PSU. Note that all PSUs on an appliance must be of the same type (AC).
Important - Make sure you are electromagnetically grounded before you install,
uninstall, or replace a PSU. ESD (electrostatic discharge) can damage the appliance.
QLS250 Rear Panel
QLS450, QLS650, and QLS800 Rear Panel

QLS250, QLS450, QLS650, and QLS800
Installing and Removing AC Power Supply Units in Check Point Appliances|7
Item Description
1 LED indicator for each PSU
nOff - No power supply cable is connected to any of the PSUs in the system
nGreen - System is on
nBlinking green - Power supply cables are connected to all PSUs, but system is off
nAmber - No power supply cable is connected to the PSU, but other PSUs in the system
are connected to a power supply cable
nBlinking amber - Warning that a hardware issue (high temperature, high power, high
current, slow fan) might lead to an issue with the PSU
nBlinking fast green - PSU undergoing Firmware update
2 Restraint strip slot
3 Extractor handle
4 ESD grounding point
5 Alarm off button for PSUs
6 Release lever
7 QLS250 - Two ACPSUs
QLS450, QLS650, and QLS800 - Three AC PSUs
Legend
QLS250, QLS450, QLS650, and QLS800
Installing and Removing AC Power Supply Units in Check Point Appliances|8
Removing a Power Supply Unit
Before you remove a Power Supply Unit, we recommend that you make sure that:
nIn QLS250 - A second AC power supply is installed and connected to a working power source.
nIn QLS450, QLS650, and QLS800 - Two other AC power supplies are installed and connected to a
working power source.
Or
nThe appliance is shut down.
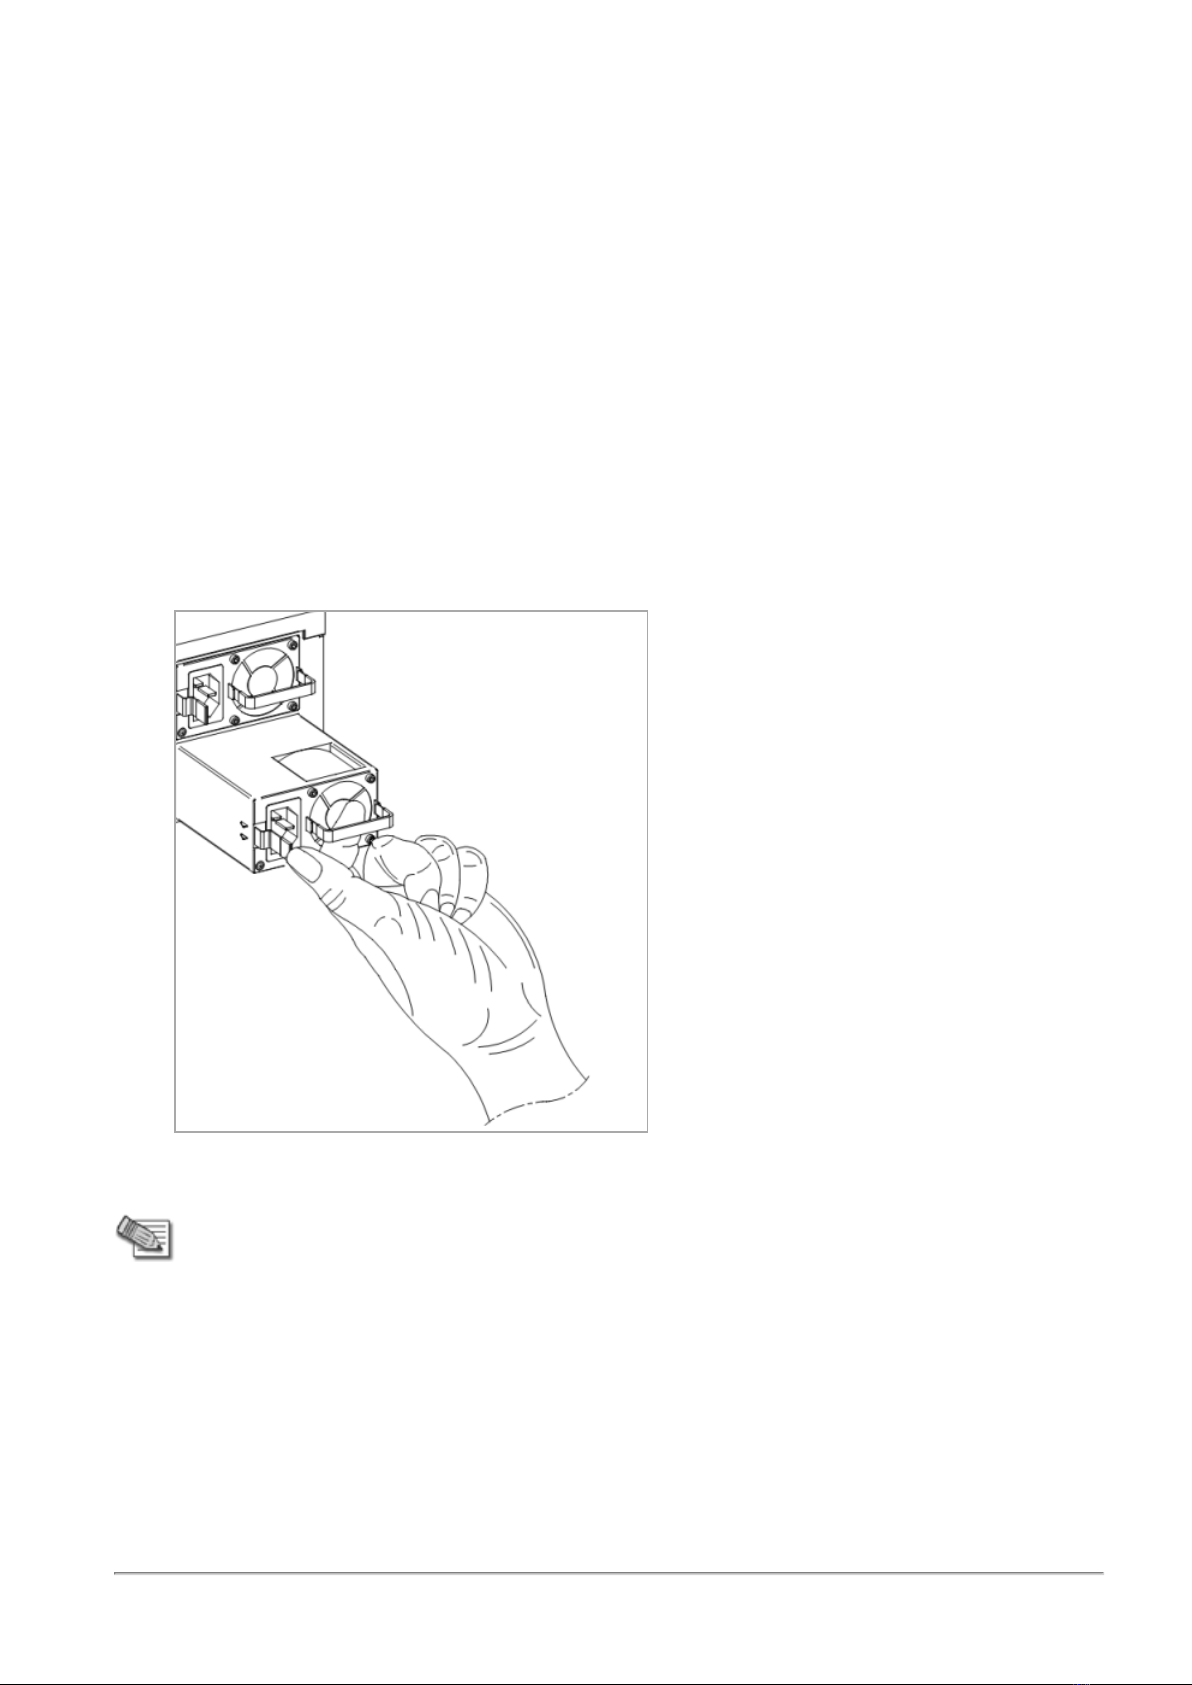
To remove a Power Supply Unit:
1. Remove the power supply cable from the PSU.
2. If the alarm sounds, press the Alarm Off button to the right of the PSU.
3. Press and hold down the release lever as shown.
4. While holding the release lever, pull the extraction handle to remove the PSU.
Note - Remove the PSU only with the extraction handle to prevent any possible damage.

QLS250, QLS450, QLS650, and QLS800
Installing and Removing AC Power Supply Units in Check Point Appliances|9
Installing a Power Supply Unit
To install a replacement Power Supply Unit:
1. Insert the PSU into the power supply slot.
2. Push in the PSU until the release lever clicks.
3. Insert the power supply cable into the power supply socket.
4. Make sure that the power LED is lit up.
QLS250, QLS450, QLS650, and QLS800
Installing and Removing AC Power Supply Units in Check Point Appliances|10
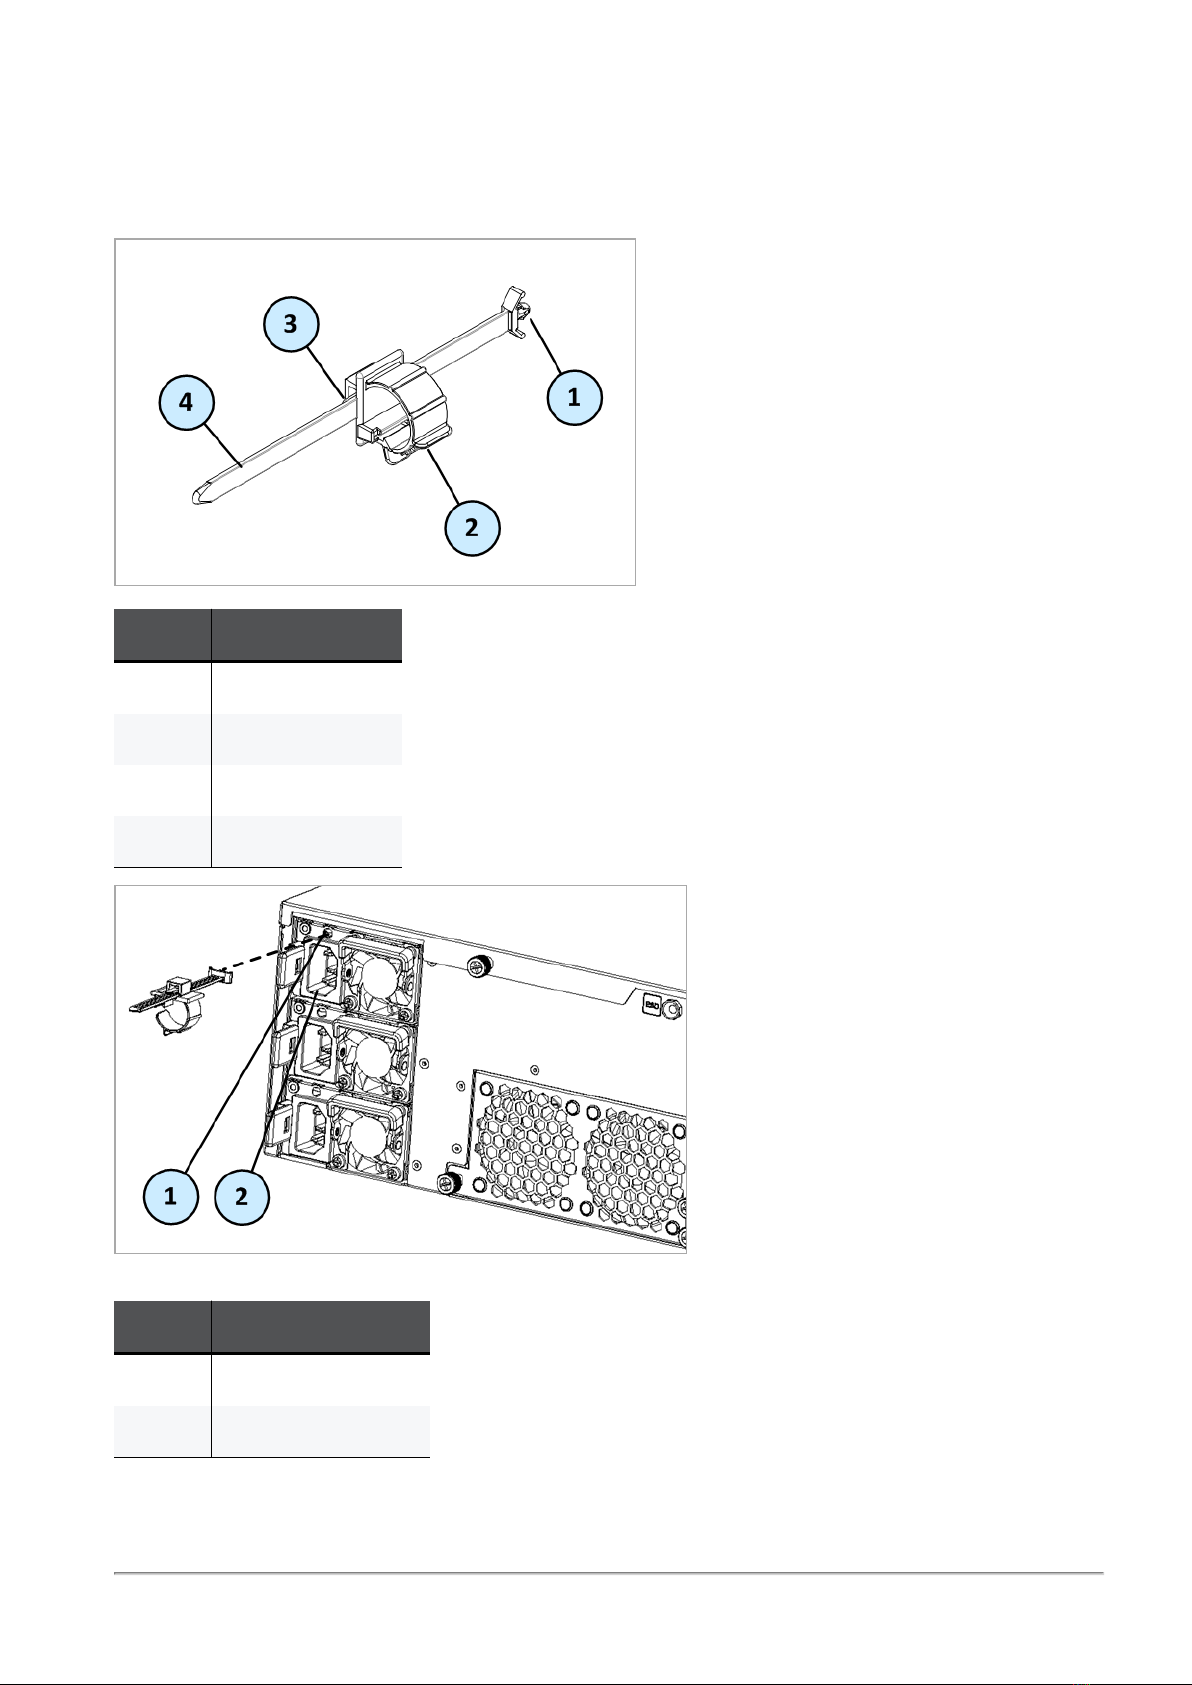
Installing the Power Supply Cable Restraint
Use the power supply cable restraint to prevent accidental removal of the power supply cable.
Item Description
1 Restraint anchor
2 Cable loop
3 Restraint strip tab
4 Restraint strip
Item Description
1 Restraint strip slot
2 Power supply socket
Legend
QLS250, QLS450, QLS650, and QLS800
Installing and Removing AC Power Supply Units in Check Point Appliances|11
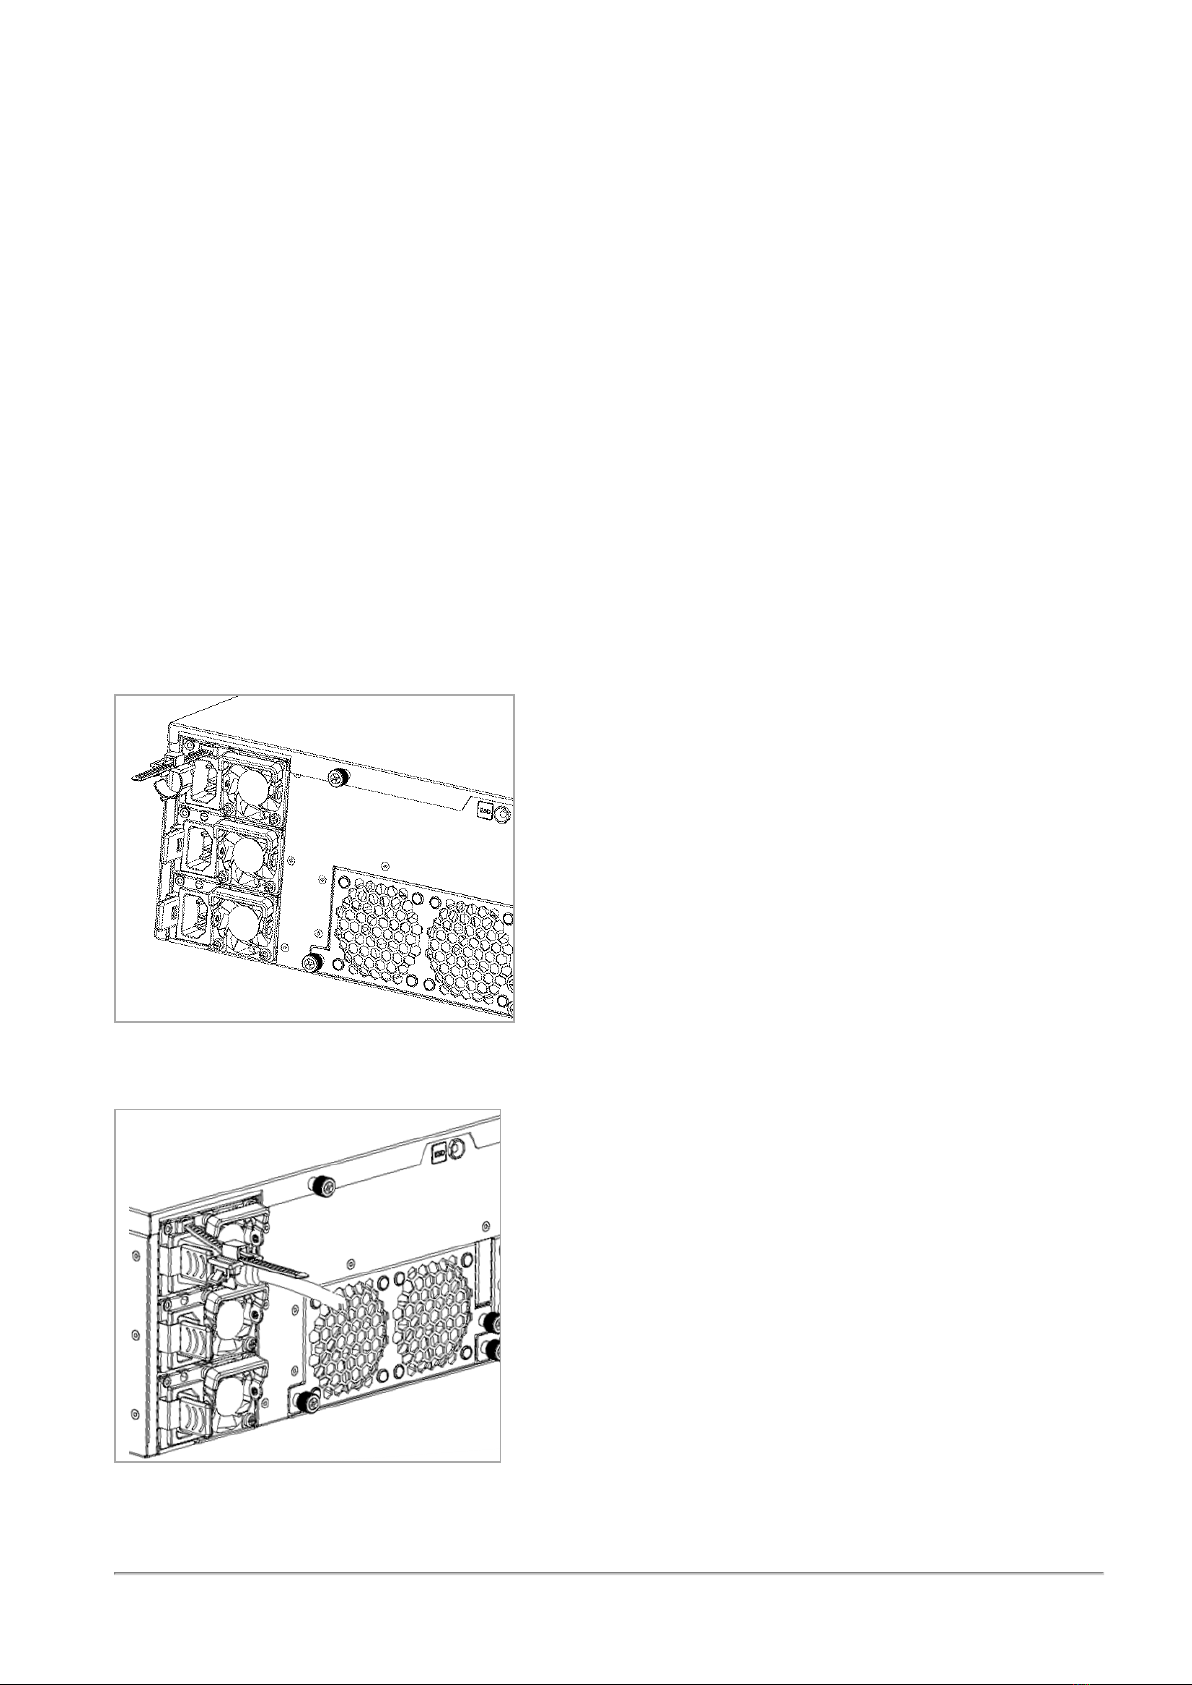
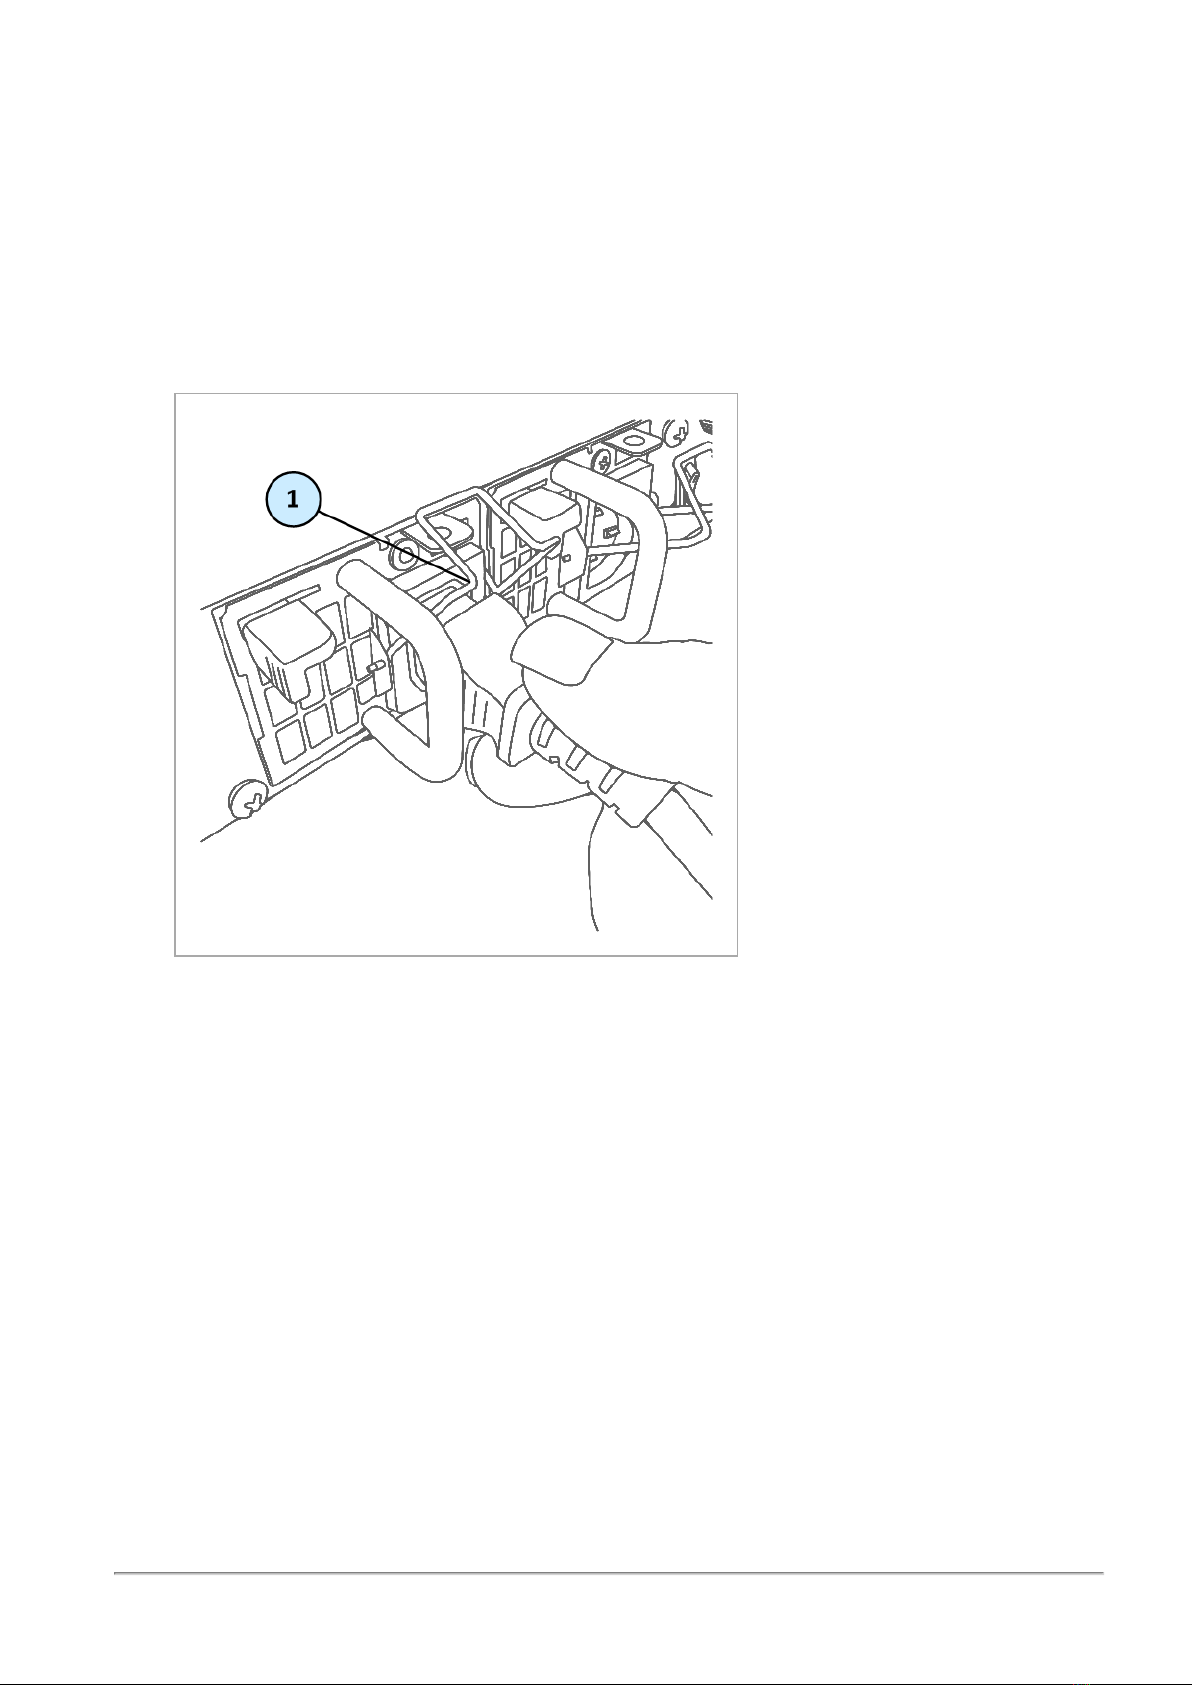
To install the power supply cable restraint:
1. If a power supply cable is connected to the power supply socket, disconnect it.
2. Locate the restraint strip slot above the power supply socket.
3. Make sure that the cable loop on the restraint faces the power supply socket.
4. Insert the restraint strip anchor into the slot until it fastens and locks (see the line drawing after the
procedure).
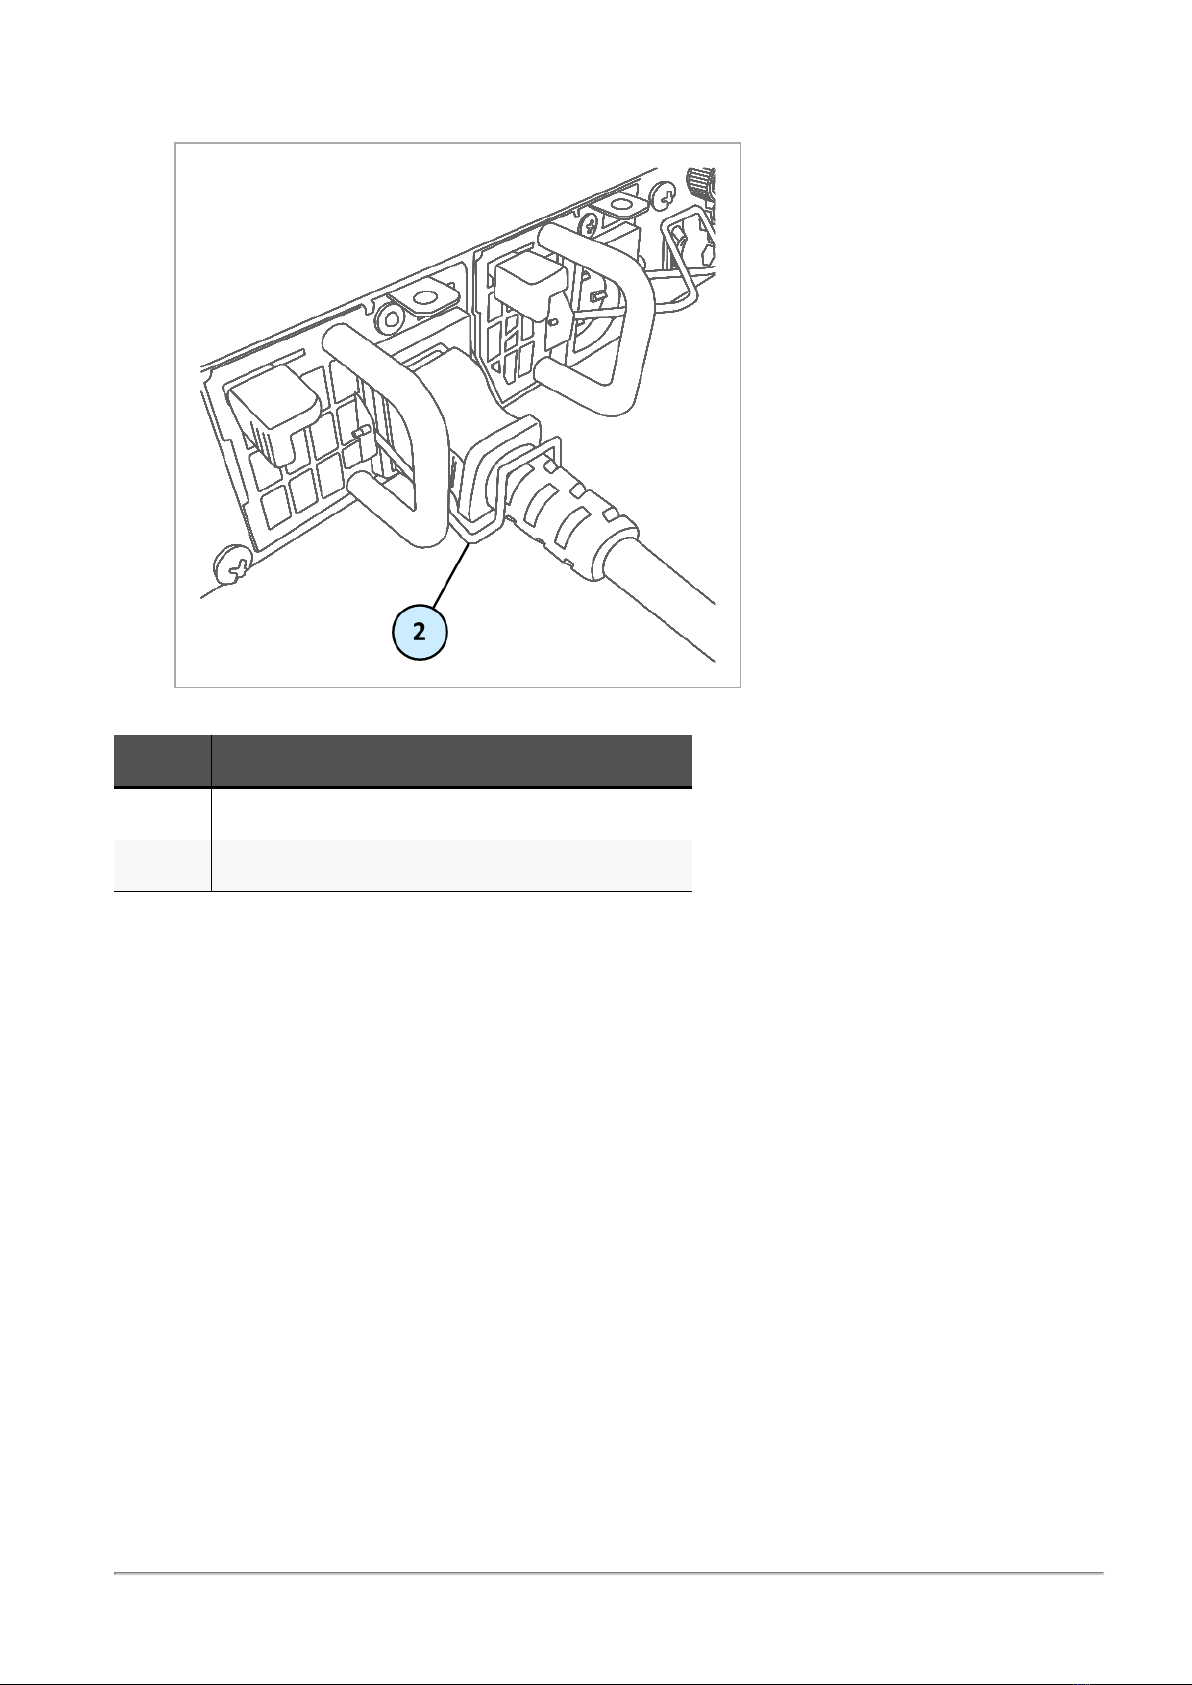
5. Connect the power supply cable to the power supply socket.
6. Pull the restraint tab to the side to move the cable loop on the restraint strip.
7. Move the cable loop until you can position it around the power supply cable as shown in the next
figure.
8. Insert the open side of the cable loop into the loop slot until it fits tightly against the power supply
cable.
9. Make sure the cable loop is secured and the power supply cable cannot be removed while the cable
loop is in place (see the line drawing after the procedure).
Restraint strip anchor inserted into the slot
Cable loop secured around the power supply cable


TE250XN
Installing and Removing AC Power Supply Units in Check Point Appliances|13
TE250XN
Item Component Description
1 Release lever Used together with the extraction handle to remove the PSU
2 Extraction
handle
Used together with the release lever to remove the PSU
3 LED indicator
for each PSU
nOff - PSU is not connected to an electric outlet
nAmber - Power off
nGreen - Power on
nRed - Failure
4 PSU socket Connects to an electric outlet with a power supply cable.
Use the cable restraint clips to avoid accidental removal of the power supply
cable.
5 Alarm Off
button
If a power supply cable is not connected to the outlet, an alarm sounds
continuously. Press this button to turn off the alarm for the PSU.
Legend

TE250XN
Installing and Removing AC Power Supply Units in Check Point Appliances|14
Removing a Power Supply Unit
Before you remove a Power Supply Unit, we recommend that you make sure that either:
nAnother PSU is installed and connected to a working power source
Or
nThe appliance is shut down
To remove a Power Supply Unit:
1. Remove the power supply cable from the PSU.
2. If the alarm sounds, press the Alarm Off button to the right of the PSU.
3. While holding the release lever, pull the extraction handle to remove the Power Supply Unit.
Note - Remove the power supply unit only with the extraction handle to prevent any
possible damage.

TE250XN
Installing and Removing AC Power Supply Units in Check Point Appliances|15
Installing a Power Supply Unit
To install a replacement power supply unit:
1. Insert the PSU into the power supply slot.
2. Push in the power supply unit until the release lever clicks.
3. Insert the power supply cable into the power supply socket.
4. Make sure that the power LED is lit up.
TE250XN
Installing and Removing AC Power Supply Units in Check Point Appliances|16
Using the Power Cable Restraint Clip
The appliance has power supply cable restraint clips attached to the Power Supply Units. Use the restraint
clip to prevent accidental removal of the power supply cable.
To secure the restraint clip on the power supply cable:
1. Make sure the restraint clip is in the open position (facing upward) and connect the power supply
cable to the power supply socket on the PSU.
TE250XN
Installing and Removing AC Power Supply Units in Check Point Appliances|17
2. Push down on the restraint clip to close it and secure the power supply cable.
Item Description
1 Restraint clip in the open position (facing upward)
2 Restraint clip in the closed position
Legend
Other manuals for Quantum LightSpeed Appliance QLS250
2
This manual suits for next models
3
Table of contents
Other Checkpoint Power Supply manuals

Checkpoint
Checkpoint Smart-1 series User manual

Checkpoint
Checkpoint Smart-1 series Instruction Manual

Checkpoint
Checkpoint Smart-1 series Instruction Manual

Checkpoint
Checkpoint Quantum 6000 User manual

Checkpoint
Checkpoint TE250X User manual

Checkpoint
Checkpoint QUANTUM SMART-1 User manual

Checkpoint
Checkpoint 4800 User manual

Checkpoint
Checkpoint TCPP9000 User manual

Checkpoint
Checkpoint 15000 User manual

Checkpoint
Checkpoint QUANTUM SMART-1 6000-L User manual


