manuals.online logo
Brands
  1. Home
  2. •
  3. Brands
  4. •
  5. Chinavision
  6. •
  7. Analytical Instrument
  8. •
  9. Chinavision CVACZ-G696 Mounting instructions

Chinavision CVACZ-G696 Mounting instructions

Use's Manual
A ffi C(@&
Safety rcgulations
Please read the safety regulations and operation
guide carelully before operating.
2\ Please read all of the operational guide and safety regulations
in this manual before operation . lmproper operations
without complying with this manual guided could cause
damage to the device, influence on measurement result
or bodily injury to the user.
I The instrument is not allowed to disassemble or repair
in any ways. lt is forbidden to do any illegal modification
or performance change for laser emitter. Please keep it
out Of reach of children and avoid using by any irrelevbnt
personnel.
A tt i. "triAty prohibited to shoot eyes or other parts of body
with the laser; it is not allowed take the laser to shoot any
obiects' surface with strong reflecting.
A O,r" to electromagnetic radiation interference to other
eguiFnent and devices, please don't use the meter in the
pke q aound medical equipment, dont use it in inflammable,
erpl,cive environment.
A Dbca.ded batteries or meter device shall not processed
itrst lake household garbage, please handle them in line
yittr rcdatad la and regulations.
A try quality is:sues or any questions on the meter, please
cootacf bcal disfributors or manufacturer in time, we are
ready to trr solutions for you.
Professianaf casfes quality and good
quality gets reputation
. lnstallation and replacement of battery
. Discharge the battery door on the back of device,
and place battery according to correct polarity,
then cover the battery door.
. Only 1.5 V AAA alkaline battery is applied to the
meter.
. lf not used for a long time, please take out the
battery to avoid battery corrosion to meter body.
o Display Screen
. Laser emission on Battery power instructions
Store data/check stored data
i .l\4easurement
I' Maximum
instructions
. lnstructions of
area, Volume,
Pythagorean
proposition and L_
indirect measurement
. Minimum instructions
. The Lord
measurement display
o Keyboard
. L3sr emi$ion
. Arealy'olume
Measuring key
. Measurement
benchmark
select key
. +key
. OfflRemove key
. Start and shut off the meter
Under off state, press ffi& t<ey, instrument and
laser get starting simultaneously and stand by for
measurement.
Under on state, long press @l key for 3 seconds
lo make the device off. The instrument will be
shut off without any operation for 1 50 seconds.
. unit setting
Press @ key, reset current unit of measurement,
the machine default unit is: 0.000m
Optional units as below:
Length Area Volume
0.000m 0.000m2 0. 000m3
0.00m 0. 00m2 0.00m3
0. Oin 0.00ft2 0.00ft3
0.00fr 0.OOft'? 0.00fts
Measurement benchmark setting
Press ft! key to enter into setting of switching
between front benchmark and end benchmark .
System usually takes end benchmark as default.
o Single Measurement:
Press ffi! key under measuring mode, the laser is
emitted to shoot measuring location.
Re-press @ key for single measurement of distance ,
thenthe measured resultsdisplayedon maindisplay.
o Continuous Measurement:
Long press ffil key under measuring mode to enter
into continuous measurement state, and maximum
and minimum measurement results in the process of
continuous measurement will displayon the screen.
The main display screen indicates the very measured
result, press l!! keyto exit continuous measurement
state.
a Area Measurement:
Press @ key and you will see E , on the display
screen, that is Rectangle with one edge flashing.
Complete the following operations according to
screen tips:
Press @ key to measure the first edge(length).
Press G& key to measure the second edge(width)
Area will be calculated automatically by the meter,
and the results showed on main display screen.
Press @} key to remove previous measured result
and get ready for the next measurement.
. Unit Conversion
Button
' Pythagorean
proposition indirect
measurement key
. _key
. Backlight
Conversion Button
. Storage/Storied
date read key
o Volumetric Measurement:
Double press fit key and you will see ffi, on the
display screen, that is cube with one edoe flashino.
gomflete the following operations acdording to"
tips:
Press $& key to measure the first edge(length).
Press @B key to measure the second edge(width).
Press [&l key to measure the third edge(height).
Volume wlll be calculated automatically by the
meter, and the results showed on main display
screen.
Press G$ key to remove previous measured
result and get ready for the next measurement.
o Pythagorean proposition indirect measurement:
There are three kinds of pre-designed measuring
mode lo get unilateral distince of tiiangle by ways"
of Pythagorean proposition. This is cohvenient for
users to do indirect measuring in certain complex
environment. Presstlkeyto make modeseleciion:
1) Press tl key and you will see 'on the display
screen, that is triangle with hypotenuse flashing.
Press !E key to firstly measure the length (a) of
dotted line hypotenuse according to screen prompt
Press @ key to measure the length(b) of the
dotted line right side
Length (x) of the solid line right side will be calculated
automatically by the meter.
'""'-m
2) Double press El key and you will see on the
display screen, that is triangle with vertical leg flashing
Press ffi key to firstly measure the length (a) of
dotted line right side according to screen prompt
Press && key to measure the length (b) of the
other dotted line right side
Length(x) of the solid line hypotenuse will be
calculated automatically by the meter.
3) Press GN key e times and you will see -11 on the
display screen, that is triangle with hypotenuse
flashing.
PressEE key to firstly measure the length (a) of
dotted line hypotenuse according to screen prompt
Press fiffi key to measure the length(b) of dotted
line hypotenuse (shown as in the figure)
Press E& key to measure the length(c)of another
dotted line hypotenuse (shown as in the figure)
Length (x) of the solid line right side will be
calculated automatically by the meter.
" --Ti[
IY
- !--1-
-'==1-!)
I
I
I
I
4) Press El key a times and you will see on the
display screen <l that is triangle with hypotenuse
flashing. \
*r::::
*...,
!3r-
&:;:-
s;:
Sili!
?1:
:'::..,
n*:--
&*
et:
6.:.:
,tri:.:
ti{"
F
ft
K
E.
xl
E
I
n.
a
E
f
B
E
E
I
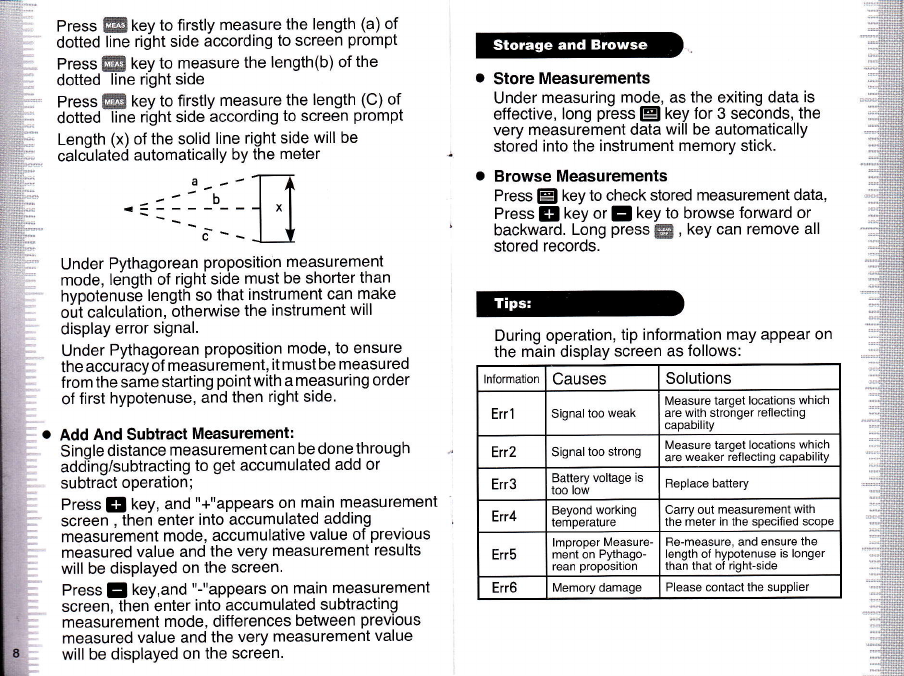
Press ED key to firstly measure the length (a) of
dotted line right side according to screen prompt
Press ffi key to measure the length(b) of the
dotted line right side
Press ffi key to firstly measure the length (C) of
dotted line right side according to screen prompt
Length (x) of the solid line right side will be
calculated automatically by the meter
,---T-1
-=::.:r__],1
c--- I Y
Under Pvthaoorean proposition measurement
mode, lehgth"of right sicie must be shorter than
hvootenus-e lenqth so that instrument can make
oiri calculation. -otherwise the instrument will
display error signal.
Under Pythagorean proposition mode, to ensure .
the accuiacvof measurement, it must be measured
f rom the sarire starting point with a measuring order
of first hypotenuse, and then right side.
Add And Subtract Measurement:
Sinqle distance measurement can be done through
addTng/subtracting to get accumulated add or
subtract operation;
Press El key, and "+"appears on main measuremenl
screenJhen enter into accumulated adding
measurement mode, accumulative value of previous
measured value and the very measurement results
will be displayed on the screen.
Press E key,and "r'appears on main measurement
screen Jhen- enter into accu mulated subtracting
measurement mode, differences between previous
measured value and the very measurement value
will be displayed on the screen.
o Store Measurements
Under measurinq mode. as the exiting data is
effective, long p6ss @l key for 3 sec6nds, the
very measurement data will be automatically
stored into the instrument memory stick.
o Browse Measurements
Press @l key to check stored measurement data,
Press tt key or ! key to browse forward or
backward. Long press ffi , key can remove all
stored records.
During operation, tip information may appear on
the main display screen as follows:
lnformation Causes Solutions
Err'l Signal too weak Measure target locations which
are with stronger reflecting
canehilitv
Err2 Signal too strong Measure target locations which
are weaker rellectinq capability
Err3 Battery voltage is
too low Beplace battery
Err4 Beyond working
temperature Carry out measurement with
the meter in the specified scope
Err5 lmproper Measure-
ment on Pythago-
rean proposition
Re-measure, and ensure the
length oI hypotenuse is longer
than that of right-side
Err6 Memory damage Please contact the supplier
ITEM Specifications
Dislance measurement
nra.i<i^n 12mm
!,leasurement unit options mm/in/tt
Continuous measure-
n66r fi rn^ti^n yes
)utdoor target reflection
board no
Area measuremen function yes
Volume measurement yes
Pythagorean proposi-
tion measurement
function
Full mode
Add and subract meas.
urement function yes
Min/Max value VES
Max storage 99 units
Automatic backlight VES
Buttons/Keys sound YES
Laser level il
Laser type 635nm,<'l mW
Automatically cut off laser 20s
Automatic shutdown 1 50S
Storage temperature -20'c -60'c
Working temperature 0'c -40'c
Storage humidity RH85./.
BatterV 1.5V 3-AAA
Battery life 4000 times for single measurements
Weiqht (including battery) 1 80o
Dimension 1 23*54*28mm
. The meter should not be stored in high
temperature and strong humidity environment for
longterm: if not used lor long time. please take
outlhe battery and place the meter in the allocated
potable bag and store in cool and dry place.
. Please keep the device surface cleaning. Wet
soft cloth is applied to clean dust, but erosion liquid
is never allowed to use for the meter maintenance.
Laser output window and its focus lens can be
maintained according to maintenance procedures
lor optical device.
Please carefully check instruments and attachments
are complete in line with below list.
ii..
ll
ir
t
L
NO. Item Unit OTY Note
1Laser Distance
Meter master body Unit 1
2lnstrument portable
bao piece
3Holding rope prece
4AAA battery sel 3
5lvlanual copy 1
6Gift box set ,l
7Outdoor target
reflection board set 1Only 100M
Note: There will be a bit of greater differences ol measurement
results in harsh environmenl, such as strong sunlight, excessive
temperature fluctuations, weak reflective surface. low battery.
As to this. targe treflection board as auxiliary will assist you
to get a better result.
Checked by: Date:

Popular Analytical Instrument manuals by other brands

EXFO FLS-5834-EI user guide

EXFO

EXFO FLS-5834-EI user guide

Hathorn M7 Operator's manual

Hathorn

Hathorn M7 Operator's manual

Teledyne 6400A instruction manual

Teledyne

Teledyne 6400A instruction manual

Red Technology CB-1005 user manual

Red Technology

Red Technology CB-1005 user manual

Vividia Ablescope FC-8050i manual

Vividia

Vividia Ablescope FC-8050i manual

USBDÜSEN NOZZCAM operating instructions

USBDÜSEN

USBDÜSEN NOZZCAM operating instructions

Vividia ME-610X product manual

Vividia

Vividia ME-610X product manual

Whistler WIC4750 owner's manual

Whistler

Whistler WIC4750 owner's manual

Eschenbach Mobilux Digital Inspection operating instructions

Eschenbach

Eschenbach Mobilux Digital Inspection operating instructions

Electric Eel Ecam Ace100-Micro user manual

Electric Eel

Electric Eel Ecam Ace100-Micro user manual

Sanyipace F929ADFBAB8R user manual

Sanyipace

Sanyipace F929ADFBAB8R user manual

Goldanalytix GoldScreenBox instruction manual

Goldanalytix

Goldanalytix GoldScreenBox instruction manual

RIDGID seeSnake DVD Pak Operator's manual

RIDGID

RIDGID seeSnake DVD Pak Operator's manual

Myron L ULTRAMETER II 6P Operation manual

Myron L

Myron L ULTRAMETER II 6P Operation manual

Depstech DS530 user manual

Depstech

Depstech DS530 user manual

Powerfix Profi PEKW 8 A1 Operating instructions and safety instructions

Powerfix Profi

Powerfix Profi PEKW 8 A1 Operating instructions and safety instructions

Testec TT-SI 8000 Series instruction manual

Testec

Testec TT-SI 8000 Series instruction manual

Milwaukee M12 360IC12 Original instructions

Milwaukee

Milwaukee M12 360IC12 Original instructions

manuals.online logo
manuals.online logoBrands
  • About & Mission
  • Contact us
  • Privacy Policy
  • Terms and Conditions

Copyright 2025 Manuals.Online. All Rights Reserved.