Citizen D320 User manual

CITIZEN QUARTZ
TRAINING TIMER
Model No. ME4xxx
Cal. No. D320
• INSTRUCTION MANUAL
CTZ-B8020
Thank you for purchasing a CITIZEN QUARTZ
Watch. To ensure correct use, please read these
instructions carefully. Please confirm that the
CITIZEN International Guarantee Card is included
for your possible claim.
When reading this instruction manual please keep
the watch diagram above in view. Symbols (A, B,
etc.) used in the sections on operating instructions
refer to the symbols indicated in this diagram. The
design may differ slightly depending on the model.
1. FEATURES
This watch is a digital quartz watch equipped with a
training timer function convenient for various types
of sports training along with alarm, chronograph and
timer functions. It also is equipped with a
temperature measurement function and EL
(electroluminescence) function.
2. EXPLANATION OF DISPLAYS AND FUNCTIONS
Please read the following while referring to the
watch illustration shown above.
3. SWITCHING FUNCTIONS (MODES)
Pressing button M switches the mode as shown
below each time it is pressed. The current mode
can be confirmed by looking at the mode mark.
[Auto-Return Function]
The watch automatically returns to the time mode if
none of the buttons on the watch are pressed for
about 2 minutes or more in the calendar,
temperature memo or alarm mode.
4. EL ILLUMINATION
Pressing button Cduring the normal display of any
mode illuminates the EL light for as long as button
Cis pressed. In addition, the EL light is illuminated
when the split time or stop operation is performed
during chronograph measurement.

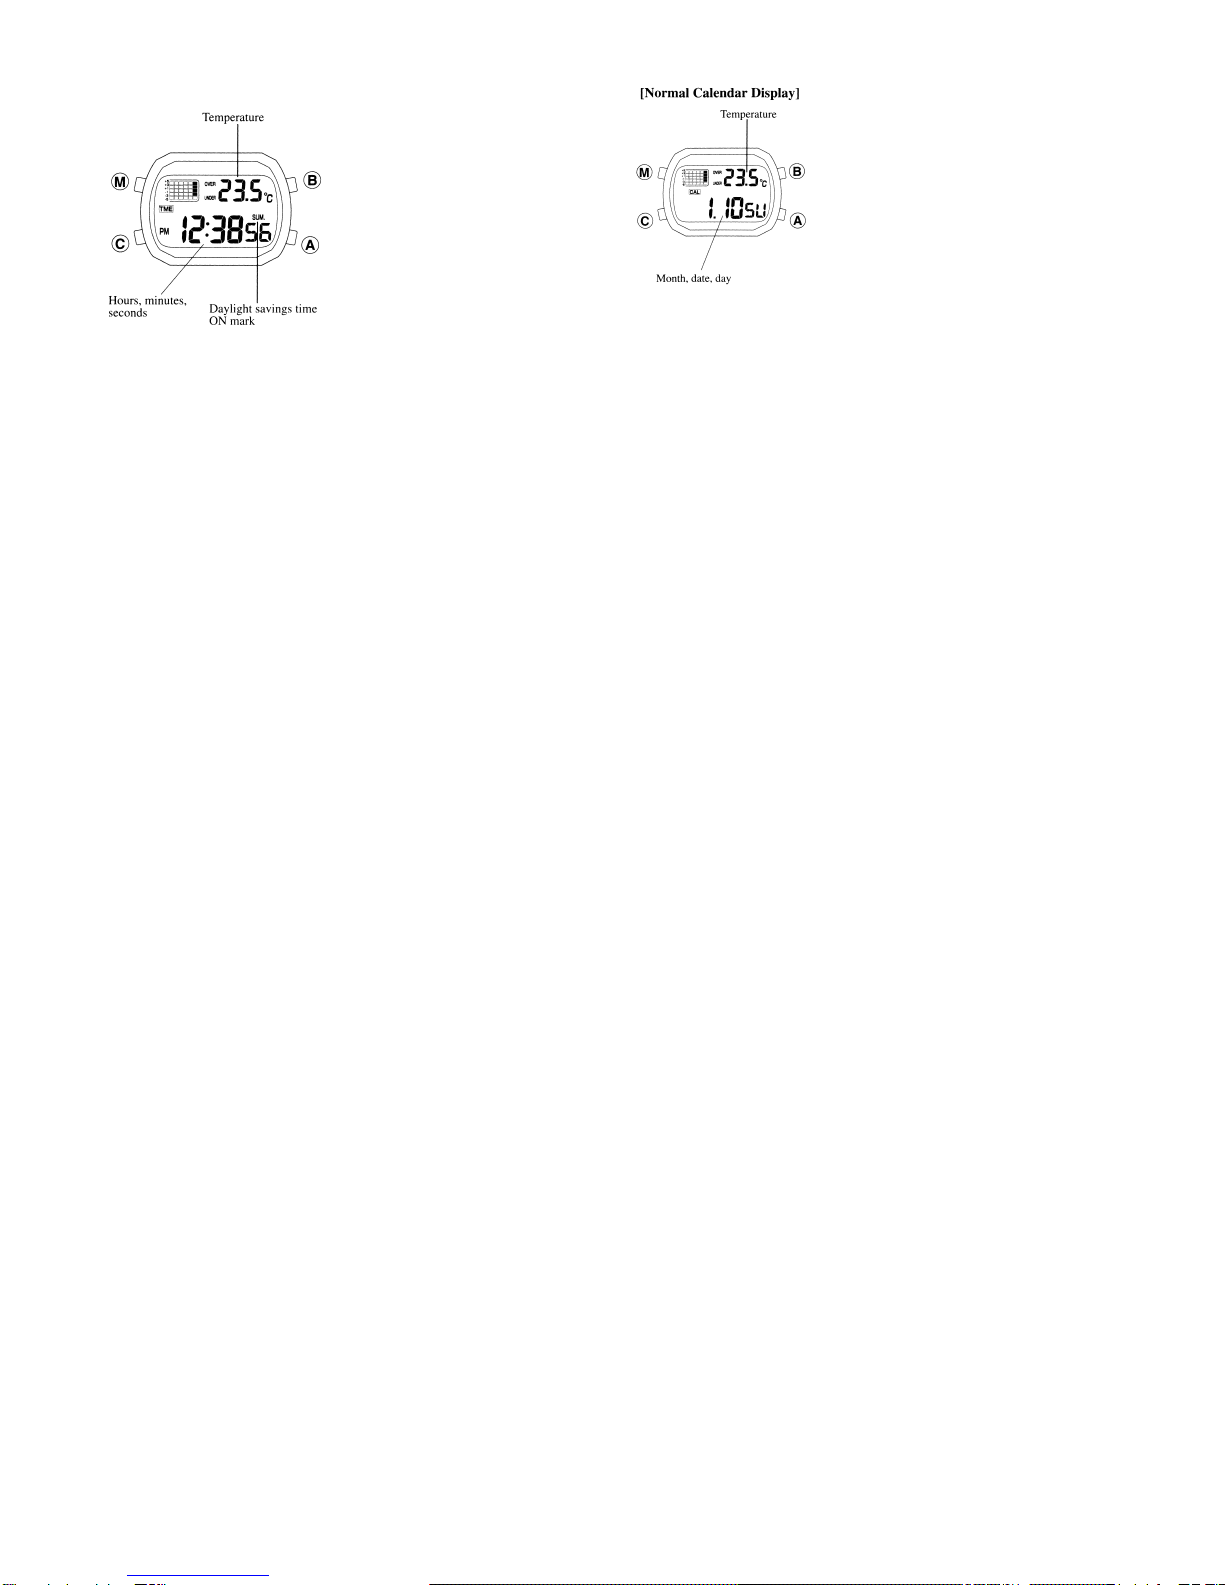
5. SETTING THE TIME [TME]
[Normal Time Display] <Switching Daylight
Savings Time (Summer
Time)>
1. Continuously pressing
button Bfor at least 2
seconds during the normal
time display causes “SUM”
and “ON/OFF” to flash
and the watch to switch
to the daylight savings
time correction mode.
2. Press button Ato set daylight savings time. Each
time button Ais pressed, daylight savings time
switches between set (ON) and cancelled (OFF).
3. Press button M to return the watch to the normal
time display.
* When Daylight Savings Time is Set (ON) “SUM” is
displayed during the normal time display, and the
time displayed is one hour ahead of the normal
time (time when daylight savings time is cancelled).
Note: Although “SUM” is displayed on the watch,
this refers to daylight savings time. The
abbreviation “SUM” is used since daylight
savings time is used during the summer.
<Setting the Time>
1. Continuously pressing button Bfor at least 2
seconds during the normal time display causes
“SUM.” and “ON/OFF” to flash and the watch to
switch to the daylight savings time correction
mode. This allows the flashing portion of the
display to be corrected.
2. Each time button B is pressed in the correction
mode, the flashing location on the display changes
in the order of daylight time, seconds, minutes,
hours and 12/24 hour display. Press button B
until the location of the display desired to be
corrected flashes.
3. Pressing button Ato correct the location of the
display that is flashing. (Pressing button A
continuously causes the display to advance rapidly.)
* Daylight savings time is alternately switched on
and off each time button Ais pressed.
* When correcting seconds, pressing button Acauses
the seconds display to return to “00” and then start
running.
* The 12/24-hour display is alternately switched
between 12-hour and 24-hour display every time
button Ais pressed.
4. Press buttonM to return the watch to normal
time display
* When the watch is set to the 12-hour display,
make sure to set the time while paying attention to
AM and PM
* The watch automatically returns to the normal time
display if none of the buttons on the watch are
pressed for about 2 minutes or more when in the
correction mode (flashing display).
* Pressing button M when in the time correction mode
causes the watch to immediately return to the
normal time display.
6. SETTING THE DATE [CAL]
<Setting the Date>
1. Continuously pressing button
B for 2 seconds or more
during the normal calender
display causes the “month”
to flash and the watch to
enter correction mode. This
allows the flashing portion of
the display to be corrected.
2. Each time button B is
2. pressed in the correction mode, the flashing loca-
tion on the display changes in the order of month,
date and year. Press button B until the location
of the display desired to be corrected flashes.
3. Press button Ato correct the location of the
display that is flashing. (Pressing button A
continuously causes the display to advance rapidly.
4. Press button M to return the watch to the normal
calendar display.
* The year can be set from 1999 to 2099 (only
displayed when in correction mode).
* The day is set automatically whenever the year,
month and date are corrected.
* When the date has been set to a date that does
not exist (such as February 30), it will automatically
be corrected to the first day of the following month
when the watch is returned to the normal display.
* Since this watch is provided with an auto-date
function, the date does not have to be corrected
on the last day of the month.
* The watch automatically returns to the normal
calendar display if none of the buttons on the watch
are pressed for about 2 minutes or more when in
the date correction mode (flashing display).
* Pressing button M when in the date correction
mode causes the watch to immediately return to
the normal calendar display.
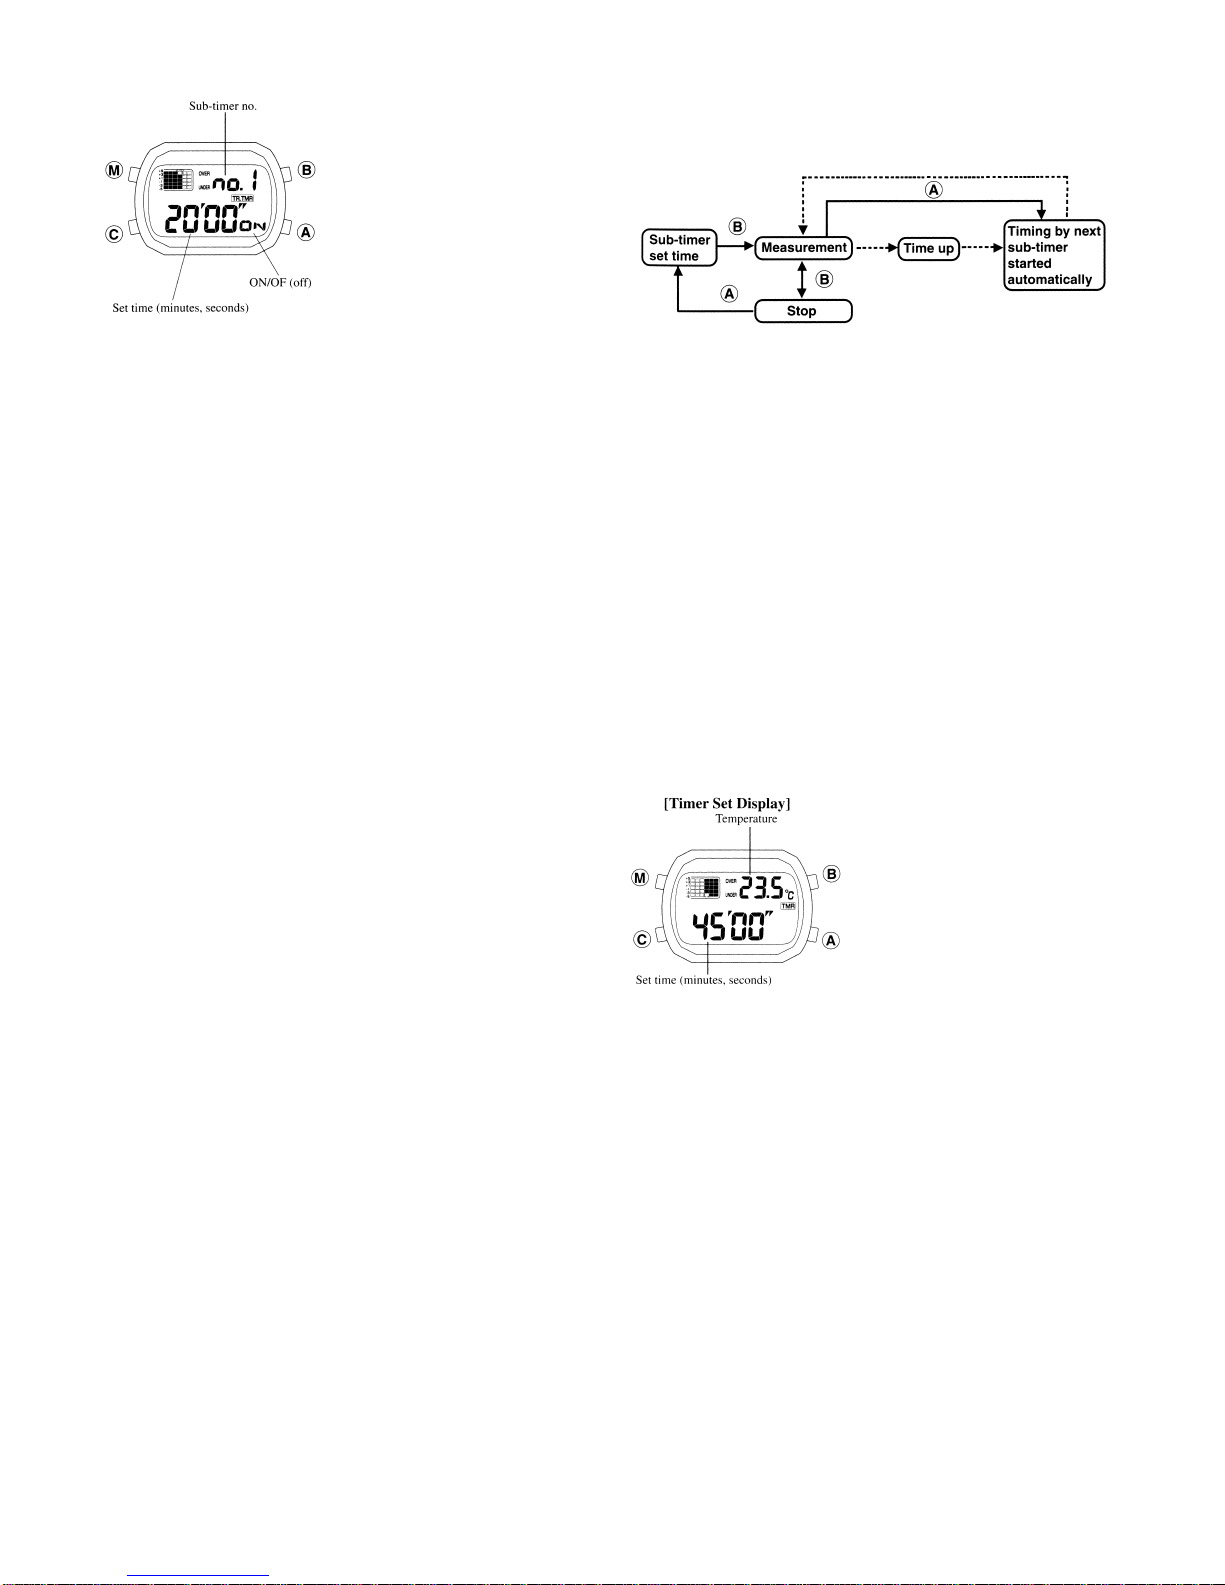
7. USING THE THERMOMETER FUNCTION
The thermometer function displays the most recent
temperature as measured in all modes except the
chronograph and training timer modes. This watch
measures temperature in two ways: either by
automatically measuring temperature every hour on
the hour, or by arbitrarily measuring temperature
whenever desired by the user by operating the buttons
of the watch regardless of the time. In addition,
temperature display can be switched between
Celsius (°C) and Fahrenheit (°F).
<Automatic Temperature Measurement>
The watch measures temperature automatically
every hour on the hour. Temperature is not
measured if the watch has been switched to the
time correction mode (flashing display) at the time
temperature is measured.
<Arbitrary Temperature Measurement by button
operation>
When button Ais pressed during the normal display
in the time mode, temperature is measured
continuously for 3 minutes at 2 second intervals.
Temperature measurement is terminated by pressing
either button Aor button M during temperature
measurement.

<Temperature Measuring Range and
Measurement Accuracy>
Notes:
* The measured temperature is affected by body
temperature if temperature is measured while
wearing the watch. In order to measure temperature
accurately, remove the watch and allow it to
acclimatise to the temperature of the surrounding
environment for at least 20 to 30 minutes. The
amount of time required to eliminate the effects of
body temperature varies according to the tempera-
ture differences before and after allowing the watch
to acclimatise to the surrounding environment and
the conditions at the location where the watch is
allowed to acclimatise.
* Do not use the thermometer to measure temperature
beyond the displayed temperature range indicated.
Exposure of the watch to extremely high or low
temperatures may cause malfunction.
<Switching Between Celsius and Fahrenheit Display>
Simultaneously pressing button Awhile pressing
button Mfor at least 3 seconds or more in the time
mode switches the temperature display between
Celsius (°C) and Fahrenheit (°F). (The display will
not switch if button Ais pressed first.)
8. TEMPERATURE MEMO MODE [MEMO]
When temperature is measured automatically every
hour on the hour or when temperature is measured
at an arbitrary time by operating the watch buttons,
the watch stores temperature measurement data
(consisting of temperature, time and memo number)
in the form of a temperature memo. A maximum of
7 temperature memos can be stored in memory.
Temperature memos stored in memory can be
viewed in the temperature memo mode.
[Temperature Memo (No. 1) Display]
<Displaying Temperature
Memos>
1. Press button Mto switch
to the memo mode.
2. Each time button Ais
pressed, up to 7 tempera-
ture memos are displayed
in order starting with the
2. most recent memo. The memo number of the
most recent temperature data is assigned a value
of “m1”, while the oldest temperature data is
assigned a value of “m7”.
* When the number of temperature memos exceeds
7, the oldest memo is automatically deleted.
Temperature memos cannot be deleted manually.
* When there are less than 7 temperature memos
stored in memory (such as after performing the all-
reset procedure described later), only the number
of temperature memos stored in memory is
repeatedly displayed.
* The most recent temperature data (m1) is displayed
in the time, calendar, alarm and timer modes.
<Temperature Memo Graphic
Display>
In the temperature memo mode,
the temperatures of each stored
temperature memo (m2 through
m7) are displayed in the form of
a bar graph based on the
temperature difference with the most recent
temperature memo (m1). This graphic display provides
a rough visual representation of temperature changes
between each temperature memo.
* The temp mark flashes during display of the most
recent temperature memo (m1). The temperature
graph of the selected temperature memo (m2
through m7).
* When the temperature difference between the
selected temperature memo and the most recent
temperature memo (m1) exceeds ±5°C (4°F), the
word OVER (when the selected temperature is
higher than the most recent temperature) or UNDER
(when the selected temperature is lower) flashes.
* When the most recent temperature memo
exceeds the range of -10° to +60°C (14°F to
140°F), the word OVER (when it is above
+60°C/140°F) or UNDER (when it is below -
10°C/14°F) flashes.
9. USING THE ALARM [ALM]
Once this alarm is set (switched ON), the alarm tone
sounds for 20 seconds at the same time every day.
<Alarm ON/OFF>
The alarm is switched on and off each time button
Ais pressed during the normal alarm display.
When the alarm is turned on, the mark lights on
the digital display in each mode.
Celsius (°C) Fahrenheit (°F)
Displayed temperature
range -9.9°C to +59.9C 14°F to 139°F
Measurement units 0.1°C 1°F
Measurement accuracy 20°C to 30°C: ±1°C
-5°C to 40°C: ±2°C 68°F to86°F: ±2°F
23°F to 104°F: ±4°F

<Setting the Alarm>
1. Continuously press button Bin the alarm mode
for at least 2 seconds. The “hours” flash at this
time. The location of the display that is flashing
can be corrected.
2. Press button Ato correct the “hours”. (Pressing
button Acontinuously causes the display to
advance rapidly.)
3. Press button Bagain while the “hours” are
flashing. The “minutes” flash at this time.
4. Press button Ato correct the “minutes”.
5. Press button Mto return the watch to the normal
alarm display.
<Alarm Tone Monitor>
The alarm tone can be monitored by continuously
pressing button Ain the alarm mode. The alarm
sounds for as long as button Ais pressed.
* The alarm can be turned off when it is sounding by
pressing any button.
* When the 12-hour display has been set for the
time mode, the alarm time also uses a 12-hour
display. Set the alarm time while paying attention
to AM and PM.
* The alarm time does not switch to daylight savings
time even if the watch has been set to daylight
savings time in the time mode.
* When none of the watch buttons are pressed for
about 2 minutes or more in the alarm correction
mode, the watch automatically returns to the
normal alarm display.
* Pressing button Mwhen in the alarm correction
mode immediately returns the watch to the normal
alarm display.
10. USING THE CHRONOGRAPH [CHR]
The chronograph is able to measure and display
time in 1/1000 second increments up to a maximum
of 23 hours, 59 minutes and 59.999 seconds. The
chronograph returns to 00 hours, 00 minutes, 00.000
seconds after measuring for 24 hours. The chronograph
can also be used to measure split time.
<Use of Integrated Measurement>
1. Pressing button B repeatedly starts and stops
the chronograph each time it is pressed.
2. Press button Ato reset the chronograph while it
is stopped.
<Measuring Split Time>
1. Pressing button Brepeatedly starts and stops
the chronograph each time it is pressed.
2. When button Ais pressed during timing, the split
time is displayed for 10 seconds. The letters
“SPL” flash during the time the split is displayed.
The most recent split time can be measured and
displayed each time button Ais pressed.
3. Press button Ato reset the chronograph while it
is stopped.
<Switching Modes during Chronograph
Measurement>
Chronograph measurement is continued even when
switching to a different mode by pressing button M
during chronograph measurement. When again
returning to the chronograph mode, time is displayed
in continuation from before the mode was switched.
However, when chronograph measurement exceeds
24 hours, it returns to the chronograph reset display.
*Split time: The amount of time elapsed when
reaching an intermediate point after starting.
11. USING THE TRAINING TIMER [TR.TMR]
The training timer function is equipped with five sub-
timers (No. 1 through No. 5). Time is measured
repeatedly in sequence using these five sub-timers.
Each sub-timer can be set in 1 second increments
from 0 minutes 10 seconds to 59 minutes 59
seconds. In addition, each sub-timer can also be set
to OFF (when not in use) or skipped during timing
(to immediately start timing with the next sub-timer).
<Example of Using the Training Timer>
The training timer is particularly convenient when
performing a series of training exercises for a pre-
determined amount of time at a sports gym and so
forth (e.g.,running on a running machine for 20
minutes ➝ resting for 5 minutes ➝ bench pressing
for 5 minutes ➝ resting for 3 minutes ➝ doing
squats for 5 minutes). The training timer can also be
used in athletic competitions such as soccer matches
in which there is a first half and second half with a
half-time period in between (e.g., 45 minute first half
➝ 10 minute half time ➝45 minute second half).

[Normal Training Timer (No.1) Display]
<Setting the Sub-timer>
The setting procedure is the
same for all 5 sub-timers.
Set sub-timer nos. 1 through
5 by repeating the procedure.
1. Press button Ain the
training timer mode to
select the sub-timer to be
set. (Sub-timer nos. 1
through 5 are called up
1. each time button Ais pressed.)
2. Pressing button Afor at least 2 seconds switches
the selected sub-timers to the correction mode
(ON or OFF flashes).
3. While ON or OFF is flashing, press button A
again to switch the selected sub-timer ON (in use)
or OFF (not in use).
4. Each time button B is pressed, the flashing
location changes (ON/OFF ➝ minutes ➝ seconds).
Press button B until the location desired to be
corrected flashes.
5. Press button Ato correct the location that is
flashing. (Pressing button Acontinuously causes
the display to advance rapidly.)
6. Press button Mto complete the sub-timer setting
procedure.
* When a sub-timer is set to a time from 00 minutes
to 00 seconds to 00 minutes 09 seconds, the sub-
timer will automatically be set to 10 seconds after
the setting procedure is completed.
* When none of the watch buttons are pressed for
about 2 minutes or more in the sub-timer correction
mode, the watch automatically returns to the
normal display.
* Pressing button M when in the sub-timer correction
mode immediately returns the watch to the normal
display.
<Training Timer Measurement Procedure>
Timing can be started from any of the five sub-timers
that have been set to ON. When timing of one sub-
timer has been completed, a tone indicating that
time has expired sounds for about 5 seconds, and
timing with the next sub-timer starts automatically
simultaneous to sounding of the above tone. Sub-
timers that have been set to OFF during timer setting
are skipped.
1. Press button Ato select the sub-timer with which
timing is to be started.
2. Press button B to start the selected sub-timer.
3. Pressing button B during timing stops the
elected sub-timer. Pressing button B again
resumes timing in continuation from the time at
which timing was previously stopped.
4. Pressing button Awhile the selected sub-timer is
stopped returns the selected sub-timer to the set
time.
<Skip Function>
Pressing button Aduring timing by the selected
sub-timer immediately causes timing by that timer to
be skipped followed by the start of timing with the
next sub-timer.
<Switching Mode during Training Timer
Measurement>
Training timer measurement is continued even when
switching to a different mode by pressing button M
during training timer measurement. When again
returning to the training timer mode, time is displayed
in continuation from before the mode was switched.
When the set time of the selected sub-timer expires,
a tone indicating that the time is up sounds even
when the watch is displaying a different mode.
12. USING THE TIMER [TMR]
The timer can be used to set the time in 1 second
increments counting down from 59 seconds to 00
minutes 01 second. A tone indicating that the time is
up sounds for about 5 seconds when the time has
elapsed. At the same time, an auto chronograph
(24 hour clock) begins to measure the amount of
time elapsed after time on the timer expired.
<Setting the Timer>
1. Pressing button Afor at
least 2 seconds in the timer
mode causes the “minutes”
to flash.
2. Press button B to set the
“minutes”. (Pressing button
B continuously causes the
display to advance rapidly.)
3. Pressing button Awhen the “minutes” are
flashing causes the “seconds” to flash.
4. Press button B to set the “seconds”.
5. Pressing button Mcompletes the timer setting
procedure.
* When none of the watch buttons are pressed for
about 2 minutes or more in the timer correction
mode, the watch automatically returns to the timer
set display.
* Pressing button M when in the timer correction
mode immediately returns the watch to the timer
set display.

<Measuring Time with the Timer>
1. Press button B to start timing from the set time.
2. Pressing button B during timing interrupts timing.
Pressing button B again restarts timing in
continuation from the time when the timer was
previously stopped.
3. Pressing button Awhile the timer is stopped
returns the timer to the set time.
<Use of Auto-Chronograph Measurement>
1. The auto-chronograph starts measuring time
automatically after the set time of the timer has
elapsed.
2. Pressing button B during auto-chronograph
measurement repeatedly starts and stops the
auto-chronograph each time it is pressed.
3. Pressing button Awhen the auto-chronograph is
stopped returns the timer to the timer set time.
<Timer Restart Function>
Pressing button Aduring timer or auto-chronograph
measurement immediately returns the timer to the
timer set time and timing is automatically restarted
from that set time.
<Switching Mode during Timer Measurement>
Measurement is continued even when switching to
a different mode by pressing button M during timer
or auto-chronograph measurement. When again
returning to the timer mode, time is displayed in
continuation from before the mode was switched.
However, when the auto-chronograph completes 24
hours of measurement, the timer returns to the timer
set display.
13. ALL-RESET PROCEDURE
Always make sure to perform the all-reset procedure
described below after replacing the battery. In addition,
there may also rarely be times when the watch does
not run properly or has an abnormal display due to
a strong impact or is subjected to static electricity
(such as when there is no time display showing or
when the alarm sounds continuously). Perform the
reset-all procedure in these cases as well.
<All-Reset Procedure>
1. Press all four buttons
A, B, Cand M
simultaneously.(The
entire display lights.)
2. Release all buttons.
3. Press any button. (A tone confirming operation
sounds and the watch will start to run.) This
completes the all-reset procedure.
After performing this procedure, make sure to
properly reset the time and each of the other modes
before using the watch.
14. PRECAUTIONS
Caution:Water Resistance Performance
There are several types of water-resistant watches,
as shown on the following table.
For correct use within the design limits of the watch,
confirm the level of water-resistance of your watch,
as indicated on the dial and case, and consult the
table.
*(The unit “bar” is roughly equal to 1 atmosphere.)
*WATER RESISTANT (ANT) xxbar may also be indicated as W.R. xxbar

Water-resistance for daily use (to 3 atmospheres):
This type of watch is water resistant to minor
exposure to water. For example, you may wear the
watch while washing your face; however, it is not
designed for use underwater.
Upgraded water-resistance for daily use
(to 5 atmospheres): This type of watch is water-
resistant to moderate exposure to water. You may
wear the watch while swimming; however, it is not
designed for use while skin diving.
Upgraded water-resistance for daily use
(to 10/20 atmospheres): This type of watch may be
used for skin diving; however it is not designed for
scuba or saturated diving using helium gas.
CAUTION
• Do NOT operate the button with wet fingers or when
the watch is wet. Water may enter the watch and
compromise water-resistance.
• If the watch is used in seawater, rinse with fresh
water afterward and wipe with a dry cloth.
• If moisture has entered the watch, or if the inside
of the crystal is fogged up and does not become
clear within a day, immediately take your watch to
your dealer or Citizen Service Centre for repair.
Leaving the watch in such a state will allow
corrosion to form inside.
• If seawater enters the watch, place the watch in a
box or plastic bag and immediately take the watch
in for repair. Otherwise, pressure inside the watch
will increase, and parts (crystal, buttons, etc.) may
come off.
CAUTION: Keep your watch clean
• Dust and dirt tend to be deposited in gaps in the
back of the case or band. Deposited dust and dirt
may cause corrosion and soil your clothing. Clean
the watch occasionally.
Cleaning the Watch
• Use a soft cloth to wipe off dirt, perspiration and
water from the case and crystal.
• Use a soft, dry cloth to wipe off perspiration and
dirt from the leather band.
• To clean a metal, plastic, or rubber watchband,
wash away dirt with mild soap and water. Use a
soft brush to remove dust and dirt jammed in the
gaps in the metal band. If your watch isn’t water-
resistant, take it to your dealer.
NOTE: Avoid using solvents (thinner, benzine, etc.),
as they may mar the finish.
WARNING: Handling of the Battery
• Keep the battery out of the reach of small children.
If a child swallows the battery, contact a physician
immediately.
CAUTION: Replacing the Battery
• For replacement of the battery, take your watch to
your dealer or Citizen Service Centre.
• Replace the battery as soon as possible if the
service life of the battery has expired. Leaving a
depleted battery in the watch may result in
leakage, which can damage the watch severely.
CAUTION: Operating environment
• Use the watch within the operating-temperature
range specified in the instruction manual.
• Do NOT use the watch where temperatures are
outside the specified range, may result in
deterioration of functions or even stoppage of the
watch.
• Do NOT use the watch in places where it is
exposed to high temperature, such as in a sauna.
Doing so may result in a skin burn.
• Do NOT leave the watch in a place where it is
exposed to high temperature, such as the glove
compartment or dash-board of a car.
Doing so may result in deterioration of the watch,
such as deformation of plastic parts.
• Do NOT place the watch close to a magnet.
Timekeeping will become inaccurate if you place
the watch close to magnetic health equipment such
as a magnetic necklace or a magnetic latch of a
refrigerator door or handbag clasp or the earphone
of a mobile phone. If this has occurred, move the
watch away from the magnet and reset the time.
• Do NOT place the watch close to household
appliances that generate static electricity.
Timekeeping may become inaccurate if the watch
is exposed to strong static electricity, such as is
emitted from a TV screen.
• Do NOT subject the watch to strong shocks such
as dropping it onto a hard floor.
• Avoid using the watch in an environment where it
may be exposed to chemicals or corrosive gases.
If solvents, such as thinner and benzine, or
substances containing such solvents come in
contact with the watch, discolouration, melting,
cracking, etc., may result. If the watch comes in
contact with mercury used in thermometers, the
case, band or other parts may become
discoloured.

15. SPECIFICATIONS
1. Caliber No.: D320
2. Type: Digital quartz watch
3. Accuracy: Within ±20 seconds per
month on average (when
worn at normal temperatures
of +5°C/41°F to +35°C/95°F)
4. Operating
Temperature Range: -5°C/23°F to +50°C/122°F
5. Display Functions
*Time: Hours, minutes, seconds,
temperature
*Date: Month, date, day, temperature
*Temperature memo: Memo time (hours, minutes),
temperature, memo no.
*Alarm: Alarm time (hours, minutes)
or OFF, temperature
*Chronograph: 24-hour measurement
(1/1000 second increments),
split time measurement,
auto-chronograph
measurement.
*Training timer: Repeated timing by 5 sub-
timers, skip function
*Timer: 60-minute measurement
(1-second increments)
6. Additional Functions
*EL illumination function
*Temperature measurement function
7. Battery: No. 280-206, battery code: CR2016
8. Battery Life: Approx. 3 years (when used under the
following conditions: alarm tone
sounds for 20 seconds/day, time up
tone sounds for a total of 10 seconds/
day, and EL illumination is used for
3 seconds/day)
*Specifications are subject to change without notice.
Table of contents
Other Citizen Watch manuals

Citizen
Citizen B110 Operating manual

Citizen
Citizen 6P23 User manual

Citizen
Citizen P990 User manual

Citizen
Citizen 9015 User manual

Citizen
Citizen J304 User manual

Citizen
Citizen H33 Series User manual

Citizen
Citizen 6029 User manual

Citizen
Citizen FS03 User manual

Citizen
Citizen Eco-Drive U700 User manual

Citizen
Citizen E761 Operating manual

Citizen
Citizen 0S21 User manual

Citizen
Citizen Classic User manual

Citizen
Citizen 085X User manual

Citizen
Citizen JG1 Series User manual

Citizen
Citizen YP17747 User manual

Citizen
Citizen 9170 User manual

Citizen
Citizen 0S2B User manual

Citizen
Citizen Quartz E870 User manual

Citizen
Citizen 6P25 User manual

Citizen
Citizen Calibre 8700 Series User manual