Clarke CIC2410 Use and care manual

OPERATION & SAFETY
INSTRUCTIONS
GC0116
INSPECTION CAMERA
MODEL NO: CIC2410
PART NO: 6470385

2
Parts & Service: 020 8988 7400 / E-mail: Parts@clarkeinternational.com or Service@clarkeinternational.com
INTRODUCTION
Thank you for purchasing this CLARKE Inspection Camera.
Before attempting to use this product, please read this manual thoroughly and
follow the instructions carefully. In doing so you will ensure the safety of yourself
and that of others around you, and you can look forward to your purchase
giving you long and satisfactory service.
GUARANTEE
This product is guaranteed against faulty manufacture for a period of 12
months from the date of purchase. Please keep your receipt which will be
required as proof of purchase.
This guarantee is invalid if the product is found to have been abused or
tampered with in any way, or not used for the purpose for which it was
intended.
Faulty goods should be returned to their place of purchase, no product can
be returned to us without prior permission.
This guarantee does not effect your statutory rights.
ENVIRONMENTAL RECYCLING POLICY
Through purchase of this product, the customer is taking on the
obligation to deal with the WEEE in accordance with the WEEE
regulations in relation to the treatment, recycling & recovery and
environmentally sound disposal of the WEEE.
In effect, this means that this product must not be disposed of with general
household waste. It must be disposed of according to the laws governing
Waste Electrical and Electronic Equipment (WEEE) at a recognised disposal
facility.

3
Parts & Service: 020 8988 7400 / E-mail: Parts@clarkeinternational.com or Service@clarkeinternational.com
SAFETY PRECAUTIONS
GENERAL
1. Always read and ensure you fully understand the following precautions
and the hazards associated with this type of product. Please keep these
instructions in a safe place for future reference.
2. Never carry out any modifications to this product. If experiencing difficulty
of any kind consult your local Clarke dealer.
OPERATING ENVIRONMENT
1. Keep the work area clean and well lit. Cluttered benches and dark areas
may cause accidents.
2. Always operate the camera in a well ventilated work area.
3. Do not operate the camera in explosive atmospheres, such as in the
presence of flammable liquids, gasses or dust particles.
4. Keep bystanders and children away from work areas.
ELECTRICAL SAFETY
1. Before inspecting hollow walls and cavities, shut off the circuit breakers to
the entire building.
2. Before inspecting items that may contain an electrical charge, have them
inspected by a qualified electrician.
3. Switch off the engine before inspecting automobile parts.
4. Do not use the camera while standing in water.
5. Avoid body contact with grounded surfaces such as pipes, radiators,
ranges and refrigerators.
6. Do not expose the hand-held display unit to rain or wet conditions. Water
entering the display unit will increase the risk of electric shock.
7. Do not place the camera head and lance into any place that may
contain an electrical charge or moving parts which could increase the risk
of damage.
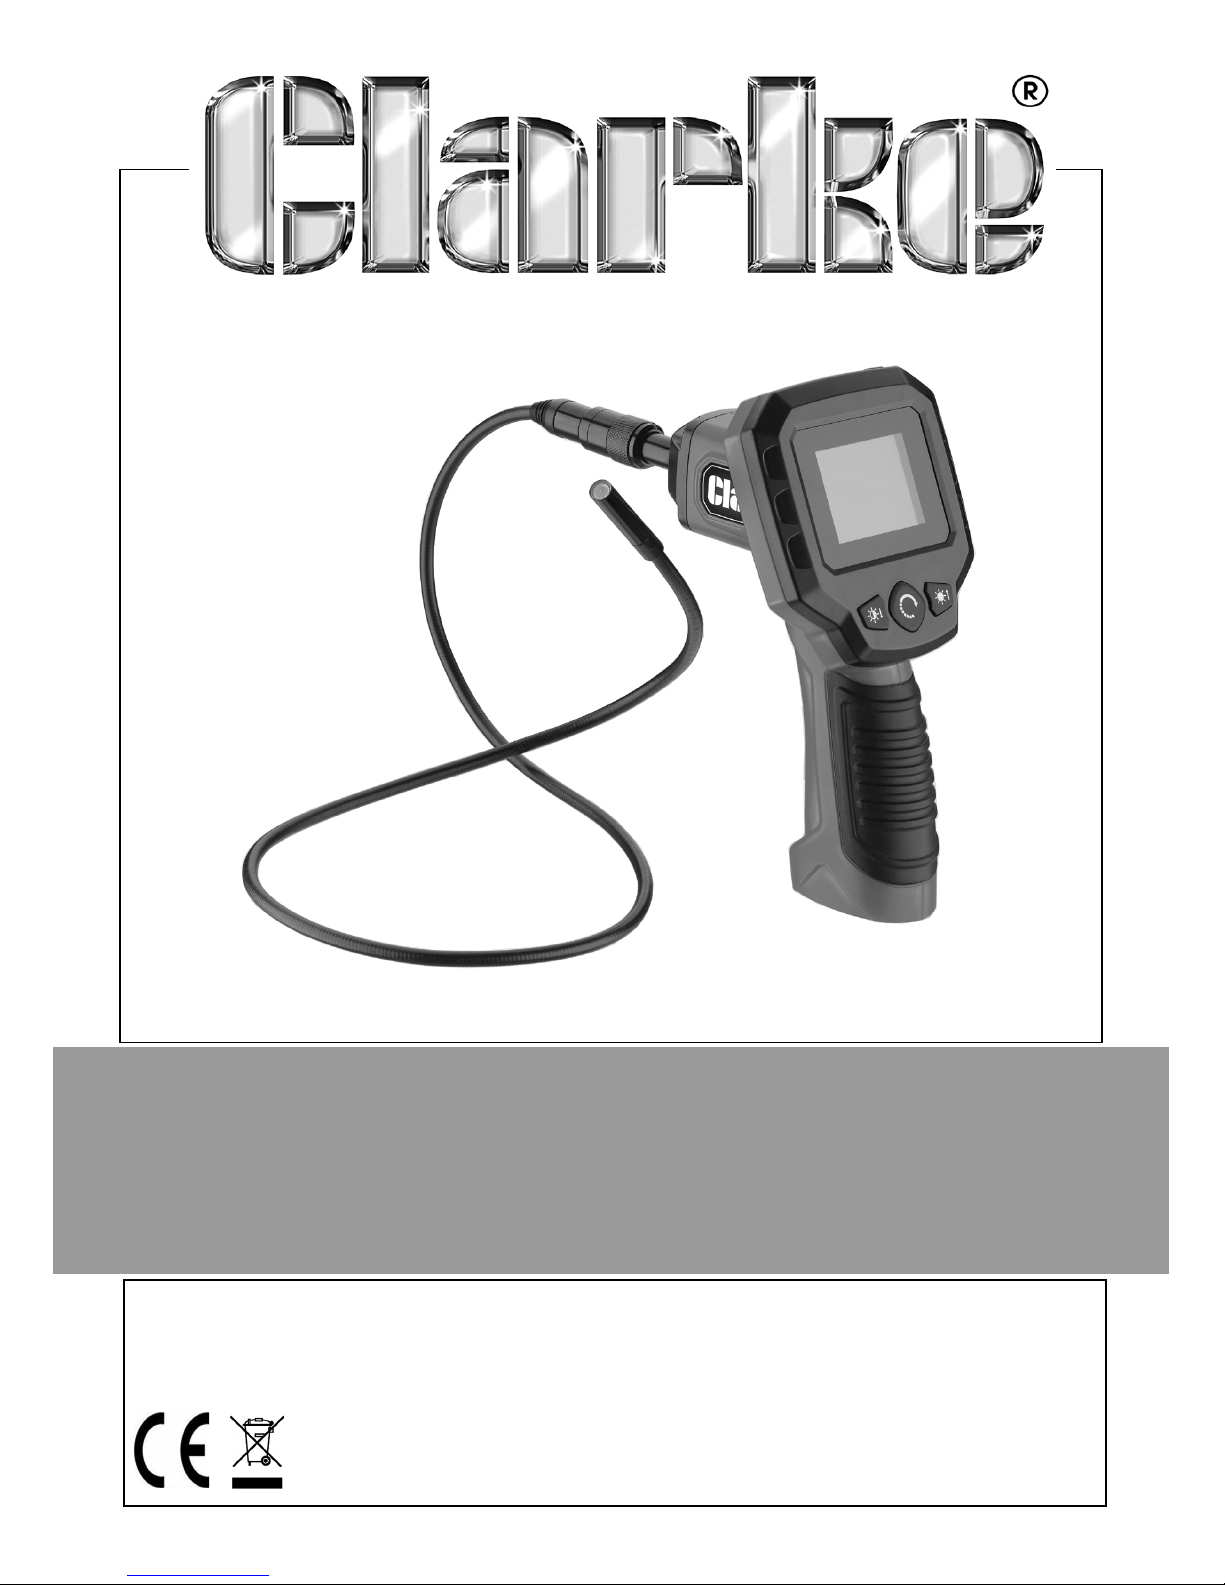
8. Make sure your hands are dry before operating the camera or changing
the batteries.
CAMERA SAFETY
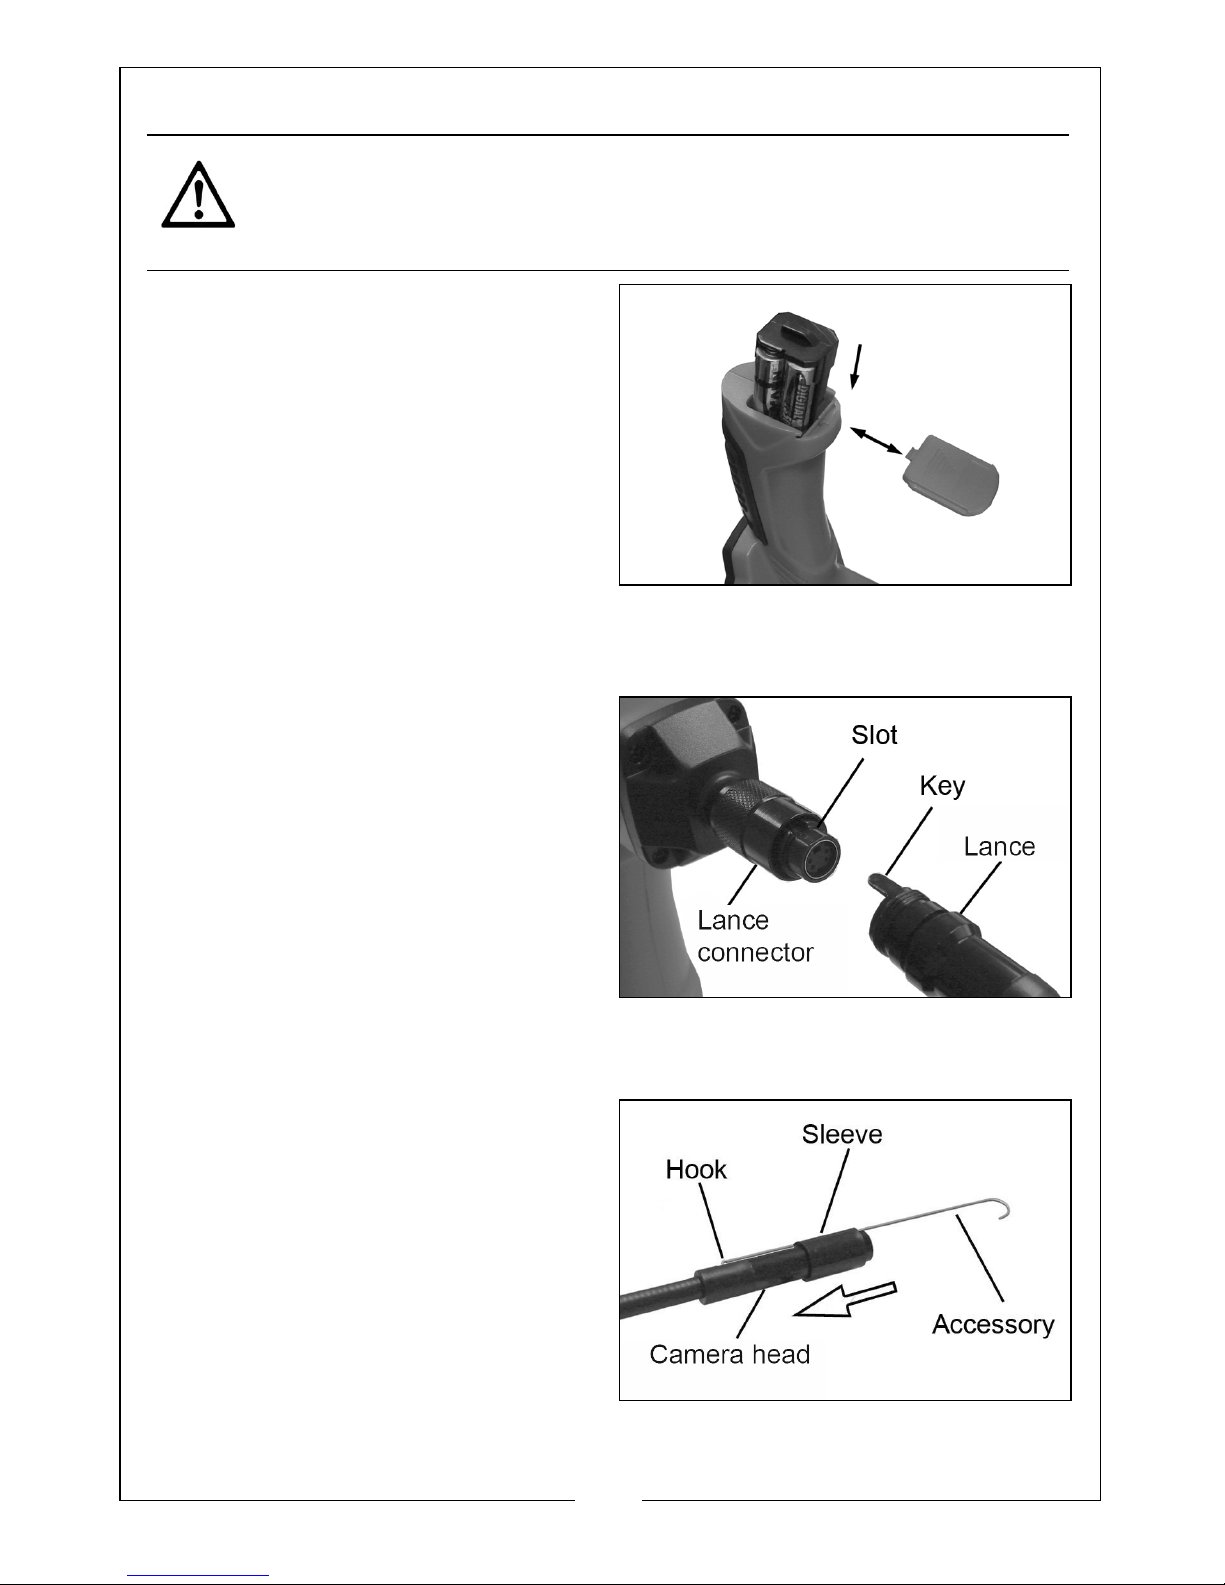
1. The handheld display unit is not waterproof. The camera head and lance
are rated to IP67.

4
Parts & Service: 020 8988 7400 / E-mail: Parts@clarkeinternational.com or Service@clarkeinternational.com
2. Do not continue using the camera if condensation forms in the camera
head. Let any condensation evaporate before use.
3. Do not submerge the camera head and camera cable into corrosive
substances such as drain cleaner.
4. Do not get petrol or oil on the camera head or camera cable.
5. Do not use excessive force to insert or withdraw the camera head and
cable.
6. Do not use where the camera could come into contact with moving
machinery.
7. Do not place the camera on unstable surfaces.
8. Handle the camera with care and check for damage if dropped.
9. Store the camera and accessories in their case and out of reach of
children.

5
Parts & Service: 020 8988 7400 / E-mail: Parts@clarkeinternational.com or Service@clarkeinternational.com
PREPARATION
COMPONENTS
Open the storage case and check for any damage sustained in transit. Notify
your Clarke dealer immediately of any defects.

6
Parts & Service: 020 8988 7400 / E-mail: Parts@clarkeinternational.com or Service@clarkeinternational.com
INSTALLING THE BATTERIES
The battery compartment is located
on the bottom of the handle.
1. Slide the battery cover off,
remove the battery case and
insert four AA batteries (not
supplied).
2. Slide the battery case back in and
replace the battery cover.
The battery case can only be
inserted in the correct orientation.
CONNECTING/DISCONNECTING THE CAMERA CABLE
1. Carefully push the lance key into
the lance connector slot.
2. Turn the cable connector
counterclockwise until the cable
and lance connector are securely
attached.
3. Turn the camera cable connector
the opposite way to detach it
from the connector and remove
the camera cable.
ATTACHING THE ACCESSORIES
1. Hold the accessory against the
imager head, seating the hook
into the hole.
2. Match the slot in the sleeve to the
accessory, then slide the sleeve
down the imager head until it
covers the hook.
CAUTION: POSITION THE BATTERIES IN THE CORRECT POLARITY AND DO
NOT INSTALL BATTERIES OF DIFFERENT TYPES, CHARGE LEVELS OR
CAPACITIES TOGETHER.

7
Parts & Service: 020 8988 7400 / E-mail: Parts@clarkeinternational.com or Service@clarkeinternational.com
CONNECTING TO AN EXTERNAL MONITOR WITH THE RCA CABLE
1. Plug one end of the RCA cable into the RCA video connection on the
camera, then plug the other end into the RCA video port on the monitor.
OPERATING INSTRUCTIONS
DISPLAY UNIT CONTROLS
The camera has the basic controls shown below.
WARNING: ALWAYS READ THE SAFETY INSTRUCTIONS IN THIS MANUAL
BEFORE STARTING WORK.

8
Parts & Service: 020 8988 7400 / E-mail: Parts@clarkeinternational.com or Service@clarkeinternational.com
LIVE VIEWING
Before each use, inspect the condition of the camera, checking for
condensation in the camera head, cracked or damaged camera cable or
other damage that may affect its operation.
View the available image on the display screen or use the RCA cable to view
the image on an external monitor.
1. Press the power button to turn the camera on.
2. Press the left button to decrease the brightness
3. Press the right button to increase the brightness.
4. Press the centre button to flip the image horizontally and vertically.
5. The camera lens must be at least 30 mm away from its subject in order for it
to focus and correctly display the image on the screen.
6. Always handle the camera with accessories and camera cable carefully
when inserting it into mechanical items.
7. When finished, press the power button to turn the camera off before
cleaning and storing as follows.
CLEANING AND MAINTENANCE
PERIODICALLY
1. After use, use a mild detergent on a clean cloth to remove any oil, grease
or dirt from the camera, especially around the buttons and ports. Take
care that no moisture enters the camera. Do not put excessive pressure on
the display screen.
2. Remove the batteries prior to long term storage.
3. Store the camera and its accessories in the storage case out of reach of
children.
4. Refer to your Clarke dealer if any components need replacing.

9
Parts & Service: 020 8988 7400 / E-mail: Parts@clarkeinternational.com or Service@clarkeinternational.com
FAULT FINDING
TECHNICAL SPECIFICATION
PROBLEM POSSIBLE CAUSES SOLUTION
Display is on but does
not show image
Camera cable con-
nection is loose.
Camera head is dirty.
Check that camera cable
is connected.
Clean camera head.
Light is dim at maximum
brightness.
Display turns itself off.
Camera will not turn on.
Low batteries. Replace batteries.
Dimensions (L x W x H) 150 x 400 x 206 mm
Weight 0.37 kg
Electrical Supply 4 x AA Non-rechargable Batteries
Rated Voltage 4 - 6.5 VDC
Rated Current 200 mA
Protection Class III
Camera Cable Length 1000 mm (inc camera)
Camera Cable Diameter 6 mm
Camera Cable and Camera IP
Rating
IP 67 (protected against the effect of
immersion between 15 cm and 1m
Operating Temperature -8°to +80°C
Camera Illumination Levels 1-5
LCD Screen Size 61mm (diagonal) TFT LCD
LCD Screen Resolution 320 x 240
Video output RCA Cable
Imager Head Diameter 9 mm (0.3”)
Imager Head Lights 4 x adjustable LED
Image Sensor 1/9” VGA CMOS

10
Parts & Service: 020 8988 7400 / E-mail: Parts@clarkeinternational.com or Service@clarkeinternational.com
PARTS LIST
ID DESCRIPTION
1 Hand-held Display Unit
2 Camera cable with 9 mm camera head
3RCACable
4 Mirror Accessory
5 Hook Accessory
6 Magnet Accessory
7 Storage Case

11
Parts & Service: 020 8988 7400 / E-mail: Parts@clarkeinternational.com or Service@clarkeinternational.com
DECLARATION OF CONFORMITY

Table of contents
Popular Analytical Instrument manuals by other brands

SICK
SICK VICOTEC320 Series operating instructions

Vivax Metrotech
Vivax Metrotech vCamMX quick guide

Bühler technologies
Bühler technologies GAS 222.35 Ex1 Installation and operation instruction

DeLaval
DeLaval Herd Navigator precision analytics 100 Instruction book

SecurityMan
SecurityMan ToolCam Speci?cations

Swann
Swann Chematest 35 Operator's manual