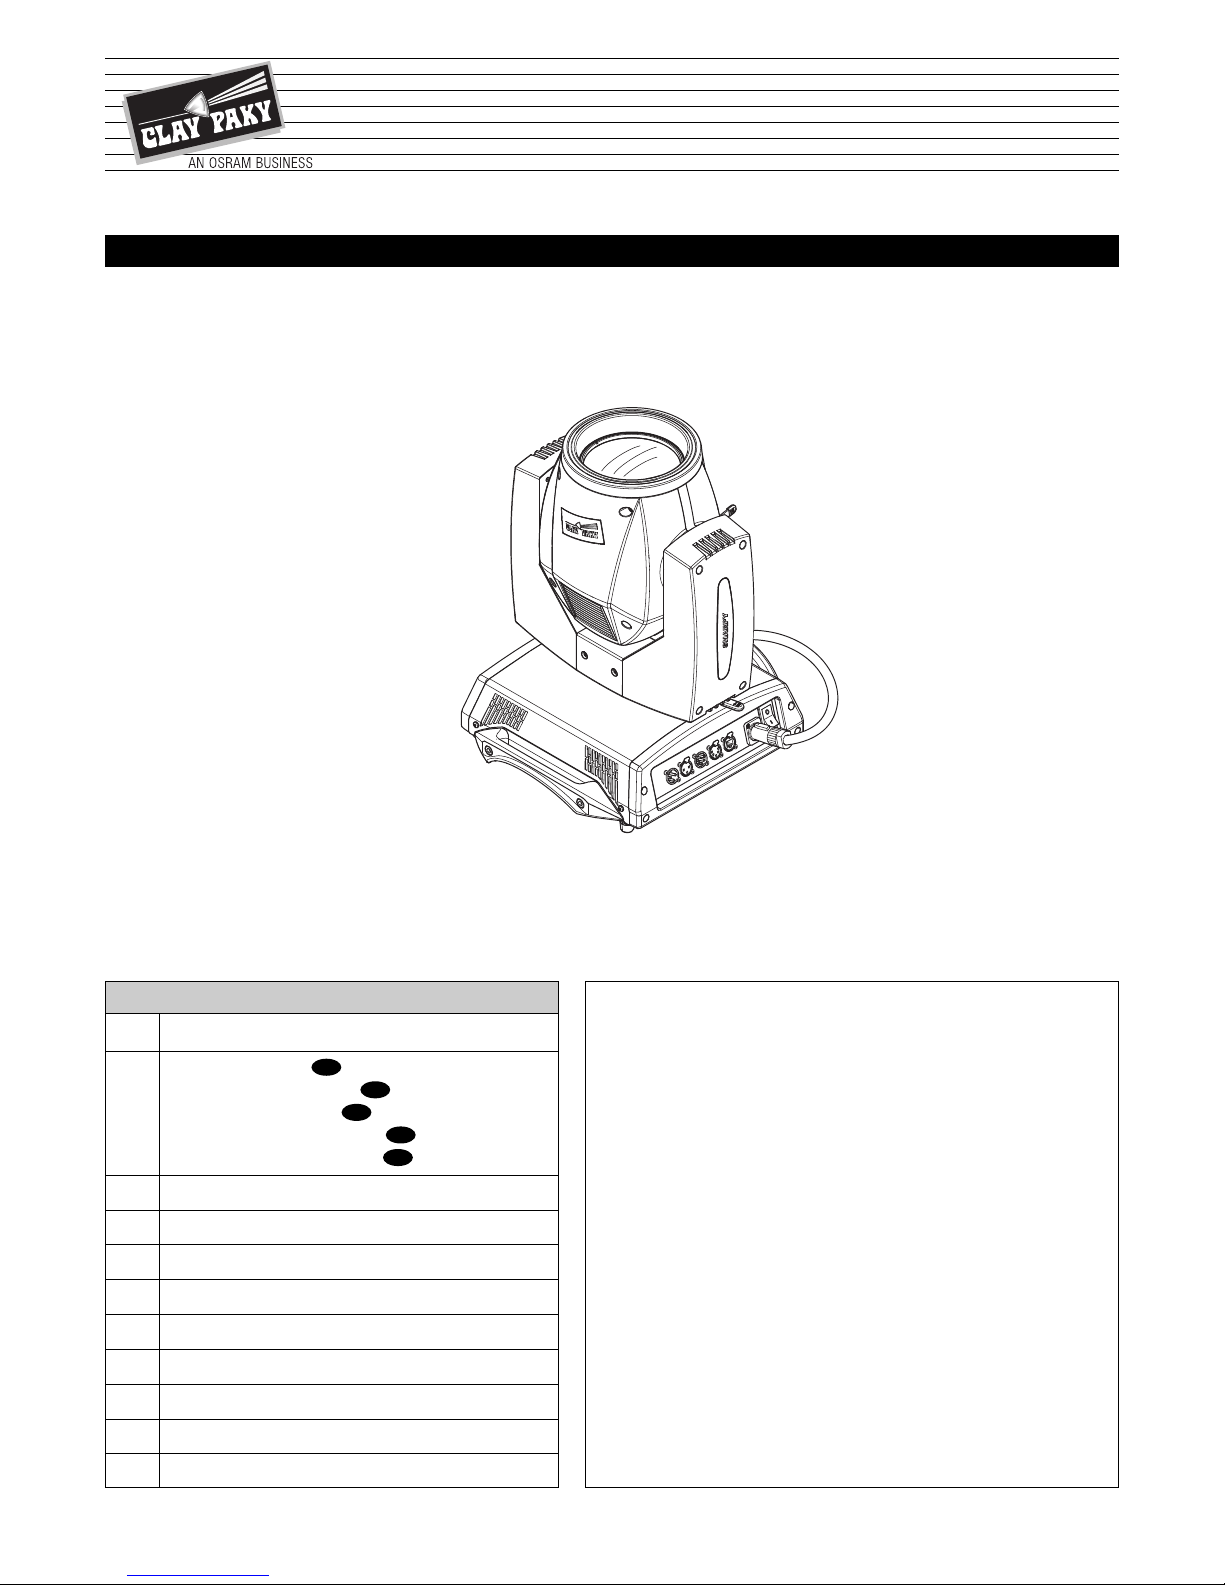
Claypaky Sharpy User manual

1
SHARPY
C61375
INSTRUCTION MANUAL
Congratulation on choo ing a Clay Paky product!
We thank you for your cu tom.
Plea e note that thi product, a all the other in the rich Clay
Paky range, ha been de igned and made with total quality to
en ure excellent performance and be t meet your expectation
and requirement .
Carefully read this instruction manual in its entirety and keep it
safe for future reference. It is essential to know the information
and comply with the instructions given in this manual to ensure
the fitting is installed, used and serviced correctly and safely.
CLAY PAKY S.p.A. disclaims all liability for damage to the fitting
or to other property or persons deriving from installation, use and
maintenance that have not been carried out in conformity with this
instruction manual, which must always accompany the fitting.
CLAY PAKY S.p.A. reserves the right to modify the
characteristics stated in this instruction manual at any time and
without prior notice.
ENGLISH
INDEX
Page Contents
2 Safety Information
4 Informazioni di sicurezza
6 Consignes de sécurité
8 Informationen zur Sicherheit
10 Informaciones de suguridad
12 Unpacking and preparation
13 Installation and start-up
14 Control panel
16 Menu setting
23 Maintenance
30 Optional accessories
31 Technical information
31 Cause and solution of problems
32 Channel functions
EN
IT
FR
DE
ES

2
SHARPY
• Installation
Make sure all parts for fixing the projector are in a good state of repair.
Make sure the point of anchorage is stable before positioning the projector.
The safety chain must be properly hooked onto the fitting and secured to the framework, so that, if the primary
support system fails, the fitting falls as little as possible.
If the safety chain gets used, it needs to be replaced with a genuine spare.
• MINIMUM DISTANCE OF ILLUMINATED OB ECTS
The projector needs to be positioned so that the objects hit by the beam of light are at least 12 metres
(39’4”) from the lens of the projector.
• Minimum distance from flammable materials
The projector must be positioned so that any flammable materials are at least 0.20 metres (8") from every point on
the surface of the fitting.
• Maximum ambient temperature
Do not operate the fixture if the ambient temperature (Ta) exceeds 40° C (104° F).
• IP20 protection rating
The fitting is protected against penetration by solid bodies of over 12mm (0.47”) in diameter (first digit 2), but not
against dripping water, rain, splashes or jets of water (second digit 0).
• Protection against electrical shock
Connection must be made to a power supply system fitted with efficient earthing (Class I appliance according to
standard EN 60598-1).
It is, moreover, recommended to protect the supply lines of the projectors from indirect contact and/or shorting to
earth by using appropriately sized residual current devices.
• Connection to mains supply
Connection to the electricity mains must be carried out by a qualified electrical installer.
Check that the mains frequency and voltage correspond to those for which the projector is designed as given on
the electrical data label.
This label also gives the input power to which you need to refer to evaluate the maximum number of fittings to
connect to the electricity line, in order to avoid overloading.
• Temperature of the external surface
The maximum temperature that can be reached on the external surface of the fitting, in a thermally steady state, is
100°C (212°F).
• Maintenance
Before starting any maintenance work or cleaning the projector, cut off power from the mains supply.
After switching off, do not remove any parts of the fitting, to avoid getting burnt for at least 35 minutes. After this
time the likelihood of the lamp exploding is virtually nill.
The fitting is designed to hold in any splinters produced by a lamp exploding. The lenses must be mounted and, if
visibly damaged, they have to be replaced with genuine spares.
• Lamp
The fitting mounts a high-pressure lamp that needs an external igniter. This igniter is fitted onto the apparatus.
- Carefully read the "operating instructions" provided by the lamp manufacturer.
- Immediately replace the lamp if damaged or deformed by heat.
• Photobiological Safety
CAUTION. Do not look directly at the light source.
Do not look at the light beam with optical devices or any other tool that could cause light convergence.
This product is intended for the following areas of application:
studios, stages, theaters, exhibitions, trade fairs, events, theme parks, entertainment venues, architectural lighting
and similar
Not suitable for household illumination
SAFETY INFORMATION
IP20
12
189W
tc100°C
ta40°C
Risk Group 1
According to
EN 62471
EN

3
SHARPY
Not for residential use
• Battery
This product contains a rechargeable lead-acid or lithium iron tetraphosphate battery. To preserve the environment,
please dispose the battery at the end of its life according to the regulation in force.
Disposing
This product is supplied in compliance with European Directive 2012/19/EU - Waste Electrical and Electronic
Equipment (WEEE). To preserve the environment please dispose/recycle this product at the end of its life according
to the local regulation.
LiFePO4
Pb
The products to which this manual refers comply with the European Directives pursuant to:
• 2006/95/EC - Safety of electrical equipment supplied at low voltage (LVD)
• 2004/108/EC - Electromagnetic Compatibility (EMC)
• 2011/65/EU - Restriction of the use of certain hazardous substances (RoHS)

4
SHARPY
• Installazione
Assicurarsi che tutte le parti per il fissaggio del proiettore siano in buona condizione.
Assicurarsi della stabilità del punto di ancoraggio prima di posizionare il proiettore.
La fune di sicurezza, debitamente agganciata all’apparecchio e fissata alla struttura di sostegno, deve essere
installata in modo che, in caso di cedimento del sistema di supporto primario, si abbia la minor caduta possibile
dell’apparecchio. Dopo un eventuale intervento la fune di sicurezza deve essere sostituita con il ricambio originale.
• DISTANZA MINIMA DEGLI OGGETTI ILLUMINATI
Il proiettore deve essere posizionato in modo tale che gli oggetti colpiti dal fascio luminoso siano distanti
almeno 12 metri dall’obiettivo del proiettore stesso.
• Distanza minima dei materiali infiammabili
Il proiettore deve essere posizionato in modo tale che i materiali infiammabili siano distanti almeno 0,20 metri da
ogni punto della superficie dell’apparecchio.
• Massima temperatura ambiente
Non utilizzare il proiettiore se la temperatura ambiente (Ta) supera i 40°C.
• Grado di protezione IP20
L’apparecchio è protetto contro la penetrazione di corpi solidi di dimensione superiore a 12mm (prima cifra 2),
mentre teme lo stillicidio, la pioggia, gli spruzzi e i getti d’acqua (seconda cifra 0).
• Protezione contro la scossa elettrica
È obbligatorio effettuare il collegamento ad un impianto di alimentazione dotato di un’efficiente messa a terra
(apparecchio di Classe I secondo la norma EN 60598-1).
Si raccomanda, inoltre, di proteggere le linee di alimentazione dei proiettori dai contatti indiretti e/o cortocircuiti
verso massa tramite l’uso di interruttori differenziali opportunamente dimensionati.
• Collegamento alla rete di alimentazione
Le operazioni di collegamento alla rete di distribuzione dell’energia elettrica devono essere effettuate da un
installatore elettrico qualificato. Verificare che frequenza e tensione della rete corrispondano alla frequenza ed alla
tensione per cui il proiettore è predisposto ed indicate sulla targhetta dei dati elettrici. Sulla medesima targhetta è
pure indicata la potenza assorbita. Fare riferimento a quest’ultima per valutare il numero massimo di apparecchi
da collegare alla linea elettrica, al fine di evitare sovraccarichi.
• Temperatura della superficie esterna
La temperatura massima raggiungibile sulla superficie esterna dell’apparecchio, in condizioni di regime termico, è
di 100°C.
• Manutenzione
Prima di iniziare qualsiasi operazione di manutenzione o pulizia sul proiettore togliere la tensione dalla rete di
alimentazione. Dopo lo spegnimento non rimuovere alcuna parte dell’apparecchio per 10 minuti. Trascorso tale
tempo la probabilità di esplosione della lampada è praticamente nulla. Se è necessario sostituire la lampada,
aspettare ulteriori 20 minuti per evitare scottature. L’apparecchio è progettato in modo da trattenere le schegge
prodotte dall’eventuale scoppio della lampada. Le lenti devono essere obbligatoriamente montate; devono inoltre,
se visibilmente danneggiate, essere sostituite con ricambi originali.
• Lampada
L’apparecchio monta una lampada ad alta pressione che richiede un accenditore esterno.
Tale accenditore è incorporato nell’apparecchio.
- Leggere attentamente le “istruzioni d’uso” fornite dal costruttore della lampada.
- Sostituire immediatamente la lampada se danneggiata o deformata dal calore.
• Sicurezza fotobiologica
ATTENZIONE. Non guardare direttamente la sorgente di luce.
Non guardare il fascio di luce con strumenti ottici o altri strumenti che potrebbero causare convergenza di luce.
Il prodotto è concepito per essere utilizzato nei seguenti ambiti:
studi, palchi, teatri, esposizioni, fiere, eventi, parchi a tema, locali di intrattenimento, illuminazione architetturale e simili.
INFORMAZIONI DI SICUREZZA
IP20
12
189W
tc100°C
Gruppo di rischio 1
Secondo la norma
EN 62471
IT
ta40°C

5
SHARPY
Non adatto all'illuminazione domestica
Non per uso residenziale
• Batteria
Questo prodotto contiene una batteria ricaricabile piombo-acido o Litio Ferro Tetrafosfato. A tutela dell'ambiente si
prega di smaltire la batteria a fine vita in conformità alla normativa vigente.
Smaltimento
Questo dispositivo è conforme alla Direttiva Europea 2012/19/UE - Rifiuti di apparecchiature elettriche ed elettro-
niche (RAEE). Nel rispetto dell'ambiente, smaltire/riciclare il prodotto al termine del suo ciclo di vita secondo le
disposizioni di legge locali.
LiFePO4
Pb
I prodotti a cui questo manuale si riferisce sono conformi alle Direttive Europee di cui sono oggetto:
• 2006/95/CE - Sicurezza delle apparecchiature alimentate in Bassa Tensione (LVD)
• 2004/108/CE - Compatibilità Elettromagnetica (EMC)
• 2011/65/UE - Restrizione d’uso di determinate sostanze pericolose (RoHS)

6
SHARPY
• Installation
S’assurer que toutes les pièces pour la fixation du projecteur sont en bon état.
S’assurer de la stabilité du point d’ancrage avant de positionner le projecteur.
Le câble de sécurité, à fixer correctement à l’appareil et à la structure de support, doit être installé de façon à ce que, en
cas de rupture du système de support principal, la chute de l’appareil soit la plus limitée possible. Après une éventuelle
intervention du câble de sécurité suite à une chute, il faut le remplacer par une pièce de rechange d’origine.
• DISTANCE MINIMUM DES OB ETS ECLAIRES
Le projecteur doit être positionné de façon à ce que les objets éclairés par le faisceau lumineux soient à
une distance d’au moins 12 mètres de l’objectif du projecteur.
• Distance minimum des substances inflammables
Le projecteur doit être positionné de façon à ce qu’il y ait une distance d’au moins 0,20 mètre entre toute substance
inflammable et tout point de sa surface.
• Température ambiante maximum
Ne pas utiliser le projecteur quand la température ambiante (Ta) dépasse 40°C.
• Degré de protection IP20
L’appareil est protégé contre la pénétration de corps solides de dimension supérieure à 12 mm (premier chiffre 2), tandis qu’il
craint les gouttes d’eau, la pluie et les projections d’eau (deuxième chiffre 0).
• Protection contre l’électrisation
L’appareil doit obligatoirement être branché à une installation d’alimentation équipée d’une mise à la terre efficace
(appareil de Classe I selon la norme EN 60598-1).
Nous recommandons également de protéger les lignes d’alimentation des projecteurs contre les contacts indirects et/ou
les courts-circuits vers la masse en utilisant des interrupteurs différentiels de sensibilité adéquate.
• Branchement au réseau d’alimentation
Les opérations de branchement au réseau de distribution de l’énergie électrique doivent être exécutées par un installateur
électrique qualifié. Contrôler que la fréquence et la tension de réseau correspondent à la fréquence et à la tension pour
lesquelles le projecteur est prévu ; ces données sont indiquées sur la plaquette des données électriques. Cette même
plaquette reporte également la puissance absorbée. Afin d’éviter des surcharges, se référer à celle-ci pour évaluer le
nombre maximum d’appareils à brancher à la ligne électrique.
• Température de la surface extérieure
La température maximum qui peut être atteinte sur la surface extérieure de l’appareil, en conditions de régime thermique,
est de 100°C.
• Entretien
Avant de procéder à toute opération d’entretien ou de nettoyage sur le projecteur, couper la tension d’alimentation. Après
avoir éteint le projecteur, ne démonter aucun élément de l’appareil pendant les 10 minutes qui suivent. Une fois ce temps
écoulé, la probabilité d’explosion de la lampe est quasiment nulle. S’il faut remplacer la lampe, attendre encore 20 minutes
afin d’éviter tout risque de brûlures.
L’appareil a été conçu de façon à retenir les éclats produits en cas d’explosion de la lampe. Les lentilles doivent
obligatoirement être montées sur l’appareil et doivent être remplacées par des pièces d’origine dès qu’elles sont
visiblement endommagées.
• Lampe
L’appareil fonctionne avec une lampe haute pression avec ballast externe.
Ce dernier est incorporé dans l’appareil.
- Lire avec attention les « instructions d’utilisation » fournies par le fabricant de la lampe.
- Remplacer la lampe dès qu’elle est endommagée ou déformée par la chaleur
• Sécurité photobiologique
ATTENTION. Ne pas regarder directement la source de lumière.
Ne pas regarder le faisceau de lumière avec des instruments optiques ou d’autres instruments qui pourraient pro-
voquer une convergence lumineuse.
Le produit est conçu pour être utilisé dans les milieux suivants :
studios, scènes, théâtres, expositions, salons, événements, parcs à thème, lieux de divertissement, éclairage architec-
tural et similaires
CONSIGNES DE SÉCURITÉ
IP20
12
189W
tc100°C
Classe de dangerosité 1
Selon la norme
EN 62471
FR
ta40°C

7
SHARPY
Non adapté à l’éclairage domestique
Non indiqué pour un utilization résidentiel
• Batteria
Questo prodotto contiene una batteria ricaricabile piombo-acido o Litio Ferro Tetrafosfato. A tutela dell'ambiente si
prega di smaltire la batteria a fine vita in conformità alla normativa vigente.
Élimination
Ce dispositif est conforme à la Directive Européenne 2012/19/UE – Déchets d’équipements électriques et électro-
niques (DEEE). Dans le respect de l’environnement, écouler/recycler le produit à la fin de son cycle de vie selon
les dispositions légales locales.
LiFePO4
Pb
Les produits auxquels ce manuel se rapporte sont conformes aux Directives Européennes dont ils font l’objet :
• 2006/95/CE - Sécurité des matériels électriques de Basse Tension (BT)
• 2004/108/CE - Compatibilité Électromagnétique (CEM)
• 2011/65/UE - Limitation de l’utilisation de certaines substances dangereuses (RoHS)

8
SHARPY
• Installation
Sicherstellen, dass alle Teile für die Befestigung des Projektors in einwandfreiem Zustand sind.
Vor der Installation des Projektors die Stabilität der Verankerungsstelle überprüfen.
Das korrekt am Gerät eingehakte und an der Haltestruktur befestigte Sicherheitsseil muss so installiert werden,
dass bei einem Nachgeben der Haupthalterung die Fallhöhe des Gerätes so gering wie möglich ist. Nach einem
eventuellen Einsatz muss das Sicherheitsseil durch ein Originalersatzteil ersetzt werden.
• MINDESTABSTAND ZU BELEUCHTETEN OB EKTEN
Der Projektor muss so installiert werden, dass der Abstand zwischen den vom Lichtstrahl beleuchteten
Objekten und dem Objektiv des Projektors mindestens 12 Meter beträgt.
• Mindestabstand zu entzündbaren Materialien
Der Projektor muss so installiert werden, dass entzündbare Materialien mindestens 0,20 Meter von jedem Punkt
der Geräteoberfläche entfernt sind.
• Max. Raumtemperatur
Den Projektor nicht verwenden, wenn die Raumtemperatur (RT) 40°C überschreitet.
• Schutzart IP20
Das Gerät ist gegen das Eindringen von festen Fremdkörpern mit Durchmesser über 12 mm (erste Kennziffer 2)
geschützt, während es gegen Tropf,- Regen- und Spritzwasser sowie Wasserstrahlen (zweite Kennziffer 0)
empfindlich ist.
• Schutz gegen Stromschlag
Es ist Pflicht, das Gerät an eine Stromversorgungsanlage anzuschließen, die mit einer leistungsfähigen Erdung
ausgestattet ist (Gerät der Klasse I gemäß Richtlinie EN 60598-1).
Darüber hinaus wird empfohlen, die Zuleitungen der Projektoren mit korrekt bemessenen
Fehlerstromschutzschaltern vor indirekten Kontakten und/oder Kurzschlüssen zu schützen.
• Netzanschluss
Der Anschluss an das Stromnetz muss von einem kompetenten Elektroinstallateur ausgeführt werden.
Vergewissern Sie sich, dass Spannung und Frequenz der Netzversorgung mit den Werten übereinstimmen, für die
der Projektor ausgelegt ist und die auf dem Typenschild angegeben sind. Ebenfalls auf dem Typenschild ist die
Leistungsaufnahme angegeben. Um zu beurteilen, wie viele Geräte maximal an die Stromleitung angeschlossen
werden können, ist auf diese Angaben Bezug zu nehmen, damit Überlastungen vermieden werden.
• Temperatur der Außenfläche
Die Außenfläche des Geräts kann im Wärmebetrieb eine Höchsttemperatur von 100°C erreichen.
• Wartung
Vor Beginn von Wartungs- oder Reinigungsarbeiten am Projektor stets die Stromversorgung abschalten. Nach dem
Abschalten 10 Minuten lang keine Geräteteile abnehmen. Nach Ablauf dieser Zeit besteht praktisch keine Gefahr
mehr, dass die Lampe birst. Falls die Lampe ersetzt werden muss, weitere 20 Minuten warten, um
Verbrennungsgefahr zu vermeiden.
Das Gerät wurde so konzipiert, dass es die Splitter bei einem eventuellen Bersten der Lampe zurückhält. Die
Montage der Linsen ist obligatorisch vorgeschrieben; des Weiteren müssen sie bei sichtbarer Beschädigung durch
Originalersatzteile ersetzt werden.
• Lampe
Das Gerät ist mit einer Hochdrucklampe bestückt, die eine externe Zündeinheit verlangt.
Diese Zündeinheit ist in das Gerät eingebaut.
- Lesen Sie die vom Lampenhersteller gelieferte "Bedienungsanleitung" aufmerksam durch.
- Eine beschädigte oder von der Hitze verformte Lampe muss sofort ersetzt werden.
• Photobiologische Sicherheit
ACHTUNG. Nicht direkt in die Lichtquelle blicken.
Den Lichtstrahl nicht mit optischen Geräten oder anderen Instrumenten anschauen, die Lichtkonvergenz
verursachen könnten.
Das Produkt wurde für die Verwendung in den folgenden Bereichen entwickelt:
Studios, Bühnen, Theater, Ausstellungen, Messen, Veranstaltungen, Themenparks, Unterhaltungslokale,
Architekturbeleuchtung oder ähnliches.
INFORMATIONEN ZUR SICHERHEIT
IP20
12
189W
tc100°C
Gefahrenklasse 1
Gemäß Norm
EN 62471
DE
ta40°C

9
SHARPY
Nicht für Haushaltsbeleuchtung geeignet
Nicht für den häuslichen Gebrauch
• Batterie
Dieses Produkt enthält eine wiederaufladbare Blei-Säure-Batterie oder Lithium-Eisen-tetraphosphat. Zum
Schutz der Umwelt bitten wir Sie, diese Batterie, nachdem sie verbraucht ist, gemäß den geltenden
Vorschriften zu entsorgen.
Entsorgung
Diese Vorrichtung entspricht der Europäischen Richtlinie 2012/19/UE - Abfall von elektrischen und elektronischen
Gerätschaften (RAEE). Das Produkt am Ende seines Lebenszyklus unter Berücksichtigung der Umwelt nach den
lokalen Gesetzesvorschriften entsorgen/recyceln.
LiFePO4
Pb
Die Produkte, auf die dieses Handbuch sich bezieht, entsprechen den Europäischen Richtlinien, denen sie unterliegen:
• 2006/95/EG - Niederspannungsrichtlinie (LVD)
• 2004/108/EG - Elektromagnetische Kompatibilität (EMC)
• 2011/65/EU - Beschränkung der Verwendung bestimmter gefährlicher Stoffe (RoHS)

10
SHARPY
• Instalación
Asegúrese de que todos los elementos de fijación del proyector estén en buenas condiciones.
Controle la estabilidad del punto de anclaje antes de instalar el proyector.
La cuerda de seguridad, correctamente enganchada al aparato y fijada a la estructura de soporte, debe colocarse
de modo que, si el soporte principal cede, el aparato sufra la menor caída posible. En caso de desgaste de la
cuerda de seguridad, sustitúyala por el recambio original.
• DISTANCIA MINIMA DE LOS OB ETOS ILUMINADOS
El proyector debe ser posicionado de modo tal que los objetos tocados por el haz luminoso tengan una
distancia de al menos 12 metros del objetivo del mismo proyector.
• Distancia mínima de los materiales inflamables
El proyector debe ser posicionado de modo tal que los materiales inflamables tengan una distancia de al menos
0,20 metros de cada punto de la superficie del aparato.
• Máxima temperatura ambiente
No utilice el proyector si la temperatura ambiente (ta) supera los 40°C.
• Grado de protección IP20
El aparato está protegido contra la penetración de cuerpos sólidos de dimensiones superiores a 12 mm (primer
dígito 2), pero no contra el goteo, la lluvia, las salpicaduras y los chorros de agua (segundo dígito 0).
• Protección contra descargas eléctricas
Es obligatorio efectuar la conexión a una instalación de alimentación dotada de una eficiente puesta a tierra
(aparato de Clase I según la norma EN 60598-1).
Además, se recomienda proteger las líneas de alimentación de los proyectores de los contactos indirectos y/o
cortocircuitos hacia masa, mediante el uso de interruptores diferenciales dimensionados oportunamente.
• Conexión a la red de alimentación
Las operaciones de conexión a la red de distribución de la energía eléctrica deben ser efectuadas por un instalador
eléctrico cualificado. Constate que los valores de frecuencia y tensión de la red sean iguales a los que figuran en
la placa de los datos eléctricos del proyector. En la misma placa está indicada la potencia absorbida. Hacer
referencia a esta última para valorar el número máximo de aparatos que conectar a la línea eléctrica, con el fin de
evitar sobrecargas.
• Temperatura de la superficie externa
La temperatura máxima que puede alcanzar la superficie externa del aparato, en condiciones de régimen térmico,
es de 100°C.
• Mantenimiento
Antes de iniciar cualquier operación de mantenimiento o limpieza del proyector desconecte el aparato de la
alimentación eléctrica. Después del apagado no extraiga ninguna parte del aparato durante 10 minutos.
Transcurrido dicho tiempo la probabilidad de que la lámpara explote es prácticamente nula. Si fuera necesario
cambiar la lámpara, espere 20 minutos más para evitar quemarse.
El aparato está proyectado para retener las astillas producidas por el posible estallido de la lámpara. Las lentes
deben montarse obligatoriamente; además, si estuvieran dañadas, deberán ser sustituidas por recambios
originales.
• Lámpara
El aparato utiliza una lámpara de alta presión que requiere un arrancador externo.
Dicho arrancador está incorporado en el aparato.
- Leer atentamente las "instrucciones de uso" suministradas por el fabricante de la lámpara.
- Sustituir la lámpara inmediatamente si estuviera dañada o deformada por el calor.
• Seguridad fotobiológica
ATENCIÓN. No mire directamente a la fuente de luz.
No mire el haz de luz con instrumentos ópticos u otros instrumentos que puedan causar convergencia de luz.
El producto es concebido para ser utilizado en los siguientes ambientes:
estudios, palcos, teatros, exposiciones, ferias, eventos, parques temáticos locales de entretenimiento, iluminación de
arquitecturas y similares
INFORMACIONES DE SEGURIDAD
IP20
12
189W
tc100°C
Clase de peligrosidad 1
Según la norma
EN 62471
ES
ta40°C

11
SHARPY
No es apropiado para la iluminación doméstica
No para uso residencial
• Batería
Este producto contiene una batería recargable plomo-ácido o de litio tetrafosfato Hierro. Para proteger el ambiente
se ruega eliminar la batería conforme a la normativa vigente.
Eliminación
Este dispositivo es conforme a la Directiva Europea 2012/19/UE - Residuos de equipos eléctricos y electrónicos
(RAEE). Con el fin de respetar el ambiente, eliminar/reciclar el producto al final de su ciclo de vida según las
disposiciones de ley locales
LiFePO4
Pb
Los productos a los que se refiere este manual son conformes a las Directivas Europeas de las cuales son objeto:
• 2006/95/CE - Seguridad de los equipos alimenticios de Baja Tensión (LVD)
- 2004/108/CE - Compatibilidad Electromagnética (EMC)
• 2011/65/UE - Restricción del uso de determinadas sustancias peligrosas (RoHS)

12
SHARPY
UNPACKING AND PREPARATION
Lamp 189W
(fitted into projector)
IST005/001
2 x 183102/805
1
PAN Mechanism Lock and Release (every 90°) - Fig. 2
TILT Mechanism Lock and Release (every 45°) - Fig. 3
2 3
Packing contents - Fig. 1

13
SHARPY
4
1
23
2
1
5
INSTALLATION AND START-UP
Connecting and disconnecting power cable - Fig. 5
Installing the projector - Fig. 4
The projector can be installed on the floor resting on special rubber feet, on a truss or on the ceiling or wall.
WARNING: with the exception of when the projector is positioned on the floor, the safety ca le must e fitted. (Cod. 105041/003 availa le on request).
This must e securely fixed to the support structure of the projector and then connected to the fixing point at the centre of the ase.
Continue ➔

14
SHARPY
Switching on the projector - Fig. 8
Press the switch. The projector starts resetting the effects. At the same time, the following information scrolls on the display:
Model Firmware xxx (Fixture ID) System errors
SHARPY Version X.X.X Dmx Address xxx E: .........................
Date - Hour W: .........................
On conclusion of resetting in case of absence of the dmx signal, Pan and Tilt move to the “Home” position (Pan 50% - Tilt 50%). The control panel
(Fig. 8) has a display and buttons for the complete programming and management of the projector menu. The display can be in one of two
conditions: rest status and setting status. When it is in the rest status, the display shows the projector’s DMX address and the Fixture ID address
(if set).
During menu setting status, after a wait time (about 30 seconds) without any key having been pressed, the display automatically returns to rest status.
It should be noted than when this condition occurs, any possible value that has been modified but not yet confirmed with the
F
key will be cancelled.
CONTROL PANEL
1
2
Dmx Address
Warning Message
Fixture ID
12m
8
Connecting to the control signal line (DMX) - Fig. 7
Use a cable conforming to specifications EIA RS-485: 2-pole twisted, shielded, 120Ohm characteristic impedance, 22-24 AWG, low capacity. Do not use
microphone cable or other cable with characteristics differing from those specified. The end connections must be made using XLR type 3 or 5-pin male/female
connectors. A terminating plug must be inserted into the last projector with a resistance of 120Ohm (minimum 1/4 W) between terminals 2 and 3.
IMPORTANT: The wires must not make contact with each other or with the metal casing of the connectors. The casing itself must be connected to the
shield braid and to pin 1 of the connectors.
Connecting to the mains supply - Fig. 6
L
N
SIGNAL
SCREEN
DMX 512
DMX 512
5 PIN
1
2
3
4
5
SIGNAL
SCREEN
1
3
2
DMX 512
3 PIN
SIGNAL
SIGNAL
Mains
6
7

SHARPY
15
28
28
Reversal of the display - Fig. 9
To activate this function, press UP
B
and DOWN
C
keys simultaneously while the display is in the rest mode. This status will be memorised and
maintained even for the next time it will be switched on. To return to the initial state, repeat the operation all over again.
Setting the projector starting address
On each projector, the starting address must be set for the control signal (addresses from 1 to 512).
The address can also be set with the projector switched off.
Setting the address: see pag. 8.
Setting the projector Fixture ID
On each projector, the Fixture ID address must be set for an easy identification of the fixtures in an installation (ID from 1 to 255).
The Fixture ID address can be set with the projector switched off.
Setting the Fixture ID: see pag. 8.
9
Functions of the buttons - Using the menu
Setting addresses and options with the projector disconnected
The projector’s DMX address, as well as other possible operating options, can also be set when the appliance is disconnected from the electricity supply.
All that is needed is to press
F
to momentarily activate the display and thus access the settings. Once the required operations have been carried out,
the display will switch off again after a wait time of 30 seconds.
USING THE MENU:
1) Press
F
once – “Main Menu” appears on the display.
2) Use the UP
B
and DOWN
C
keys to select the menu to be used:
• Setup (Setup Menu): To set the setting options.
• Option (Option Menu): To set the operating options
• Informations (Informations Menu): To read the counters, software version and other information.
• Manual Control (Manual control Menu): To trigger the test and manual control functions.
• Test (Test Menu): To check the proper functionning of effects
• Advanced (Advanced Menu): Access to the "Advanced menu" is recommended for a trained technical personnel.
To enable the "Advanced" see pag.13
3) Press
F
to display the first item in the selected menu.
4) Use the UP
B
and DOWN
C
keys to select the MENU items.
Confirms the displayed value, or activates the displayed function, or enters the successive
menu.
Decreases the value displayed (with auto-repetitions) or passes to the next item in the menu.
Increases the value displayed (with auto-repetitions) or passes to the previous item in a menu.
Return to the top level
Commute from units, tens, hundreds, in the "Address", "Fixture ID" and "Calibration" menù.
F
C
DOWN
B
UP
D
LEFT
E
RIGHT

16
SHARPY
MENU SETTING
System
Errors
Information
Fixture
Hours
Lamp
Hours
4
Lamp
Manual
Control
Reset
Channel
6
Set Up
Option
Information
Manual
Control
Test
Advanced
13
Lamp
Strikes
System
Version
Board
Diagnostic
Dmx
Monitor
Fans
Monitor
Access code
1234
Advanced
Calibration
Upload
Firmware
Setup
Model
5
Pan / Tilt
Colour
Beam
Gobo
All
Test
Dmx
Address
Channel
Mode
Ethernet
Interface
Fixture ID
Sensor
status
Network
parameters
2
Lamp Dmx
Safety
Black Out
Pan / Tilt
Color
Display
Option
Invert
Pan
Invert
Tilt
Swap
Pan-Tilt
Encoder
Pan-Tilt
P/T Homing
Mode
Pan Home
Def Pos
Tilt Home
Def Pos
Fixed Wheel
Shortcut
Linear
Movement
Setting Default
Preset
User
Preset 1
User
Preset 2
User
Preset 3
Shutter
Dimmer Filter
Type
Shutter
On Error

17
SHARPY
DMX ADDRESS
NOTE: without the DMX signal the Address (XXX) flashing
Allows you to select the DMX ADDRESS.
1) Press
F
- the current DMX Adress appear on the display.
2) Use the UP
B
and DOWN
C
, RIGHT
E
keys to plan the DMX
Address.
3) Press
F
to confirm the selection or LEFT
D
to keep current
settings.
CHANNEL MODE
Allows you to select a channel arrangement from the two available.
1) Press
F
- the current settings appear on the display (Standard or
Vector).
2) Use the UP
B
and DOWN
C
keys to select one of the following
settings:
- Standard
- Vector
3) Press
F
to confirm the selection or LEFT
D
to keep current
settings.
FIXTURE ID
Allows you to select the FIXTURE ID.
1) Press
F
- the current Fixture ID appear on the display.
2) Use the UP
B
, DOWN
C
, RIGHT
E
keys to plan the Fixture ID.
3) Press
F
to confirm the selection or LEFT
D
to keep current settings.
ETHERNET INTERFACE
It lets you set the Ethernet settings to be attributed to the projector.
1) Premere
F
.
2) Use the UP
B
and DOWN
C
keys to select the “Ethernet Interface”
options to set:
Control Protocol
It lets you select the “Control Protocol” Art-net to assign according to the
control unit used:
1) Press
F
the current setting appears on the display.
2) Use the UP
B
and DOWN
C
keys to select one of the following settings:
- Disabled
- Art-net on IP 2
- Art-net on IP 10
3) Press
F
to confirm the selection or LEFT
D
to keep the current setting.
Repeat on DMX
It lets you enable the transmission of the Ethernet protocol by DMX signal
to all the connected projectors.
1) Press
F
the current setting appears on the display.
2) Use the UP
B
and DOWN
C
keys to select one of the following settings:
- Disabled: DMX transmission disabled.
- Enabled on primary: DMX transmission enabled.
3) Press
F
to confirm the selection or LEFT
D
to keep the current setting.
Universe
It lets you assign the “Universe” number to be assigned to a series of
projectors.
1) Press
F
– the current Universe address appears on the display.
2) Use the UP
B
, DOWN
C
, RIGHT
E
keys to set the Universe address.
3) Press
F
to confirm the selection or LEFT
D
to keep the current setting.
SET UP MENU
Set Up Dmx
Address
Channel
Mode
Fixture ID
Address xxx
Standard
Vector
Value xxx
Ethernet
Interface
Control
Protocol
Repeat on
DMX
Universe
NOTE: On grey the default options
Continue ➔

18
SHARPY
LAMP DMX
Used for enabling lamp remote control channel.
1) Press
F
- the current settings appear on the display (On or Off).
2) Use the UP
B
and DOWN
C
keys to enable (On) or disable (Off)
the lamp remote control channel.
3) Press
F
to confirm the selection or LEFT
D
to keep current settings.
SAFETY BLACK OUT
This allows the Dimmer's automatic lock option to be activated after 3
seconds with no incoming DMX signal.
1) Press
F
– the current setting (On or Off) appears on the display.
2) Use the UP
B
, DOWN
C
keys to enable (ON) or disable (Off) the
Dimmer's lock option after 3 seconds with no incoming DMX signal.
3) Press
F
to confirm the selection or LEFT
D
to keep the current
setting.
PAN / TILT
Invert pan
Used for reversing Pan movement.
1) Press
F
- the current settings appear on the display (On or Off).
2) Use the UP
B
and DOWN
C
keys to enable (On) or disable (Off)
PAN inversion.
3) Press
F
to confirm the selection or LEFT
D
to keep current settings.
Invert tilt
Used for reversing tilt movement.
1) Press
F
- the current settings appear on the display (On or Off).
2) Use the UP
B
and DOWN
C
keys to enable (On) or disable (Off)
Tilt inversion.
3) Press
F
to confirm the selection or LEFT
D
to keep current settings.
Swap Pan-Tilt
Used for swapping Pan and Tilt channels (as well as Pan fine and Tilt fine).
1) Press
F
- the current settings appear on the display (On or Off).
2) Use the UP
B
and DOWN
C
keys to enable (On) or disable (Off)
Pan and Tilt channel swap.
3) Press
F
to confirm the selection or LEFT
D
to keep current settings.
Encoder Pan-Tilt
Used for enabling the Pan / Tilt encoders.
1) Press
F
- the current settings appear on the display (On or Off).
2) Use the UP
B
and DOWN
C
keys to enable (On) or disable (Off)
Pan / Tilt encoders.
3) Press
F
to confirm the selection or LEFT
D
to keep current settings.
You can quickly disable the Pan and Tilt Encoder by simultaneously
pressing the UP
B
and DOWN
C
keys in the ''Main Menu''.
P/T Homing Mode
Lets you set the initial projector Reset mode.
1) Press
F
, the current setting appears on the display.
2) Use the UP
B
and DOWN
C
keys to select one of the following
settings:
Standard: Pan & Tilt are simultaneously reset.
Sequenced: Tilt is reset first followed by Pan.
3) Press
F
to confirm the selection or LEFT
D
to keep the current
setting.
Pan Home Def Pos
Lets you assign the Pan channel “home” position at the end of Reset,
without a DMX input signal.
1) Press
F
, the current setting appears on the display.
2) Use the UP
B
and DOWN
C
keys to select one of the following
settings:
0 degree
90 degrees
180 degrees
270 degrees (default)
3) Press
F
to confirm the selection or LEFT
D
to keep the current
setting.
Tilt Home Def Pos
Lets you assign the Tilt channel “home” position at the end of Reset,
without a DMX input signal.
OPTIONS MENU
Swap
Pan-Tilt
On
Off
Encoder
Pan-Tilt
On
Off
Lamp Dmx
Pan / Tilt
Option On
Off
Safety
Black Out
On
Off
Invert
Pan
On
Off
Invert
Tilt
On
Off
P/T Homing
Mode
Standard
Sequenced
Pan Home
Def Pos
Tilt Home
Def Pos

Save To
Preset 3
19
SHARPY
1) Press
F
, the current setting appears on the display.
2) Use the UP
B
and DOWN
C
keys to select one of the following settings:
0%
12.5%
25%
50% (default)
75%
87.5%
100%
3) Press
F
to confirm the selection or LEFT
D
to keep the current setting.
COLOR
Fixed wheel short-cut
Used for optimizing color change time so that the disc turns in the direc-
tion that requires shorter movement.
1) Press
F
– the current settings appear on the display (On or Off).
2) Use the UP
B
and DOWN
C
keys to enable (On) or disable (Off)
color change optimization.
3) Press
F
to confirm the selection, or LEFT
D
to keep current settings.
Linear Movement
It enables the linear movement of the colour wheel.
1) Press
F
– the current settings appear on the display (On or Off).
2) Use the UP
B
and DOWN
C
keys to enable (On) or disable (Off)
the linear movement of the colour wheel.
3) Press
F
to confirm the selection, or LEFT
D
to keep current settings.
SHUTTER
Shutter on error
Used for automatically closing the stop/strobe in the event of Pan/Tilt
position error.
1) Press
F
- the current settings appear on the display (On or Off).
2) Use the UP
B
and DOWN
C
keys to enable (On) or disable (Off)
automatic stop/strobe closing in the event of Pan/Tilt position error.
3) Press
F
to confirm the selection, or LEFT
D
to keep current settings.
DIMMER FILTER TYPE
It lets you best optimize the "Dimmer curve" according to that set on the
control unit. One of the following 2 options can be selected:
• DMX follower
Dimmer movement speed/linearity follows the DMX values set by the
control desk.
• Position dependent
Dimmer movement speed follows the DMX values set by the control
unit taking into account the physical Dimmer starting position.
DISPLAY
Used for automatically reduce brightness on the display after about 30
seconds in idle.
1) Press
F
- the current settings appear on the display (On or Off).
2) Use the UP
B
and DOWN
C
keys to enable (On) or disable (Off) the
decreasing of display brightness.
3) Press
F
to confirm the selection or LEFT
D
to keep current settings.
SETTING
Used to save 3 different settings of the items in the options menu and
relative submenus.
1) Press
F
- “Default preset” appears on the display.
2) Use the UP
B
and DOWN
C
keys to select one of the following
configurations:
- Default preset (*)
- User preset 1
- User preset 2
- User Preset 3
3) Press
F
- “Load preset X” appears on the display.
4) Use the UP
B
and DOWN
C
keys to select:
- Load preset X to recall a previously stored configuration.
- Save to preset X to store the current configuration.
a confirmation message (Are you sure?) appears on the display.
5) Select YES to confirm the selection or NO to keep the current setting
and return to the next higher level.
(*) DEFAULT PRESET
By pressing the RIGHT
E
key and the LEFT
D
key simultaneously
once entered in the "main menu" it is possible to quickly (short cut)
reset the default settings (DEFAULT PRESET).
Reset To
Dafault
Go Back
Setting Default
Preset
Load
Preset 1
Save To
Preset 1
User
Preset 1
Load
Preset 2
Save To
Preset 2
User
Preset 2
Load
Preset 3
User
Preset 3
On
Off
Display
Shutter Shutter
On Error
On
Off
Dimmer filter
type
Color
Fixwheel
Shortcut
On
Off
Linear
Movement
On
Off
Continue ➔

20
SHARPY
Used for restoring default values on all options menu items and relevant submenus.
1) Press
F
, a confirmation message (Are you sure?) appears on the display.
2) Select YES to confirm the selction or NO to keep current setting.
OPTION DEFAULT
Lamp DMX On
Safety Black Out Off
Invert Pan Off
Invert Tilt Off
Swap Pan-Tilt Off
Encoder Pan-Tilt On
P/T Homing Mode Standard
Pan Home Def Pos 270 degrees
Tilt Home Def Pos 50%
Fixed Wheel Shortcut On
Linear Movement Off
Shutter on error Off
Dimmer Filter Type DMX follower
Display On
SYSTEM ERRORS
Shows a list of warnings and messages relevant to errors occurred since
the fixtures switching-on.
1) Pressing
F
you are allowed to reset the SYSTEM ERRORS list.
A confirmation message (Are you sure you want to clear error list ?)
appears on the display.
2) Select YES to reset the list or NO to go back.
FIXTURE HOURS
Used for displaying projector operating hours (total and partial).
1) Press
F
- Hours total and partial appears on the display.
Total counter
Counts the number of projector working life hours (from manufacture to date).
Partial counter
Counts the number of partial projector working life hours since the last
reset to date.
2) Press
F
to reset partial projector working hours a confirmation
message (Are you sure?) appears on the display.
3) Select YES to reset partial projectors counter or NO to keep the current
setting and return to the top menu level.
LAMP HOURS
Used for displaying the lamp working hours (total and partial).
1) Press
F
- Hours total and partial appears on the display.
Total counter
Counts the number of projector working hours with the lamp on (from
manufacture to date).
Partial counter
Counts the number of lamp working hours since the last reset to date.
2) Press
F
to reset partial lamp working hours, a confirmation message
(Are you sure ?) appears on the display.
3) Select YES to reset partial counter or NO to keep the current setting
and return to the top menu level
LAMP STRIKES
Used for displaying the number of times the lamp was turned on (total and
partial).
1) Press
F
- the number of times the lamp was turned on (total and
partial) appears on the display.
Total counter
Counts the number of times the lamp was turned on (from manufacture
to date).
Partial counter
Counts the number of times the lamp was turned on since the last reset
to date.
2) Press
F
to reset partial lamp strikes hours, a confirmation message
(Are you sure ?) appears on the display.
3) Select YES to reset partial counter or NO to keep the current setting
and return to the top menu level
Lamp
Strikes
Total XXX
Partial XXX
Reset...
Lamp
Hours
Total XXX
Partial XXX
Reset...
INFORMATION MENU
Information System
Errors
Fixture
Hours
Total XXX
Partial XXX
Reset...
Option Setting
Other manuals for Sharpy
2
Table of contents
Other Claypaky Spotlight manuals

Claypaky
Claypaky MYTHOS User manual

Claypaky
Claypaky ALPHA PROFILE 1500 User manual

Claypaky
Claypaky ALPHA SPOT HPE 1500 User manual

Claypaky
Claypaky Golden Scan 3 User manual

Claypaky
Claypaky STAGE PROFILE 1200 SV User manual

Claypaky
Claypaky SHARPY WASH 330 User manual

Claypaky
Claypaky Stage Zoom 1200 User manual

Claypaky
Claypaky ALPHA PROFILE 700 User manual

Claypaky
Claypaky ALPHA WASH 1500 LT User manual