Clek FOONF User manual
WARNING
• Read and understand product
labels and all instructions in
this manual and in your vehicle
owner’s manual before installing
or using this car seat.
• Failure to properly install or
use this car seat or follow these
warnings and those on this car
seat’s labels can result in serious
injury or death to the child
in a sharp turn, sudden stop
or crash.
C01-0602-D1-CA January 2016
Foonf 2016 Instruction Manual
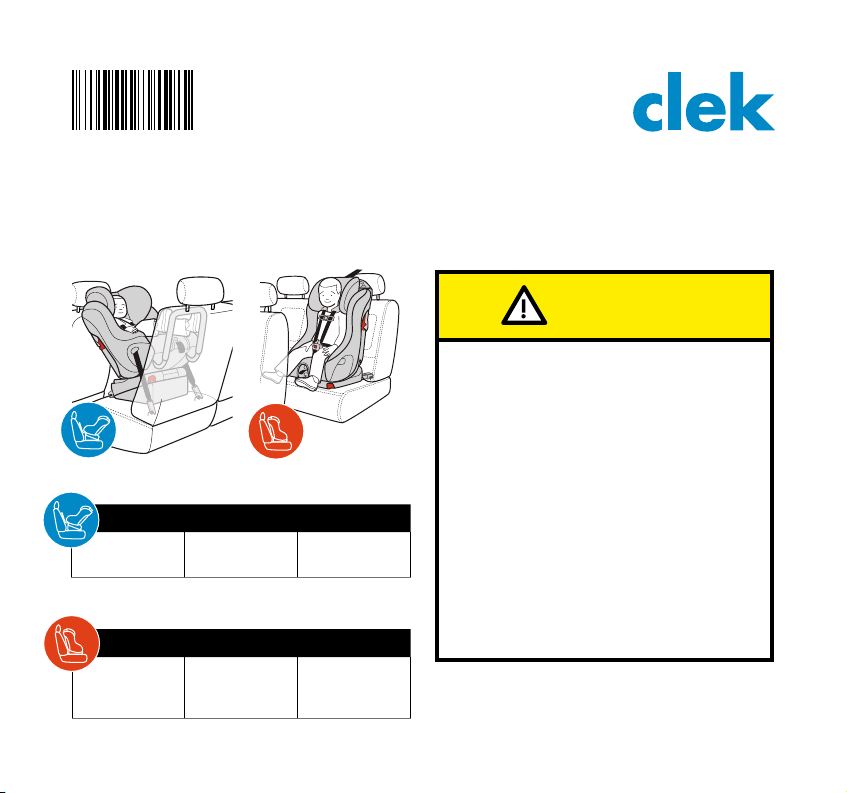
This car seat is designed for use either Rear-Facing or Forward-Facing by children who meet
all of the following requirements:
HEIGHT WEIGHT AGE
64 – 110 cm
25 – 43 in. 6.4 – 18 kg
14 – 40 lb Able to sit
upright alone
HEIGHT WEIGHT AGE
76 – 124 cm
30 – 49 in. 10 – 29.5 kg
22 – 65 lb
2+ years
recommended
(1 year min)
FO16CA
ii
i
Checklist for Proper Use
IMPORTANT: This is only a checklist — you must read and understand all of the warnings and
instructions on this car seat’s labels and in this manual before installing or using this car seat.
When Using This Car Seat in Rear-Facing Mode
√ Child weighs between 6.4 and 18 kg (14 and 40 lb), height is between 64 and 110 cm (25
and 43 in.) and able to sit upright alone.
√ Car seat is securely installed in a vehicle rear seat using Rear-Facing Base and Anti-
Rebound Bar.
– If car seat must be installed in a front seat, the front air bag for that position is
deactivated and the vehicle owner’s manual states that this is an acceptable position to
install a Rear-Facing child restraint.
√ UAS Belt or vehicle belt is correctly routed under Seat Cushion in the Rear-Facing belt path
and there is no slack in the UAS Belt or the vehicle belt.
√ Car seat is reclined within an acceptable recline zone for the child’s age using a Rear-
Facing recline position.
√ The top of the child’s head is at least 2.5 cm (1 in.) below the top of the car seat Headrest.
√ Shoulder Harness Straps are through Shoulder Harness Slots closest to and at or below the
shoulder of the child.
√ Bottom of Headrest is at or above the Shoulder Harness Slots in use.
√ Crotch Strap is through Crotch Strap Slot at or behind and closest to the child’s crotch.
√ Harness is snugly adjusted on child and buckled.
When Using This Car Seat in Forward-Facing Mode
√ Child weighs between 10 and 29.5 kg (22 and 65 lb), height is between 76 and 124 cm
(30 and 49 in.) and is at least 1 year of age.
√ Car seat is securely installed in a vehicle rear seat without the Rear-Facing Base or the
Anti-Rebound Bar.
– If car seat must be installed in a front seat, the front air bag for that position is
deactivated, check the vehicle owner’s manual for proper use of a child restraint in
that position.
√ Car seat is correctly attached to the vehicle using either the Rigid UAS Connectors and
Top Tether; the vehicle belt and Top Tether; or the rigid UAS
Connectors, the vehicle belt and the Top Tether.
– If child weighs more than 21.8 kg (48 lb) or the weight
limit specied for UAS use in your vehicle owner’s
manual, this car seat must be installed with the vehicle
belt and Top Tether; or with the Rigid UAS Connectors,
vehicle belt, and Top Tether..
√ Car seat is in a Forward-Facing recline position.
√ The top of the child’s ears are at or below the top of the
car seat Headrest.
√ Shoulder Harness Straps MUST be through Shoulder
Harness Slots closest to and at or above shoulders of child.
√ Bottom of Headrest is at or above the Shoulder Harness
Slots in use.
√ Crotch Strap is through Crotch Strap Slot at or behind and
closest to the child’s crotch.
√ Harness is snugly adjusted on child and buckled.
For concerns related
to parts or the use and
maintenance of this
product, please contact
us at:
Clek Inc.
Attn: Customer Service
226 Lesmill Road
Toronto, ON
Canada
M3B 2T5
1-866-656-2462
www.clekinc.ca

12
Table of Contents
Checklist for Proper Use ....................................................................................... i
When Using This Car Seat in Rear-Facing Mode ............................................... i
When Using This Car Seat in Forward-Facing Mode .......................................... ii
Car Seat Features .............................................................................................. 3
Registration & Recall Information ......................................................................... 5
Registering Your Car Seat ............................................................................. 6
Warnings ......................................................................................................... 7
Certification ..................................................................................................... 11
Vehicle Classification ......................................................................................... 11
Size & Age Limitations ....................................................................................... 11
When Using This Car Seat in Rear-Facing Mode ............................................. 12
When Using This Car Seat in Forward-Facing Mode ....................................... 14
Vehicle Information ........................................................................................... 15
Vehicle Universal Anchorage System (UAS) .................................................... 15
Vehicle Seat Location Requirements .............................................................. 16
Vehicle Belt Requirements ........................................................................... 18
Vehicle Belt Systems ................................................................................... 19
Adjusting Car Seat to Fit Your Child .................................................................... 22
Installing Headrest ..................................................................................... 22
Adjusting Headrest .................................................................................... 23
Crotch Strap Adjustment ............................................................................. 24
Shoulder Harness Adjustment ...................................................................... 26
Shoulder Harness Slot Selection ............................................................ 26
Shoulder Harness Unthreading .............................................................. 27
Shoulder Harness Rethreading .............................................................. 28
Installing/Removing Rear-Facing Car Seat ............................................................ 32
Installing Rear-Facing Car Seat With UAS ..................................................... 34
Removing Rear-Facing Car Seat Installed With UAS ......................................... 41
Installing Rear-Facing Car Seat With Vehicle Belt ........................................... 43
Removing Rear-Facing Car Seat Installed With Vehicle Belt .............................. 49
Installing/Removing Forward-Facing Car Seat ...................................................... 50
Installing Forward-Facing Car Seat With UAS ................................................ 52
Removing Forward-Facing Car Seat Installed With UAS ................................... 61
Installing Forward-Facing Car Seat With Vehicle Belt ...................................... 63
Removing Forward-Facing Car Seat Installed With Vehicle Belt ........................ 69
Securing Your Child in Car Seat .......................................................................... 71
Removing Your Child From Car Seat ............................................................. 77
Operation and Adjustments ................................................................................. 78
Installing/Removing Rear-Facing Base ............................................................ 78
Removing/Installing Seat Cushion .................................................................. 79
Installing/Removing Anti-Rebound Bar ............................................................ 81
Rear-Facing UAS Storage ............................................................................. 84
Forward-Facing Rigid UAS Storage ................................................................ 86
Top Tether Storage ...................................................................................... 86
Instruction Manual Storage ........................................................................... 87
Aircraft Installation ............................................................................................ 88
Care and Cleaning ............................................................................................. 89
Removing/Installing Seat Cushion Cover ....................................................... 89
Car Seat Cleaning ..................................................................................... 91
Recycling Your Car Seat ............................................................................. 93
Troubleshooting ................................................................................................. 93
Accessories ....................................................................................................... 93
Warranty ......................................................................................................... 94
® Clek and Foonf are registered trademarks of Clek Inc.
For a complete list of Clek Inc. trademarks please visit www.clekinc.ca/trademarks.
34
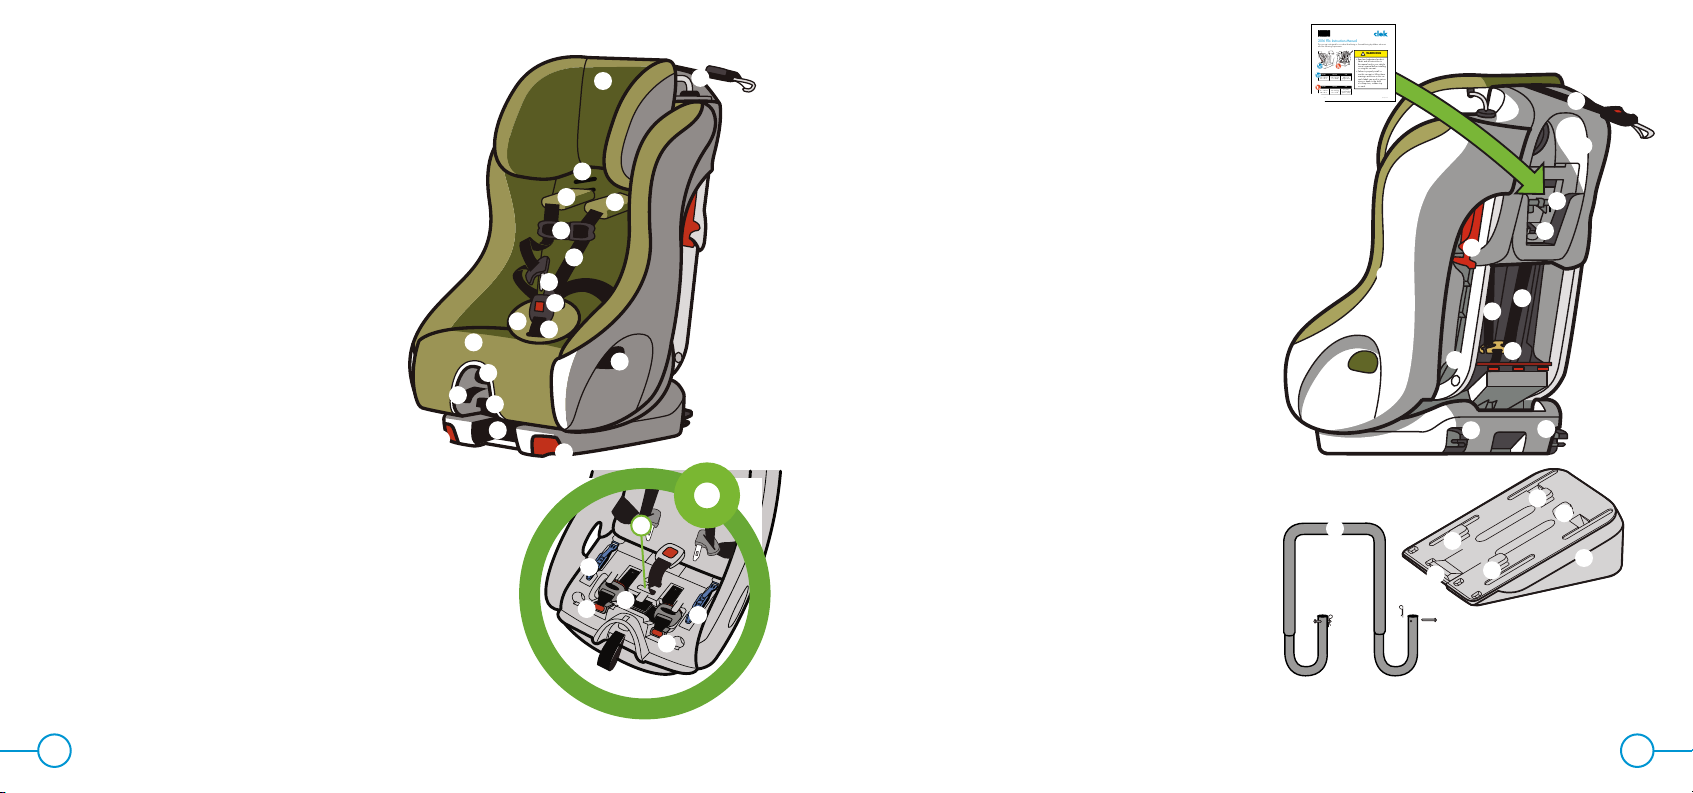
Car Seat Features – Front
1 Seat Cushion
2 Shoulder Harness Slots
3 Shoulder Harness Covers
4 Shoulder Harness Straps
5 Chest Clip
6 Buckle Tongues
7 Buckle
8 Crotch Strap
9 Buckle Pad
10 Harness Adjuster
11 Harness Adjuster Strap
12 Recline Handle
13 Rigid UAS Release Handles
14 Rigid UAS Adjustment Handle
15 Rear-Facing Belt Path
16 Headrest
17 Headrest Adjuster
18 Crotch Strap Slots
19 Rear-Facing UAS Storage
(under Seat Cushion)
20 Rear-Facing UAS Belt
21 Rear-Facing UAS Connectors
22 Rear-Facing Belt Lock-offs
2
4
33
5
7
8
9
1
10
11 12
6
17
16
15
14
13 13
Car Seat Features – Back
23 Seat
24 Top Tether
25 Tether Adjuster
26 Tether Hook
27 Tether Storage (behind manual)
28 Forward-Facing Shoulder Belt Lock-offs
29 Shoulder Harness Access Panel
30 Troubleshooting Tool
31 Shoulder Harness Straps
32 Metal Harness Plate
33 Rigid UAS Connectors
(Forward-Facing Use)
34 Instruction Manual (stored in Shoulder
Harness Access Panel)
35 Forward-Facing Belt Path
36 Rear-Facing Base
37 Rear-Facing Base Retention Hooks
38 Rear-Facing Base Release Lever
39 Anti-Rebound Bar
40 Anti-Rebound Bar Locking Pins and
Locking Pin Clips
23
24 25
26
28
29
31
30
32
31
33 33
27
36
37
37
37
37
38
WARNING
• Read and understand product
labels and all instructions in
this manual and in your vehicle
owner’s manual before installing
or using this car seat.
• Failure to properly install or
use this car seat or follow these
warnings and those on this car
seat’s labels can result in serious
injury or death to the child
in a sharp turn, sudden stop
or crash.
C03-1422- C1-CA January 2016
2016 FlloInstruction Manual
This car seat is designed for use either Rear-Facing or Forward -Facing by children who meet
all of the following requirements:
HEIGHT WEIGHT AGE
64 – 110 cm
25 – 43 in.
6.4 – 18.1 kg
14 – 40 lb
Able to sit
upright alone
HEIGHT WEIGHT AGE
76 – 124 cm
30 – 49 in.
10 – 29.5 kg
22 – 65 lb
2+ years
recommended
(min. 1 year)
FL16CA
34
35
39
40 40
20
19
18
21
21
22
22
6
5
Registering Your Car Seat
Please ll in the information on the previous page for your
records. The model name, serial number and manufacturing
date can be found on a label afxed to the back of this Car
Seat.
Fill out the prepaid registration postcard attached to the
car seat and mail it today.
Child restraints could be recalled for safety reasons. You must
register this restraint to be reached in a recall. Send your
name, address, e-mail address if available, and the restraint’s
model number and manufacturing date to:
Clek Inc.
226 Lesmill Road
Toronto, Ontario, Canada M3B 2T5
or call 1-866-656-2462
or register online at http://www.clekinc.ca/register
For recall information, call Transport Canada’s Road
Safety Information Centre at 1-800-333-0371, or go to
http://www.tc.gc.ca/eng/motorvehiclesafety/safedrivers-
childsafety-notices-menu-907.htm
Registration & Recall Information
WARNING
• Child restraints could be recalled for safety reasons. You must register this
restraint (car seat) to be reached in a recall.
Model Name: _____________________________________________________________________
Serial Number: ___________________________________________________________________
Manufactured In: __________________________________________________________________
(yyyy/mm/dd)
Date of Purchase: __________________________________________________________________
FOONF
8
7
WARNING — DEATH or
SERIOUS INJURY can occur (continued)
• Discontinue Rear-Facing use when:
– Child’s weight exceeds 18 kg (40 lb).
– Child’s height exceeds 110 cm (43 in.).
– Child’s head is less than 2.5 cm (1 in.) from top of Headrest in highest
position.
• Discontinue Forward-Facing use when:
– Child’s weight exceeds 29.5 kg (65 lb).
– Child’s shoulders are above the top Shoulder Harness Slots.
– Top of child’s ears are above the top of the car seat’s Headrest in its
highest adjustment position.
• This car seat must be installed by an adult.
• Never allow the child to buckle themselves in this car seat.
• Snugly adjust Harness provided with this car seat around child.
• Never secure car seat into vehicle with a belt around the base. Belt must
always be routed through the correct Belt Path in the seat for the mode
of use (denoted by blue markings for Rear-Facing and red markings for
Forward-Facing).
• Never use this child restraint Rear-Facing without the Rear-Facing Base
and Anti-Rebound Bar.
Warnings
WARNING — DEATH or
SERIOUS INJURY can occur
Failure to properly install or use this car seat or follow these warnings and
instructions and those on this car seat’s labels can result in serious injury or
death of the child in a sharp turn, sudden stop or crash.
• Do not install or use this car seat until you read and understand the
instructions in this manual and in your vehicle owner’s manual. Do not let
others install or use this car seat unless they understand how to correctly
install and use it.
• Never use this car seat Rear-Facing in a vehicle front seating location with
an air bag.
• Use only in a Rear-Facing position when using this car seat with an infant
less than one year old and weighing less than 10 kg (22 lb).
• Failure to choose the correct car seat mode (Rear-Facing or Forward-
Facing) and to properly secure this car seat and your child can increase
the risk of injury or death.
• Never use this car seat with children not able to sit upright alone. Their
head may fall forward, which could restrict their ability to breathe.

910
WARNING — DEATH or
SERIOUS INJURY can occur (continued)
• Do not use this car seat after nine (9) years from the date of manufacture.
The date of manufacture can be found on the label afxed to the back of
this car seat.
• Do not use accessories or parts with this car seat other than those
provided by Clek Inc. Use of accessories or parts from other
manufacturers could alter the performance of this car seat.
• Do not attempt to make repairs to or otherwise modify or tamper with this
car seat.
• Never use this car seat if it is damaged or is missing parts.
• Keep this manual in the storage compartment located on the back of this
car seat for future use.
• Never use a second-hand car seat or a car seat whose history you do not
know.
• Register your child restraint with Clek Inc.
• Avoid burn injury — always touch the surfaces that will contact your child
rst before putting them in this car seat. This car seat can become very hot
if left in the sun and can burn your child’s skin.
WARNING — DEATH or
SERIOUS INJURY can occur (continued)
• Always use the Buckle Pad supplied with this car seat for children
weighing up to 10 kg (22 lb).
• Never use this seat without the Headrest.
• Do not use this child restraint with motorized or door mounted belt systems.
• When installing this child seat Forward-Facing, it must be secured by the
Top Tether, and the UAS lower anchors and/or the vehicle belt as shown
in this instruction manual.
• UAS system or vehicle belt must stay tightly adjusted on car seat at all
times.
• Always secure the Top Tether provided with this child restraint as specied
in this instruction manual.
• Do not use this car seat after a crash of any kind. A crash can cause
damage to this car seat that you cannot see.
• Always securely attach this car seat to the vehicle, even when not
occupied. An unsecured car seat can injure other occupants in a crash.
• Never leave child unattended.
• Never leave child in car seat when Harness is not buckled and properly
adjusted, children can strangle on loose Harness straps.
11 12
American Academy of Pediatrics
(AAP) Recommendation
The AAP advises parents to keep their
toddlers in Rear-Facing car seats until age 2,
or until they reach the maximum height and
weight for their seat.
When Using This Car
Seat in Rear-Facing Mode
• All infants less than one year old or 10 kg
(22 lb) MUST be Rear-Facing.
• Child’s weight is between 6.4 and 18 kg
(14 and 40 lb), AND
• Child’s height is between 64 and 110 cm
(25 and 43 in.), AND
• Child is able to sit upright alone.
Certification
• This child restraint system conforms to all applicable requirements of Canadian Motor
Vehicle Safety Standards 213 and 213.1 and is certied for use in motor vehicles.
• This restraint is certied for use in Aircraft.
Vehicle Classification
• This car seat is for use only in the following classes of vehicles: passenger cars, trucks, and
multi-purpose vehicles, such as SUVs (sport utility vehicles).
Size & Age Limitations
WARNING
• Use only in a Rear-Facing position when using this car seat with an infant
less than one year old and weighing less than 10 kg (22 lb).
• Failure to choose the correct car seat mode (Rear-Facing or Forward-
Facing) and to properly secure this seat and your child can increase the
risk of injury or death.
• Never use this seat with children not able to sit upright alone. Their head
may fall forward, which could restrict their ability to breathe.
13 14
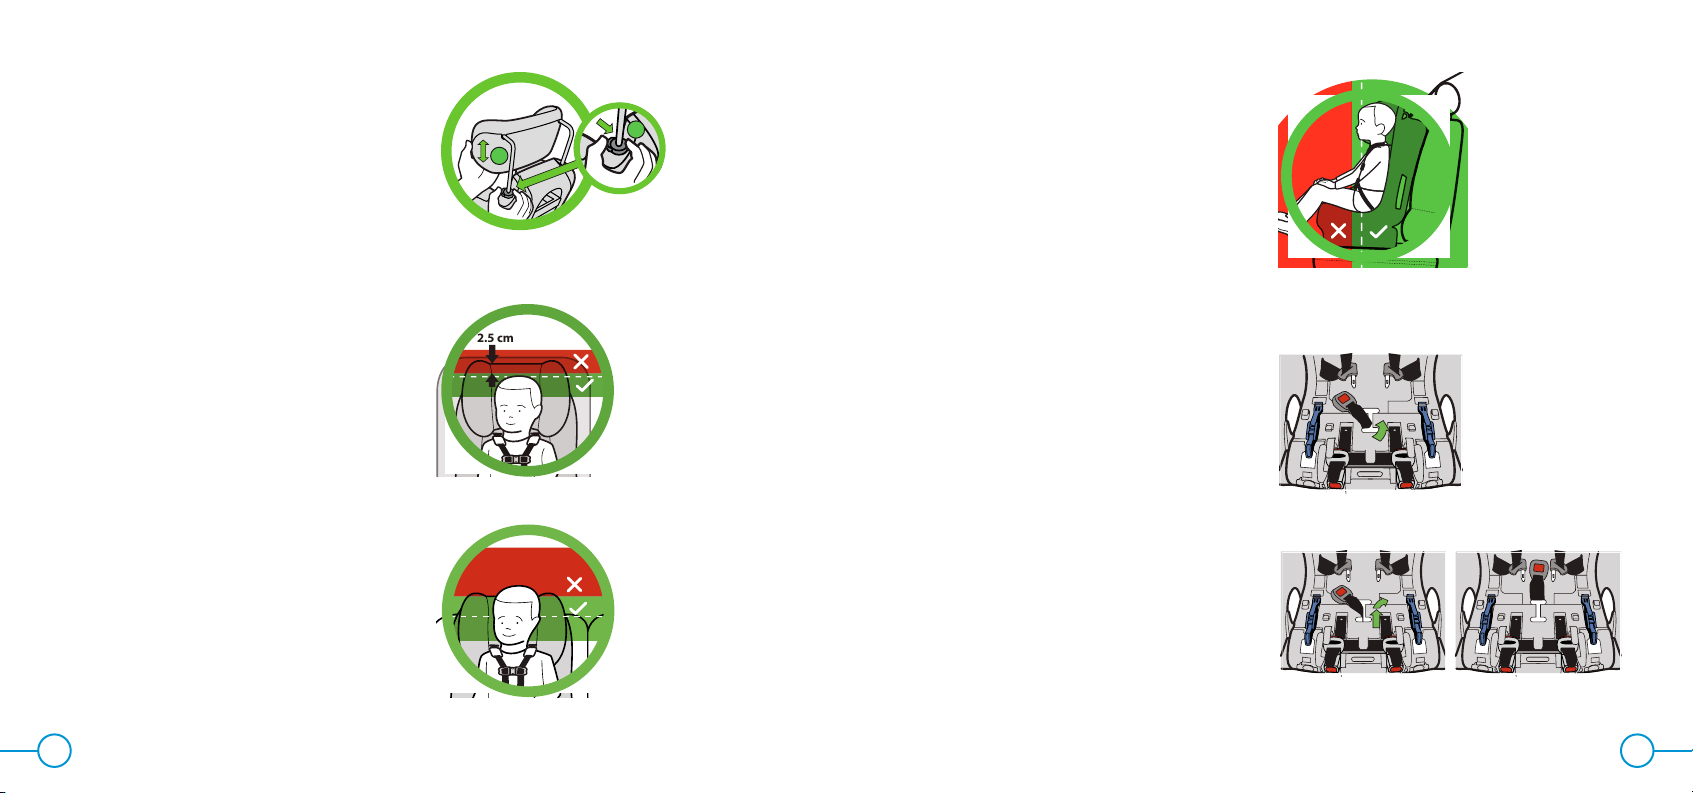
2.5 cm
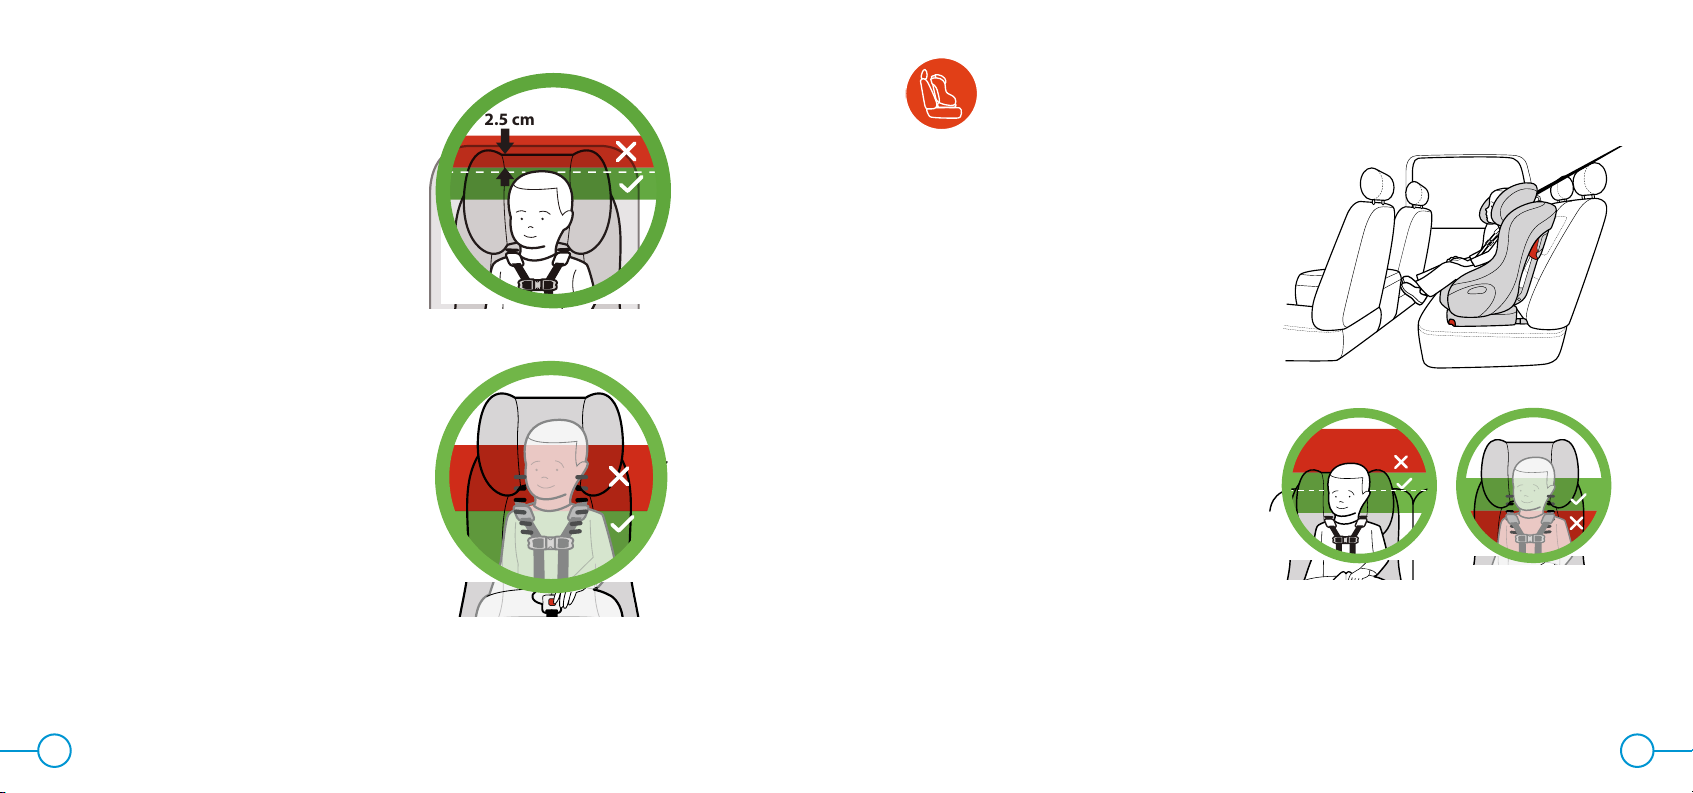
When Using This Car Seat
in Forward-Facing Mode
• Child’s weight is between 10 and 29.5 kg
(22 and 65 lb), AND
• Child’s height is between 76 and 124 cm
(30 and 49 in.), AND
• Child is at least 1 year of age, AND
• The tops of the child’s ears MUST be below
the top of the car seat’s Headrest, as shown
in Figure 3. If the tops of the child’s ears
are above the top of this car seat’s Headrest
in the highest adjustment position, your
child is too large for this car seat.
• The Shoulder Harness Straps must be
through Shoulder Harness Slots at or above
and closest to the child’s shoulders, as
shown in Figure 4. If the child’s shoulders
are above the highest set of Shoulder
Harness Slots, your child is too large for
this car seat.
• If child weighs more than 21.8 kg (48 lb)
or the weight limit specied for UAS use in
your vehicle owner’s manual, this car seat
must be installed with:
– the vehicle belt and Top Tether; or
– the Rigid UAS Connectors, vehicle belt
and Top Tether
Figure 3 Figure 4
• The top of the child’s head must be at
least 2.5 cm (1 in.) below the top of the
car seat’s Headrest, as shown in Figure 1.
If the top of the child’s head is less
than 2.5 cm (1 in.) below the top of
the Headrest in the highest adjustment
position, your child is too large for using
this car seat Rear-Facing and must be
transitioned to using this car seat Forward-
Facing.
• The Shoulder Harness Straps must be
through Shoulder Harness Slots at or
below and closest to the child’s shoulders,
as shown in Figure 2.
Figure 1
Figure 2
16
15
Vehicle Seat Location Requirements
• Before using this car seat, reference your vehicle owner’s
manual for:
– Car seat installation instructions
– Information about air bags and car seat use
– Vehicle UAS lower anchor weight limit. If no
recommended weight limit is present in your vehicle
owner’s manual, call your vehicle manufacturer. If no
guidance is available, assume a vehicle lower anchor
weight limit of 18.1 kg (40 lb).
• For a toddler over one year old and Forward-Facing, if
a vehicle front seat location with an air bag must be used,
follow the vehicle manufacturer’s instructions for child
restraint use and move the vehicle seat back as far as
possible.
WARNING
• According to accident statistics,
children 12 and under are safer
when properly restrained in rear
vehicle seating positions, rather
than front seating positions.
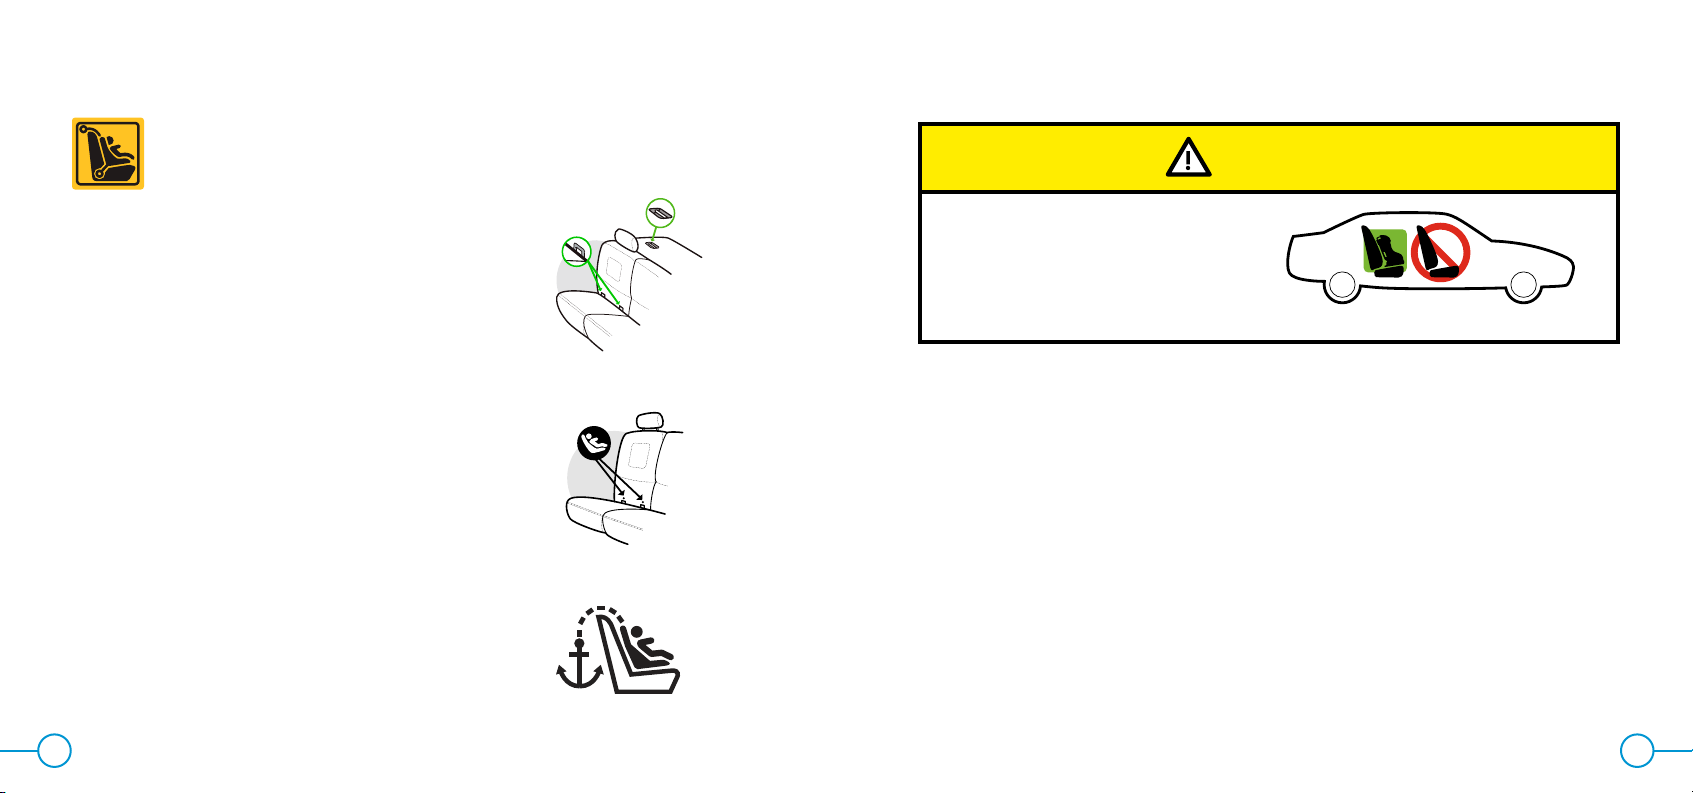
Vehicle Information
Vehicle Universal Anchorage System (UAS)
• UAS stands for Universal Anchorage System. This term
refers to the anchors built into a vehicle for attaching child
restraints and consists of two lower anchors at the crease
between the vehicle seat back and vehicle seat cushion
and a top tether anchor behind the vehicle seat as shown
in Figure 5.
• 2003 or newer model year vehicles have at least two
seating locations with a UAS Anchorage System. Some
2001 and 2002 model year vehicles have UAS Anchorage
Systems. 2000 model year vehicles or older DO NOT have
UAS Anchorage Systems. See your vehicle owner’s manual
if you are unsure if your vehicle is equipped with a UAS
Anchorage System.
• See your vehicle owner’s manual for seating positions
which can be used with UAS.
• If not readily visible, the UAS lower anchors may be noted
by a symbol located near the crease between the vehicle
seat back and vehicle seat cushion, as shown in Figure 6.
• If covered, the top tether anchor locations may be
identied by a symbol as shown in Figure 7.
Figure 5
Figure 6
Figure 7

18
17
Vehicle Belt Requirements
Refer to the vehicle owner’s manual for information regarding
car seat installation and vehicle belt use with a car seat.
WARNING
• Never use this car seat with a vehicle belt that is cut, damaged, frayed or
inoperable.
• Using this car seat with a vehicle belt system unsafe for use with this car
seat can result in serious injury or death. Pay careful attention to these
systems; some of the vehicle belts that are not safe to use look very much
like vehicle belts that are safe to use. If you are unsure, consult your
vehicle owner’s manual or call 1-866-656-2462.
• Not all vehicle belts can be used with a car seat. This car seat
must be held tight at all times by the lap belt or lap portion of the
lap/shoulder belt.
• Never use an inatable vehicle belt to secure this car seat.
– If installing this car seat using UAS in a seating position equipped
with an inatable vehicle belt, do not buckle the vehicle belt behind
this car seat.
WARNING — DEATH or
SERIOUS INJURY can occur
• Do not use this child restraint Rear-Facing in a front
vehicle seat location with an air bag. Child’s head
and neck may be seriously injured when an inating
air bag hits back of child restraint.
• Never use this car seat in a front vehicle seat location
unless recommended by your vehicle owner’s manual.
• Improper placement of this car seat in your vehicle
increases the risk of serious injury or death. Some
seating positions in your vehicle may not be safe for
this car seat. Some vehicles do not have any seating positions that can
be used safely with this car seat. If you are not sure where to place this
car seat in your vehicle, consult your vehicle owner’s manual or call
1-866-656-2462.
DO NOT place rear-facing child seat on front
seat with air bag. DEATH OR SERIOUS
INJURY can occur. The back seat is the safest
place for children 12 and under.
NE PAS placer un siège d’enfant faisant face à
l’arrière sur le siège avant doté d’un coussin
gonflable. LA MORT OU DES BLESSURES
GRAVES pourraient s’ensuivre. Le siège arrière
est l’endroit le plus sécuritaire pour les enfants
de 12 ans et moins.
WARNING/ADVERTENCIA/
MISE EN GARDE
NO coloque el asiento infantil para el
automóvil orientado hacia atrás en el
asiento delantero del vehículo que
tenga una bolsa neumática de
seguridad. El niño podría MORIR O
SUFRIR LESIONES GRAVES. El asiento
trasero es el lugar más seguro para los
niños de 12 años o menores.
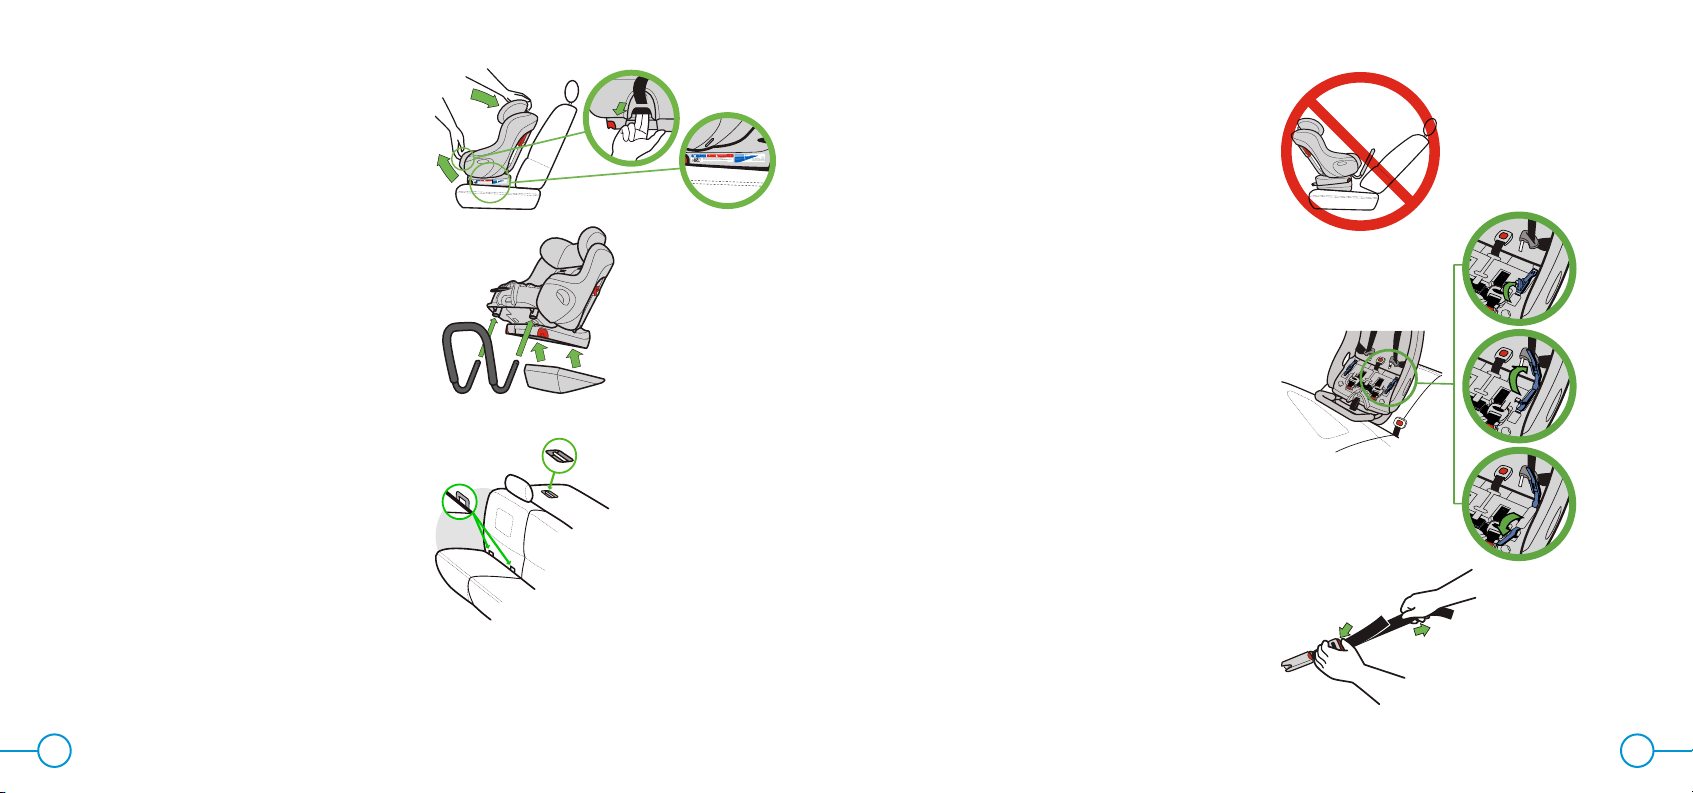
• Install this car seat only on vehicle seats that face forward.
NEVER install this car seat on vehicle seats facing sideways
or backwards, as shown in Figure 8.
• Only use this car seat on vehicle seats with seat
backs that lock in an upright position. Check
that the vehicle seat back is locked in an upright
position recommended by the vehicle owner’s
manual for use when installing a child restraint.
Figure 8
20
19
Figure 12
Figure 14
Figure 13
• Retractable Lap Belts – Lap belt is mounted on a retractor
which automatically pulls the lap belt back in when
released, as shown in Figure 12.
– If this type of lap belt is equipped with an Emergency
Locking Retractor (ELR) it should NEVER be used with a
car seat.
– If this type of lap belt is equipped with an Automatic
Locking Retractor (ALR), or a Switchable Locking
Retractor (SLR), it can be used. See your vehicle owner’s
manual for more information on SLR retractor belts. To
check if your retractable lap belt is equipped with an
ALR retractor:
1. Pull the belt all the way out until it stops.
2. Allow the belt to pull back in about 15 cm (6 in.).
3. Pull out on belt again. If the belt will not pull out
again, it is equipped with an ALR retractor.
• Manually Adjustable Lap Belts, see Figure 13 – Length can
be manually adjusted. Does not retract into the vehicle.
– Most manually adjustable lap belts will allow for secure
installation, but if the locking latch plate slides, not
allowing for a secure installation, it may be necessary
to ip the locking latch plate over to get a secure
installation as shown in Figure 14.
Figure 10
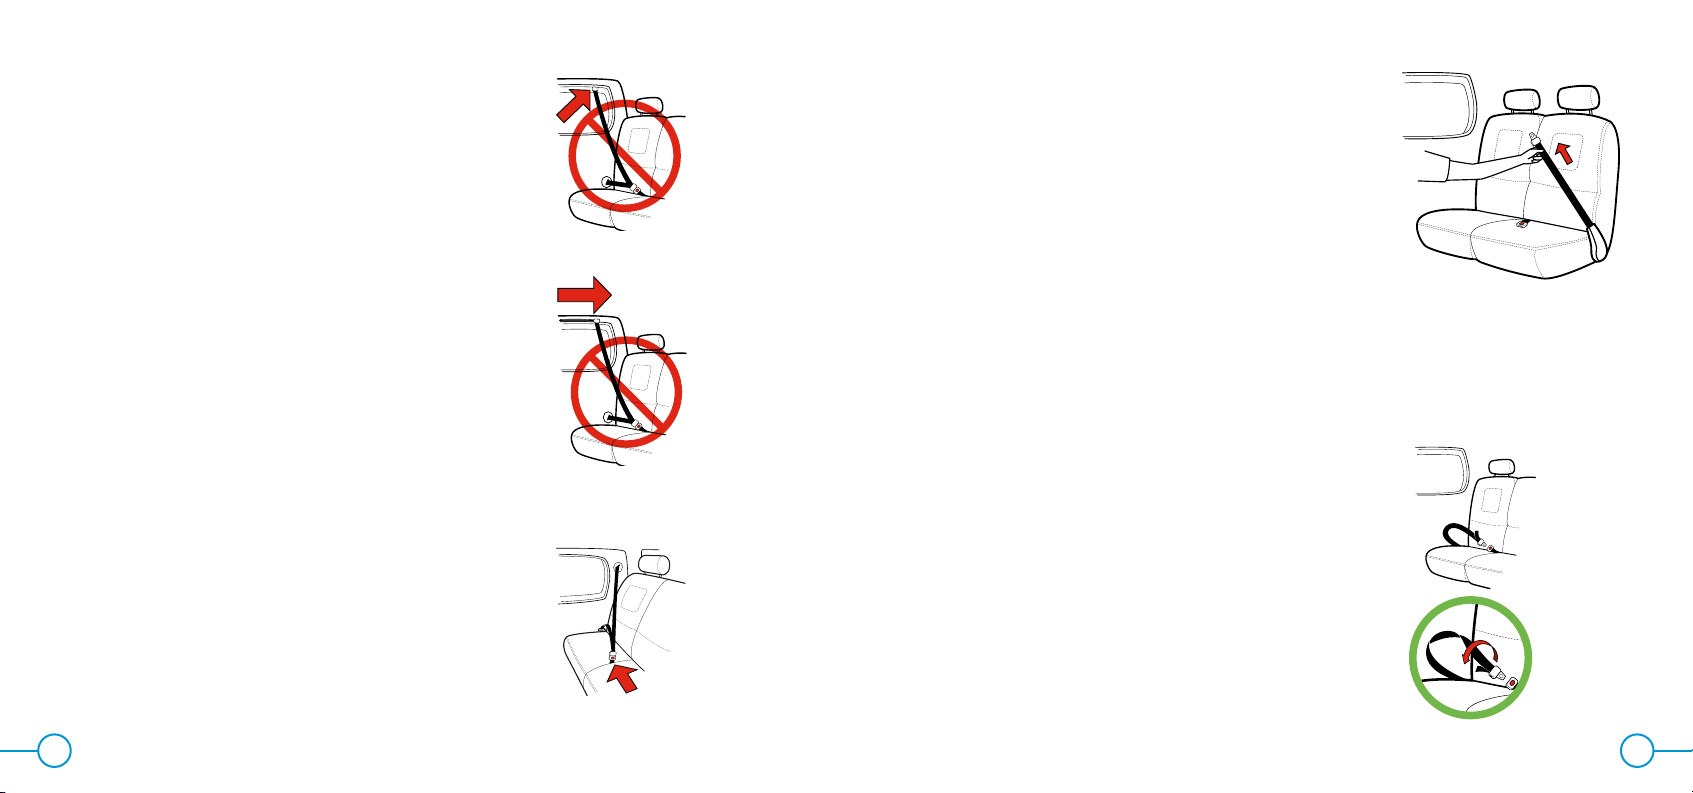
Vehicle Belt Systems
• NEVER use a passive restraint — lap or shoulder belt
mounted on door, as shown in Figure 9.
• NEVER use a passive restraint — lap belt with a motorized
shoulder belt, as shown in Figure 10.
• NEVER use an inatable vehicle belt.
– Check the belt for labels and refer to your vehicle
owner’s manual.
• Buckle/Lap Belt Anchor Forward of Seat Bight – lap belt or
lap belt portion of a lap/shoulder belt or buckle comes out
of vehicle seat bottom forward of the seat back, as shown
in Figure 11.
– May not allow for secure installation of this car seat
in some cases. Check for movement of car seat after
installation. If car seat is not secure, DO NOT use this
vehicle belt.
Figure 9
Figure 11

22
21
• Lap/Shoulder belts with a sliding latchplate – Shoulder
belt is mounted on a retractor which automatically pulls the
shoulder belt back in when released as shown in Figure
15. Latchplate slides freely along the webbing of the
vehicle belt as shown in Figure 16.
– If this type of lap/shoulder belt is equipped with an
Emergency Locking Retractor (ELR), it may be used.
– If this type of lap/shoulder belt is equipped with an ELR/
ALR Switchable Locking Retractor (SLR), it can be used.
To check if your lap/shoulder belt is equipped with an
SLR:
1. Slowly pull the shoulder belt all the way out until it
stops.
2. Allow the shoulder belt to pull back in about 15 cm
(6 in.).
3. Pull out on shoulder belt again. If the belt will not pull
out again, it is equipped with a SLR
NOTE: Some vehicle seat belt systems may have a lap/
shoulder belt equipped with a latchplate which appears to
hold the lap portion at a xed length when the belt is pulled
tight. This type of lap/shoulder belt is compatible. It may still
have a switchable locking retractor (SLR).
See your vehicle owner’s manual for more information on
installing a child seat using the vehicle belt.
Adjusting Car Seat to Fit Your Child
Figure 15
Figure 16
IMPORTANT: This Car Seat is shipped
without the Headrest attached. The Headrest
must be installed on the seat prior to use.
Installing Headrest
Insert the Headrest support rods into the
Headrest guides in the top of the seat back
as shown in Figure 17 and push the Headrest
down until it locks into position.
NOTE: It may be necessary to rock the
Headrest back and forth from front to back in
order to get the support rods into the guides.
WARNING — DEATH or
SERIOUS INJURY can occur
• Never use this car seat without the Headrest.
Figure 17
23 24
Figure 18
2
1
2.5 cm
Figure 20
Figure 19
Adjusting Headrest
Step 1
Press the button on the Headrest Adjuster on the
right-hand side of the seat (when facing front
of seat) (1) and raise or lower the Headrest into
the desired position (2) as shown in Figure 18.
Step 2
Check for proper adjustment of Headrest.
The bottom of the Headrest must always be at
or above the Harness Slots in use.
Rear-Facing: The top of the child’s head
must be at least 2.5 cm (1 in.) below the
top of the car seat’s Headrest, as shown
in Figure 19. If the top of the child’s head
is less than 2.5 cm (1 in.) below the top
of the Headrest in the highest adjustment
position, your child is too large for
using this car seat Rear-Facing and must
be transitioned to using this car seat
Forward-Facing.
Forward-Facing: The tops of the child’s
ears MUST be below the top of the car
seat’s Headrest, as shown in Figure 20.
If the tops of the child’s ears are above
the top of this car seat’s Headrest in the
highest adjustment position, your child is
too large for this car seat.
Crotch Strap Adjustment
Check position of Crotch Strap:
• The Crotch Strap must be through the
Crotch Strap Slot located at or behind
and closest to the front of the child’s
crotch as shown in Figure 21.
Step 1
Remove the Seat Cushion, see “Removing/
Installing Seat Cushion” on page 79.
Step 2
To move the Crotch Strap from one position
to the other:
• Slide the belt to one side of the Crotch
Strap Slot and push the edge of the
belt into the adjustment slot as shown in
Figure 22.
• Slide the Crotch Strap into the other
Crotch Strap Slot as shown in Figure
23, ensuring that the red release button
on the buckle faces out of the seat as
shown in Figure 24.
Figure 22
Figure 96
Figure 97 Figure 98
Figure 95
Figure 93
Figure 94 Figure 94a
Figure 23 Figure 24
Figure 96
Figure 97 Figure 98
Figure 95
Figure 93
Figure 94 Figure 94a
Figure 96
Figure 97 Figure 98
Figure 95
Figure 93
Figure 94 Figure 94a
Figure 21

25 26
Figure 26
Figure 27 Figure 28
Figure 96
Figure 97 Figure 98
Figure 95
Figure 93
Figure 94 Figure 94a
Figure 96
Figure 97 Figure 98
Figure 95
Figure 93
Figure 94 Figure 94a
Figure 96
Figure 97 Figure 98
Figure 95
Figure 93
Figure 94 Figure 94a
Step 3
NOTE: For larger children, the Crotch Strap
can be lengthened.
It is recommended that the shorter Crotch
Strap length be used for children weighing
up to 10 kg (22lbs)
TO LENGTHEN THE CROTCH STRAP
• Slide the belt to one side of the Crotch
Strap Slot and push the edge of the
belt into the adjustment slot as shown in
Figure 25.
• Slide the Crotch Strap out of the Crotch
Strap Slot as shown in Figure 26.
• Select the longer Crotch Strap length
and slide the Crotch Strap into the
appropriate Crotch Strap Slot as shown
in Figure 27, ensuring that the red
release button on the buckle faces out of
the seat as shown in Figure 28.
Step 4
Install the Seat Cushion, see “Removing/
Installing Seat Cushion” on page 79.
Figure 25
Figure 96
Figure 97 Figure 98
Figure 95
Figure 93
Figure 94 Figure 94a
Figure 29
Shoulder Harness Adjustment
SHOULDER HARNESS SLOT SELECTION
NOTE: This car seat comes with six (6)
harness height positions.
Place child in seat and select the appropriate
set of Shoulder Harness Slots for the direction
the child is facing.
For Rear-Facing Use: Choose the Shoulder
Harness Slots at or just below and closest
to the shoulders of your child as shown in
Figure 29.
WARNING — DEATH or
SERIOUS INJURY can occur
• To prevent ejection in a crash, the loops at the end of the Shoulder
Harness Straps must be properly attached to the Metal Harness Plate.
• To prevent loose Harness and risk of ejection in a crash, Harness must be
properly routed under bottom of seat back cover.
• To prevent loose Harness and risk of ejection in a crash, the Shoulder
Harness Straps must be routed through Shoulder Harness Slots at the
same height on each side and in the pad and seat back.

27 28
Figure 30
Figure 31
For Forward-Facing Use: Choose the
Shoulder Harness Slots at or just above
and closest to the shoulders of your child as
shown in Figure 30.
SHOULDER HARNESS UNTHREADING
Step 1
Unbuckle Harness and separate Chest Clip.
Step 2
Loosen Harness to largest size:
• While lifting up on Harness Adjuster
Tab, pull out on Shoulder Harness Straps
until they stop as shown in Figure 31.
Step 3
Remove Tether Hook from its storage location
on back of car seat. See “Top Tether
Storage” on page 86.
Figure 32
Figure 34
Step 4
Remove Shoulder Harness Access Panel from
back of car seat:
• Twist the access panel lock counter-
clockwise and pull to remove as shown
in Figure 32.
Step 5
Remove loops at ends of Shoulder Harness
Straps from Metal Harness Plate by sliding
strap out through slot in Metal Harness Plate
as shown in Figure 33.
Step 6
From front of car seat, pull Shoulder Harness
Straps out of seat back.
SHOULDER HARNESS RETHREADING
Step 1
Check that Shoulder Harness Straps are not
twisted and from front of seat, insert Shoulder
Harness Straps through the desired Shoulder
Harness Slots as shown in Figure 34. Straps
MUST go through the Shoulder Harness Slots
at the same height on each side
Figure 33
29 30
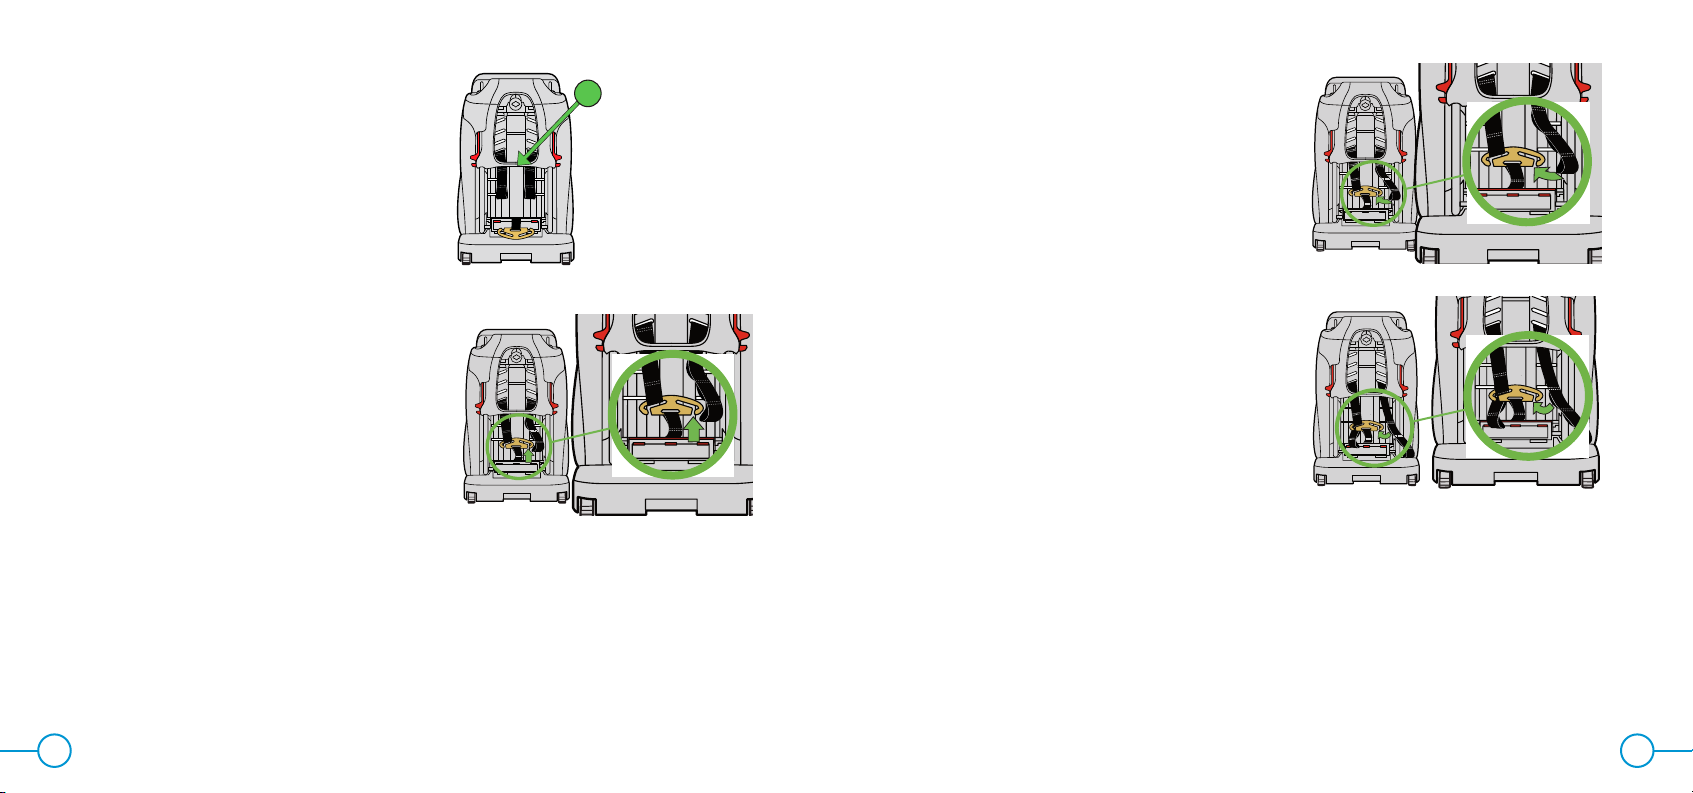
Step 2
Route Shoulder Harness Straps under bottom
of seat back cover (1) as shown in Figure 35.
Step 3
Attach desired loops at end of Shoulder
Harness Straps to Metal Harness Plate by
sliding strap into slot in Metal Harness Plate
as shown in Figure 36.
1
Figure 35
Figure 36
TO LENGTHEN THE SHOULDER HARNESS
WEBBING
For larger children: to make the
Harness larger, attach the Metal
Harness Plate to a loop closer to the end
of the Shoulder Harness Strap as shown
in Figure 37.
TO SHORTEN THE SHOULDER HARNESS
WEBBING
For smaller children: to make the
Harness smaller, attach the Metal
Harness Plate to a loop further in from
the end of the Shoulder Harness Strap
as shown in Figure 38.
Figure 37
Figure 38

31 32
Figure 40
Check that both Shoulder Harness Straps are
attached to the Metal Harness Plate on the
same loop while ensuring that each Shoulder
Harness Strap is completely inside the slot in
Metal Harness Plate as shown in Figure 39.
Step 4
Reattach Shoulder Harness Access Panel to
back of car seat:
• Insert the access panel and twist the
access panel lock clockwise as shown in
Figure 40.
Step 5
If installing this car seat Rear-Facing, store
the Top Tether. See “Top Tether Storage” on
page 86.
Figure 39
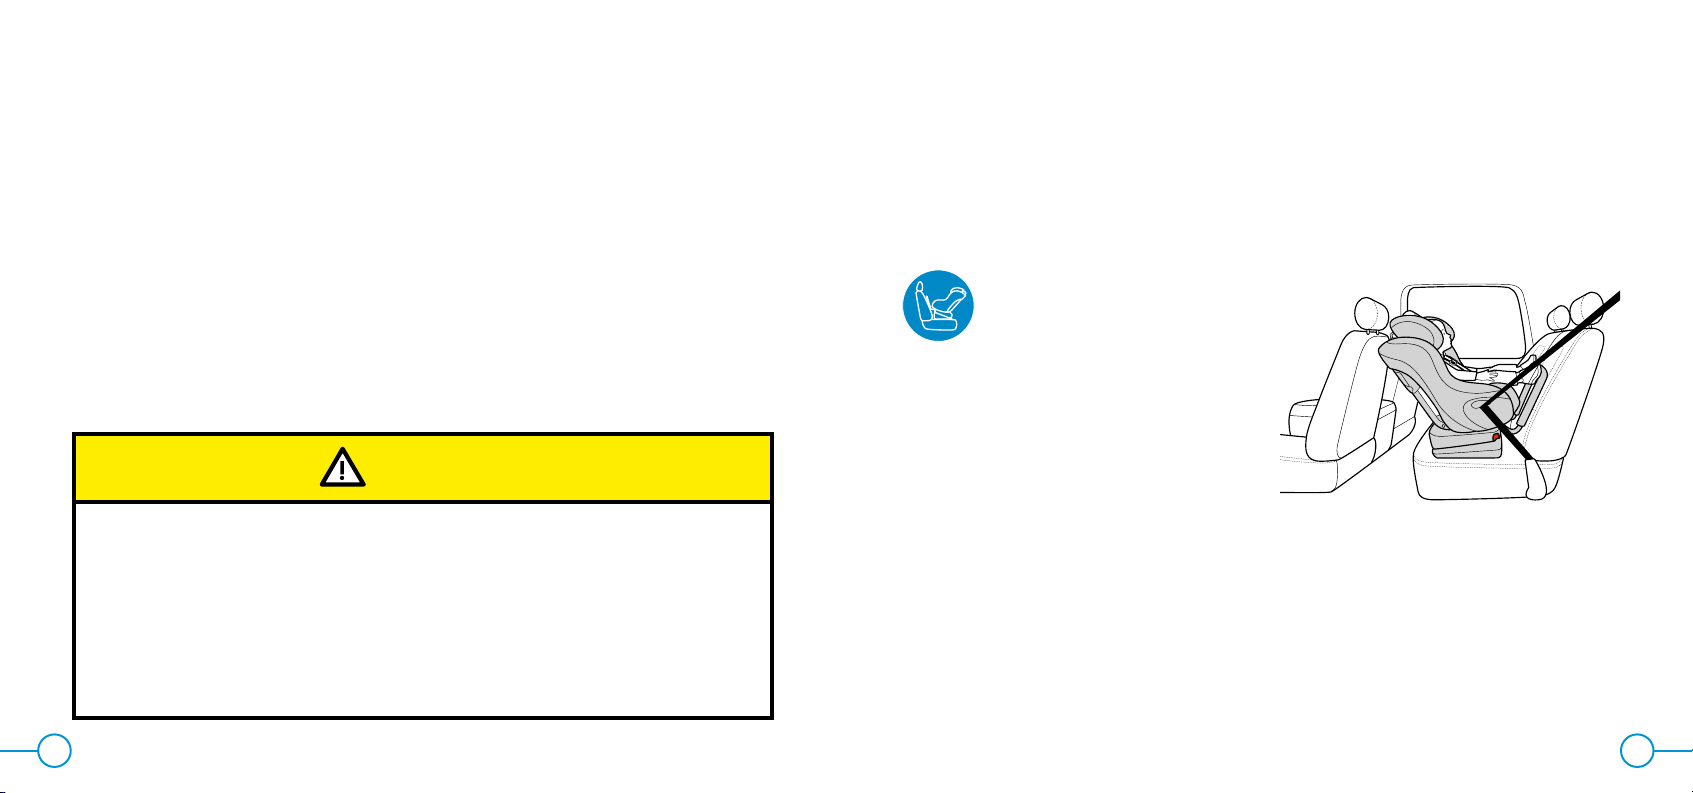
Installing/Removing Rear-Facing Car Seat
WARNING — DEATH or
SERIOUS INJURY can occur
• Never use this car seat Rear-Facing in a vehicle front seating location with
an air bag.
• Rear-Facing UAS Belt or vehicle belt must be routed through Rear-Facing
Belt Path when using car seat Rear-Facing.
• Rear-Facing Base and Anti-Rebound Bar must be used when using car
seat Rear-Facing.
• Rear-Facing UAS Belt or vehicle belt must stay tightly adjusted around car
seat at all times.
• Failure to properly install or use this car seat increases the risk of serious
injury or death to the child and others in a sharp turn, sudden stop
or crash.
• Seat must be in Recline Position 3 within an acceptable recline range for
the child’s age when used Rear-Facing.
• To avoid injury this car seat must be installed by an adult.

34
33
WARNING — DEATH or
SERIOUS INJURY can occur (continued)
• Never leave this car seat unsecured in your vehicle. This car seat must
remain secured even when not in use. In a sharp turn, crash or sudden
stop, an unsecured car seat can be thrown around and could severely
injure vehicle occupants.
• When installing this child restraint Rear-Facing, it must be secured by the
Rear-Facing UAS Belt or vehicle belt as shown in this instruction manual.
• Use only with children who weigh between 6.4 and 18 kg (14 and 40 lb)
and whose height is between 64 and 110 cm (25 and 43 in.).
Installing Rear-Facing Car Seat With UAS
WARNING — DEATH or
SERIOUS INJURY can occur
• Only use the car seat UAS system in vehicle seating locations designated
by the vehicle manufacturer for use with UAS and that have a standard
anchor spacing of 280 mm (11 in.).
• Rear-Facing UAS Connectors must be secured to the vehicle UAS lower
anchors only. Connection to other vehicle anchors or vehicle components
could result in the anchor tearing free in a crash.
• Never attach more than one UAS Connector to a vehicle lower anchor
unless recommended by the vehicle owner’s manual for that vehicle.
35 36
Figure 44
Step 1
Prepare car seat for Rear-Facing Installation:
• Fully recline car seat to Recline Position 3
by pulling Recline Handle out and rotating
car seat back as shown in Figure 41
• Install Rear-Facing Base to bottom of
seat. See “Installing/Removing Rear-
Facing Base” on page 78.
• Remove seat cushion and install Anti-
Rebound Bar. See “Installing/Removing
Anti-Rebound Bar” on page 81.
Step 2
Select a Forward-Facing vehicle seating
location which has UAS.
Locate the UAS lower anchors (as explained
in the “Vehicle Universal Anchorage System
(UAS)” on page 15 in this manual and in your
vehicle owner’s manual. See Figure 42.
Figure 42
Figure 43
2
tatio
n
’arrière O
rien
tation
v
Pourajust
Pourdév
errouillerles
c
maximumpuistirez sur les poignées de déve
rro
uilla
geDUA.
1
32
Orientation
versl’arrière Orie
ntationve
rs
l’ava
nt
•Pourajusterlesconnecteursrigid
es
inférieursduDU
A:Tirez
sur
lapoign
éed’ajust
ement
DUAet
gli
ssez
le
siègedansl
a
positi
on
souh
ai
tée.
•Pour
déve
rrouill
e
rles
co
nn
e
cteursrigid
es
inférieursdu
DU
A
:Étirezlesco
nnect
eursa
u
maximumpuistirezsurlespoignéesdedéverro
uill
ageDUA.
•Leniveaudu
so
ldoit
êtredanslaplag
e
d’i
nclinaisonprévuepour
l’âge
d
el’enfan
t.
Plaged’ inclina iso n
T
o
uslesenfantso
rientés
ve
rs
l’arriè
re
1anetpl
us
13 2
Orientation
versl’arrière Orientationversl’avant
• Pourajuster les connecteurs rigides inférieurs du DUA:Tirezsurlapoignée d’ajustement
DUAetglissez le siège dans la position souhaitée.
• Pourdéverrouiller les connecteurs rigides inférieurs du DUA: Étirez les connecteurs au
maximumpuistirez sur les poignées de déverrouillage DUA.
• Le niveau du sol doit être dans la plage
d’inclinaisonprévuepour l’âge de l’enfant.
Plage d’inclinaison
Tousles enfants orie ntés
versl’arrière
1an et plus
13 2
Orientation
versl’arrière Orientationversl’avant
• Pourajusterlesconnecteursrigides inférieurs du DUA: Tirez sur la poignée d’ajustement
DUAetglissezlesiègedans la position souhaitée.
• Pourdéverrouillerlesconnecteursrigides inférieurs du DUA:Étirezlesconnecteurs au
maximumpuistirezsurlespoignées de déverrouillage DUA.
• Le niveau du sol doit être dans la plage
d’inclinaisonprévuepourl’âgedel’enfant.
Plaged’inclinaison
Touslesenfantsorientés
versl’arrière
1anetplus
Figure 41
Step 3
If the vehicle seat back is adjustable, make
sure the seat back is locked in a more upright
position. Refer to vehicle owner’s manual for
recommended seat back angle. DO NOT
install or use this car seat while the vehicle
seat back is excessively reclined, as shown in
Figure 43.
Step 4
Open both Rear-Facing Belt Lock-offs, as
shown in Figure 44.
Step 5
Remove Rear-Facing UAS Belt from its storage
location under the Seat Cushion, see “Rear-
Facing UAS Storage” on page 84.
Lengthen each side of Rear-Facing UAS Belt
by pressing adjuster release button while
pulling belt to extend the length of Rear-
Facing UAS Belt as shown in Figure 45.
Figure 45
Other manuals for FOONF
6
Table of contents
Other Clek Car Seat manuals


