Clek Oobr User manual
0000001 9
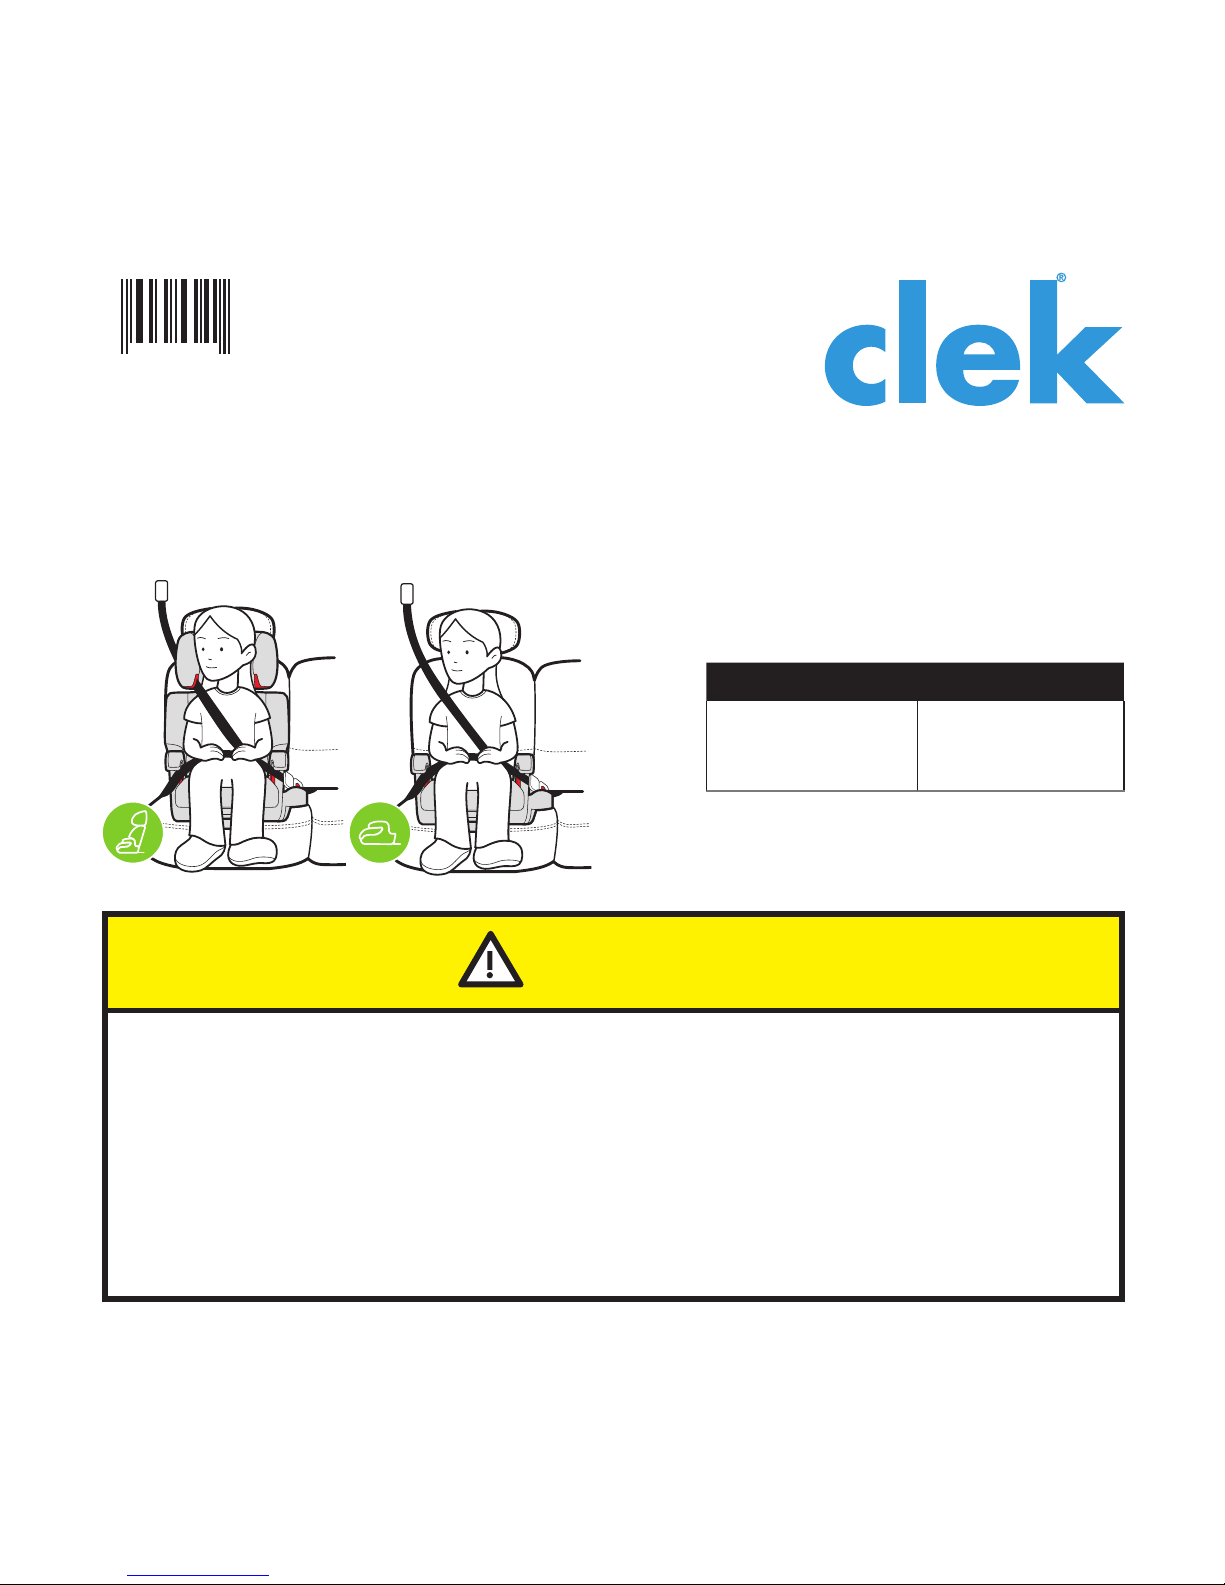
Oobr Instruction Manual
This belt-positioning booster seat (booster seat) is designed for use in either full back mode
or backless mode by children who meet all of the following requirements:
JULY2013
WARNING
tREAD AND UNDERSTAND PRODUCT LABELS AND ALL INSTRUCTIONS IN THIS
MANUAL AND IN YOUR VEHICLE OWNER’S MANUAL BEFORE INSTALLING OR
USING THIS BOOSTER SEAT.
tFAILURE TO PROPERLY INSTALL OR USE THIS BOOSTER SEAT OR FOLLOW THESE
WARNINGS AND THOSE ON THIS BOOSTER SEAT’S LABELS CAN RESULT IN
SERIOUS INJURY OR DEATH TO THE CHILD IN A SHARP TURN, SUDDEN STOP
OR CRASH.
Height Weight
101–145 cm.
40–57 in.
18–45 kg.
40–100 lb.

ii
When Using This Booster Seat in Backless Mode
(without Seat Back)
√Child weighs between 18 and 45 kg. (40 and 100 lb.), and height is between
101 and 145 cm. (40 and 57 in.)
√Child is sitting in the booster seat in a forward-facing location in the vehicle rear seat
√Vehicle seat belt is correctly routed beneath Armrests and shoulder belt is properly
positioned on child’s shoulder
√There is no slack in the vehicle seat belt
√Vehicle lap belt sits low and snugly on the child’s hips and is not twisted. The shoulder
belt MUST be at or above the child’s shoulder, lie snugly across the midpoint of the
child’s chest and across the center of the shoulder, and MUST not be twisted
√Child is sitting upright and is not slouching
√The tops of the child’s ears are below the top of the vehicle seat back or headrest in its
highest adjustment position
√Booster seat is securely installed with both UAS Connectors attached to vehicle’s
UAS Lower Anchors, if available
i
Checklist for Proper Use
IMPORTANT: This is only a checklist — you must read and understand all of the warnings
and instructions on this booster seat’s labels and in this manual before installing or using
this booster seat.
When Using This Booster Seat in Full Back Mode
(with Seat Back)
√Child weighs between 18 and 45 kg. (40 and 100 lb.), and height is between
101 and 145 cm. (40 and 57 in.)
√Child is sitting in the booster seat in a forward-facing location in the vehicle rear seat
√Vehicle seat belt is correctly routed beneath Armrests and through the Shoulder
Belt Guide
√There is no slack in the vehicle seat belt
√Vehicle lap belt sits low and snugly on the child’s hips and is not twisted. The shoulder
belt MUST be at or above the child’s shoulder, lie snugly across the midpoint of the
child’s chest and across the center of the shoulder, and MUST not be twisted
√Child is sitting upright and is not slouching
√The tops of the child’s ears are below the top of the booster seat Headrest
√Booster seat is securely installed with both UAS Connectors attached to vehicle’s
UAS Lower Anchors, if available

21
Table of Contents
Checklist for Proper Use .......................................................................................... i
When Using This Booster Seat in Full Back Mode (with Seat Back) .......................... i
When Using This Booster Seat in Backless Mode (without Seat Back) ......................ii
Booster Seat Features............................................................................................. 3
Registration & Recall Information............................................................................ 4
Registering Your Booster Seat............................................................................. 5
Warnings .............................................................................................................. 6
Certification........................................................................................................... 9
Vehicle Classification.............................................................................................. 9
Size Limitations.....................................................................................................10
When Using This Booster Seat in Full Back Mode (with Seat Back) ........................10
When Using This Booster Seat in Backless Mode (without Seat Back) ....................12
Vehicle Information...............................................................................................13
Vehicle Child Restraint Anchorage System (UAS) .................................................13
Vehicle Seat Location Requirements ...................................................................14
Vehicle Seat Belt Requirements ..........................................................................15
Unsafe Vehicle Seat Belt Systems ................................................................16
Installing/Removing Booster Seat Using UAS Connectors.........................................17
Installing Booster Seat in Full Back Mode When Using UAS Connectors.................18
Adjusting the Seat Back Recline ................................................................. 23
Removing Booster Seat in Full Back Mode When Using UAS Connectors .............. 25
Installing Booster Seat in Backless Mode When Using UAS Connectors ................ 26
Removing Booster Seat in Backless Mode When Using UAS Connectors............... 32
Installing Booster Seat WITHOUT Using UAS Connectors ........................................ 33
Installing Booster Seat in Full Back Mode WITHOUT Using UAS Connectors ......... 34
Installing Booster Seat in Backless Mode WITHOUT Using UAS Connectors .......... 36
Securing Your Child in Booster Seat ...................................................................... 38
When Using Booster Seat in Full Back Mode (with Seat Back) ............................. 39
Adjusting the Headrest ............................................................................. 46
When Using Booster Seat in Backless Mode (without Seat Back).......................... 47
Installing/Removing Seat Back ............................................................................. 53
Installing/Removing Cup Holder (drink-thingy™)................................................ 56
Instruction Manual Storage ...................................................................................57
Care & Cleaning .................................................................................................. 58
Removing/Installing Seat Cushion & Seat Cushion Cover .................................... 58
Washing Instructions........................................................................................62
Seat Cushion Cover Washing Instructions ....................................................62
Seat Back Cover & Headrest Cover Fabric Washing Instructions.................... 63
Seat Frame (Exterior Plastics Only) Washing Instructions............................... 64
Accessories.......................................................................................................... 64
Warranty ............................................................................................................ 65
For concerns related to parts or the
use and maintenance of this product,
please contact us at:
Clek Inc.
12 Upjohn Rd., Suite 1
Toronto, Ontario Canada
M3B 2V9
www.clekinc.ca
® Clek and Clek logos, Olli, Ozzi, and Oobr are registered trademarks of Clek Inc.
For a complete list of Clek Inc. trademarks please visit www.clekinc.com/trademarks.
43
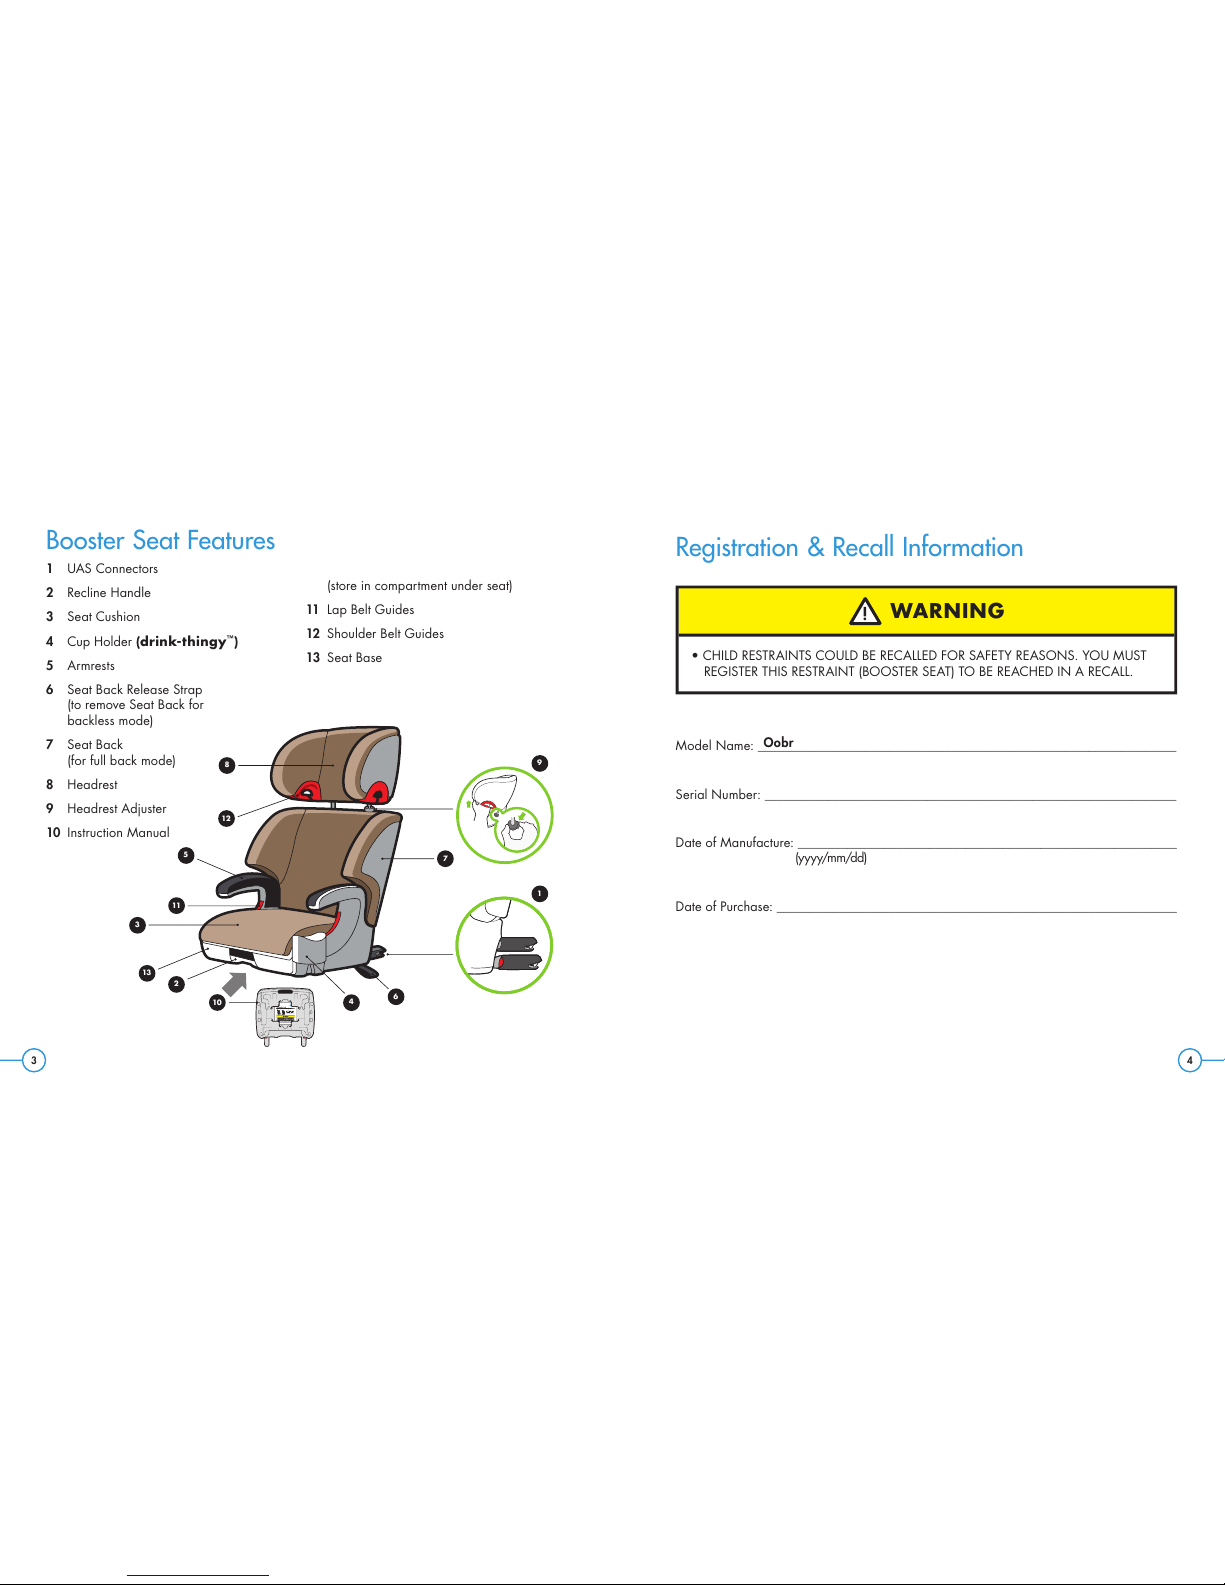
Booster Seat Features
1 UAS Connectors
2 Recline Handle
3 Seat Cushion
4 Cup Holder (drink-thingy™)
5 Armrests
6 Seat Back Release Strap
(to remove Seat Back for
backless mode)
7 Seat Back
(for full back mode)
8 Headrest
9 Headrest Adjuster
10 Instruction Manual
(store in compartment under seat)
11 Lap Belt Guides
12 Shoulder Belt Guides
13 Seat Base
Registration & Recall Information
Model Name: ___________________________________________________________________
Serial Number: __________________________________________________________________
Date of Manufacture: _____________________________________________________________
(yyyy/mm/dd)
Date of Purchase: ________________________________________________________________
WARNING
t$)*-%3&453"*/54$06-%#&3&$"--&%'034"'&5:3&"40/4:06.645
REGISTER THIS RESTRAINT (BOOSTER SEAT) TO BE REACHED IN A RECALL.
Oobr
8
12
5
11
3
13
2
10 46
7
9
1

65
Registering Your Booster Seat
Please fill in the information on the previous page for your records. The model name,
serial number and manufacturing date can be found on a label affixed to the underside
of this booster Seat Base.
Fill out the prepaid registration postcard attached to the seat and mail it today.
Child restraints could be recalled for safety reasons. You MUST register this restraint
(booster seat) to be reached in a recall. Send your name, address, e-mail address
if available, and the restraint’s model number and manufacturing date to Clek Inc.,
12 Upjohn Rd., Suite 1, Toronto, Ontario Canada M3B 2V9 or call Clek Inc.’s
customer service line at 1-866-656-2462 to register, or you may register online
at http://www.clekinc.ca/register. For recall information in Canada, call Transport
Canada’s Road Safety Information Centre at 1-800-333-0371, or go to
http://www.tc.gc.ca/eng/roadsafety/safedrivers-childsafety-notices-menu-907.htm.
Warnings
WARNING — DEATH or
SERIOUS INJURY can occur
FAILURE TO PROPERLY INSTALL OR USE THIS BOOSTER SEAT OR FOLLOW THESE
WARNINGS AND INSTRUCTIONS AND THOSE ON THIS BOOSTER SEAT’S
LABELS CAN RESULT IN SERIOUS INJURY OR DEATH OF THE CHILD IN A SHARP
TURN, SUDDEN STOP OR CRASH.
t%0/05*/45"--0364&5)*4#0045&34&"56/5*-:063&"%"/%
UNDERSTAND THE INSTRUCTIONS IN THIS MANUAL AND IN YOUR VEHICLE
OWNER’S MANUAL. DO NOT LET OTHERS INSTALL OR USE THIS BOOSTER
SEAT UNLESS THEY UNDERSTAND HOW TO CORRECTLY INSTALL AND USE IT.
t5)*4#0045&34&"5.645#&*/45"--&%#:"/"%6-5
t/&7&3"--085)&$)*-%50#6$,-&5)&.4&-7&4*/5)*4#0045&34&"5
t'"*-63&50$)004&5)&$033&$5#0045&34&"5.0%&'6--#"$,03
#"$,-&44"/%501301&3-:4&$63&:063$)*-%$"/*/$3&"4&5)&3*4,
OF INJURY OR DEATH.
t64&0/-:5)&7&)*$-&4-"1"/%4)06-%&3#&-54:45&.8)&/
RESTRAINING THE CHILD IN THIS BOOSTER SEAT.
87
WARNING — DEATH or
SERIOUS INJURY can occur (continued)
t/&7&364&8*5)0/-:"-"1#&-5503&453"*/"$)*-%*/5)*4#0045&3
SEAT. USE WITHOUT A LAP AND SHOULDER BELT CAN RESULT IN SERIOUS
INJURY OR DEATH.
t%0/0564&5)*4#0045&34&"58*5).0503*;&%03%003.06/5&%
BELT SYSTEMS.
t4&$63&5)*4$)*-%3&453"*/58*5)5)&7&)*$-&4$)*-%3&453"*/5
ANCHORAGE SYSTEM IF AVAILABLE OR WITH A VEHICLE BELT.
t%0/0564&5)*4#0045&34&"5"'5&3"/"$$*%&/50'"/:,*/%
AN ACCIDENT CAN CAUSE DAMAGE TO THIS BOOSTER SEAT THAT YOU
CANNOT SEE.
t%0/0564&5)*4#0045&34&"5"'5&3/*/&:&"34'30.5)&%"5&0'
MANUFACTURE. THE DATE OF MANUFACTURE CAN BE FOUND ON THE
LABEL AFFIXED TO THE UNDERSIDE OF THE BOOSTER SEAT CUSHION BASE.
t%0/05"55&.1550.",&3&1"*34500305)&38*4&.0%*':035".1&3
WITH THIS BOOSTER SEAT.
t/&7&364&5)*4#0045&34&"5*'*5*4%"."(&%03)"4.*44*/(1"354
WARNING — DEATH or
SERIOUS INJURY can occur (continued)
t%0/0564&"$$&4403*&4031"3548*5)5)*4#0045&34&"505)&3
5)"/5)04&1307*%&%#:$-&,*/$64&0'"$$&4403*&4031"354'30.
OTHER MANUFACTURERS COULD ALTER THE PERFORMANCE OF THIS
BOOSTER SEAT.
t"70*%#63/*/+63:—ALWAYS TOUCH THE SURFACES OF THE PARTS FIRST
BEFORE PUTTING THE CHILD IN THIS BOOSTER SEAT. THIS BOOSTER SEAT
CAN BECOME VERY HOT IF LEFT IN THE SUN AND CAN BURN THE
$)*-%44,*/
t,&&15)*4."/6"-*/5)&4503"(&$0.1"35.&/5-0$"5&%0/5)&
BOTTOM OF THIS BOOSTER SEAT FOR FUTURE USE.
t/&7&364&"4&$0/%)"/%#0045&34&"503"#0045&34&"58)04&
)*4503::06%0/05,/08
t3&(*45&3:063#0045&34&"58*5)$-&,*/$
109
Certification
t5IJTCPPTUFSTFBUDPOGPSNTUPBMMBQQMJDBCMFSFRVJSFNFOUTPG$BOBEJBO.PUPS7FIJDMF
Safety Standard 213, 213.1 and is certified for use in motor vehicles.
tThis booster seat is not certified for aircraft use because aircraft seats DO NOT have
shoulder belts.
Vehicle Classification
This booster seat is for use only in the following classes of vehicle: Passenger Cars, Trucks,
and Multi-Purpose Passenger Vehicles such as SUVs (sports utility vehicles) and CUVs
(crossover utility vehicles).
Size Limitations
The child MUST meet ALL of the following requirements on
page 10 through page 12 to use this booster seat:
When Using This Booster Seat in
Full Back Mode (with Seat Back)
t$IJMETXFJHIUJTCFUXFFOBOELH
(40 and 100 lb.)
t$IJMETIFJHIUJTCFUXFFOBOEDN
(40 and 57 in.)
WARNING
t'"*-63&50$)004&5)&$033&$5#0045&34&"5.0%&'6--#"$,03
#"$,-&44'03:063$)*-%4)&*()5"/%8&*()5.":*/$3&"4&5)&
3*4,0'*/+63:03%&"5)

1211
t5IFUPQTPGUIFDIJMETFBST.645CFCFMPXUIFUPQPG
this booster seat’s Headrest, as shown in Figure 1. If the
tops of the ears are above the top of this booster seat’s
Headrest in the highest adjustment position, your child
is too large for using this booster seat in full back mode.
t5IF4IPVMEFS#FMU(VJEF.645CFBUPSBCPWFUIF
child’s shoulder, as shown in Figure 2. If the child’s
shoulder is above the Shoulder Belt Guide with the
Headrest in its highest adjustment position, your child
is too large for using this booster seat in full back mode.
Figure 1
Figure 2
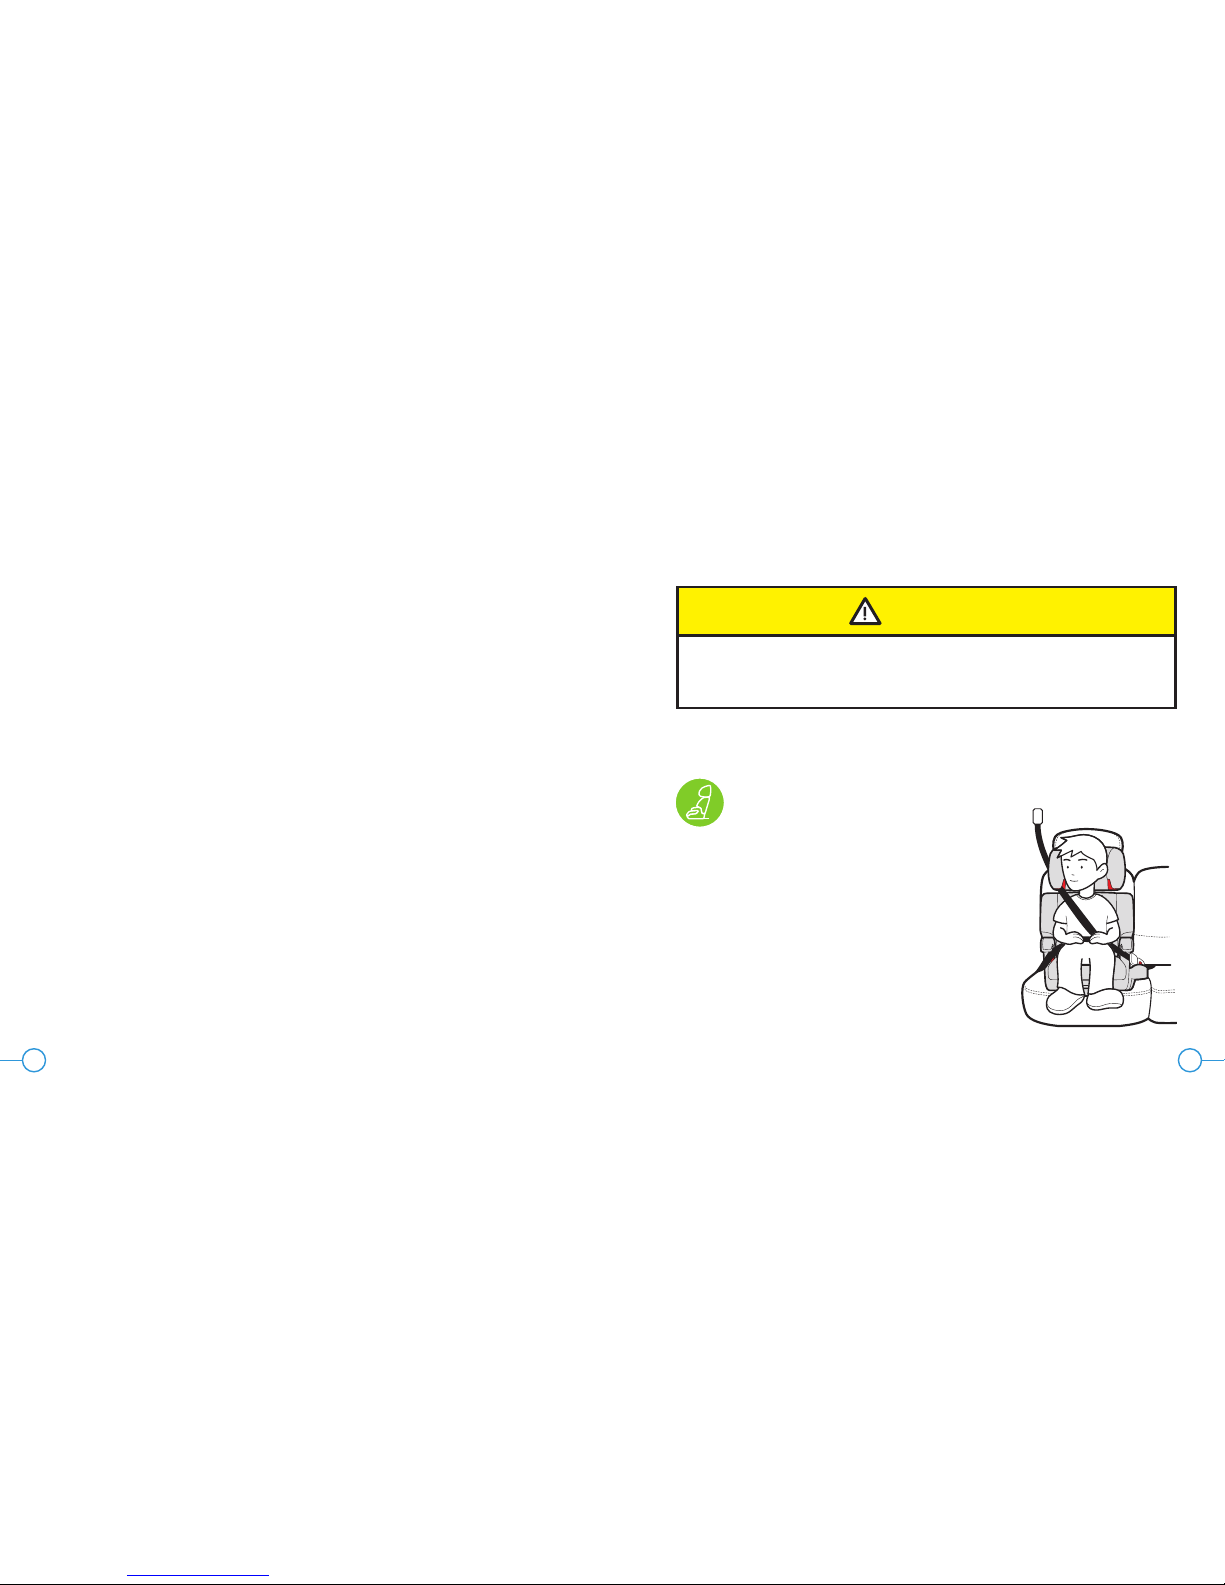
When Using This Booster Seat in Backless Mode
(without Seat Back)
t$IJMETXFJHIUJTCFUXFFOBOELH
(40 and 100 lb.)
t$IJMETIFJHIUJTCFUXFFOBOEDN
(40 and 57 in.)
t5IFUPQTPGUIFDIJMETFBST.645CFCFMPXUIFUPQPG
the vehicle seat back or the vehicle seat’s headrest in the
highest adjustment position, as shown in Figure 3. If the
tops of the child’s ears are above the top of the vehicle
seat back or headrest in the highest adjustment position,
your child is too large for using this booster seat in
backless mode.
Figure 3
1413
Vehicle Information
Vehicle Child Restraint Anchorage System (UAS)
t6"4TUBOETGPS6OJWFSTBM"ODIPSBHF4ZTUFNBMTP
referred to as LATCH in the United States). These terms
refer to the anchors built into a vehicle for attaching
child restraints and consists of two lower anchors at the
crease between the vehicle seat back and vehicle seat
cushion and a top tether anchor behind the vehicle seat.
The Clek booster seat has been designed to attach
securely to only the vehicle’s UAS Lower Anchors.
tNPEFMZFBSWFIJDMFTPSOFXFSIBWFBUMFBTUUXP
seating locations with a Universal Anchorage System.
Some 2001 and 2002 model year vehicles have
Universal Anchorage Systems. 2000 model year
vehicles or older DO NOT have Universal Anchorage
Systems. See your vehicle owner’s manual or visit
www.clekinc.ca if you are unsure if your vehicle
is equipped with a Universal Anchorage System.
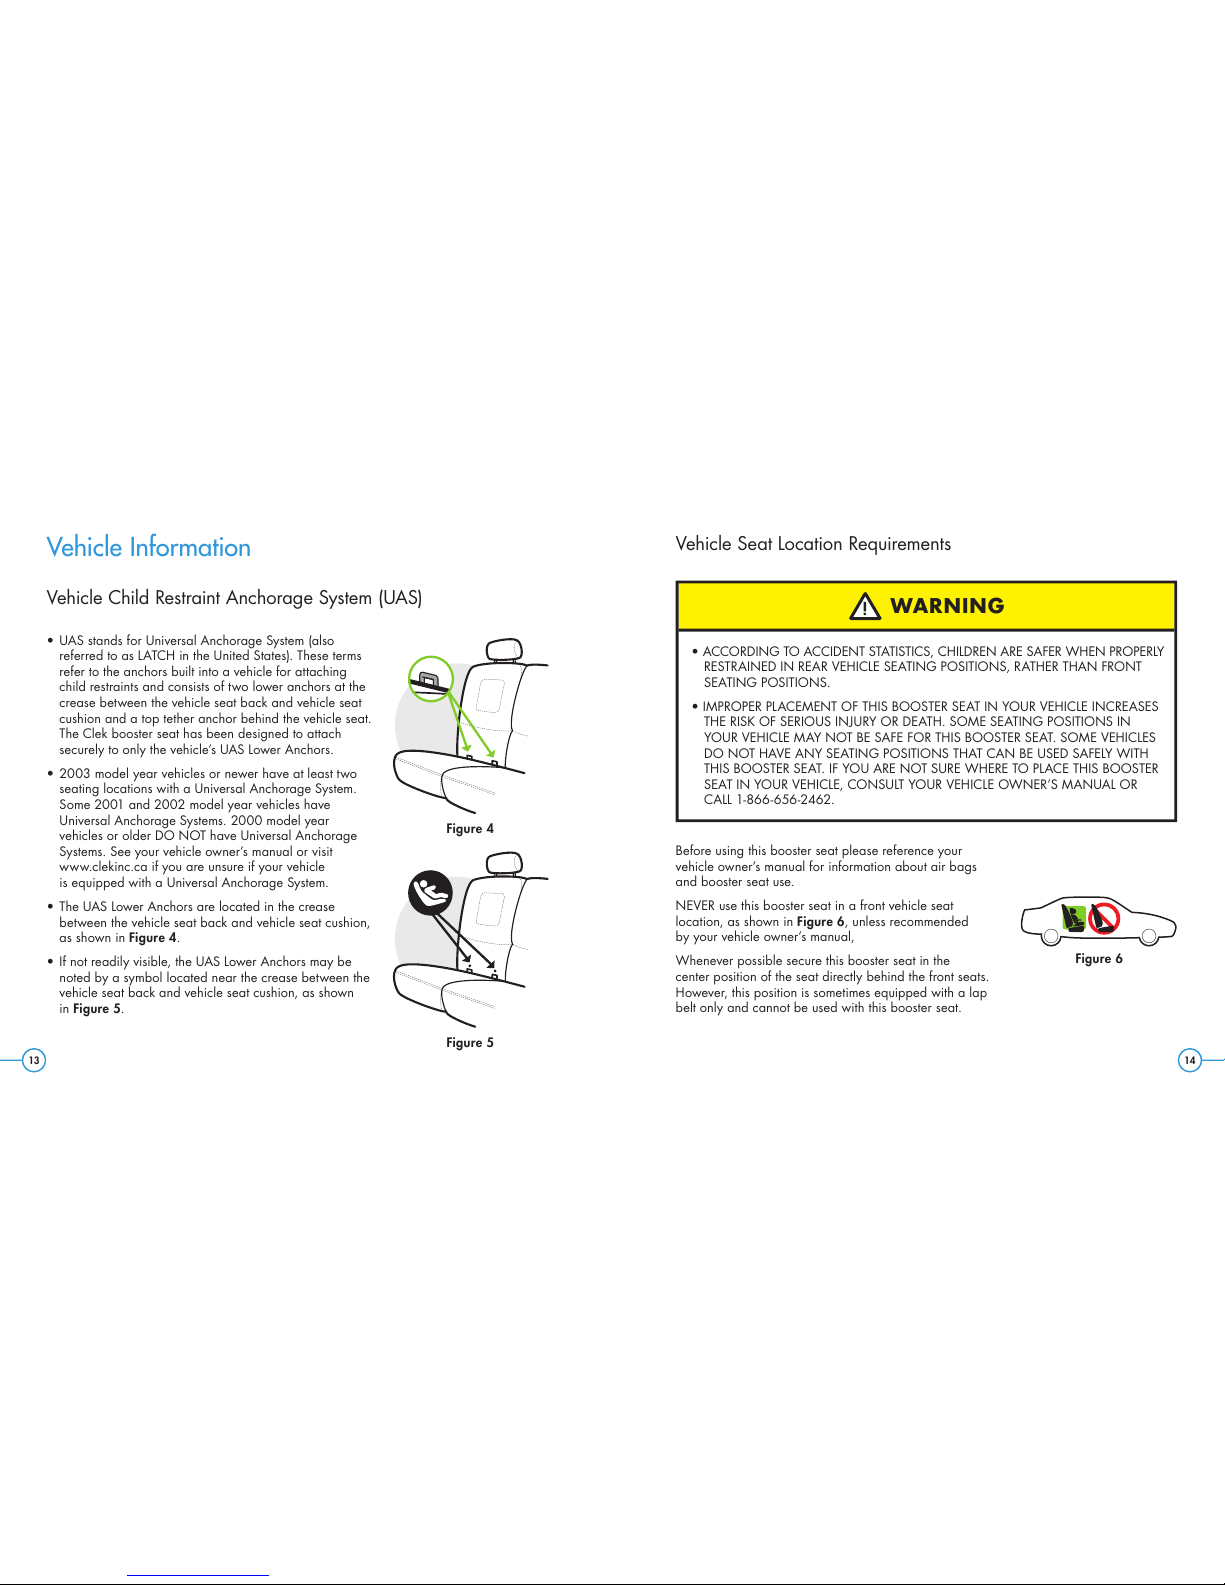
t5IF6"4-PXFS"ODIPSTBSFMPDBUFEJOUIFDSFBTF
between the vehicle seat back and vehicle seat cushion,
as shown in Figure 4.
t*GOPUSFBEJMZWJTJCMFUIF6"4-PXFS"ODIPSTNBZCF
noted by a symbol located near the crease between the
vehicle seat back and vehicle seat cushion, as shown
in Figure 5.
Figure 4
Figure 5
Vehicle Seat Location Requirements
Before using this booster seat please reference your
vehicle owner’s manual for information about air bags
and booster seat use.
NEVER use this booster seat in a front vehicle seat
location, as shown in Figure 6, unless recommended
by your vehicle owner’s manual,
Whenever possible secure this booster seat in the
center position of the seat directly behind the front seats.
However, this position is sometimes equipped with a lap
belt only and cannot be used with this booster seat.
WARNING
t"$$03%*/(50"$$*%&/545"5*45*$4$)*-%3&/"3&4"'&38)&/1301&3-:
RESTRAINED IN REAR VEHICLE SEATING POSITIONS, RATHER THAN FRONT
SEATING POSITIONS.
t*.1301&31-"$&.&/50'5)*4#0045&34&"5*/:0637&)*$-&*/$3&"4&4
5)&3*4,0'4&3*064*/+63:03%&"5)40.&4&"5*/(104*5*0/4*/
YOUR VEHICLE MAY NOT BE SAFE FOR THIS BOOSTER SEAT. SOME VEHICLES
DO NOT HAVE ANY SEATING POSITIONS THAT CAN BE USED SAFELY WITH
THIS BOOSTER SEAT. IF YOU ARE NOT SURE WHERE TO PLACE THIS BOOSTER
SEAT IN YOUR VEHICLE, CONSULT YOUR VEHICLE OWNER’S MANUAL OR
CALL 1-866-656-2462.
Figure 6
1615
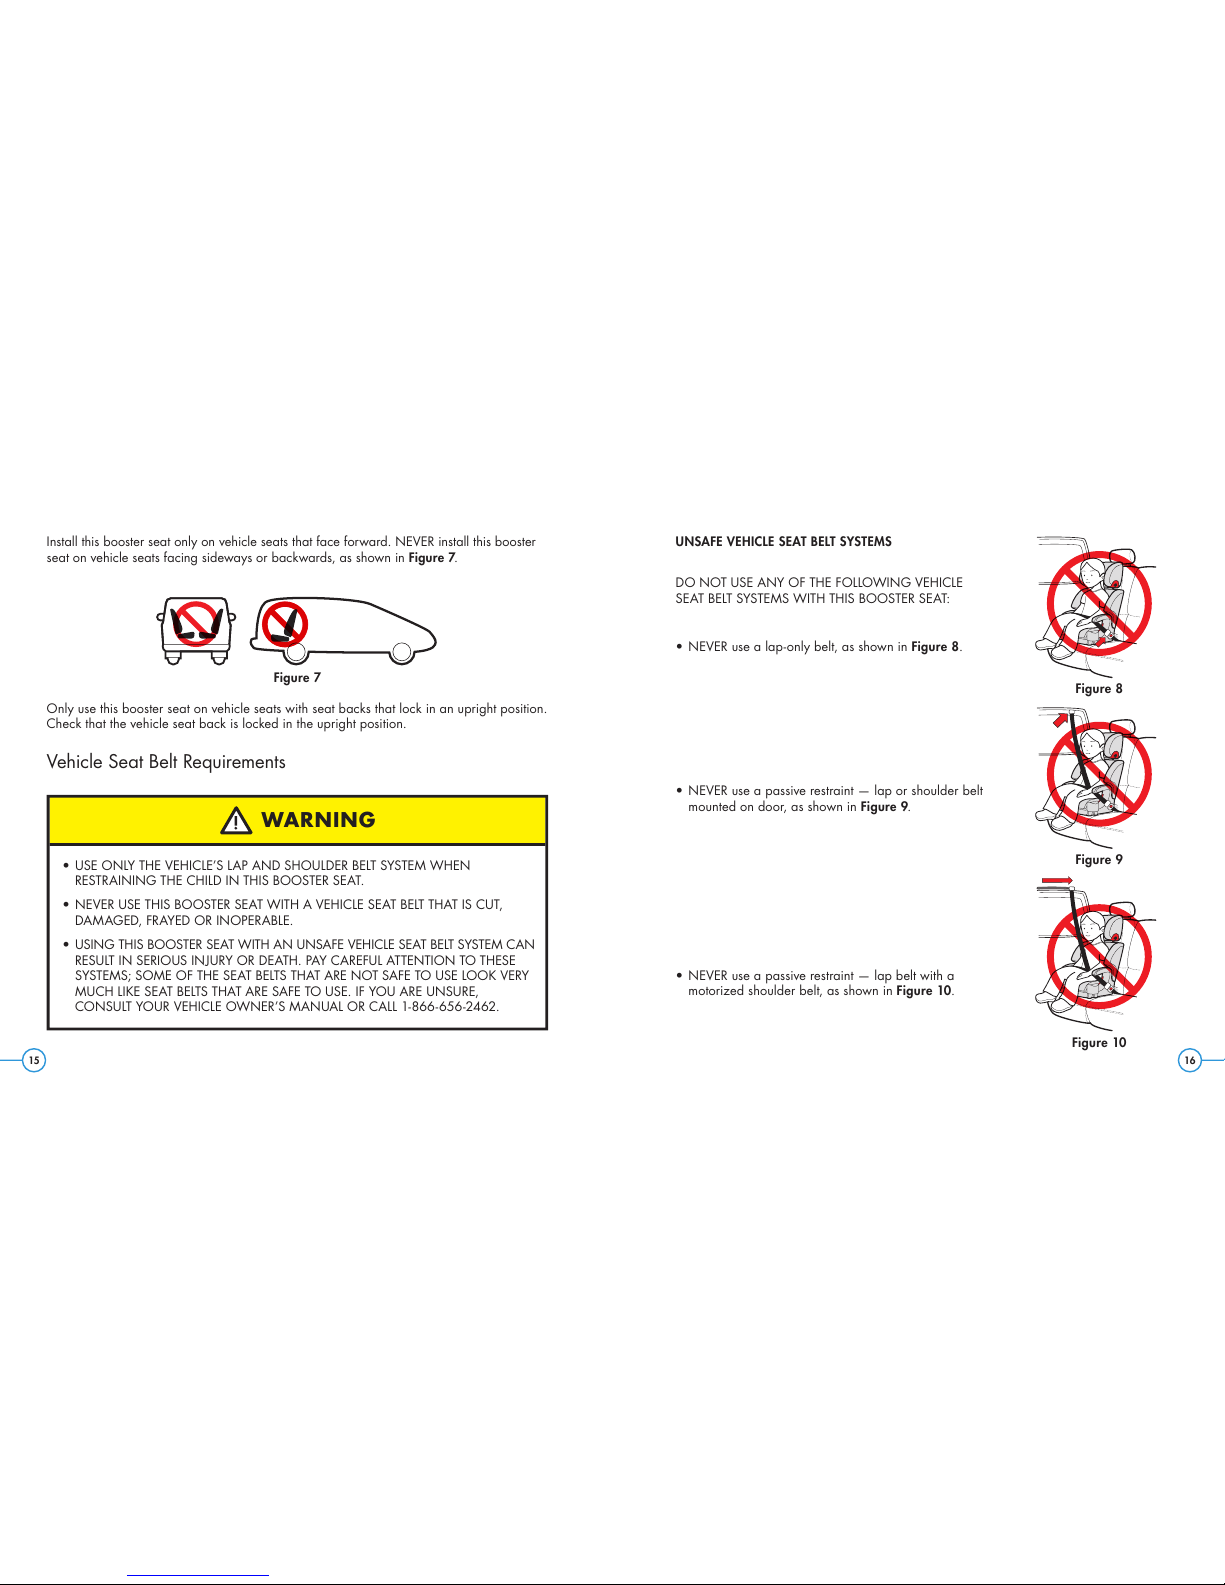
Install this booster seat only on vehicle seats that face forward. NEVER install this booster
seat on vehicle seats facing sideways or backwards, as shown in Figure 7.
Only use this booster seat on vehicle seats with seat backs that lock in an upright position.
Check that the vehicle seat back is locked in the upright position.
Vehicle Seat Belt Requirements
WARNING
t64&0/-:5)&7&)*$-&4-"1"/%4)06-%&3#&-54:45&.8)&/
RESTRAINING THE CHILD IN THIS BOOSTER SEAT.
t/&7&364&5)*4#0045&34&"58*5)"7&)*$-&4&"5#&-55)"5*4$65
DAMAGED, FRAYED OR INOPERABLE.
t64*/(5)*4#0045&34&"58*5)"/6/4"'&7&)*$-&4&"5#&-54:45&.$"/
RESULT IN SERIOUS INJURY OR DEATH. PAY CAREFUL ATTENTION TO THESE
4:45&.440.&0'5)&4&"5#&-545)"5"3&/054"'&5064&-00,7&3:
.6$)-*,&4&"5#&-545)"5"3&4"'&5064&*':06"3&6/463&
CONSULT YOUR VEHICLE OWNER’S MANUAL OR CALL 1-866-656-2462.
Figure 7
UNSAFE VEHICLE SEAT BELT SYSTEMS
DO NOT USE ANY OF THE FOLLOWING VEHICLE
SEAT BELT SYSTEMS WITH THIS BOOSTER SEAT:
t/&7&3VTFBMBQPOMZCFMUBTTIPXOJOFigure 8.
t/&7&3VTFBQBTTJWFSFTUSBJOUMBQPSTIPVMEFSCFMU
mounted on door, as shown in Figure 9.
t/&7&3VTFBQBTTJWFSFTUSBJOUMBQCFMUXJUIB
motorized shoulder belt, as shown in Figure 10.
Figure 8
Figure 9
Figure 10
1817
Installing/Removing Booster Seat
Using UAS Connectors
IMPORTANT: This booster seat is designed to be used with the vehicle’s Universal
Anchorage System. Always secure this booster seat to the vehicle’s Universal Anchorage
System, if available. If your vehicle does not have a Universal Anchorage System, you can
still use this booster seat. See “Installing Booster Seat WITHOUT Using UAS Connectors”
section of this manual on page 33.
WARNING
t'"*-63&501301&3-:*/45"--0364&5)*4#0045&34&"5*/$3&"4&45)&
3*4,0'4&3*064*/+63:03%&"5)505)&$)*-%"/%05)&34*/"4)"31
TURN, SUDDEN STOP OR CRASH.
t50"70*%*/+63:5)*4#0045&34&"5.645#&*/45"--&%#:"/"%6-5
t/&7&3-&"7&5)*4#0045&34&"56/4&$63&%*/:0637&)*$-&5)*4
BOOSTER SEAT MUST REMAIN CONNECTED TO THE UAS LOWER ANCHORS
IN THE VEHICLE OR SECURED BY THE VEHICLE’S SEAT BELT EVEN WHEN NOT
IN USE. IN A SHARP TURN, CRASH OR SUDDEN STOP, AN UNSECURED
BOOSTER SEAT CAN BE THROWN AROUND AND COULD SEVERELY INJURE
VEHICLE OCCUPANTS.
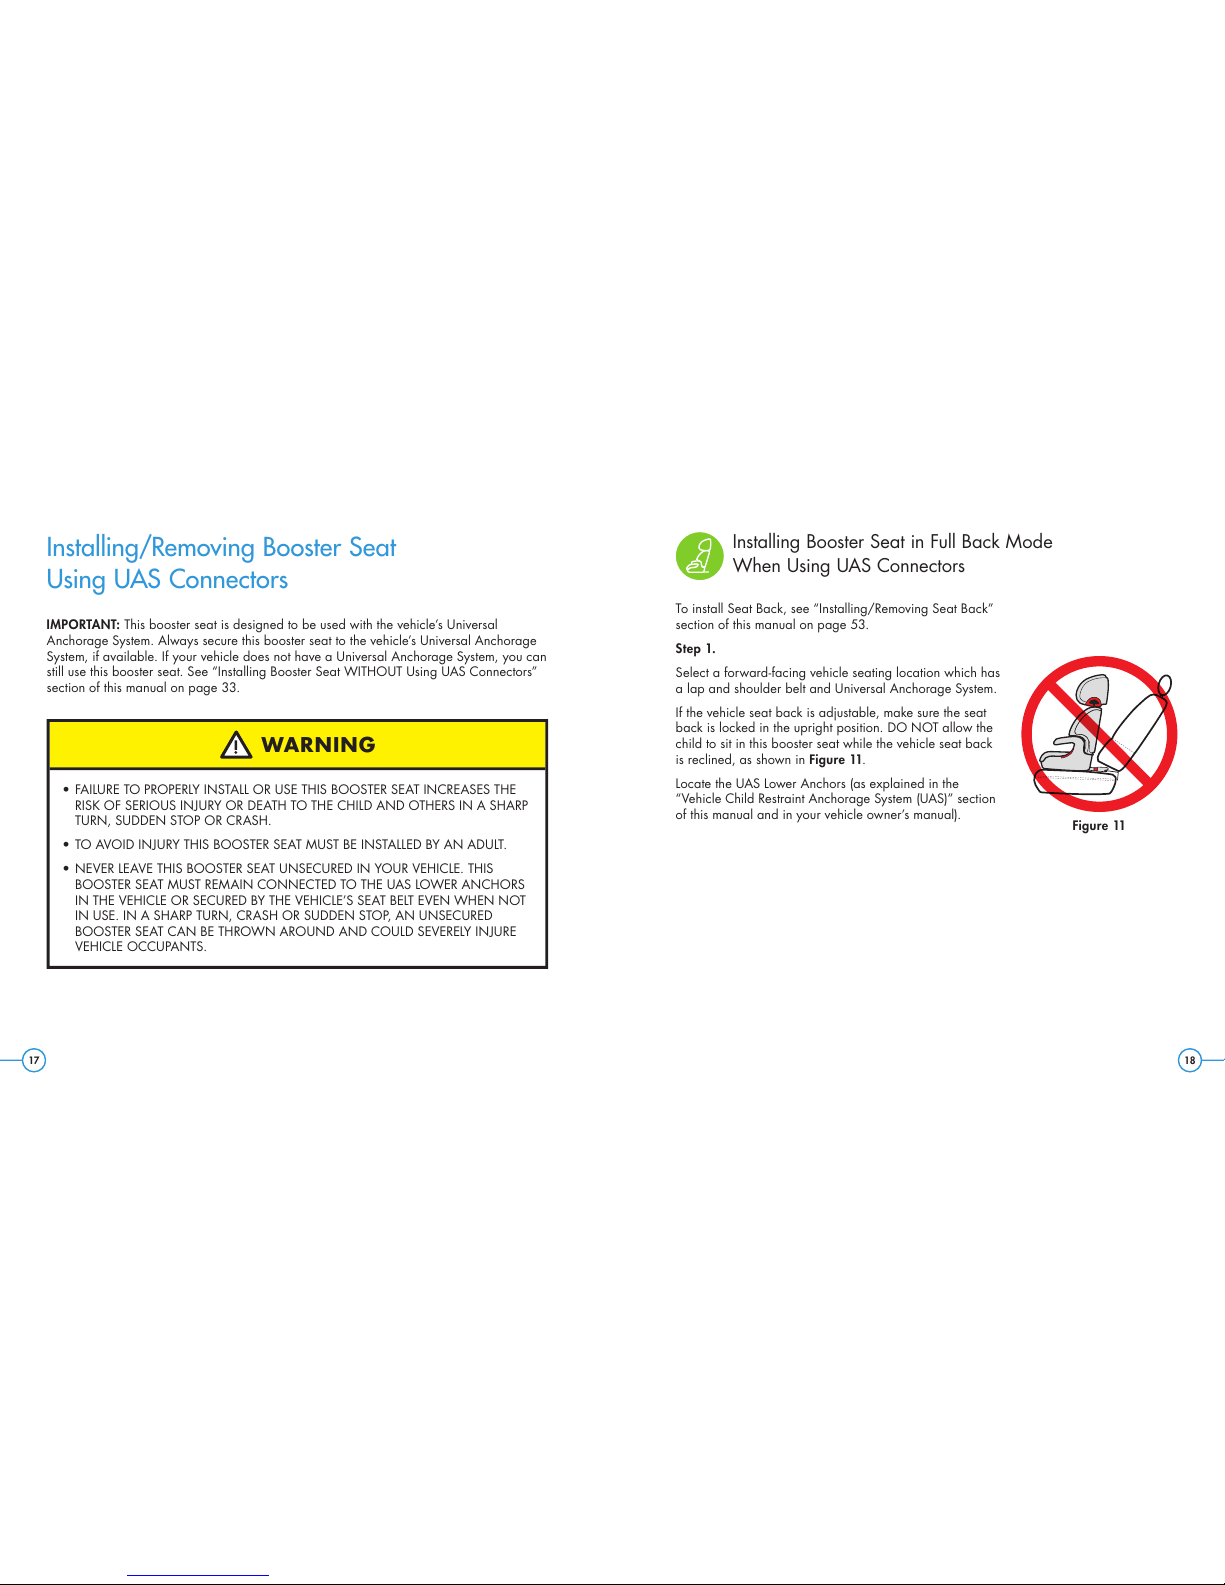
Installing Booster Seat in Full Back Mode
When Using UAS Connectors
To install Seat Back, see “Installing/Removing Seat Back”
section of this manual on page 53.
Step 1.
Select a forward-facing vehicle seating location which has
a lap and shoulder belt and Universal Anchorage System.
If the vehicle seat back is adjustable, make sure the seat
back is locked in the upright position. DO NOT allow the
child to sit in this booster seat while the vehicle seat back
is reclined, as shown in Figure 11.
Locate the UAS Lower Anchors (as explained in the
“Vehicle Child Restraint Anchorage System (UAS)” section
of this manual and in your vehicle owner’s manual). Figure 11
2019
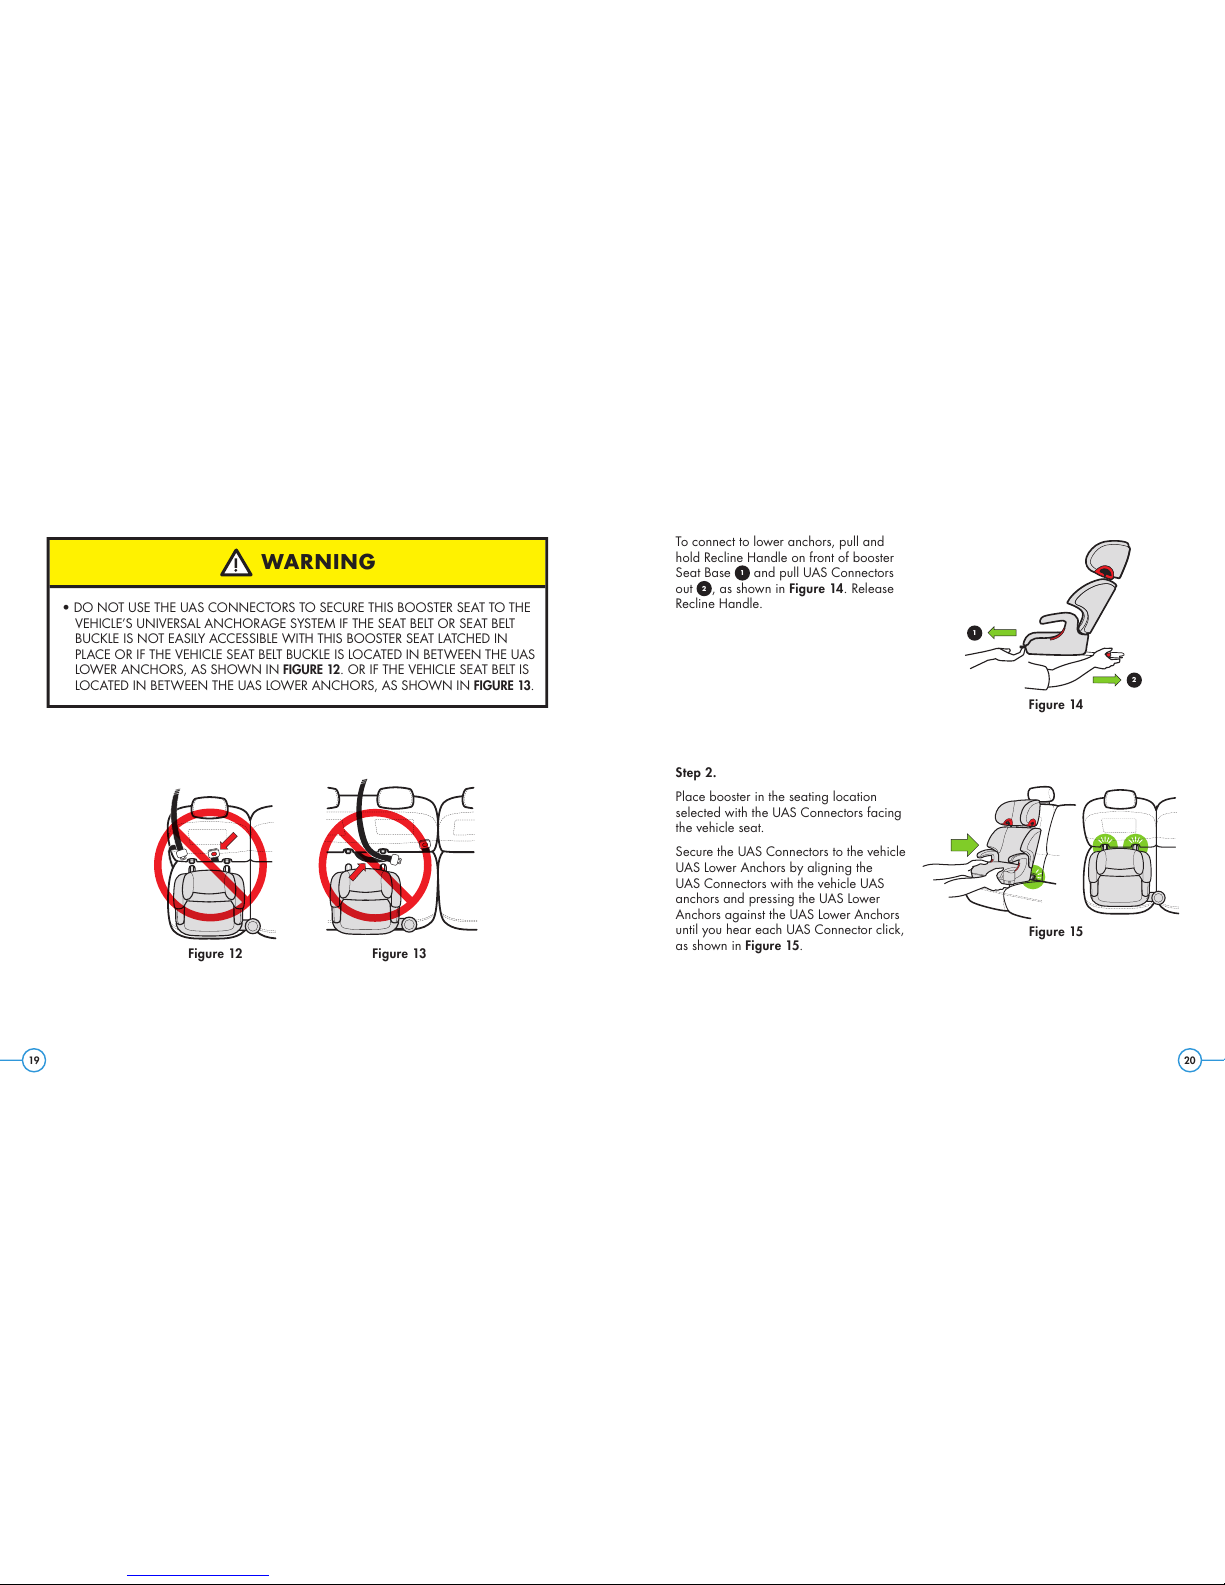
WARNING
t%0/0564&5)&6"4$0//&$5034504&$63&5)*4#0045&34&"5505)&
VEHICLE’S UNIVERSAL ANCHORAGE SYSTEM IF THE SEAT BELT OR SEAT BELT
#6$,-&*4/05&"4*-:"$$&44*#-&8*5)5)*4#0045&34&"5-"5$)&%*/
1-"$&03*'5)&7&)*$-&4&"5#&-5#6$,-&*4-0$"5&%*/#&58&&/5)&6"4
LOWER ANCHORS, AS SHOWN IN FIGURE 12. OR IF THE VEHICLE SEAT BELT IS
LOCATED IN BETWEEN THE UAS LOWER ANCHORS, AS SHOWN IN FIGURE 13.
Figure 12 Figure 13
To connect to lower anchors, pull and
hold Recline Handle on front of booster
Seat Base 1and pull UAS Connectors
out 2, as shown in Figure 14. Release
Recline Handle.
Step 2.
Place booster in the seating location
selected with the UAS Connectors facing
the vehicle seat.
Secure the UAS Connectors to the vehicle
UAS Lower Anchors by aligning the
UAS Connectors with the vehicle UAS
anchors and pressing the UAS Lower
Anchors against the UAS Lower Anchors
until you hear each UAS Connector click,
as shown in Figure 15.Figure 15
1
2
Figure 14
2221
IMPORTANT: If UAS Connectors fail to connect to the vehicle’s UAS Lower Anchors,
you can still use this seat. See “Installing Booster Seat in Full Back Mode WITHOUT Using
UAS Connectors” section of this manual on page 34. Please notify Clek Inc. Customer
Service if the UAS Connectors fail to latch by calling 1-866-656-2462.
Step 3.
Once the UAS Connectors are connected to the UAS Lower Anchors, pull forward on this
booster seat to make sure it is securely attached to the vehicle’s UAS Lower Anchors on
both sides. If not, start over at Step 1.
Step 4.
Complete installation by adjusting this booster seat so the back of this booster seat
contacts the front of the vehicle seat back or headrest, as shown in Figure 16.
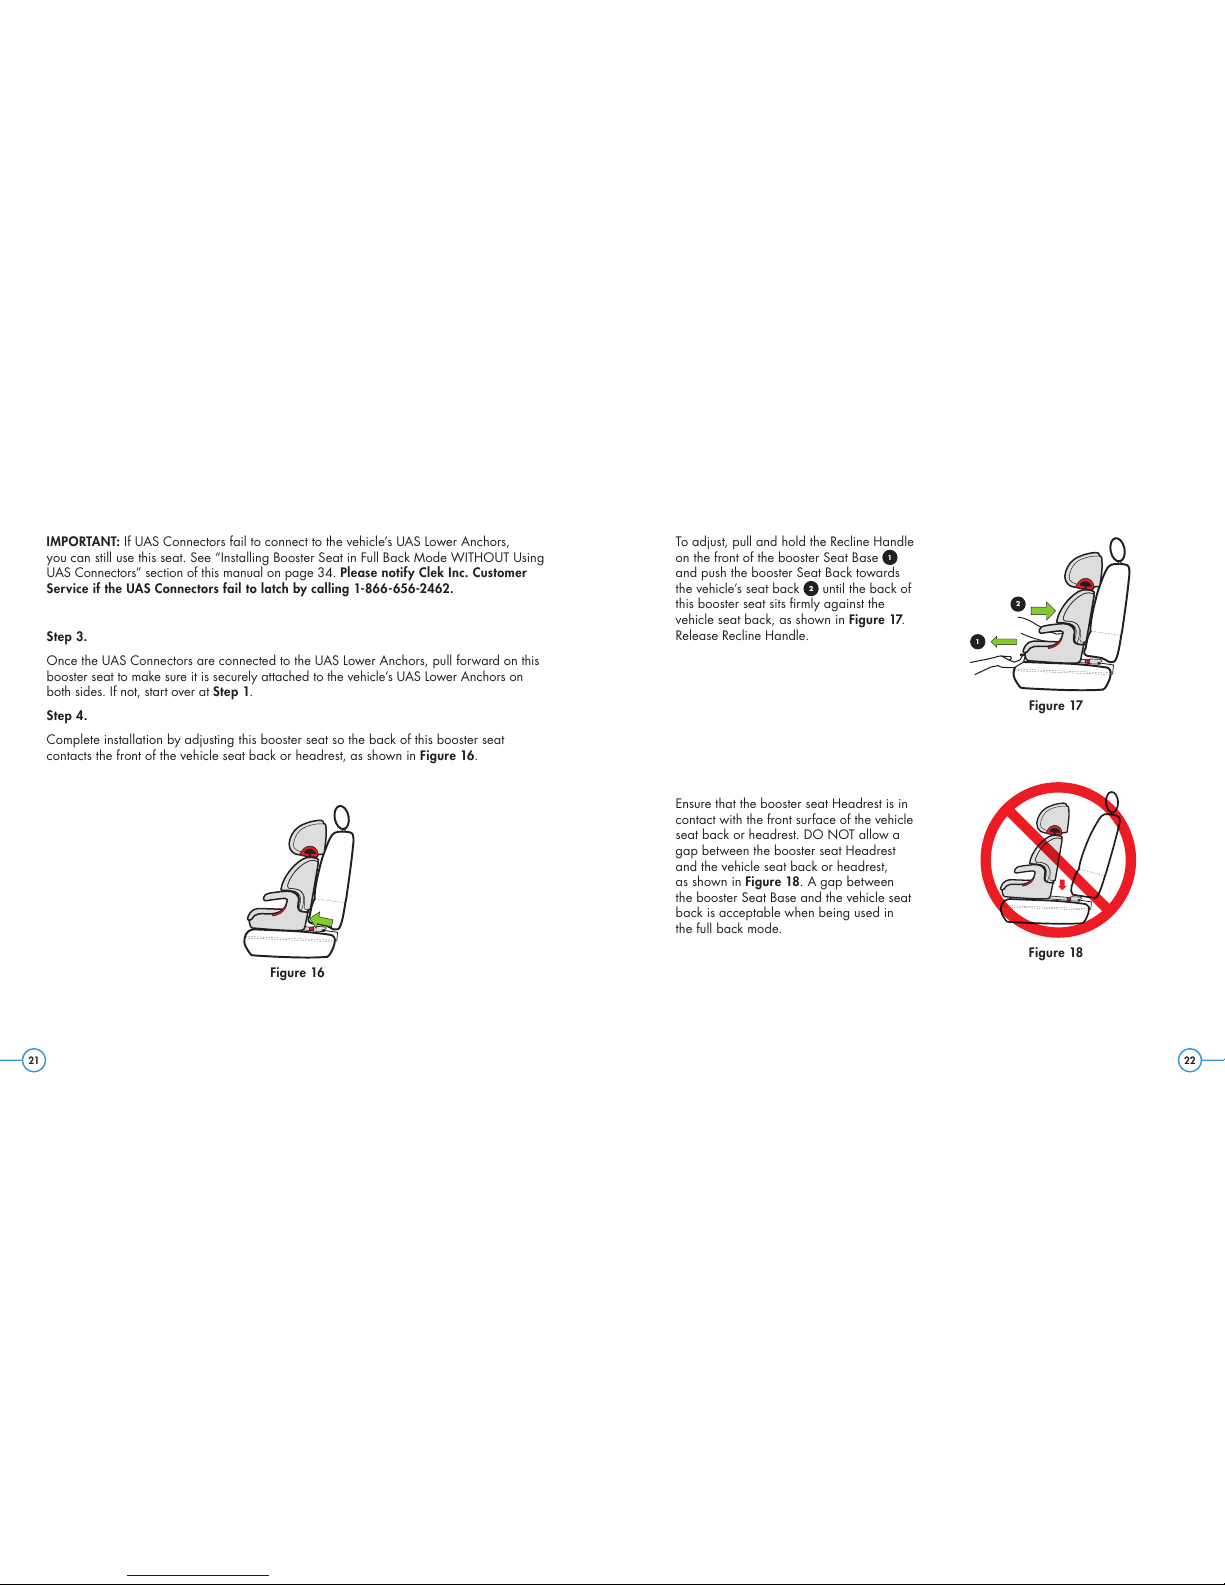
To adjust, pull and hold the Recline Handle
on the front of the booster Seat Base 1
and push the booster Seat Back towards
the vehicle’s seat back 2until the back of
this booster seat sits firmly against the
vehicle seat back, as shown in Figure 17.
Release Recline Handle.
Ensure that the booster seat Headrest is in
contact with the front surface of the vehicle
seat back or headrest. DO NOT allow a
gap between the booster seat Headrest
and the vehicle seat back or headrest,
as shown in Figure 18. A gap between
the booster Seat Base and the vehicle seat
back is acceptable when being used in
the full back mode.
Figure 16
Figure 17
1
2
Figure 18

2423
ADJUSTING THE SEAT BACK RECLINE (FULL BACK MODE WHEN USING
UAS CONNECTORS ONLY):
WARNING
t%0/05"--08"("1#&58&&/5)*4#0045&34&"5)&"%3&45"/%5)&
7&)*$-&4&"5#"$,037&)*$-&)&"%3&45"44)08/*/FIGURE 19. SUCH
"("1*/$3&"4&45)&3*4,0'4&3*064*/+63:03%&"5)505)&$)*-%*/
A SUDDEN STOP OR CRASH.
tNEVER ATTEMPT TO RECLINE THIS BOOSTER SEAT WHILE DRIVING.
t"-8":4&/463&5)"55)&7&)*$-&-"1"/%4)06-%&3#&-5*41301&3-:
POSITIONED AND SNUGLY ADJUSTED ON THE CHILD.
To adjust to reclined position, pull on the Recline Handle
located on the front of the Seat Base and slide this booster
seat towards you to the desired recline position, as shown
in Figure 20. Release Recline Handle to lock booster seat
in the recline position. Make sure the booster seat Headrest
remains in contact with the vehicle seat back or headrest.
To return this booster seat to the upright position, pull and
hold the Recline Handle with one hand 1and then push
this booster seat towards the vehicle seat back 2, as
shown in Figure 21. Release Recline Handle to lock booster
seat in the upright position.
IMPORTANT: Always check vehicle seat belt fit on the
child after adjusting the recline position of this booster
seat. See Step 7 of the “Securing Your Child in Booster
Seat When Using Booster Seat in Full Back Mode
(with Seat Back)” section of this manual on page 43.
Figure 20
Figure 21
2
1
Figure 19

2625
Removing Booster Seat in Full Back Mode
When Using UAS Connectors
Step 1.
Pull on the Recline Handle located on the front of the
booster Seat Base and slide this booster seat towards
you exposing the UAS Connectors 1, as shown in
Figure 22.
Step 2.
Locate the red buttons on the front of the UAS Connectors.
Releasing one UAS Connector at a time, use your thumb to
press in on one button 2while using the other hand to
pull this booster seat forward 3, as shown in Figure 23.
Repeat for the opposite UAS Connector.
To store the UAS Connectors when not in use, pull and
hold Recline Handle on front of booster Seat Base and
then push UAS Connectors into Seat Base.
Step 3.
Remove this booster seat from vehicle.
Figure 23
2
3
Figure 22
1
Installing Booster Seat in Backless Mode
When Using UAS Connectors
To remove Seat Back, see “Installing/Removing Seat Back”
section on page 53.
Step 1.
Select a forward-facing vehicle seating location which has
a lap and shoulder belt and Universal Anchorage System.
If the vehicle seat back is adjustable, make sure the seat
back is locked in the upright position. DO NOT allow the
child to sit in this booster seat while the vehicle seat back
is reclined, as shown in Figure 24.
Figure 24
WARNING
t8)&/*/#"$,-&44.0%&5)&#"$,0'5)*4#0045&34&"5#"4&.645
$0/5"$55)&7&)*$-&4&"5#"$,
2827
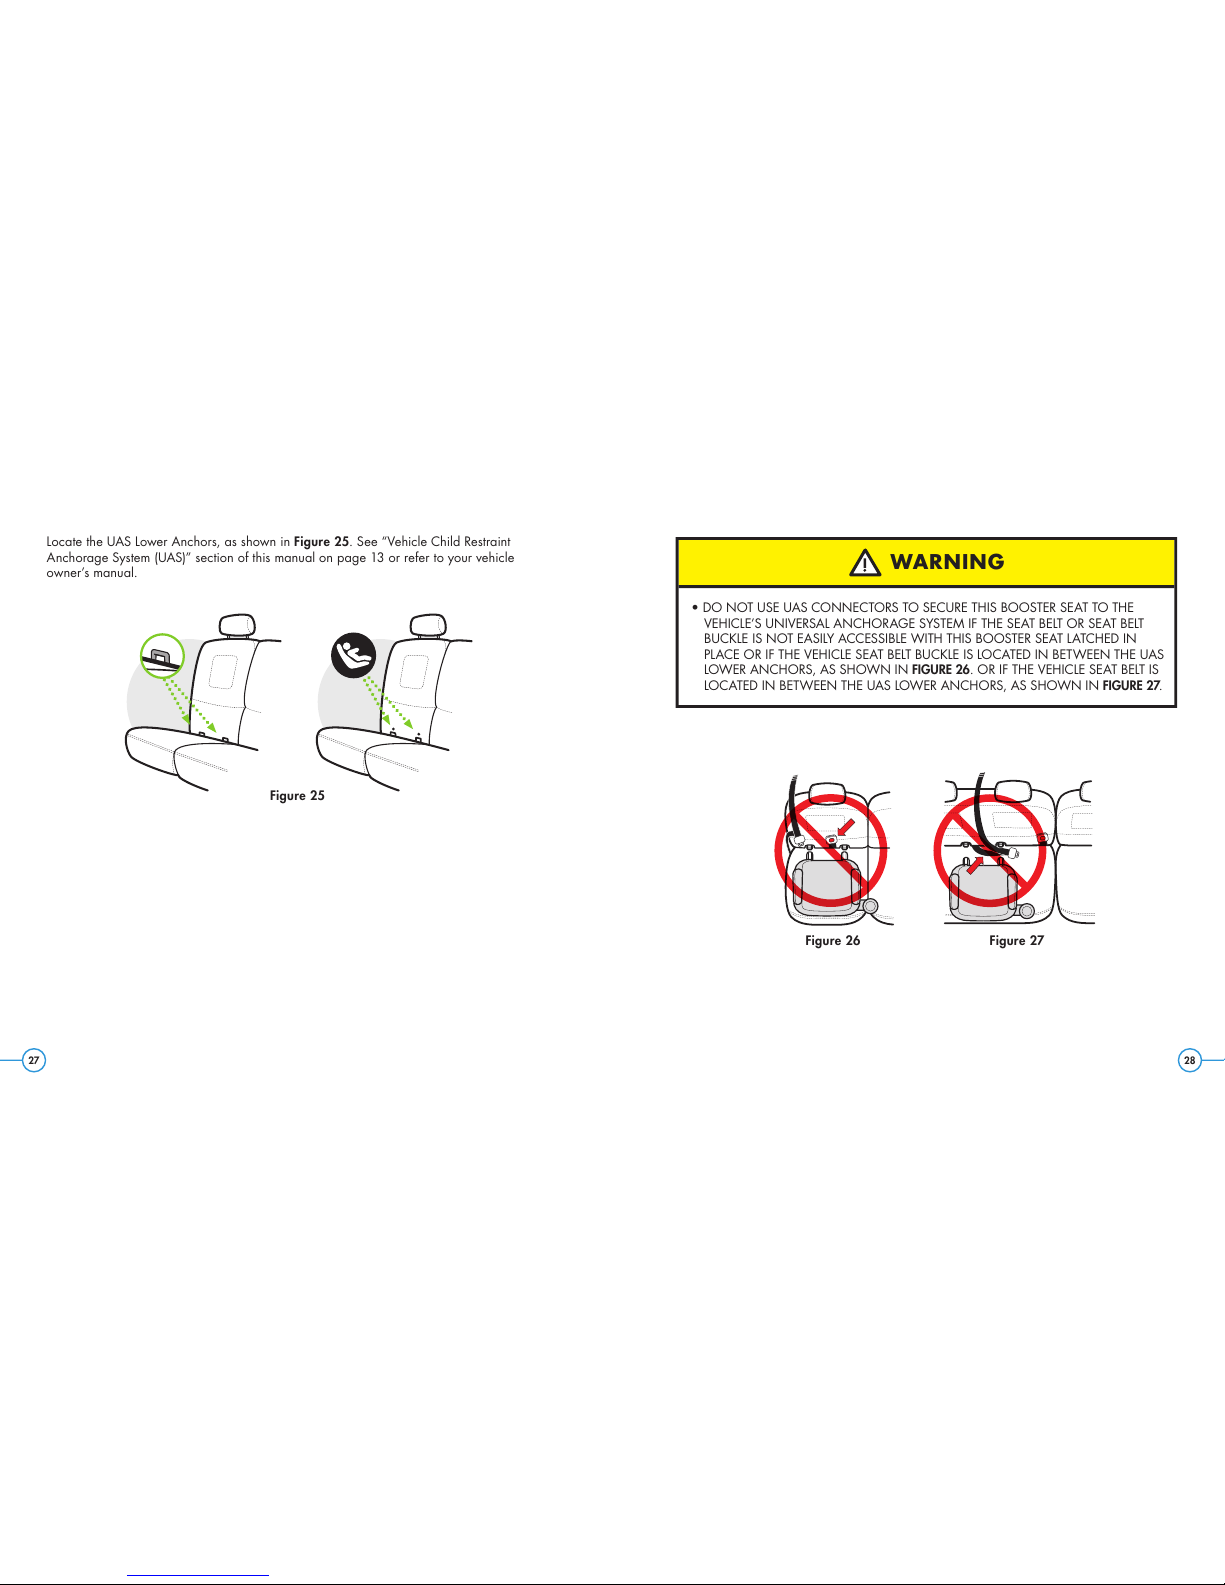
Locate the UAS Lower Anchors, as shown in Figure 25. See “Vehicle Child Restraint
Anchorage System (UAS)” section of this manual on page 13 or refer to your vehicle
owner’s manual.
Figure 25
WARNING
t%0/0564&6"4$0//&$5034504&$63&5)*4#0045&34&"5505)&
VEHICLE’S UNIVERSAL ANCHORAGE SYSTEM IF THE SEAT BELT OR SEAT BELT
#6$,-&*4/05&"4*-:"$$&44*#-&8*5)5)*4#0045&34&"5-"5$)&%*/
1-"$&03*'5)&7&)*$-&4&"5#&-5#6$,-&*4-0$"5&%*/#&58&&/5)&6"4
LOWER ANCHORS, AS SHOWN IN FIGURE 26. OR IF THE VEHICLE SEAT BELT IS
LOCATED IN BETWEEN THE UAS LOWER ANCHORS, AS SHOWN IN FIGURE 27.
Figure 26 Figure 27
3029
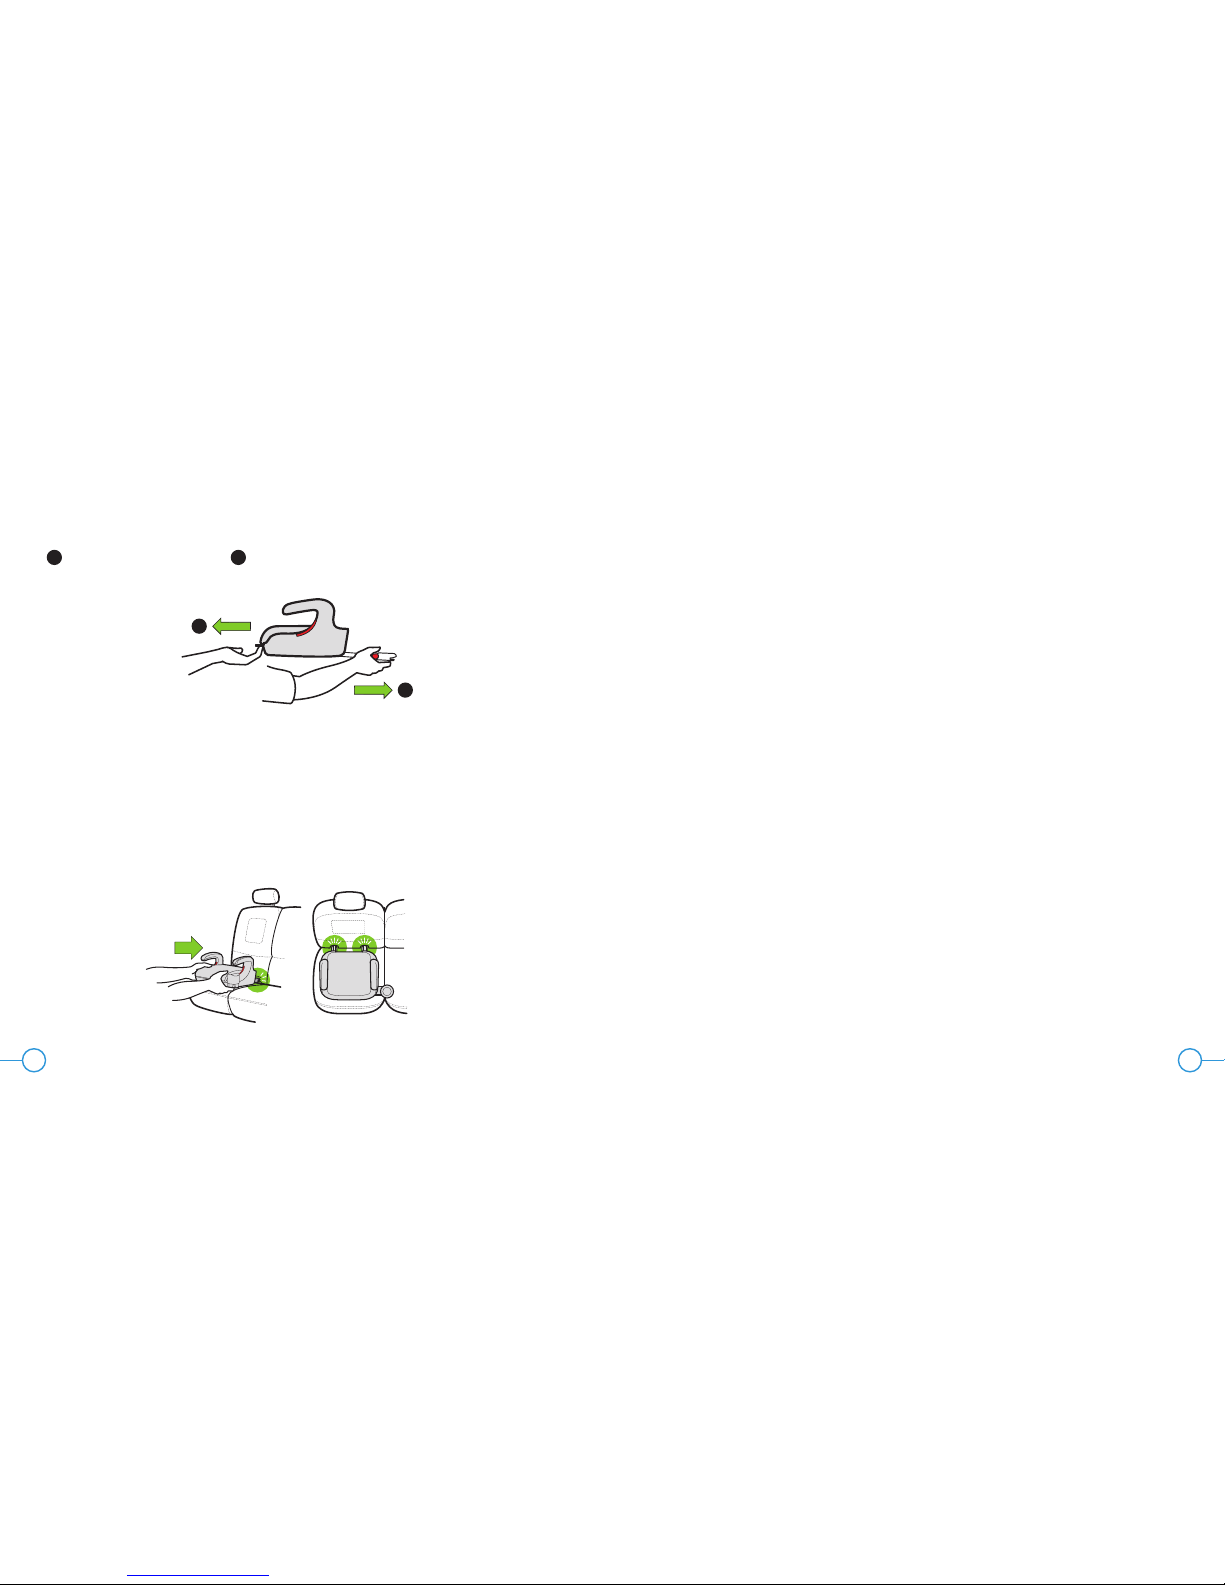
To connect to lower anchors, pull and hold Recline Handle on front of booster Seat Base
1and pull UAS Connectors out 2,as shown in Figure 28.
Step 2.
Place this booster seat in the seating location selected with the UAS Connectors facing
the vehicle seat.
Secure the UAS Connectors to the vehicle UAS Lower Anchors by aligning the UAS
Connectors with the vehicle UAS Lower Anchors and pressing the UAS Connectors against
the UAS Lower Anchors until you hear each UAS Connector click, as shown in Figure 29.
IMPORTANT: If UAS Connectors fail to connect to the UAS Lower Anchors, you can
still use this seat. See section titled “Installing Booster Seat in Backless Mode WITHOUT
Using UAS Connectors” of this manual on page 36. However, please notify us if the
UAS Connectors fail to latch by calling 1-866-656-2462.
Step 3.
Once the UAS Connectors are securely connected to the UAS Lower Anchors,
pull forward on this booster seat to make sure it is securely attached to the vehicle’s
UAS Lower Anchors on both sides. If not, start over at Step 1.
Figure 29
1
2
Figure 28
3231
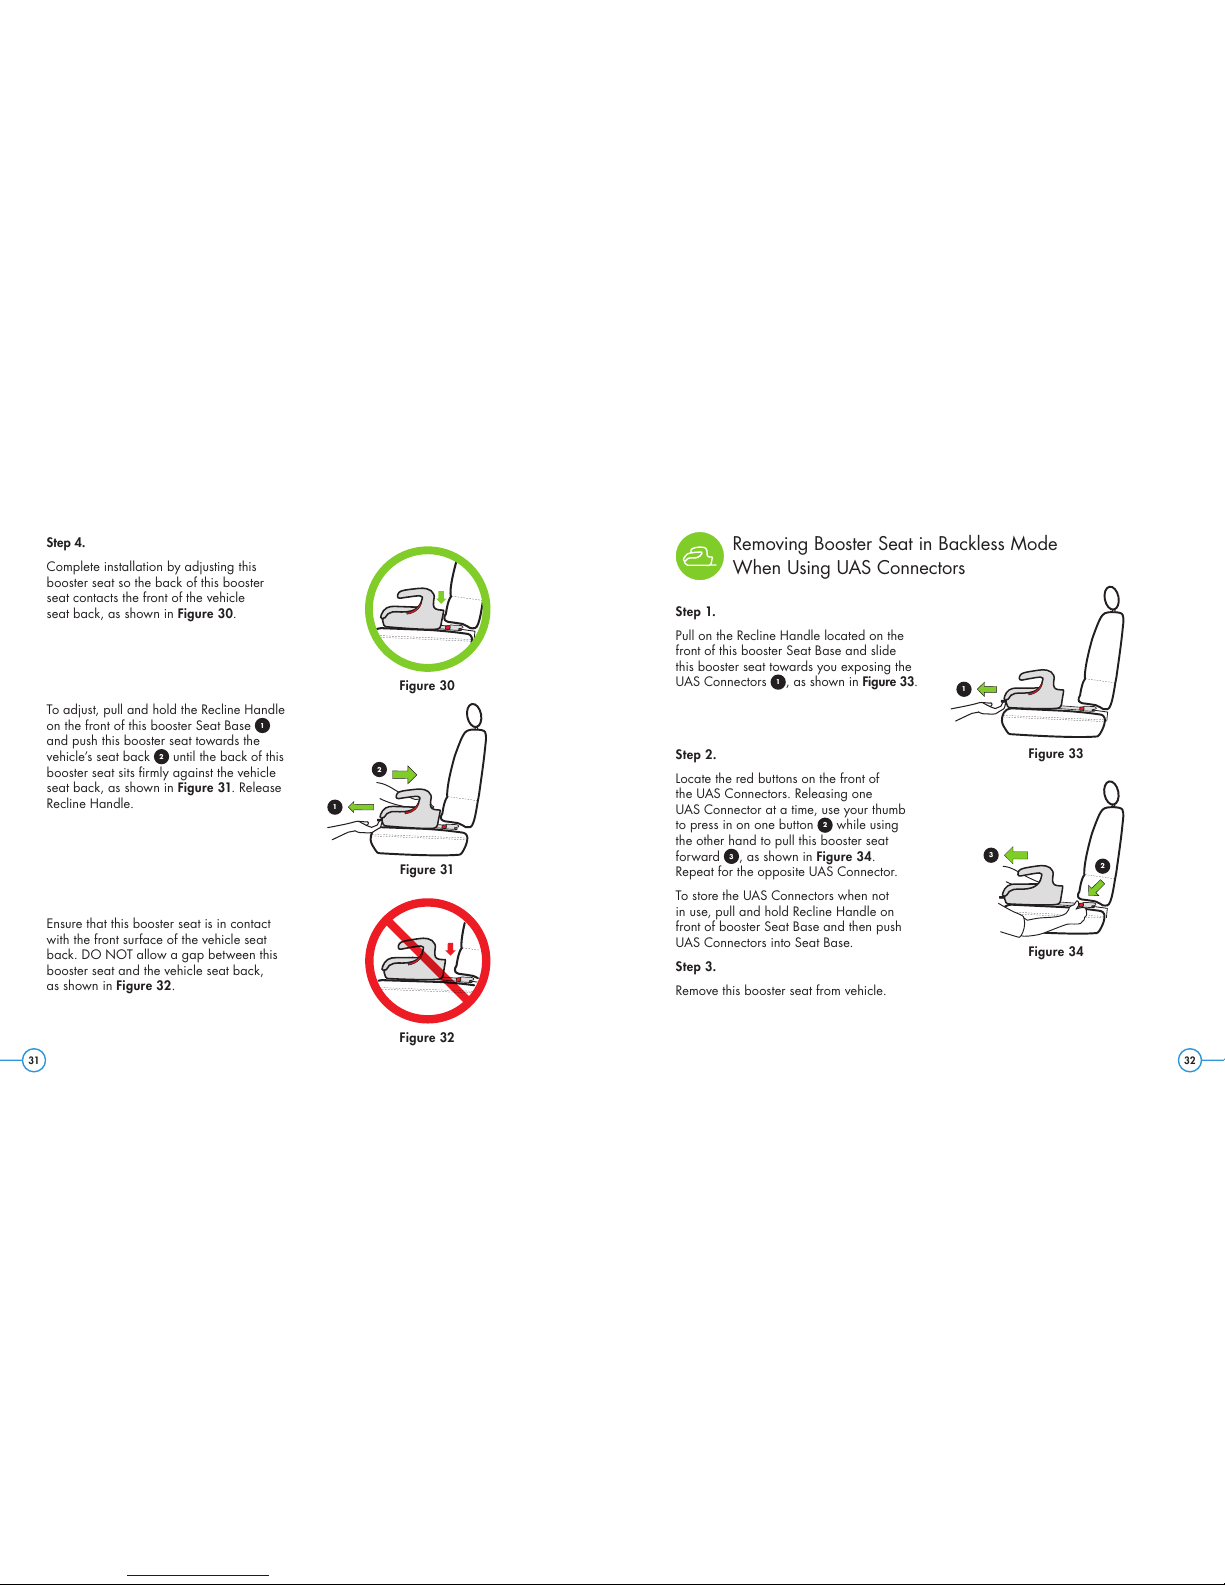
Step 4.
Complete installation by adjusting this
booster seat so the back of this booster
seat contacts the front of the vehicle
seat back, as shown in Figure 30.
To adjust, pull and hold the Recline Handle
on the front of this booster Seat Base 1
and push this booster seat towards the
vehicle’s seat back 2until the back of this
booster seat sits firmly against the vehicle
seat back, as shown in Figure 31. Release
Recline Handle.
Ensure that this booster seat is in contact
with the front surface of the vehicle seat
back. DO NOT allow a gap between this
booster seat and the vehicle seat back,
as shown in Figure 32.
Figure 32
Figure 30
1
2
Figure 31
Removing Booster Seat in Backless Mode
When Using UAS Connectors
Step 1.
Pull on the Recline Handle located on the
front of this booster Seat Base and slide
this booster seat towards you exposing the
UAS Connectors 1, as shown in Figure 33.
Step 2.
Locate the red buttons on the front of
the UAS Connectors. Releasing one
UAS Connector at a time, use your thumb
to press in on one button 2while using
the other hand to pull this booster seat
forward 3, as shown in Figure 34.
Repeat for the opposite UAS Connector.
To store the UAS Connectors when not
in use, pull and hold Recline Handle on
front of booster Seat Base and then push
UAS Connectors into Seat Base.
Step 3.
Remove this booster seat from vehicle.
Figure 33
1
Figure 34
2
3

3433
Installing Booster Seat WITHOUT
Using UAS Connectors
WARNING
t'"*-63&501301&3-:*/45"--0364&5)*4#0045&34&"5*/$3&"4&45)&
3*4,0'4&3*064*/+63:03%&"5)505)&$)*-%"/%05)&34*/"4)"31
TURN, SUDDEN STOP OR CRASH.
t50"70*%*/+63:5)*4#0045&34&"5.645#&*/45"--&%#:"/"%6-5
t/&7&3-&"7&5)*4#0045&34&"56/4&$63&%*/:0637&)*$-&5)*4
BOOSTER SEAT MUST REMAIN CONNECTED TO THE UAS LOWER ANCHORS
IN THE VEHICLE OR SECURED BY THE VEHICLE’S SEAT BELT EVEN WHEN NOT
IN USE. IN A SHARP TURN, CRASH OR SUDDEN STOP, AN UNSECURED
BOOSTER SEAT CAN BE THROWN AROUND AND COULD SEVERELY INJURE
VEHICLE OCCUPANTS.
t8)&//0564*/(6"4$0//&$50345)&#"$,0'5)*4#0045&34&"5
#"4&.645$0/5"$55)&7&)*$-&4&"5#"$,
Installing Booster Seat in Full Back Mode
WITHOUT Using UAS Connectors
To install Seat Back, see “Installing/Removing Seat Back”
section of this manual on page 53.
Step 1.
Select a forward-facing vehicle seating location, which has
a lap and shoulder belt.
If the vehicle seat back is adjustable, make sure the seat
back is locked in the upright position. DO NOT allow the
child to sit in booster seat while the vehicle seat is reclined,
as shown in Figure 35.
Check that UAS Connectors are fully retracted.
To fully retract UAS Connectors, pull and hold Recline
Handle on front of booster seat and push UAS Connectors
into Seat Base.
Figure 35
3635
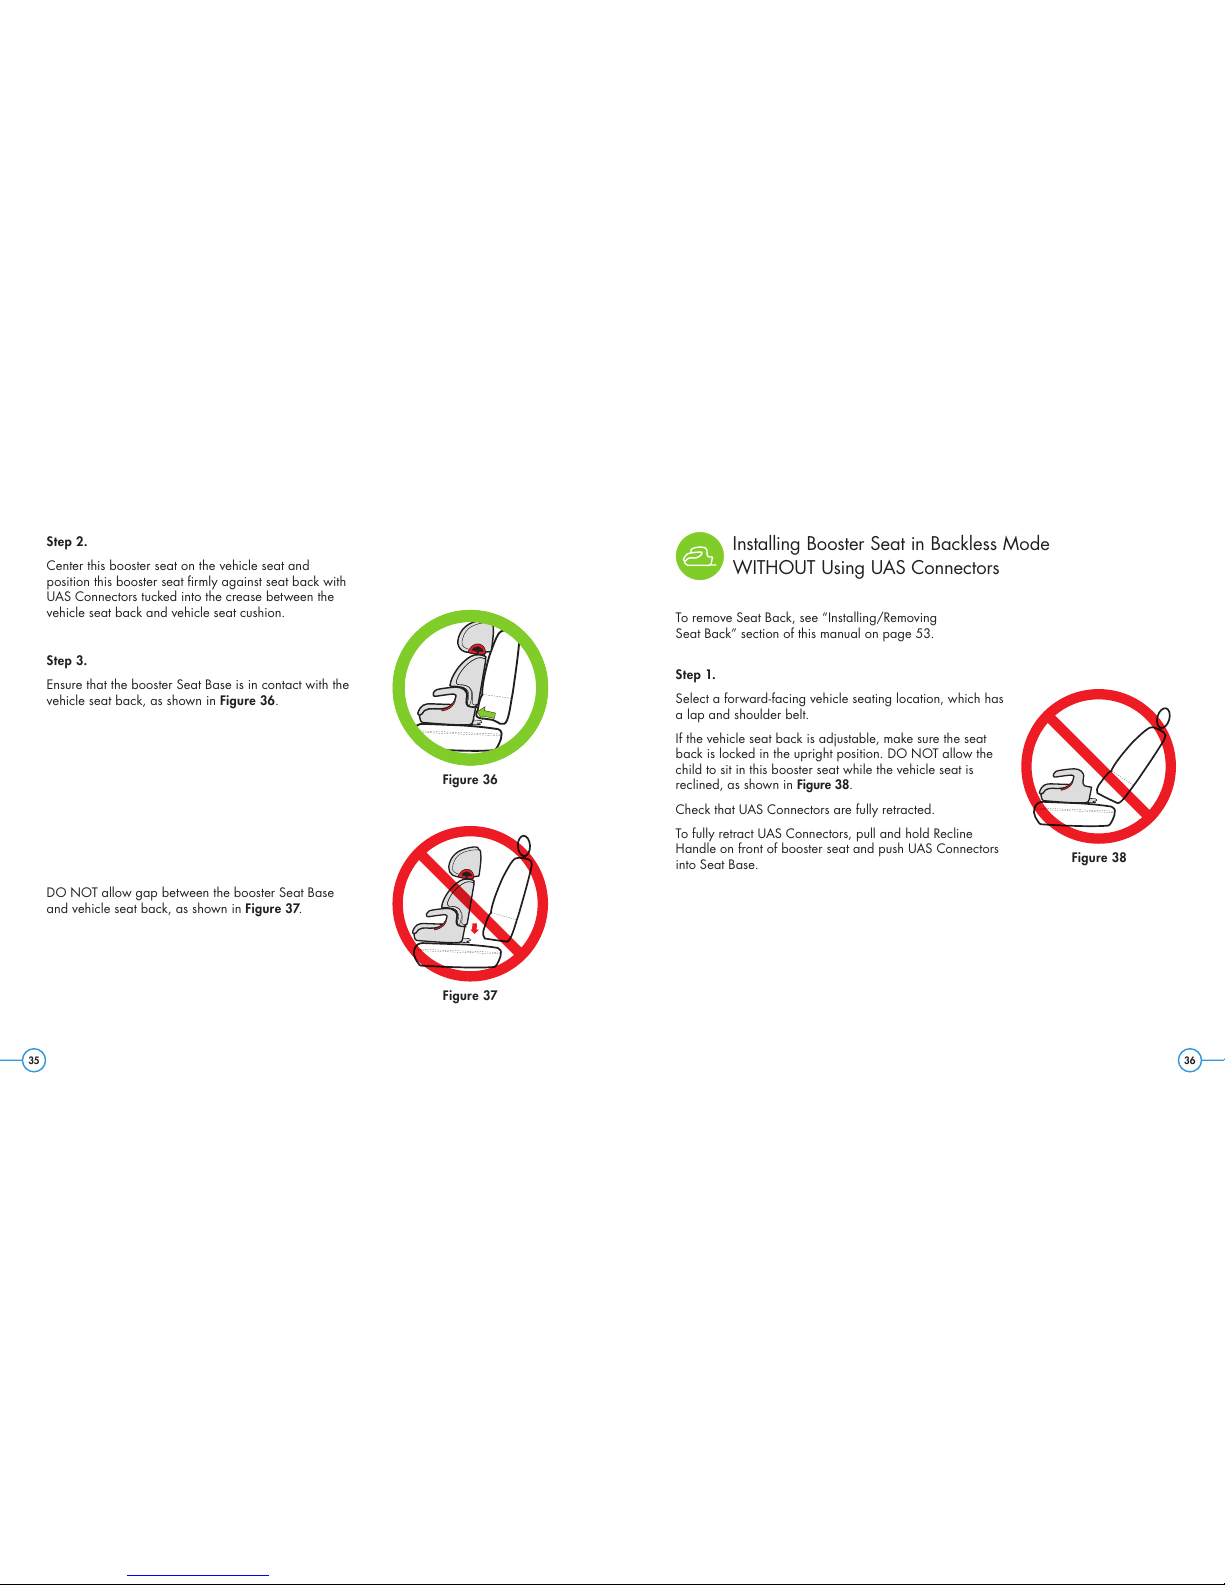
Step 2.
Center this booster seat on the vehicle seat and
position this booster seat firmly against seat back with
UAS Connectors tucked into the crease between the
vehicle seat back and vehicle seat cushion.
Step 3.
Ensure that the booster Seat Base is in contact with the
vehicle seat back, as shown in Figure 36.
DO NOT allow gap between the booster Seat Base
and vehicle seat back, as shown in Figure 37.
Figure 36
Figure 37
Installing Booster Seat in Backless Mode
WITHOUT Using UAS Connectors
To remove Seat Back, see “Installing/Removing
Seat Back” section of this manual on page 53.
Step 1.
Select a forward-facing vehicle seating location, which has
a lap and shoulder belt.
If the vehicle seat back is adjustable, make sure the seat
back is locked in the upright position. DO NOT allow the
child to sit in this booster seat while the vehicle seat is
reclined, as shown in Figure 38.
Check that UAS Connectors are fully retracted.
To fully retract UAS Connectors, pull and hold Recline
Handle on front of booster seat and push UAS Connectors
into Seat Base. Figure 38
Other manuals for Oobr
2
Table of contents
Other Clek Car Seat manuals


