Clements Orbital 360 User manual

User Manual
CLEMENTS
Orbital 360
Benchtop Centrifuge
CEN 91705
0- 40V 50/60Hz
Manual No. CEN 91705 017
Issue 1

CLEMENTS
User Manual Orbital 360 Centrifuge
Manual Number CEN 91705 017 Issue 1
Copyrig t © 2014 BMDi TUTA Healt care Pty Ltd
T e information in t is manual was originated by, and is t e exclusive
property of BMDi TUTA Healt care Pty Ltd. It is furnis ed for customer
information only, and is not an aut orisation or licence to make t is
product or to furnis t is information to ot ers.
BMDi TUTA Healthcare Pty Ltd
Unit 4B, 1 8-130 Frances St
Lidcombe NSW 141
Australia
Phone: +61 9466 5300
Website: www.medaust.com
Safety
T ank you for purc asing t is Clements Orbital 360
Centrifuge For your safety it is imperative t at t is unit
only be operated by aut orised personnel in accordance
wit t e instructions as described in t is manual. Operated
in t is way, t e Orbital 360 Centrifuge will provide t e
standard of service specified.
Due to continual improvements in product design, t e
Orbital 360 Centrifuge may vary in detail from t e
descriptions in t is manual. In t e event of furt er
questions please contact your local distributor or BMDi
TUTA Healt care direct.

3
CLEMENTS
Contents
Contents
Description and Features.................................................... 4
Specifications ..................................................................... 5
Warnings and Cautions ...................................................... 6
Installation .......................................................................... 7
Controls.............................................................................. 8
Operation ..........................................................................10
Parameter Setting Menu....................................................12
Operation Summary ..........................................................14
User Programs ..................................................................16
Rotors................................................................................17
Accessories and Spares....................................................19
Cleaning and Maintenance ................................................20
Fuse Replacement and Error Codes..................................21
Troubleshooting.................................................................22
RCF Graphs ......................................................................23
Warranty............................................................................26

4
CLEMENTS
Description and Features
Description
T e Orbital 360 Centrifuge is a versatile, compact and reliable
benc top centrifuge. It is designed for clinical and small
laboratory applications w ere precise digital control of speed and
time is required.
Features
• Brus less DC motor tec nology for low maintenance
operation
• Accurate digital control of speed and time for repeatable
processing
• Hig visibility backlit LCD display wit touc control panel
• Electronic lid interlock to ensure t at centrifuge can be
started and run only wit lid locked
• Stainless steel bowl
• Adjustable acceleration and deceleration for sensitive
samples
• Concurrent display of rpm and RCF
• 25 user programs
• Simultaneous display of all parameters
• Previous parameters maintained t roug power off/on

5
CLEMENTS
Specifications
Specifications
Speed Range 100 to 5000 rpm
Maximum RCF 4100 x g
Speed Accuracy ±50 rpm
Time Range 1 to 99 minutes
Angle Rotors 24 x 10 ml
Swing-out Rotors 4 x 50 ml
12 x 15 ml
24 x 5 ml
Power Requirement 220-240V 50/60Hz 5A
Electrical Protection Class I
Noise < 65dB(A)
Dimensions 370 (W) x 250 (H) x 432 (D) mm
Weight 15kg
Environment Indoor
10 to 35°C, RH < 85%
Package Contents
Item
Description
Qty
CEN 91705 Cell Cycle 360 Centrifuge 240V 50Hz 1
CEN 91700 036 Tool, Rotor Screwdriver, Philips Head,
110 x 5.5mm
1
CEN 91700 037 Tool, Lid Release Screwdriver, Philips
Head, 120 x 2.9mm
1
CEN 91700 038 Lead, Mains Power, IEC Socket –
Earthed Australian Plug
1
CEN 91700 040 Kit, Fuse, 5 x 20mm, T5.0A 250V
(Pack 4)
1

6
CLEMENTS
Warnings and Cautions
For safe operation ensure t at users read, understand and
observe t e instructions and recommendations in t is user
manual.
Power
Ensure t at t e mains power supply matc es t at s own on t e
rating label of t e centrifuge.
Flammable Samples
T e centrifuge is not flameproof. Do not use flammable samples in
t e centrifuge. Do not store flammable or volatile material wit in
300mm of t e centrifuge.
Biohazardous Samples
Local protocols must be observed w en andling potentially
bio azardous materials. Carriers wit aerosol protection are to be
used.
Fluid Spill
Do not allow fluids to enter t e centrifuge. If a spill occurs wipe
clean, paying attention to t e nature of t e material.
Balancing
T e centrifuge must always be run wit a full complement of
buckets or carriers. Balance samples eit er by eye or by weig ing.
Fill unused tubes wit an equivalent amount of fluid as in sample
tube.
Operating
Do not stand wit in 300mm of centrifuge w ile it is running.
Do not move centrifuge w ile t e rotor is spinning.
Do not open lid w ile rotor is spinning.
Do not attempt to stop rotor by and.
Warnings and Cautions

7
CLEMENTS
Installation
Unpacking
Keep centrifuge orizontal w ile removing it from carton. Retain
packaging for transporting centrifuge. Wit power off, release lid
lock by inserting manual release tool in small ole on top rig t
and side of centrifuge. Keep tool parallel to front of panel and
press release plate. Remove tool.
Remove packing, carriers etc from centrifuge bowl. Ensure t at
bowl is clean.
Location
T e centrifuge s ould be placed on a solid level surface in a well
ventilated area. T e back of t e centrifuge must be at least 10cm
away from any wall or vertical surface.
Power Requirements
Before connecting t e centrifuge to t e mains power supply,
ensure t at t e electricity supply conforms to t e requirements for
voltage and frequency s own on t e rating label on t e back of t e
unit.
T e power supply s ould be stable, clean and free of surges and
brownouts.
Connect t e centrifuge to t e mains power supply using t e
supplied eart ed power cable.
For extended periods of non-use, switc off main power switc on
rear panel of centrifuge.
Installation

8
CLEMENTS
Controls
Controls
Manual
Lid release
access hole
Control panel
Front View Rear View
On/Off Switch IEC power inlet
Fuse holder
Condition LCD Display Shows
In Spin Cycle Actual and Set Values of Speed / RCF and Time
Remaining
Setting Mode Set Values of Parameter
Error Error code n of form En
360

9
CLEMENTS
Controls
Controls
Item Function
On/Off Switch Switches mains power to centrifuge.
IEC Inlet Mains power inlet. Also contains fuse holder.
Lid release access hole Access for manual lid release tool. Centrifuge
must be disconnected from power.
S
TOP
/ O
PEN
Button Stops spin cycle. When rotor has stopped acts
as lid release button. Cancels error condition.
S
TART
Button Starts spin cycle.
P
ULSE
Button Spins rotor when held down.
E
NTER
Button Enters and saves changed parameters.
Exits parameter setting mode.
Selects user program. Exits program mode.
I
NC
Button Increases value of set parameters.
D
EC
Button Decreases value of set parameters.
P
ROG
Button Enters user program mode.
Times out after 5 seconds.
M
ENU
Button Steps through parameter change menu in
circular fashion. Times out after 5 seconds.
S
PIN
LED (Green) Indicates that spin cycle is in progress.
S
TOP
LED (Red) Flashing - indicates that spin cycle is stopping.
Continuous - indicates that rotor has stopped.

10
CLEMENTS
Operation
Rotor Fitting
1. Open lid and switc off centrifuge.
2. Remove carriers from rotor.
3. W ile supporting rotor wit one and, unscrew (CCW) rotor-
retaining cap screw.
4. Lift off rotor being careful not to bend or apply side load to
motor s aft.
5. Select a compatible rotor, align t e slot in t e rotor s aft
wit t e drive pin in t e motor s aft and fit toget er.
6. Fit cap screw and was er to rotor.
7. W ile supporting rotor wit one and, and tig ten (CW)
rotor-retaining cap screw - again being careful not to bend
or apply side load to motor s aft..
8. Confirm t at rotor rotates smoot ly and evenly by and.
Carrier Fitting (
swing-out style rotors)
1. Fit a full complement of compatible carriers to t e rotor.
2. Ensure t at carriers are fully seated and can swing freely.
3. Switc centrifuge power on.
Tube Fitting
Select a full complement of compatible tubes wit an RCF
rating in excess of t e maximum RCF of t e centrifuge.
Balancing of Samples
It is important t at t e samples are correctly balanced wit in t e
centrifuge prior to starting t e unit. For correct balance t ere are
two requirements:
1. Balance t e weig t of t e samples
2. Balance t e location of t e samples
Operation

11
CLEMENTS
Operation
1. Balance the weight of the samples
For every sample in t e centrifuge t ere must be a balancing
sample of equal weig t. T e samples may be balanced 'by eye' i.e.
two samples appear to contain t e same volume and are t erefore
approximately t e same weig t.
W ere delicate samples are involved, it is recommended t at t e
samples be placed in Tube Carriers and balanced by weig ing
t em. T is will ensure t at vibration during t e centrifugation
process will be kept to a minimum.
. Balance the location of the samples
T e samples must be placed on t e Rotor so t at t e weig t of t e
samples is equally distributed. To do t is t e equally weig ted
samples must be placed in diametrically opposite positions on t e
rotor.
Note: Even t oug t e Orbital 360 is designed to absorb
considerable out-of-balance forces, running t e centrifuge wit
out-of-balance samples will cause excessive vibration. T is will
disturb t e samples, affect t e overall performance of t e unit and
may lead to mec anical damage.
Cushion Fitting
To ensure t at t e cus ions are correctly fitted it is recommended
t at t e cus ion be fitted to t e tube w ile it is inverted. T e
carrier (or carrier plus anger) is placed over t e tube and cus ion
– still inverted. T e assembly is fitted to t e rotor. Confirm t at all
tubes are at t e same eig t by observing t e graduation marks
at t e open end of t e carrier
Note t at t is s ould be done every time t at
a tube is placed in a carrier. A cus ion t at
was previously correctly placed in t e carrier
can momentarily ad ere to t e tube as it is
wit drawn and t en sit at an angle.
1 2 3
1
CLEMENTS
Parameter Setting Menu
Parameter Setting Menu
Press M
ENU
to select parameter setting mode.
Eac press of t e M
ENU
button advances to t e next parameter.
Press E
NTER
to save t e parameters and exit t e parameter setting
mode.
Parameter setting mode is automatically cancelled after a
5 second timeout wit no button pressed.
Set Rotor Fitted
Note: It is essential that the rotor setting matches the rotor
fitted. Otherwise the rotor could be subject to speeds in
excess of its rating leading to damage to the rotor.
1. Ensure t e rotor is stopped.
2. Press t e M
ENU
button until t e rotor field is ig lig ted.
3. Press t e I
NC
or D
EC
buttons until t e rotor number matc es
t e rotor t at is fitted to t e centrifuge. See table page 15.
4. Press t e E
NTER
button to save t e setting.
Speed
Time
[rpm]
[minutes]
Acceleration
Deceleration
Rotor Fitted
Factor 1 - 9
Factor 1 - 9
Rotor 1 - 4
Time [seconds]

13
CLEMENTS
Parameter Setting Menu
Set Speed
1. Press M
ENU
button until speed field is ig lig ted.
2. Press I
NC
or D
EC
to select required speed. Note t at speed
c anges in steps of 100rpm and will auto-increment or
auto-decrement if t e I
NC
or D
EC
button is eld down.
(T e speed will be limited to t e maximum permitted for t e
selected rotor.)
3. Press t e E
NTER
button to save t e setting.
Set Time
1. Press M
ENU
button until minutes or seconds of time field is
ig lig ted.
2. Press INC or DEC to select required time. Note t at time
c anges in steps of 1 and will auto-increment or auto-
decrement if t e I
NC
or D
EC
button is eld down.
3. Press t e E
NTER
button to save t e setting.
Set Acceleration Profile
1. Press t e M
ENU
button until t e acceleration field is
ig lig ted.
2. Press t e I
NC
or D
EC
buttons to select t e required
acceleration profile. Acceleration profiles range from a
minimum of 1 to a maximum of 9.
T e default acceleration profile is 6.
3. Press t e E
NTER
button to save t e setting.
Set Deceleration Profile
1. Press t e M
ENU
button until t e deceleration field is
ig lig ted.
2. Press t e I
NC
or D
EC
buttons to select t e required
deceleration profile. Deceleration profiles range from a
minimum of 1 to a maximum of 9.
T e default deceleration profile is 5.
3. Press t e E
NTER
button to save t e setting.

14
CLEMENTS
User Programs
User Programs
T ere are 15 user programs available t at eac store a complete
set of parameters (i.e. speed, time, acceleration, deceleration and
rotor) for a particular centrifugation process.
User programs are viewed or selected in program mode w ic is
accessed via t e P
ROG
button.
User programs are altered in parameter setting mode w ic is
accessed via t e M
ENU
button. Alterations are made to t e
currently selected user program.
View User Program
1. Press P
ROG
button. Press I
NC
or D
EC
buttons to increment or
decrement program number. (Holding I
NC
or D
EC
buttons
down will auto-increment or auto-decrement t e selected
value.)
2. Wit no button pressed for 5 seconds unit will time out and
revert to previously selected user program.
Select User Program
1. Press P
ROG
button. Press I
NC
or D
EC
buttons to increment or
decrement program number. (Holding I
NC
or D
EC
buttons
down will auto-increment or auto-decrement t e selected
value.)
2. Press E
NTER
to make t e displayed user program t e
currently selected user program.
Alter User Program
1. Select t e required user program using t e steps in Select
User Program above.
2. Press M
ENU
to select parameter setting mode.
3. Eac press of t e M
ENU
button advances to t e next
parameter.
4. Alter t e required parameters as described on t e previous
page.
5. Press E
NTER
to save t e parameters and exit t e parameter
setting mode.
6. Parameter setting mode is automatically cancelled after a
5 second timeout wit no button pressed.

15
CLEMENTS
User Programs
Warning
Rotor selected must match rotor fitted.
Pay particular attention to ensuring t at t e rotor set in t e user
program selected matc es t e actual rotor fitted.
Ot erwise t e rotor could be subject to speeds in excess of its
rating leading to damage to t e rotor.
S
TART
Spin:
As per selected
User Program
Ready
M
ENU
P
ROG
Alter:
Speed
Time
Acceleration
Deceleration
Rotor
View:
User Program
or
Select:
User Program
Ready

16
CLEMENTS
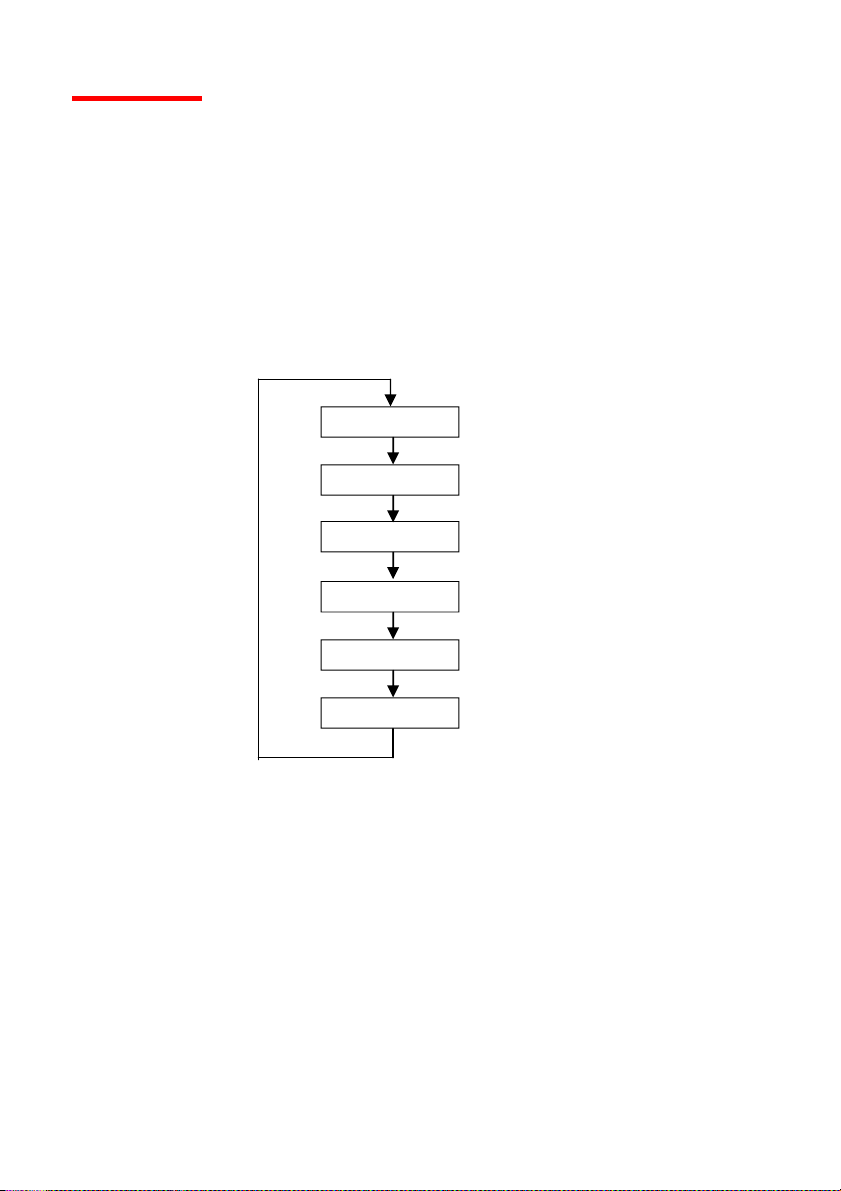
Operation Summary
Operation Summary
See previous sections for details of individual steps.
1. Confirm t at correct rotor is selected.
2. Load a balanced and evenly distributed set of sample tubes.
3. Close lid.
4. Confirm acceleration and deceleration profiles.
5. Set required speed.
6. Set required spin time.
7. Press S
TART
button.
• T e rotor will automatically accelerate to t e set speed
using t e set acceleration profile.
• T e rotor will spin for t e set time wit t e time display
counting down to zero.
• T e rotor will automatically decelerate to zero using t e
set deceleration profile.
• W en t e rotor as stopped t e beeper will signal t e
end of t e spin cycle.
8. Press t e S
TOP
/ O
PEN
button to unlock t e lid.
Note: For repeat operations using the same settings, the only
steps required are to load the samples, close the lid
and press the S
TART
button.
The previous settings are automatically restored at
power on.
Rotor Setting
Rotor Type Carriers
/ Tubes
Max
rpm
Max
x g
Rotor
Setting
CEN 91700 001 Angle 24 x 10ml 4000 2850 1
CEN 91700 002 Swing 12 x 15ml 5000 4100 2
CEN 91700 003 Swing 24 x 5ml 5000 4100 4
CEN 91700 004 Swing 4 x 50ml 4200 2760 3

17
CLEMENTS
Rotors
Angle Rotor CEN 91700 001
4 x 10ml Tubes
Max rpm: 4000
Max RCF: 850
Rotor Setting: 1
Swing Rotor CEN 91700 00
1 x 15ml Carriers
Max Speed: 5000rpm
Max RCF: 4100
Rotor Setting:

18
CLEMENTS
Rotors
Swing Rotor CEN 91700 004
4 x 50ml Carriers
Max Speed: 4 00rpm
Max RCF: 760
Rotor Setting: 3
Swing Rotor CEN 91700 003
4 x 5ml Carriers
Max Speed: 5000rpm
Max RCF: 4100
Rotor Setting: 4

19
CLEMENTS
Accessories and Spares
Accessories and Spares
Accessories
CEN 91700 001 Angle Rotor for 24 x 10ml Tubes for Orbital 360
CEN 91700 002 Swing Rotor with 12 x 15ml Carriers for Orbital 360
CEN 91700 003 Swing Rotor with 24 x 5ml Carriers for Orbital 360
CEN 91700 004 Swing Rotor with 4 x 50ml Carriers for Orbital 360
CEN 91700 034 Kit, Adaptor 50 - 15ml / 8.5ml (Pack 4)
CEN 91700 035 Kit, Adaptor 50 - 6ml (Pack 4)
Spares
CEN 91700 005 Motor Drive PCB Assembly for Orbital 360
CEN 91700 009 DC Brushless Motor for Orbital 360 (240V)
CEN 91700 010 Hinge set for Orbital 360
CEN 91700 011 Electronic Lid Lock for Orbital 360 (240V)
CEN 91700 012 Power Transformer for Orbital 260/360 (240V)
CEN 91700 013 Carrier Set 12 x 15ml for Swing Rotor CEN 91700 002
for Orbital 360
CEN 91700 014 Carrier Set 24 x 5ml for Swing Rotor CEN 91700 003
for Orbital 360
CEN 91700 015 Carrier Set 4 x 50ml for Swing Rotor CEN 91700 004
for Orbital 360
CEN 91705 017 User Manual for Orbital 360
CEN 91700 040 Kit, Fuse, 5 x 20mm, T5.0A 250V (Pack 4)
CEN 91700 041 Seal, Bowl, Rim for 360 Centrifuge
CEN 91700 046 Kit, Rubber Motor Mount (Pack 3) inc Screws (6)
CEN 91700 052 LCD Display PCB for LCD Orbital 360
CEN 91700 053 Control PCB for LCD Orbital 360
CEN 91700 054 Control Panel Decal for LCD Orbital 360

0
CLEMENTS
Cleaning and Maintenance
Cleaning
Spills must be cleaned up immediately. T e centrifuge s ould be
regularly cleaned to maintain its appearance and to ensure t at
dust or ot er damaging materials do not build up and affect t e
performance of t e unit.
• Before cleaning t e centrifuge disconnect it from t e mains
power supply.
• Clean t e exterior surfaces using a proprietary furniture
polis wit a clean soft clot .
• Wipe t e bowl and rotor wit a clean soft clot dampened in a
solution of warm water and a mild detergent. (If moisture can
be wrung from t e clot , it is wet, not damp.)
• Most sterilising agents at t eir standard cleaning dilution can
be used on t e bowl.
• Remove cleaning agent residue by wiping wit a dry paper
towel.
• Solvent-based cleaning agents and abrasive cleaning agents
s ould never be used on t e Orbital 360.
Maintenance
T e Orbital 360 is designed to provide extended and reliable
operation. To ensure proper operation and maximise t e life of t e
centrifuge t e following requirements must be observed:
• T e centrifuge s ould be inspected by aut orised service
personnel every six mont s as part of your routine
maintenance plan
• Confirm t at lid interlock prevents starting w en lid is un-
locked and also prevents opening lid before rotor as stopped
• Using an optical tac ometer confirm t at t e speed remains
wit in specification
• Use only genuine Clements spare parts
Table of contents
Popular Laboratory Equipment manuals by other brands

Heraeus
Heraeus CLINIFUGE Operating instructions manual

Boekel
Boekel 302000 operating instructions

Berthold
Berthold LB 985 operating manual

Agilent Technologies
Agilent Technologies 1141A User's and service guide

AZENTA
AZENTA Direct Tube Marker Operation manual

SKC
SKC ULTRA 690-101-NB operating instructions

TP-Link
TP-Link TL-POE10R installation guide

Pasco Scientific
Pasco Scientific CI-6689A instruction sheet

Linkam Scientific Instruments
Linkam Scientific Instruments TST350 user guide

Becton Dickinson
Becton Dickinson Clay Adams 0591 Operator's manual

MRC
MRC SPC-60 Operating instruction

PMT
PMT TTU Series user manual


